Introduction
Welcome! If you’ve been wondering how to transfer funds from your bank account to your Venmo account, you’ve come to the right place. Venmo, a popular peer-to-peer payment service, allows you to easily send and receive money from friends, family, or even businesses. While Venmo primarily operates as a mobile app, you can also access it through their website.
In this guide, we will walk you through the process of transferring money from your bank to Venmo, ensuring you can seamlessly manage your finances. With just a few simple steps, you’ll be able to connect your bank account to Venmo and initiate transfers effortlessly.
Transferring money from your bank to Venmo offers numerous benefits. It allows you to easily split bills, pay for goods and services, or send money to friends or family members—all within the convenience of the Venmo app. Additionally, by linking your bank account to Venmo, you can easily move money between your bank and Venmo accounts without having to manually withdraw or deposit funds.
Before we proceed, it’s important to note that the specific steps and processes might vary depending on your bank and the device you are using. However, the general concepts and principles discussed here should apply to most situations. Let’s get started!
Creating a Venmo Account
To begin transferring funds from your bank to Venmo, you first need to create a Venmo account. Follow these steps to create your account:
- Download and install the Venmo mobile app on your smartphone or access the Venmo website.
- Tap on the “Sign up” or “Create an account” button to start the registration process.
- Enter your email address and create a strong, unique password for your Venmo account. You can also choose to sign up using your Facebook or Google credentials.
- Provide your personal information, including your full name, phone number, and date of birth. Venmo requires this information to verify your identity and ensure secure transactions.
- Review and accept Venmo’s terms of service and privacy policy.
- Complete the registration process by verifying your email address or phone number. Venmo will send you a verification code to ensure the security of your account.
Once you’ve successfully created your Venmo account, you can proceed to link your bank account, which is crucial for transferring money between your bank and Venmo. Remember to choose a strong and unique password for your Venmo account to protect your personal and financial information.
It’s important to note that Venmo is currently only available to individuals who are residing in the United States. If you’re located outside of the US, you may want to explore similar payment services available in your country.
Now that you have your Venmo account set up, let’s move on to the next step: linking your bank account to Venmo.
Linking Your Bank Account to Venmo
Once you have created your Venmo account, the next step is to link your bank account. This will allow you to transfer funds between your bank and Venmo. Follow these instructions to link your bank account:
- Launch the Venmo app on your smartphone or access the Venmo website on your computer.
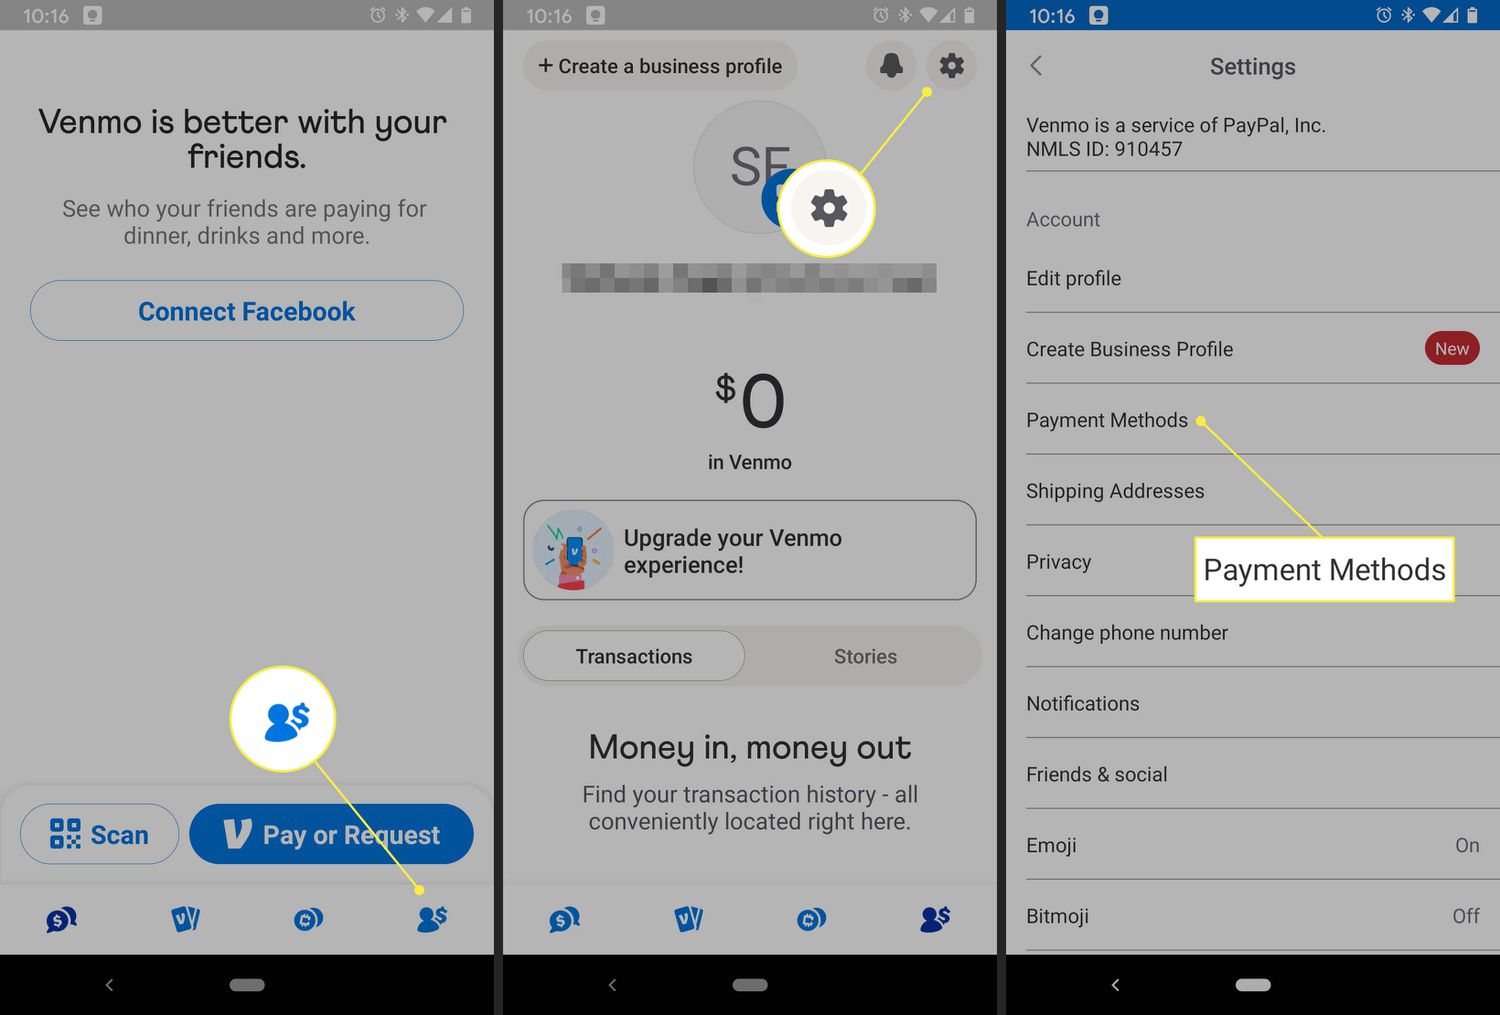
- Tap on the menu icon (three horizontal lines) in the top left corner and select “Settings” from the dropdown menu.
- In the “Settings” menu, tap on “Payment Methods” or “Bank Accounts and Cards”.
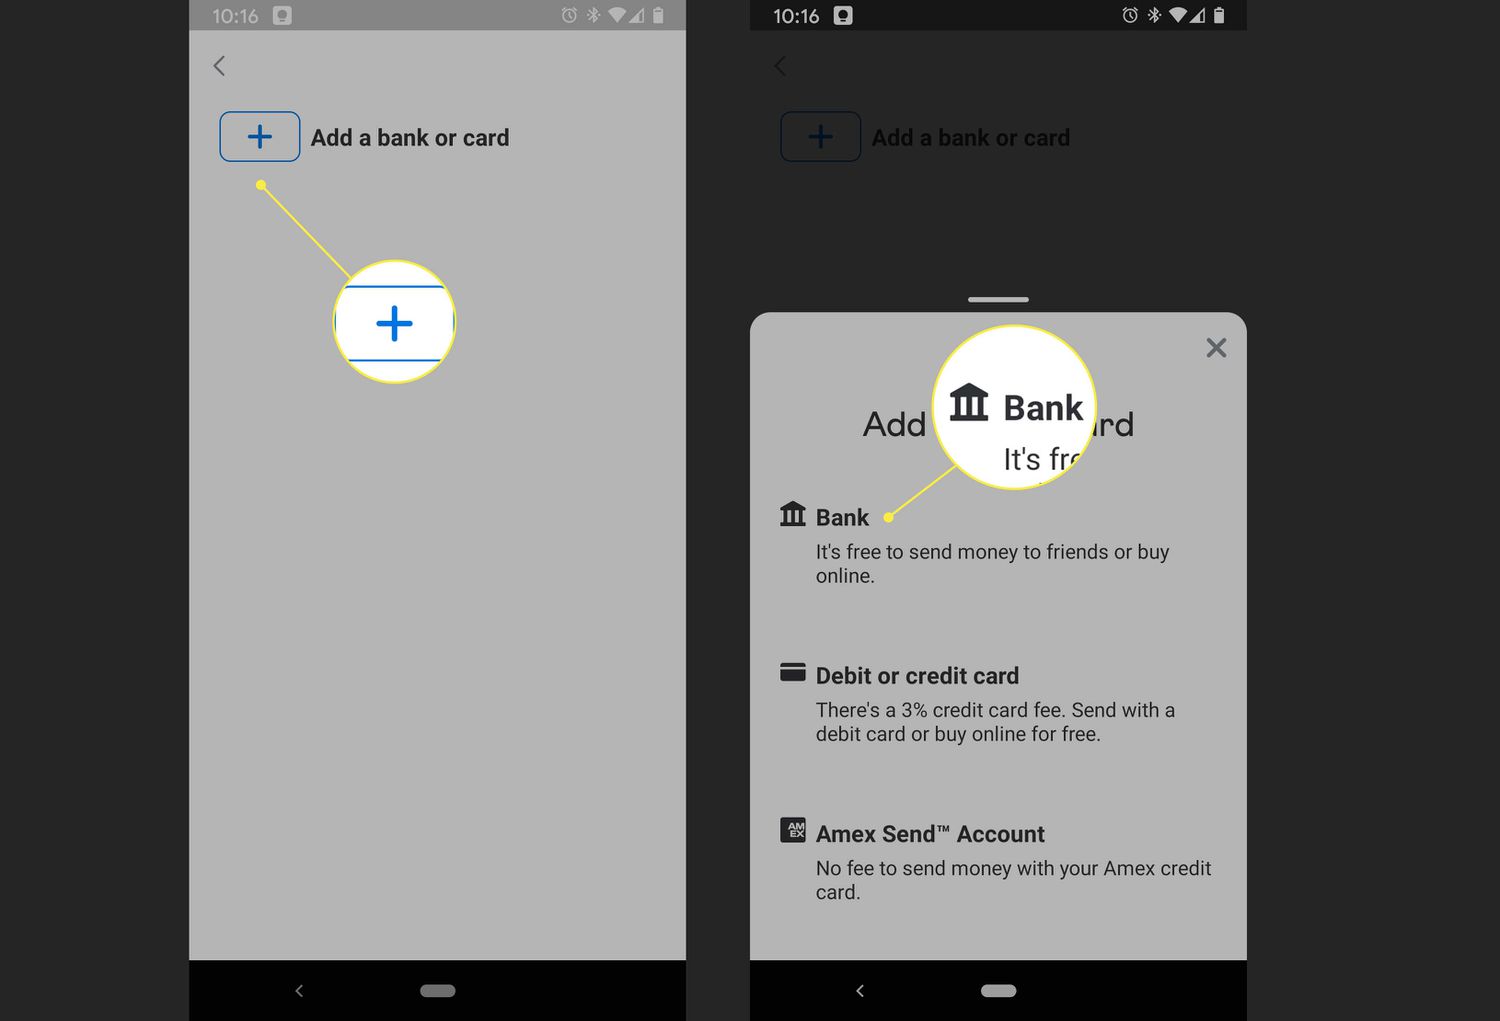
- Tap on “Add Bank Account” or “Link Bank Account” to start the linking process.
- Select your bank from the list of available banks or search for your bank using the search bar.
- Enter your online banking username and password to securely link your bank account with Venmo. Alternatively, you may be asked to provide your bank account and routing numbers manually.
- Follow any additional prompts or verification steps required by your bank or Venmo to complete the linking process.
Once your bank account is successfully linked, you will be able to initiate transfers between your bank and Venmo. It’s important to note that the linking process may vary slightly depending on your bank and the device you are using. If you encounter any difficulties or have questions during the linking process, consult Venmo’s support documentation or reach out to their customer support for assistance.
Ensure that you have the correct login credentials for your online banking, as Venmo needs them to securely establish the connection between your bank and Venmo accounts. Venmo utilizes encryption technology and security measures to protect your sensitive information, but it’s always a good practice to use a secure and private network when performing financial transactions.
Now that your bank account is linked to Venmo, let’s move on to the next step: initiating a bank transfer.
Initiating a Bank Transfer
After successfully linking your bank account to Venmo, you can initiate a bank transfer to move funds between your bank and Venmo accounts. Follow these steps to initiate a bank transfer:
- Open the Venmo app on your smartphone or access the Venmo website on your computer.
- Make sure you are logged in to your Venmo account.
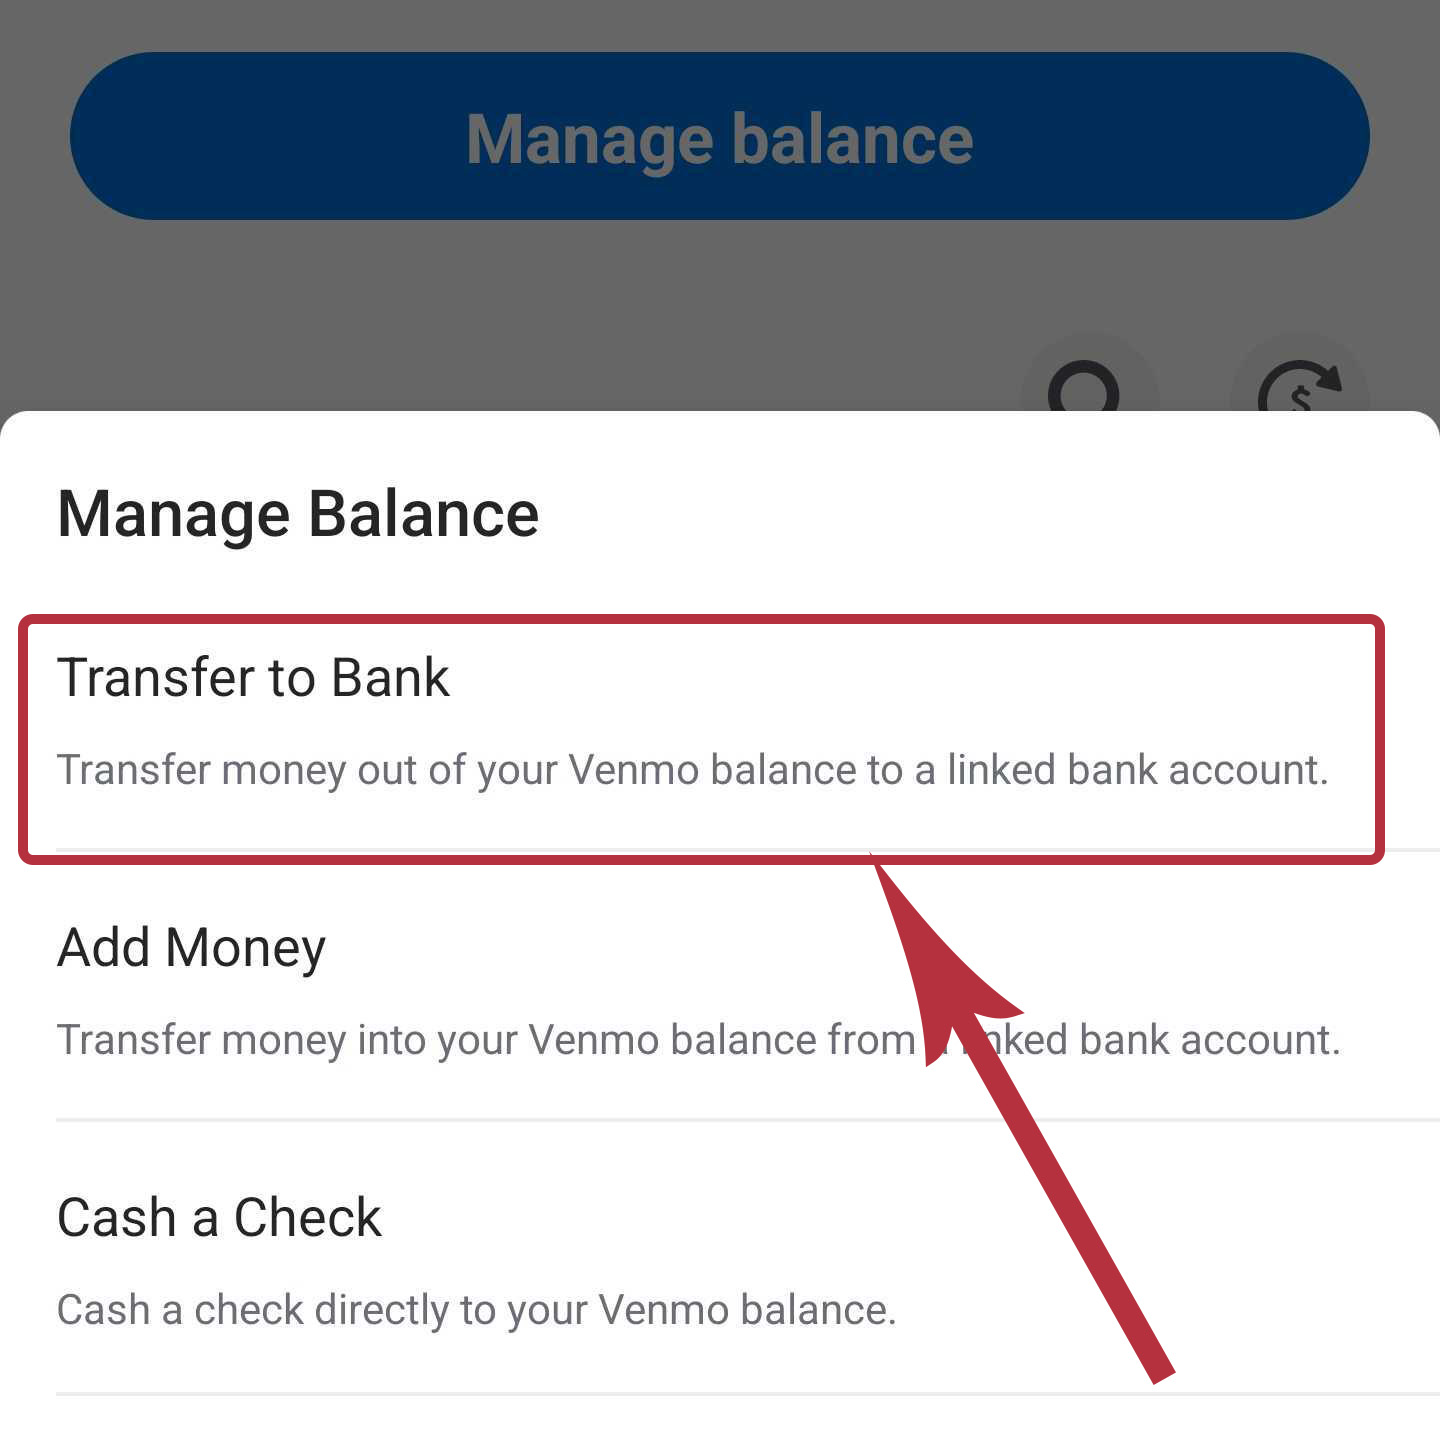
- On the Venmo home screen, tap on the “☰” icon (three horizontal lines) in the top left corner to open the menu.
- From the menu, select “Transfer to Bank” or “Transfer Money”.
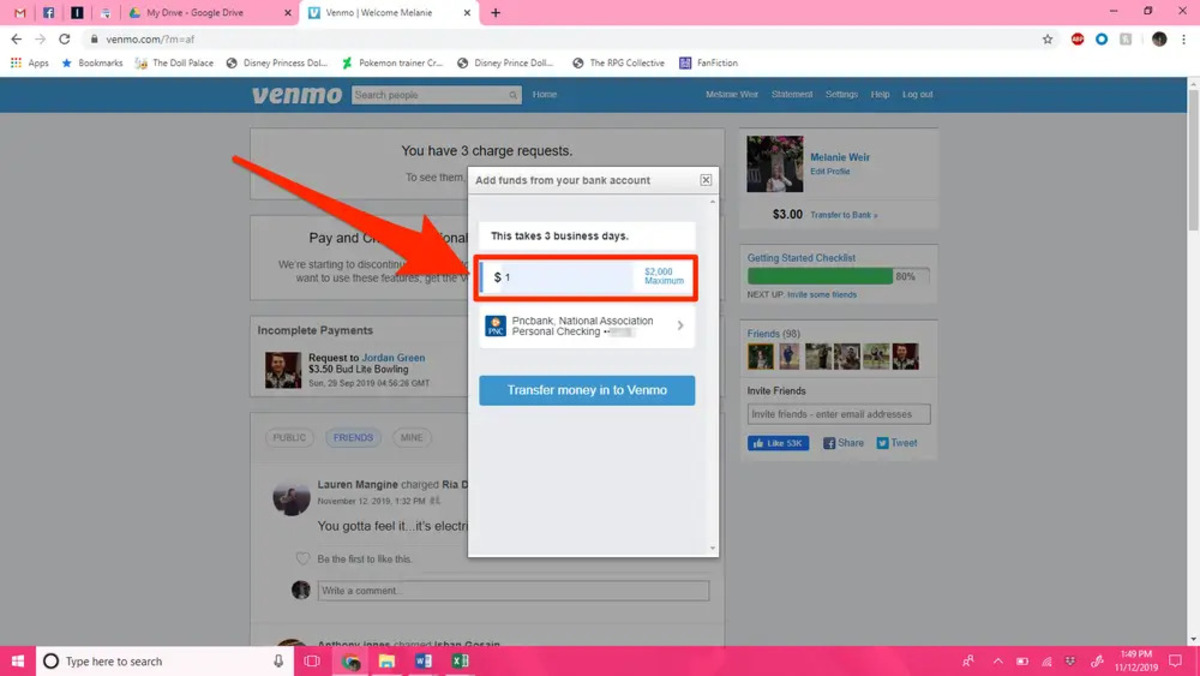
- Enter the desired amount you wish to transfer from your Venmo balance to your bank account. Venmo allows you to transfer your entire balance or specify a custom amount.
- Choose the linked bank account from which you want to transfer the funds.
- Review the transfer details to ensure everything is accurate.
- Tap on the “Transfer” or “Confirm” button to proceed with the bank transfer.
- Wait for the transfer to be processed. Typically, transfers may take up to one to three business days to complete, depending on your bank.
During the transfer process, it’s essential to ensure that you have sufficient funds in your Venmo balance to cover the transfer amount. If your Venmo balance is not enough, Venmo will automatically withdraw the remaining funds from your linked bank account to complete the transfer.
It’s also worth noting that Venmo imposes certain transfer limits, which may affect the amount you can transfer in a given timeframe. We will discuss transfer limits in more detail in the next section.
Now that you know how to initiate a bank transfer, let’s move on to the next step: verifying the transfer.
Verifying the Transfer
After initiating a bank transfer from Venmo to your linked bank account, it’s important to verify that the transfer has been successfully processed. Follow these steps to verify the transfer:
- Open the Venmo app on your smartphone or access the Venmo website on your computer.
- Ensure that you are logged in to your Venmo account.
- Tap on the “☰” icon (three horizontal lines) in the top left corner to open the menu.
- Select “Transfer to Bank” or “Transfer Money” from the menu.
- Navigate to the “Transfer to Bank” or “Transfer Money” section.
- Review the list of recent transfers to see if your transfer is listed.
- If your transfer is listed, it means that it has been successfully processed. You can also check your bank account balance to confirm the receipt of the transferred funds.
If you do not see your transfer listed, it’s possible that the transfer is still in progress or has encountered an issue. In such cases, it’s recommended to wait for a few business days for the transfer to complete. However, if you are experiencing delays or encounter any errors, it’s advisable to reach out to Venmo’s customer support for assistance.
Keep in mind that the time taken to complete a transfer may depend on various factors, including your bank’s processing times, weekends, holidays, and any unforeseen circumstances. Patience is key during this verification process.
Now that you have verified the transfer, let’s move on to the next section and discuss transfer limits in more detail.
Understanding Transfer Limits
When using Venmo to transfer funds from your bank account, it’s essential to be aware of the transfer limits imposed by Venmo. These limits dictate the maximum amount you can transfer within a certain timeframe. Understanding these limits will help you plan your transfers accordingly. Here’s what you need to know:
Venmo sets different limits for different types of accounts. For standard accounts, the weekly rolling limit for bank transfers is $19,999.99. This means that you can transfer up to $19,999.99 within a rolling seven-day period. However, it’s important to note that Venmo may impose additional limitations based on factors such as account age, user verification, and transaction history.
If you have a verified account, you may be eligible for higher transfer limits. Venmo allows verified users to increase their weekly bank transfer limit up to $19,999.99 or more, depending on their account history and activity. To increase your transfer limits, you can go through the verification process, which typically involves providing additional personal information, such as your social security number and date of birth.
It’s important to keep in mind that these transfer limits are subject to change and may vary depending on Venmo’s policies and regulations. It’s a good practice to regularly check the transfer limits applicable to your account to ensure that you stay within the allowed thresholds.
If you reach your transfer limit but still need to transfer a larger amount, you may have to split the transfer into multiple transactions or wait until your limit resets. Splitting larger transfers into smaller amounts over different days can be a practical solution to manage your transfers while staying within the allowed limits.
By understanding and adhering to the transfer limits, you can seamlessly manage your transfers and avoid any potential disruptions or issues.
Now that you are familiar with the transfer limits, let’s move on to the next section, where we will discuss potential fees associated with bank transfers.
Recognizing Potential Fees
While transferring funds from your bank to Venmo is generally free, it’s important to be aware of any potential fees that may be associated with the process. Understanding these fees will help you make informed decisions and manage your finances effectively. Here are some fees to keep in mind:
1. Bank Transfer Fees: Venmo does not charge any fees for standard bank transfers. However, it’s crucial to check with your bank to determine if they impose any charges on outgoing transfers. Some banks may have their own fees for transferring funds to external accounts. Review your bank’s fee schedule or contact their customer service to confirm if there are any applicable charges.
2. Instant Transfer Fees: If you need to transfer funds from Venmo to your bank account instantly, Venmo offers an option called “Instant Transfer.” This service allows you to receive the funds in your bank account within minutes, but it comes with a fee. Venmo typically charges a 1% fee, with a minimum fee of $0.25 for each Instant Transfer. Keep this in mind if you require immediate access to your funds.
3. Currency Conversion Fees: If you are transferring funds between different currencies, such as from a foreign bank account to Venmo, currency conversion fees may apply. Venmo uses the prevailing exchange rate and charges a small fee for currency conversion. It’s advisable to review the conversion fees and rates before initiating such transfers.
It’s important to note that Venmo has clear guidelines regarding fees and they strive to be transparent about any charges that may apply. Before initiating any transactions, take the time to review Venmo’s fee policies to ensure you have a complete understanding of the potential charges involved.
Additionally, keep in mind that fees may vary based on factors such as account type, transaction volume, and account activity. Regularly reviewing Venmo’s fee structure will help you stay informed about any updates or changes in the fee schedule.
Now that you are aware of potential fees associated with bank transfers, let’s move on to the next section, where we will discuss how to check the status of your bank transfer.
Checking the Transfer Status
After initiating a bank transfer from Venmo to your linked bank account, it can be helpful to check the status of your transfer to ensure that it has been processed successfully. Venmo provides options for tracking the transfer status, allowing you to stay updated on the progress. Here’s how you can check the transfer status:
1. Open the Venmo app on your smartphone or access the Venmo website on your computer.
2. Log in to your Venmo account using your credentials.
3. Tap on the “☰” icon (three horizontal lines) in the top left corner to open the menu.
4. Select “Transfer to Bank” or “Transfer Money” from the menu options.
5. Navigate to the “Transfer to Bank” or “Transfer Money” section.
6. Look for the list of recent transfers. The status of your transfer should be displayed next to the respective transaction.
7. If your transfer status is listed as “Completed” or “Processed,” it indicates that your transfer has been successfully credited to your bank account. You can also check your bank account balance to verify the receipt of the funds.
8. On the other hand, if your transfer status is listed as “Pending” or “In Progress,” it means that the transfer is still being processed. The time taken for a transfer to complete may vary based on your bank’s processing times and any unforeseen delays.
Checking the transfer status regularly is especially important if you encounter any unexpected delays or issues. If you have concerns about the status of your transfer, you can reach out to Venmo’s customer support for further assistance. They will be able to provide you with more specific information about your transfer and address any concerns you may have.
By staying informed about the status of your bank transfer, you can ensure its successful completion and have peace of mind knowing the progress of your transaction. Now that you know how to check the transfer status, let’s move on to the next section, where we will discuss troubleshooting common issues that may arise during the transfer process.
Troubleshooting Common Issues
While transferring funds from your bank to Venmo is usually a smooth process, there can be situations where you may encounter common issues. Understanding these issues and knowing how to troubleshoot them can help you resolve any problems that may arise. Here are some common issues and troubleshooting steps:
1. Incorrect Bank Account Information: Double-check that you have entered the correct bank account and routing numbers when linking your bank account to Venmo. If the information is incorrect, it can lead to transfer failures or delays. If you suspect that there may be an error, verify the bank account details with your bank and update the information in the Venmo app accordingly.
2. Insufficient Funds: Ensure that you have sufficient funds in your bank account to cover the transfer amount. If there are insufficient funds, the transfer may fail or result in overdraft fees from your bank. Consider checking your bank account balance before initiating the transfer to avoid any potential issues.
3. Transfer Delays: Bank transfers can take anywhere from one to three business days to complete. If your transfer is taking longer than expected, be patient and allow ample time for the transfer to be processed. Delays can occur due to weekends, holidays, or unforeseen circumstances. If there is a significant delay or you suspect an issue, reach out to Venmo’s customer support for further assistance.
4. Account Verification: Some users may encounter issues linking their bank account or initiating transfers due to account verification requirements. Ensure that your Venmo account is verified and that you have completed any necessary verification steps. If you need assistance with account verification, contact Venmo’s customer support for guidance.
5. Technical Glitches: Like any online platform, Venmo may occasionally experience technical glitches or interruptions. If you encounter any unexpected errors or issues during the transfer process, try clearing your app cache, updating to the latest app version, or accessing Venmo from a different device or web browser. If the problem persists, contact Venmo’s support team for further assistance.
Remember, if you experience any issues or require assistance, it’s always recommended to reach out to Venmo’s customer support. They have the expertise to help troubleshoot specific problems and provide guidance tailored to your situation.
By being aware of these common issues and knowing how to troubleshoot them, you can overcome any obstacles that may arise during the bank transfer process and ensure a seamless experience with Venmo.
Now that you are familiar with troubleshooting common issues, let’s conclude our guide.
Conclusion
Transferring funds from your bank account to Venmo offers a convenient and efficient way to manage your finances and make payments. By following the steps outlined in this guide, you can easily create a Venmo account, link your bank account, initiate transfers, and verify their status. Understanding transfer limits, recognizing potential fees, and troubleshooting common issues are essential aspects of a successful bank-to-Venmo transfer process.
Remember to always double-check your bank account information, ensure sufficient funds for transfers, and be patient during the processing period. If you encounter any difficulties or have questions, Venmo’s customer support is readily available to assist you.
With the ability to seamlessly transfer funds between your bank and Venmo accounts, you can enjoy the convenience of splitting bills, making purchases, sending money to friends and family, and more. Venmo keeps you connected and in control of your finances, all within the palm of your hand.
We hope this guide has provided you with the necessary information to navigate the bank-to-Venmo transfer process smoothly. As always, stay informed about any updates or changes in Venmo’s policies and fee schedules to ensure a seamless experience. Now, go ahead and enjoy the convenience and ease of transferring funds between your bank and Venmo!