How to Cancel Facebook Pay
Facebook Pay is a convenient feature that allows users to make payments and send money through the Facebook platform. However, if you no longer wish to use Facebook Pay or have decided to switch to a different payment method, you can easily cancel Facebook Pay. Follow these simple steps to cancel Facebook Pay and remove your payment method:
- Open Facebook App: First, open the Facebook app on your mobile device. Make sure you are logged in to your account.
- Go to Settings: Once you are logged in, tap on the menu icon located in the top-right corner of the app. Scroll down and tap on “Settings” to access the settings menu.
- Access Facebook Pay Settings: In the settings menu, look for the “Facebook Pay” option. Tap on it to access the Facebook Pay settings.
- Manage Payment Methods: Inside the Facebook Pay settings, you will find the “Payment Methods” section. Tap on it to manage your payment methods.
- Remove Payment Method: In the payment methods section, you will see the payment method that is linked to your Facebook Pay. Tap on the payment method that you want to remove.
- Confirm Cancellation: After selecting the payment method, you will see an option to remove or cancel it. Tap on the “Remove” or “Cancel” button to confirm the cancellation of the payment method.
By following these steps, you can cancel Facebook Pay and remove your payment method from the platform. It is important to note that canceling Facebook Pay will not delete your Facebook account or any other personal information linked to it. Your account will remain active, and you can still use other features and services provided by Facebook.
If you ever decide to use Facebook Pay again or want to add a new payment method in the future, you can easily do so by following similar steps and accessing the Facebook Pay settings in your Facebook app.
Cancelling Facebook Pay gives you control over your payment methods and allows you to choose the most suitable option for your needs. Whether you are switching to a different payment platform or simply want to remove your payment information from Facebook, following the above steps will help you cancel Facebook Pay with ease.
Introduction
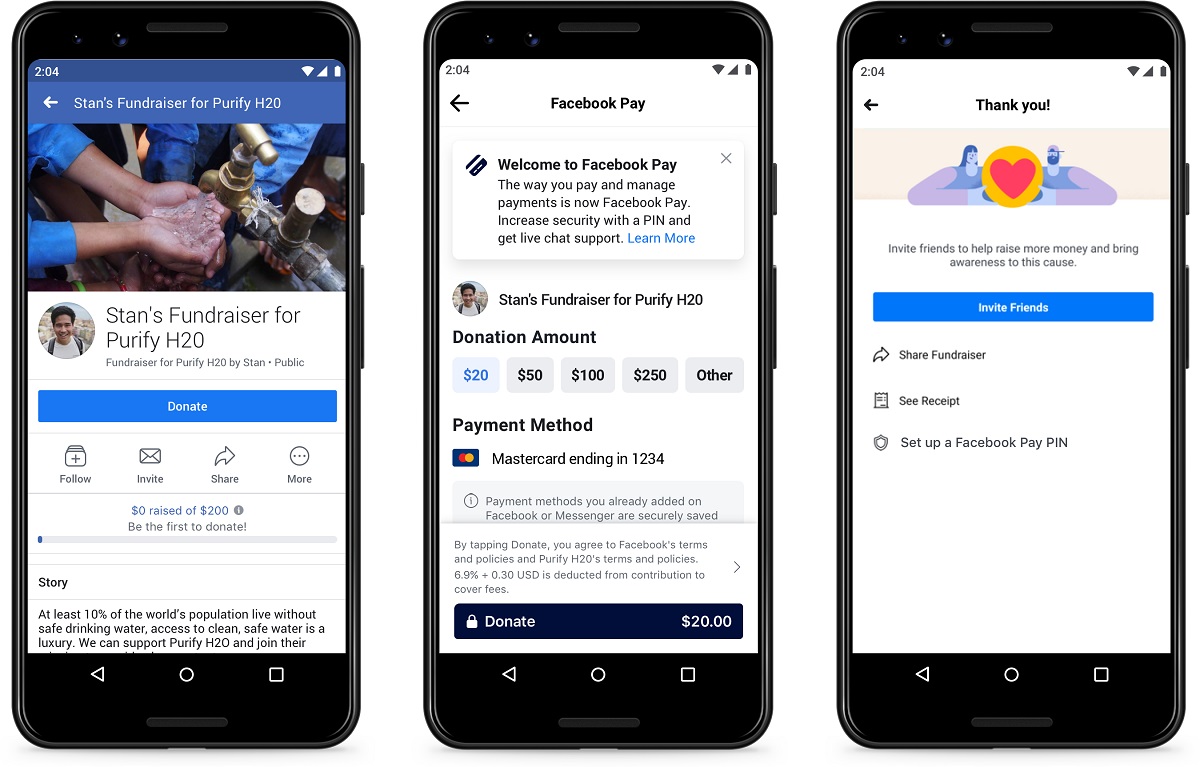
Facebook Pay has become increasingly popular due to its convenience and ease of use. It allows users to make payments and send money through the Facebook platform, eliminating the need for third-party payment apps or services. However, there may come a time when you decide to cancel Facebook Pay for various reasons. Whether you want to switch to a different payment method or no longer find it necessary to use Facebook Pay, the process of cancelling is straightforward and can be done in a few simple steps.
In this article, we will guide you through the process of canceling Facebook Pay and removing your payment method. We will explain each step in detail, ensuring that you can follow along easily. By the end of this guide, you will be able to cancel Facebook Pay with confidence and make any necessary adjustments to your payment preferences.
It is important to note that canceling Facebook Pay does not mean deleting your Facebook account. Your account will remain active, and you can continue using other features and services provided by Facebook. Canceling Facebook Pay simply allows you to manage your payment methods and choose the most suitable option for your needs.
Before we dive into the steps, please make sure that you have the latest version of the Facebook app installed on your mobile device. This will ensure that you have access to all the necessary settings and options required to cancel Facebook Pay.
Now, let’s get started with the step-by-step guide on canceling Facebook Pay and removing your payment method.
Step 1: Open Facebook App
The first step to cancel Facebook Pay is to open the Facebook app on your mobile device. Make sure you are logged in to your Facebook account before proceeding.
If you do not have the Facebook app installed on your device, you can download it from your device’s app store and then log in using your Facebook credentials.
Once you have the Facebook app open and you are logged in, you will have access to the various settings and options necessary to cancel Facebook Pay.
It is important to note that the process of canceling Facebook Pay can only be done through the Facebook app and is not available on the desktop version of Facebook.
Keep in mind that the steps may vary slightly depending on the version and platform of the Facebook app you are using. However, the general process remains the same across all versions.
Now that you have the Facebook app open and you are logged in to your account, you are ready to proceed to the next step in canceling Facebook Pay.
Step 2: Go to Settings
After opening the Facebook app and logging in to your account, the next step in canceling Facebook Pay is to go to the settings menu. The settings menu provides access to various options and features that allow you to customize your Facebook experience.
To access the settings menu, you need to tap on the menu icon located in the top-right corner of the app. This icon typically looks like three horizontal lines or a hamburger icon.
Once you tap on the menu icon, a dropdown or slide-out menu will appear, displaying a list of options. Scroll down on the menu until you find the “Settings” option and give it a tap.
By accessing the settings menu, you open up a range of customization options for your Facebook account. You can adjust privacy settings, manage your notifications, and perform other account-related tasks.
It’s worth mentioning that the location of the settings menu may vary slightly depending on the version of the Facebook app you are using. However, the general process remains the same.
Now that you have navigated to the settings menu, it’s time to proceed to the next step in canceling Facebook Pay: accessing the Facebook Pay settings.
Step 3: Access Facebook Pay Settings
Once you are in the settings menu of the Facebook app, the next step in canceling Facebook Pay is to access the Facebook Pay settings. These settings specifically manage the payment methods associated with your Facebook account.
To access the Facebook Pay settings, you need to scroll down through the settings menu until you find the “Facebook Pay” option. This option is usually located within the “Payments” or “Wallet” category.
Once you locate the “Facebook Pay” option, tap on it to access the Facebook Pay settings.
Inside the Facebook Pay settings, you will see various options related to managing your payment methods, viewing transaction history, and adjusting your payment preferences.
It is important to note that the availability of Facebook Pay may vary depending on your geographical location. If Facebook Pay is not available in your region, you may not see this option in your settings menu.
By accessing the Facebook Pay settings, you are one step closer to canceling Facebook Pay and removing your payment method. The next step will guide you through managing your payment methods within the Facebook Pay settings menu.
Step 4: Manage Payment Methods
After accessing the Facebook Pay settings, the next step in canceling Facebook Pay is to manage your payment methods. This step allows you to review and make changes to the payment methods linked to your Facebook account.
Inside the Facebook Pay settings, look for the “Payment Methods” section. This section displays the payment method(s) currently associated with your Facebook Pay.
Tap on the “Payment Methods” section to view a list of your linked payment methods. Depending on your usage, you may have added credit or debit cards, bank accounts, or other electronic payment options.
From the list of payment methods, you can choose the specific payment method that you want to remove or cancel. This step gives you full control over the payment methods linked to your Facebook Pay.
It is essential to review the payment methods carefully to ensure that you are selecting the correct one for removal. Be cautious not to remove a payment method that you still intend to use for other purposes.
By managing your payment methods in the Facebook Pay settings, you are taking the necessary steps to cancel Facebook Pay and remove the chosen payment method. The following step will guide you through the confirmation process of canceling the payment method.
Step 5: Remove Payment Method
After selecting the payment method you wish to cancel, the next step in the process of canceling Facebook Pay is to remove the chosen payment method from your account.
Within the Facebook Pay settings, locate the specific payment method that you want to remove. It could be a credit or debit card, a bank account, or any other electronic payment option.
Once you have identified the payment method, tap on it to access the removal options. Depending on the Facebook app version, you might find a “Remove” button, a trash bin icon, or an “X” symbol next to the payment method.
Tap on the appropriate option to remove the payment method. The app may prompt you to confirm the removal to ensure that you are making the right decision.
It is important to double-check before confirming the removal, as this action is irreversible. Make sure you are removing the correct payment method and not one that you still intend to use for other purposes.
By removing the payment method, you are effectively canceling its association with your Facebook Pay. This step brings you closer to completing the process of canceling Facebook Pay successfully.
Once you have removed the payment method, you are ready to proceed to the final step: confirming the cancellation of the payment method.
Step 6: Confirm Cancellation
After removing the payment method, the final step in canceling Facebook Pay is to confirm the cancellation of the payment method. This step ensures that you are fully aware of the consequences and are making an informed decision.
When you remove a payment method in the Facebook Pay settings, the app will typically prompt you to confirm the cancellation. This confirmation step is crucial as it prevents accidental removal of payment methods.
Read the confirmation message carefully to ensure that you understand the implications of canceling the payment method. It may mention that removing the payment method will no longer allow you to make payments or send money through Facebook Pay using that particular payment option.
If you are sure that you want to proceed with canceling the payment method, tap on the “Confirm” or “OK” button to finalize the cancellation. This action will remove the payment method from your Facebook Pay and dissociate it from your account.
It’s important to note that canceling a payment method in Facebook Pay does not delete your Facebook account or other personal information linked to it. The cancellation only affects the association of a specific payment method with Facebook Pay.
Once you have confirmed the cancellation, you have successfully completed the process of canceling Facebook Pay and removing the chosen payment method from your account.
Congratulations! You have now successfully canceled Facebook Pay and removed the payment method associated with it. Your account will continue to remain active, and you can still use other features and services provided by Facebook.
If you ever decide to use Facebook Pay again or want to add a new payment method in the future, you can easily do so by following similar steps and accessing the Facebook Pay settings in your Facebook app.
Keep in mind that Facebook Pay may evolve over time, and the steps outlined in this guide might change slightly. Always refer to the most up-to-date instructions provided by Facebook for the specific version of the app you are using.
Conclusion
Canceling Facebook Pay and removing your payment method is a straightforward process that can be done through the Facebook app. By following the steps outlined in this guide, you can easily manage your payment methods and make any necessary changes to your Facebook Pay preferences.
Remember, canceling Facebook Pay does not delete your Facebook account or any other personal information associated with it. Your account will remain active, and you can continue to enjoy other features and services provided by Facebook.
It’s important to note that the availability of Facebook Pay may vary depending on your geographical location. If Facebook Pay is not available in your region, you may not see the option to access or cancel Facebook Pay in your settings menu.
Always ensure that you carefully review the payment methods before removing them to avoid accidentally deleting a payment option you still intend to use for other purposes.
If you ever decide to use Facebook Pay again or want to add a new payment method in the future, you can easily do so by following similar steps and accessing the Facebook Pay settings in your Facebook app.
By canceling Facebook Pay and managing your payment methods, you maintain control and flexibility over your payment preferences while using the Facebook platform.
We hope this guide has been helpful in assisting you with canceling Facebook Pay and removing your payment method. If you have any further questions or concerns, consult the official Facebook support channels for the most up-to-date information and assistance.
Thank you for reading, and we wish you a seamless and enjoyable Facebook experience!