Introduction
Welcome to the digital age, where everything is just a few taps away. Need to order something? There’s an app for that. Want to connect with distant loved ones? Social media has got you covered. And now, thanks to the convenience of Facebook Pay, paying for goods and services has never been easier.
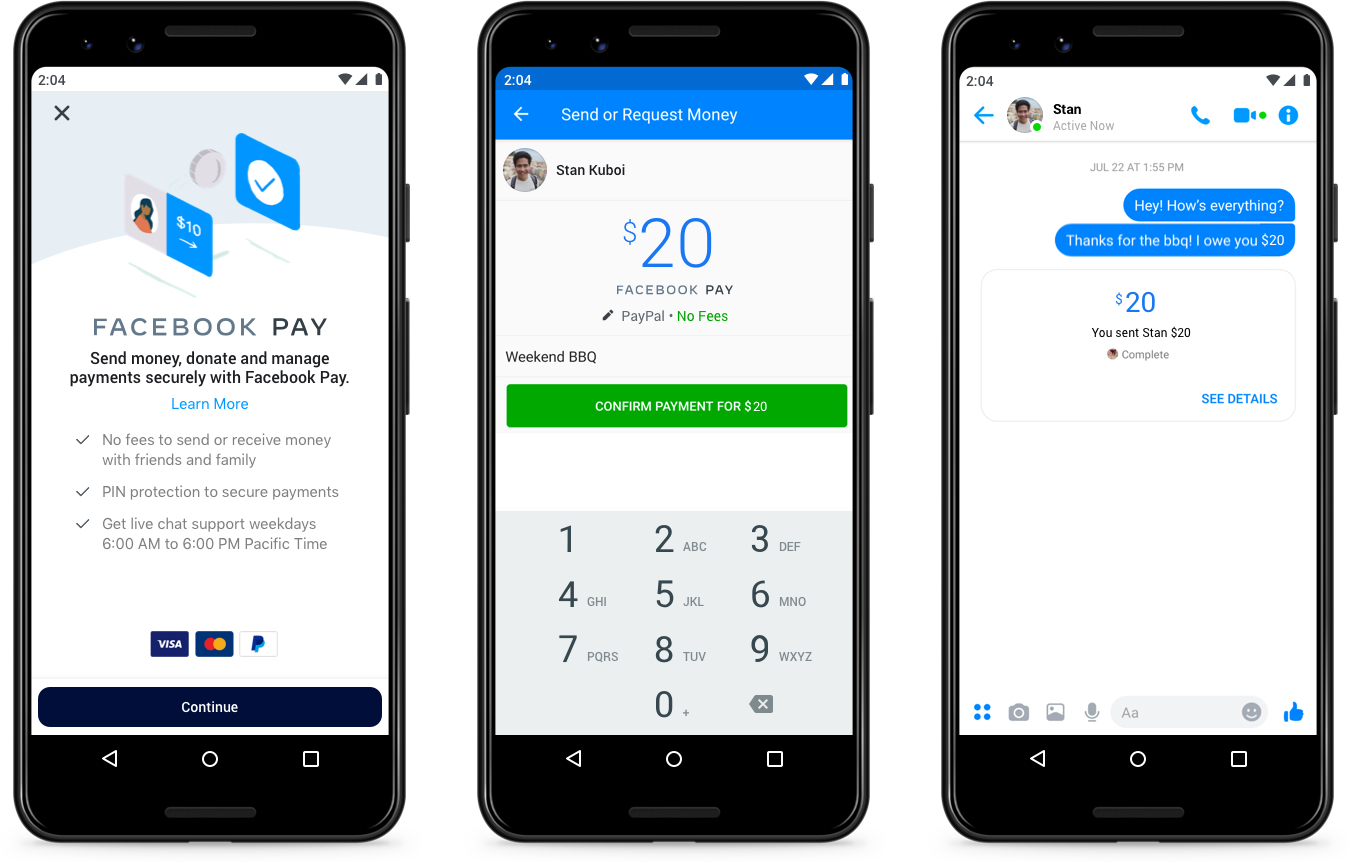
Facebook Pay is the secure and hassle-free payment service offered by Facebook, allowing users to make payments within the Facebook app itself. Whether you’re shopping on Facebook Marketplace, donating to a charitable cause, or sending money to a friend, Facebook Pay provides a seamless payment solution that saves you time and effort.
In this guide, we will take you through the steps of setting up and using Facebook Pay. From arranging your payment methods to exploring the various features, you’ll be able to navigate the world of online payments effortlessly.
In today’s fast-paced world, convenience is key. And with Facebook Pay, convenience is exactly what you get. No longer do you need to fumble with multiple payment apps or worry about sharing your financial information with countless merchants. With Facebook Pay, you can securely make payments without leaving the Facebook app.
But convenience isn’t the only benefit of using Facebook Pay. By using this payment service, you can also enjoy the peace of mind that comes with Facebook’s robust security measures. Facebook Pay is designed to keep your payment information safe, using encryption and continuous monitoring to detect and prevent fraudulent activities.
So, whether you’re a seasoned Facebook user or new to the platform, Facebook Pay is a valuable tool that can streamline your online transactions. Stay tuned as we guide you through the process of adding Facebook Pay to your app and maximizing its features.
Benefits of Using Facebook Pay
Facebook Pay offers a range of benefits for users looking to simplify their online transactions. Let’s take a closer look at some of the key advantages:
- Convenience: With Facebook Pay, you can make payments without leaving the Facebook app. Whether you’re purchasing items on Facebook Marketplace or sending money to friends, the entire payment process is seamlessly integrated into the platform.
- Security: Facebook Pay prioritizes your privacy and security. The service employs advanced encryption to protect your payment information and continuously monitors transactions for any suspicious activity. This gives you peace of mind knowing that your financial details are secure.
- Multiple Payment Methods: Facebook Pay lets you add and manage multiple payment methods, such as credit cards, debit cards, and even PayPal. This flexibility allows you to choose your preferred method for different transactions, making it convenient and accessible for everyone.
- Speedy Transactions: By storing your payment information in Facebook Pay, you can complete transactions quickly and efficiently. There’s no need to enter your card details every time, minimizing the time spent on checkout processes.
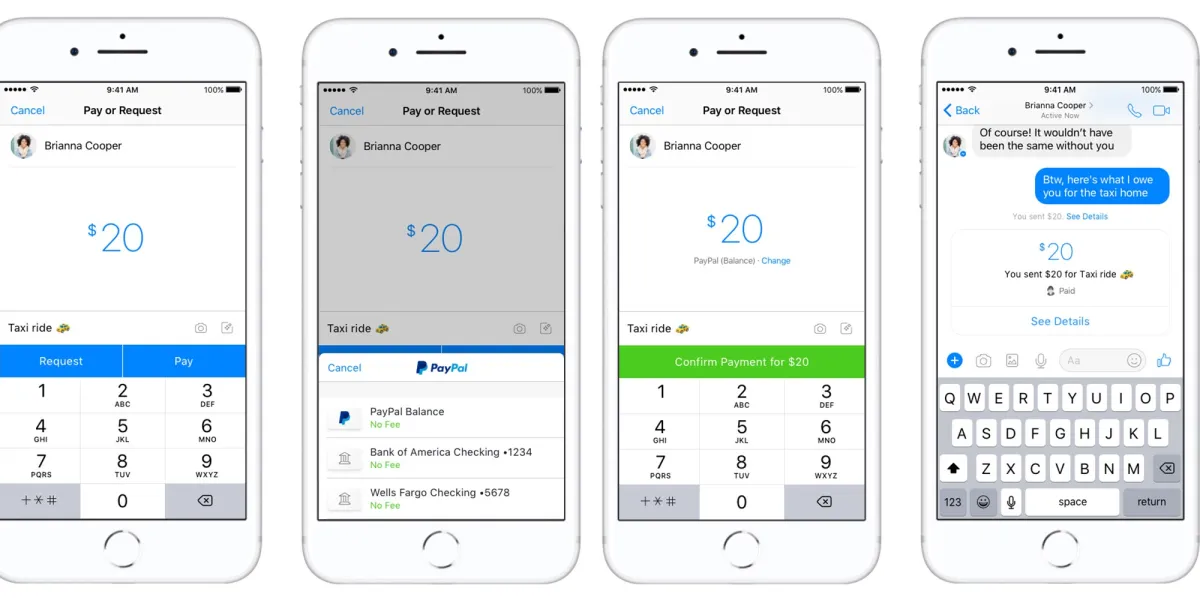
- Seamless Fund Transfers: Facebook Pay enables easy money transfers to friends and family. You can split bills, pay back borrowed money, or simply send a gift with just a few taps. The funds are transferred instantly, making it a convenient option for social payments.
- Wider Coverage: Facebook Pay is not limited to your Facebook friends or connections. You can use it to make payments on other platforms, such as Instagram and Messenger, expanding your payment options across the Facebook ecosystem.
- Rewarding Loyalty: In some cases, using Facebook Pay may come with additional perks and rewards. From exclusive discounts to cashback offers, Facebook occasionally partners with businesses to provide users with extra incentives for using the payment service.
With all these benefits, it’s no wonder that more and more users are embracing Facebook Pay as their go-to payment option. Now that we’ve explored the advantages, let’s dive into the step-by-step process of setting up Facebook Pay on your app.
Step 1: Download and Install the Facebook App
Before you can start using Facebook Pay, you’ll need to have the Facebook app installed on your device. Follow these simple steps to download and install the app:
- Open the App Store (for iPhone users) or the Google Play Store (for Android users) on your mobile device.
- Search for “Facebook” in the search bar.
- Tap on the Facebook app from the search results.
- Select the “Install” button to begin the download and installation process.
- Wait for the app to finish downloading and installing on your device.
- Once the installation is complete, locate the Facebook app icon on your home screen or in the app drawer.
- Tap on the Facebook app icon to launch the app.
- If you don’t have an existing Facebook account, you’ll be prompted to create one. Follow the on-screen instructions to set up your account.
- If you already have a Facebook account, enter your login credentials (email/phone number and password) to access your account.
Once you have successfully downloaded and installed the Facebook app and logged into your account, you are ready to proceed to the next step: updating the Facebook app to ensure you have the latest version and access to all the features, including Facebook Pay.
Note: The steps to download and install the Facebook app may vary slightly depending on your device and operating system version. However, the general process remains the same across devices.
Next, we’ll cover how to update the Facebook app to ensure you have all the latest features and bug fixes.
Step 2: Update the Facebook App
Keeping your Facebook app updated is essential to ensure you have access to the latest features and improvements, including Facebook Pay. Follow these steps to update the Facebook app on your device:
- Open the App Store (for iPhone users) or the Google Play Store (for Android users) on your mobile device.
- Tap on the “Updates” tab at the bottom of the screen. This will show a list of all available app updates.
- Scroll through the list and look for the Facebook app.
- If there is an available update for Facebook, you will see an “Update” button next to the app. Tap on this button to start the update process.
- Wait for the update to download and install on your device. The time it takes will depend on your internet connection speed.
- Once the update is complete, you can launch the updated version of the Facebook app.
If the Facebook app is already up to date, you won’t see an “Update” button next to it in the list of available updates. In that case, you can proceed to the next step and start setting up Facebook Pay.
Regularly updating your apps is important not only for security reasons but also to benefit from the latest features and enhancements. By keeping your Facebook app up to date, you can ensure a smooth experience while using Facebook Pay and other features within the app.
With the Facebook app updated on your device, we can now move on to the next step: opening the app and accessing the settings.
Step 3: Open the Facebook App and Go to Settings
Now that you have downloaded and updated the Facebook app, it’s time to open the app and navigate to the settings section. Follow these simple steps:
- Locate the Facebook app icon on your device’s home screen or app drawer.
- Tap on the Facebook app icon to open the app.
- Once the app is launched, you will be prompted to log in to your Facebook account. Enter your login credentials (email/phone number and password) and tap “Log In”.
- After you log in, you will be taken to the Facebook home screen, where you can see your news feed and other content.
- To access the settings, tap on the three horizontal lines (also known as the hamburger menu) located in the top right corner of the screen. This will open a slide-out menu.
- Scroll down the menu and locate the “Settings & Privacy” option. Tap on it to expand the submenu.
- In the submenu, select “Settings”. This will take you to the main settings page.
Once you are on the settings page, you will have access to a wide range of options and preferences. This is where you can customize your Facebook experience, including managing your account, privacy settings, notification preferences, and more.
Now that you have successfully opened the Facebook app and accessed the settings section, you are one step closer to setting up Facebook Pay. In the next step, we will guide you on how to select “Facebook Pay” in the settings menu to proceed with the setup process.
Step 4: Select “Facebook Pay”
With the Facebook app open and the settings section accessible, it’s time to select “Facebook Pay” to begin the setup process. Follow these steps:
- On the settings page, scroll down until you find the “Facebook Pay” option. This option is usually located under the “Privacy” or “Payments” section.
- Tap on “Facebook Pay” to access the Facebook Pay settings.
- Here, you will find information about Facebook Pay, including its features and benefits. Take a moment to familiarize yourself with the details.
- To proceed with the setup, tap on the “Get Started” button or a similar option that initiates the setup process.
- You may be asked to enter your Facebook account password for security purposes. Enter your password and tap “Continue” to move forward.
- Review and accept the terms and conditions for using Facebook Pay. These terms ensure your understanding and compliance with Facebook’s payment policies.
- Once you have agreed to the terms, you will be prompted to add payment methods to your Facebook Pay account.
By selecting “Facebook Pay”, you are taking the first step towards seamlessly integrating payment options within the Facebook app. The setup process will now guide you through adding and verifying your payment methods, allowing you to make payments conveniently and securely.
In the next step, we will explore how to add and verify payment methods through the Facebook Pay settings.
Step 5: Add and Verify Payment Methods
Now that you have accessed the Facebook Pay settings, it’s time to add and verify your payment methods. Follow these steps:
- In the Facebook Pay settings, tap on the “Add Payment Method” option. This will bring up a list of available payment methods.
- Select the payment method you wish to add. You can choose from options such as credit cards, debit cards, or even PayPal.
- Enter the required information for the selected payment method, such as card details or PayPal login credentials.
- Once you have entered the necessary information, tap on the “Add” or “Save” button to add the payment method to your Facebook Pay account.
- To verify your payment method, Facebook may require an additional step. This can vary depending on the payment method you added.
- Follow the on-screen instructions to complete the verification process. This may involve confirming a small transaction amount or entering a verification code.
- Once your payment method is successfully added and verified, it will be listed in the Facebook Pay settings under “Payment Methods”.
- You can repeat the process to add and verify multiple payment methods, giving you flexibility and convenience when making payments through Facebook.
By adding and verifying payment methods, you are taking advantage of the secure and efficient payment options provided by Facebook Pay. Whether you prefer using credit cards, debit cards, or other online payment services, Facebook Pay accommodates a wide range of payment preferences.
In the next step, we will cover how to set a preferred payment method, allowing you to streamline your payment process within the Facebook app.
Step 6: Set a Preferred Payment Method
After adding and verifying your payment methods in the Facebook Pay settings, you have the option to set a preferred payment method. This preferred payment method will be used by default for any transactions you make through Facebook Pay. Follow these steps to set a preferred payment method:
- In the Facebook Pay settings, scroll down to the “Payment Methods” section.
- Locate the payment method you want to set as your preferred option.
- Tap on the payment method to select it.
- A prompt will appear asking if you want to set this payment method as your preferred option. Tap “Set as Preferred” or a similar button to confirm.
- The selected payment method will now be marked as your preferred option in the Facebook Pay settings.
By setting a preferred payment method, you can streamline the payment process within the Facebook app. Whenever you make a transaction, whether it’s for an online purchase or sending money to a friend, the app will automatically use your preferred payment method, saving you time and effort.
You can change your preferred payment method at any time by repeating the steps above and selecting a different payment method as your preference. This flexibility allows you to adapt to different payment needs and preferences as they arise.
In the next step, we will explore how to enable Touch ID or Face ID for secure and convenient payments on supported devices.
Step 7: Enable Touch/Face ID for Secure Payments
To add an extra layer of security and convenience to your Facebook Pay transactions, you can enable Touch ID or Face ID authentication on supported devices. This feature allows you to use your fingerprint or facial recognition to authorize payments. Follow these steps to enable Touch ID or Face ID:
- In the Facebook Pay settings, locate the “Security” or “Biometrics” section. This may vary depending on your device and operating system.
- Tap on the option to enable Touch ID or Face ID, depending on the biometric authentication supported by your device.
- Follow the on-screen instructions to set up Touch ID or Face ID for Facebook Pay. This typically involves scanning your fingerprint or aligning your face within the designated area.
- Once the setup is complete, you will have the option to use Touch ID or Face ID for authorizing payments through Facebook Pay.
Enabling Touch ID or Face ID adds an extra level of security to your transactions, ensuring that only you can authorize payments using your registered fingerprint or face. This feature is particularly useful in situations where you want to quickly and securely complete a payment without having to enter your password.
It’s important to note that the availability of Touch ID or Face ID depends on the capabilities of your device. Not all devices support these features. If your device does not have Touch ID or Face ID, you can still use other security measures, such as a passcode or password, to secure your Facebook Pay transactions.
In the next step, we will explore some of the additional features and functionalities you can explore within Facebook Pay to enhance your payment experience.
Step 8: Explore Facebook Pay Features
Now that you have set up Facebook Pay and made it more secure with Touch ID or Face ID authentication, it’s time to explore some of the additional features and functionalities that Facebook Pay has to offer. Here are a few features you can explore:
- Send Money to Friends and Family: With Facebook Pay, you can easily send money to friends and family members directly from the app. Simply select the person you want to send money to, enter the amount, and confirm the transaction.
- Make Purchases on Facebook Marketplace: Facebook Pay allows you to make secure payments for items you purchase on Facebook Marketplace. When you find something you want to buy, select the “Buy Now” option and follow the prompts to complete the transaction.
- Donate to Charitable Causes: Facebook Pay makes it effortless to donate to charitable organizations and campaigns. Simply find a cause you want to support, select the donation amount, and complete the payment to make a positive impact.
- Manage Transaction History: Facebook Pay keeps a record of your transactions, making it easy for you to track and manage your payment history. You can view your transaction history within the Facebook Pay settings.
- Access Customer Support: If you encounter any issues or have questions about Facebook Pay, you can access customer support through the app. Look for the “Help” or “Support” section within the Facebook Pay settings for assistance.
- Discover Exclusive Offers: Keep an eye out for exclusive offers or promotions that may be available to Facebook Pay users. Facebook occasionally partners with businesses to provide special deals or discounts for users making payments through Facebook Pay.
Exploring these features will help you make the most of Facebook Pay and enhance your overall payment experience within the Facebook app. Whether you’re sending money to loved ones or purchasing items on Facebook Marketplace, Facebook Pay offers a range of convenient and secure payment options.
With this final step, you have learned how to set up and use Facebook Pay, from downloading the app to exploring its features. Now, you can enjoy the convenience of making seamless payments directly within the Facebook app. Get started with Facebook Pay today and simplify your online transactions!
Conclusion
Facebook Pay is a game-changer when it comes to simplifying online payments within the Facebook app. By following the steps outlined in this guide, you have learned how to download and install the app, update it to the latest version, access the settings, and set up Facebook Pay. You have also explored the benefits of using Facebook Pay, added and verified payment methods, set a preferred payment method, enabled Touch ID or Face ID for secure payments, and discovered additional features.
With Facebook Pay, you can enjoy the convenience of making payments without leaving the Facebook app, while also benefiting from enhanced security measures. Adding and verifying multiple payment methods gives you flexibility, and selecting a preferred payment method streamlines your payment process. Enabling Touch ID or Face ID provides an extra layer of security, ensuring that only you can authorize transactions.
Additionally, Facebook Pay allows you to explore various features, such as sending money to friends and family, making purchases on Facebook Marketplace, and donating to charitable causes. You can easily manage your transaction history and access customer support if needed. Plus, keep an eye out for exclusive offers and promotions available to Facebook Pay users, making your payments even more rewarding.
By utilizing Facebook Pay, you can save time and effort while making secure and seamless payments. Whether you’re shopping, sending money, or supporting a cause, Facebook Pay makes the process easier than ever before.
Now that you have completed the setup and explored the features of Facebook Pay, you’re ready to make the most of this convenient payment service. Experience hassle-free transactions within the Facebook app and enjoy the benefits of secure and efficient payments.
Start using Facebook Pay today and take control of your online payments like never before!