What is Facebook Pay?
Facebook Pay is a secure and convenient payment feature integrated into the Facebook platform. It allows users to seamlessly send and receive money from friends, family, or businesses directly through Facebook and Messenger. With Facebook Pay, you can easily split bills, repay loans, purchase products or services, and even donate to charitable causes. This centralized platform simplifies the payment process, eliminating the need for third-party apps or services.
One of the standout features of Facebook Pay is its accessibility. Users can access it on various Facebook-owned platforms, including Facebook, Messenger, Instagram, and WhatsApp. This widespread availability ensures that Facebook Pay is convenient and easily accessible to millions of users across the globe. Whether you’re using a desktop computer or a mobile device, sending and receiving money is just a few clicks away.
Security is a top priority for Facebook Pay. To safeguard your financial information and protect against fraud, Facebook Pay utilizes advanced encryption and multi-factor authentication. This ensures that your transactions and personal details are kept secure at all times. Additionally, Facebook Pay adheres to stringent data protection regulations and guidelines to protect your privacy.
By using Facebook Pay, you can also take advantage of the convenient payment history feature. This allows you to keep track of all your transactions, making it easy to monitor your spending and maintain a clear record of your payments. Whether you want to review a specific transaction or analyze your overall spending patterns, the transaction history feature provides valuable insights into your financial activities.
It’s important to note that Facebook Pay is not limited to personal transactions between friends and family. It can also be used for business transactions, such as purchasing products or services from online stores or making payments to freelance professionals. With the ability to receive payments on Facebook Pay, businesses can expand their reach and offer a convenient payment option to customers.
In summary, Facebook Pay is a secure and versatile payment feature integrated into the Facebook platform. From splitting bills with friends to making online purchases, Facebook Pay provides a seamless and convenient way to send and receive money. With its widespread availability, advanced security measures, and built-in transaction history feature, Facebook Pay offers a reliable solution for your payment needs.
How to Set Up Facebook Pay
Setting up Facebook Pay is a straightforward process that can be completed in a few simple steps. Here’s a guide to help you get started:
- Open the Facebook App: Launch the Facebook app on your mobile device or navigate to Facebook.com on your desktop browser.
- Go to Settings: Tap on the three horizontal lines in the bottom-right corner of the screen to open the menu. Scroll down and select “Settings & Privacy.” Then, click on “Settings.”
- Access Facebook Pay: In the Settings menu, look for “Facebook Pay” under the “Payments” section. Tap on it to continue.
- Add a Payment Method: To start using Facebook Pay, you need to link a valid payment method. You can choose to add either a credit card or a bank account. Enter the required details and click “Add Card” or “Add Bank Account.”
- Set a PIN: To add an extra layer of security, you can set a PIN for Facebook Pay. This PIN will be required each time you make a payment or access your payment settings. Choose a PIN that is easy for you to remember but difficult for others to guess.
- Review and Confirm: Before you can begin using Facebook Pay, review the information you’ve entered and make sure everything is accurate. Once you’ve done that, click on the “Confirm” button.
- Enable Messenger Payments: If you also want to send or receive money on Facebook Messenger, follow the prompts to enable Messenger Payments. This step is optional but allows you to make payments directly in Messenger.
Congratulations! You have successfully set up Facebook Pay. Now you can start sending and receiving money conveniently through the Facebook platform and Messenger. Remember to keep your login credentials secure and regularly monitor your transaction history for any unauthorized activities.
Linking a Bank Account or Credit Card
In order to use Facebook Pay, you need to link a valid payment method such as a bank account or credit card. This allows you to seamlessly send and receive money through the platform. Here’s a step-by-step guide on how to link your bank account or credit card to Facebook Pay:
- Open the Facebook App: Launch the Facebook app on your mobile device or access Facebook.com on your desktop browser.
- Access Facebook Pay Settings: Tap on the three horizontal lines in the bottom-right corner of the screen to open the menu. Scroll down and select “Settings & Privacy.” Then, click on “Settings.” From there, go to “Facebook Pay” under the “Payments” section.
- Add Payment Method: In the Facebook Pay settings, click on the option to “Add Payment Method” or “Add Card/Bank Account.”
- Select Bank Account or Credit Card: Choose whether you want to link a bank account or a credit card to Facebook Pay. If you choose a bank account, you will need to provide your account and routing numbers. If you choose a credit card, you will need to enter the card number, expiration date, and CVV code.
- Enter the Required Information: Fill in the necessary details, including the account or card number, name on the account or card, and any other requested information. Make sure to double-check the accuracy of the information before proceeding.
- Verify Your Payment Method: Facebook Pay may require additional verification to ensure the security of your payment method. This can be done by confirming a small transaction or by entering a verification code sent to your mobile device or email.
- Review and Confirm: Once you have entered all the required information and completed the verification process, review the details before confirming. Make sure everything is accurate and click on “Confirm” or “Add Card” to complete the process.
By linking your bank account or credit card to Facebook Pay, you can easily send and receive money within the Facebook platform and Messenger. Remember to keep your payment information secure and update it if there are any changes. Additionally, regularly review your transaction history and monitor for any unauthorized activities to ensure the security of your Facebook Pay account.
Sending Money on Facebook Pay
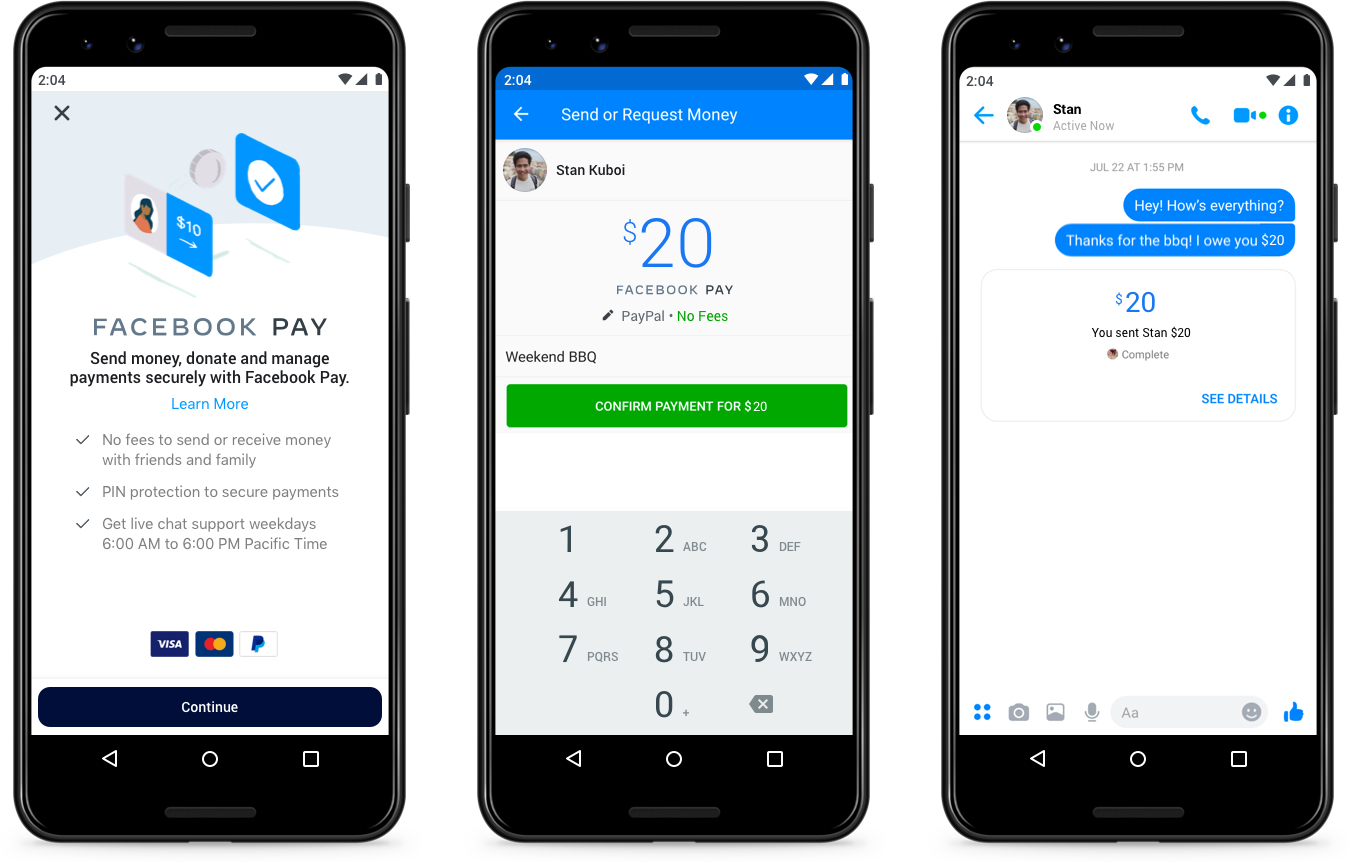
Sending money through Facebook Pay is a simple and convenient process that allows you to transfer funds to friends, family, or businesses directly through the Facebook platform or Messenger. Here’s a guide on how to send money using Facebook Pay:
- Open the Facebook App: Launch the Facebook app on your mobile device or access Facebook.com on your desktop browser.
- Navigate to the Payment Options: Tap on the three horizontal lines in the bottom-right corner of the screen to open the menu. Scroll down and select “Payments” or “Facebook Pay.”
- Choose a Recipient: Select the person or business you want to send money to. You can either search for their name or choose from your list of Facebook friends or Messenger contacts.
- Enter the Amount: Specify the amount you wish to send. You can either enter a specific value or use the provided options for common amounts.
- Add a Note: If necessary, you can include a note or description to accompany the payment. This can be helpful for providing additional context or instructions to the recipient.
- Select a Payment Method: Choose the payment method you want to use for the transaction. If you have multiple payment methods linked to Facebook Pay, select the desired one.
- Review and Confirm: Double-check the transaction details, including the recipient, amount, and payment method. Once you are satisfied, click on “Send” or “Confirm” to initiate the transfer.
- Optional: Send a Request: If you want to request money from someone, you can do so by navigating to the “Request” tab in the Facebook Pay section and following the prompts. This allows you to easily ask for owed payments or split bills with friends.
Once the payment is sent, the recipient will receive a notification and can choose to accept the payment. The funds will be transferred to their linked bank account or can be stored in their Facebook Pay balance for future use.
Sending money through Facebook Pay offers a convenient and fast way to transfer funds to individuals or businesses within the Facebook ecosystem. Whether you want to repay a friend, purchase a product or service, or support a charitable cause, Facebook Pay makes it easy to complete transactions securely and efficiently.
Receiving Money on Facebook Pay
Receiving money on Facebook Pay is a seamless process that allows you to accept funds from friends, family, or customers directly through the Facebook platform or Messenger. Here’s a guide on how to receive money using Facebook Pay:
- Ensure Facebook Pay is Enabled: Make sure you have set up and enabled Facebook Pay on your account. If you haven’t done so, refer to the previous section on how to set up Facebook Pay.
- Communicate your Facebook Pay Details: Let your friends, family, or customers know that you are able to receive money through Facebook Pay. Share your Facebook username or the email address associated with your Facebook account to ensure they can easily find and send you payments.
- Accept Incoming Payments: When someone sends you money on Facebook Pay, you will receive a notification. Click on the notification to view the details of the payment. If it is from a trusted source, you can choose to accept the payment.
- Review the Payment Details: Before accepting the payment, take a moment to review the amount, sender’s information, and any accompanying note. Make sure that the information is accurate and matches the agreed-upon transaction.
- Choose the Destination: Determine where you want the funds to be transferred. You can link your bank account to have the funds deposited directly, or you can choose to keep the money in your Facebook Pay balance for future use.
- Withdraw or Use the Funds: If you choose to have the funds deposited into your linked bank account, simply follow the prompts to withdraw the funds. If you decide to keep the money in your Facebook Pay balance, you can use it for future transactions or choose to transfer it to your bank account at a later time.
Receiving money through Facebook Pay offers a convenient way to accept payments without the need for cash or traditional banking methods. Whether you are a small business owner receiving payments for products or services or simply receiving money from friends and family, Facebook Pay provides a secure and convenient solution.
Remember to stay vigilant and only accept payments from trusted sources. Regularly monitor your transaction history to ensure accuracy and report any fraudulent or unauthorized transactions to Facebook’s support team.
How to Receive Money on Facebook Pay
Receiving money on Facebook Pay is a straightforward process that allows you to accept funds from friends, family, or customers directly through the Facebook platform. Whether you’re receiving payment for goods and services or simply receiving money from individuals, here’s a step-by-step guide on how to receive money using Facebook Pay:
- Ensure Facebook Pay is Enabled: Make sure you have set up and enabled Facebook Pay on your account. If you haven’t done so, refer to the previous section on how to set up Facebook Pay.
- Communicate Your Facebook Pay Details: Let the person or business know that you are able to receive money through Facebook Pay. Provide them with your Facebook username or the email address associated with your Facebook account so they can easily find and send you payments.
- Receive the Payment: When someone sends you money on Facebook Pay, you will receive a notification. Click on the notification or go to the Facebook Pay section in your settings to view the details of the payment.
- Review the Payment Details: Before accepting the payment, take a moment to review the amount, sender’s information, and any accompanying note. Ensure that the information is accurate and matches the agreed-upon transaction.
- Choose the Destination: Decide where you want the funds to go. You can link your bank account to have the funds deposited directly or choose to keep the money in your Facebook Pay balance for future use.
- Withdraw or Use the Funds: If you opt to have the funds deposited into your linked bank account, follow the prompts to initiate the withdrawal. If you decide to keep the funds in your Facebook Pay balance, you can use them for future transactions or transfer them to your bank account at a later time.
Receiving money through Facebook Pay offers a convenient and efficient way to accept payments. Whether you’re a freelancer, small business owner, or simply receiving money from friends and family, Facebook Pay provides a secure and user-friendly payment solution.
Remember to stay cautious and only accept payments from trusted sources. Regularly review your transaction history to ensure accuracy and promptly report any suspicious or unauthorized transactions to Facebook’s support team.
Enabling Payments on Facebook Messenger
Facebook Messenger offers a convenient way to send and receive money directly within the app. By enabling payments on Facebook Messenger, you can easily transact with friends, family, or businesses without the need for cash or third-party payment platforms. Here’s a guide on how to enable payments on Facebook Messenger:
- Open the Facebook Messenger App: Launch the Facebook Messenger app on your mobile device. Make sure you are logged in to your Facebook account.
- Access Settings: Tap on your profile picture or avatar in the top-left corner of the screen to open the Settings menu.
- Navigate to Payments: Scroll down and tap on “Payments” in the list of options. If you don’t see this option, it may not be available in your region or to your account yet.
- Link a Payment Method: In the Payments settings, tap on “Add New Debit Card” or “Add New Credit Card” to link a valid payment method to your Facebook Messenger account. Follow the prompts to add the necessary card information.
- Set a PIN: For added security, you can set a PIN code that will be required each time you send money through Facebook Messenger. Choose a secure PIN that is easy for you to remember but difficult for others to guess.
- Verify Your Payment Method: Depending on your financial institution, you may need to verify your payment method. Facebook Messenger may require you to confirm a small transaction or enter a verification code sent to your mobile device or email.
- Confirm and Enable: Once you have linked and verified your payment method, review the details and click on the “Confirm” or “Enable” button to activate payments on Facebook Messenger.
Once payments are enabled on Facebook Messenger, you can easily send and receive money by tapping on the “Money” icon within a conversation. Enter the amount, select the payment method, and confirm the transaction. The funds will be transferred to the recipient’s linked payment account, and they can choose to withdraw the funds or use them for future payments.
Enabling payments on Facebook Messenger provides a convenient and secure way to send and receive money directly within your conversations. Whether you’re splitting expenses, repaying a friend, or purchasing goods or services from a business, Facebook Messenger simplifies the payment process and eliminates the need for additional payment apps or platforms.
Receiving Payments for Products or Services
Facebook Pay offers a seamless and convenient way for businesses to receive payments for products or services directly within the Facebook platform. Whether you’re a small business owner, a freelancer, or a service provider, here’s a guide on how to receive payments for products or services using Facebook Pay:
- Set Up a Business Page: If you haven’t already, create a business page on Facebook. This will allow you to showcase your products or services, communicate with customers, and receive payments.
- Add Payment Options: In the settings of your business page, navigate to the “Payments” section. Choose the payment options you want to offer to your customers – whether it’s accepting credit/debit cards, electronic fund transfers, or other payment methods.
- Communicate Your Payment Options: Inform your customers about the available payment options on your business page. Use call-to-action buttons, website links, or direct messages to guide them to the payment process.
- Select a Payment Method: When a customer wants to purchase a product or service, they can select a preferred payment method from the options you have made available. This can be done directly on your business page or through Facebook Messenger.
- Specify the Details of the Transaction: Provide your customers with clear details about the product or service they are purchasing, including the price, any additional fees, delivery options, or relevant timelines.
- Confirm and Deliver: Once the customer completes the payment process, receive the payment in your linked account. At this point, you can proceed with delivering the product or service as agreed upon.
- Follow Up and Provide Support: After receiving the payment, ensure timely communication with your customers. Address any inquiries, provide receipts or order confirmations, and offer any necessary support to enhance the customer experience.
Receiving payments for products or services through Facebook Pay offers convenience for both you as a business owner and your customers. It eliminates the need for manual handling of payments, reduces friction in the purchase process, and provides a familiar platform for transactions.
Make sure to monitor your transaction history regularly, provide excellent customer service, and promptly address any issues or disputes that may arise. By utilizing Facebook Pay, you can expand your reach and cater to a broader audience, enabling seamless payments for your products or services.
Tracking Payments and Transaction History
Tracking payments and keeping a record of transaction history is an essential aspect of managing your finances and ensuring accurate financial records. With Facebook Pay, you can easily monitor and track your payments within the platform. Here is how you can track payments and access your transaction history:
- Open Facebook Pay Settings: Launch the Facebook app on your mobile device or go to Facebook.com on your desktop browser. Access the settings menu by tapping on the three horizontal lines on the bottom-right corner of the screen and selecting “Settings & Privacy,” then “Settings.”
- Go to Facebook Pay: Within the settings menu, look for the “Payments” or “Facebook Pay” section and tap on it to access the Facebook Pay settings.
- View Payment Activity: In the Facebook Pay settings, you will find an option to view your payment activity or transaction history. Tap on it to access the details of your past payments.
- Filter and Sort Transactions: To streamline your search, use the available filters and sorting options. You can filter payments by date range, payment method, or specific contacts/businesses involved in the transactions. Sorting options can include arranging transactions by date, amount, or chronological order.
- View Transaction Details: Clicking on a specific transaction will provide you with more detailed information, such as the date and time of the transaction, the payment method used, the recipient/sender, and any accompanying note or description.
- Export Transaction History: If you need to export your transaction history for accounting or record-keeping purposes, look for an option to export or download the transaction data. This will allow you to save the information in a format compatible with your financial management system.
By effectively tracking payments and having access to your transaction history, you can better manage your finances, reconcile payments, and maintain accurate records. It provides you with a clear overview of your financial activities, making it easier to identify patterns, trace specific transactions, and ensure that all payments are accounted for.
Remember to periodically review your transaction history, especially if you engage in frequent transactions through Facebook Pay. Regularly monitor for any discrepancies or unauthorized activities and promptly report any issues to Facebook’s support team.
Security and Privacy Measures on Facebook Pay
Facebook Pay prioritizes the security and privacy of its users’ financial information. Implementing robust measures, Facebook Pay ensures that your transactions and personal data are protected. Here are the security and privacy measures in place:
Encryption and Authentication: Facebook Pay uses advanced encryption technology to secure your payment information during transmission. This ensures that your data is protected from unauthorized access or interception. Additionally, access to your Facebook Pay account is authenticated through multi-factor authentication, adding an extra layer of security.
Data Protection and Privacy Controls: Facebook Pay adheres to strict data protection regulations and guidelines, ensuring that your personal and financial information is handled responsibly. Facebook actively monitors and maintains compliance with these regulations to safeguard your privacy.
Secure Payment Methods: Facebook Pay allows you to link your bank account or credit card as payment methods. These payment methods are secured by industry-standard security protocols and encryption, providing an added layer of protection for your financial information.
Transaction Monitoring: Facebook Pay employs advanced systems and algorithms to monitor transactions and detect any suspicious or fraudulent activities. If any suspicious activity is detected, Facebook Pay may take immediate action to protect your account and funds.
Dispute Resolution: In the unfortunate event of a payment dispute or unauthorized transaction, Facebook Pay provides mechanisms for dispute resolution. You can report any issues or discrepancies to Facebook’s support team, who will investigate and take necessary action to resolve the matter.
User Controls and Privacy Settings: Facebook Pay allows you to customize your privacy settings and manage the visibility of your payment activities. You can choose who sees your payment transactions, adjust your privacy preferences, and control the visibility of your financial information on the platform.
Regular Security Updates: Facebook Pay continually updates its security systems to stay ahead of emerging threats and vulnerabilities. This includes implementing regular security patches, bug fixes, and system enhancements to ensure a secure payment experience for users.
While Facebook Pay puts in place these security measures to protect your financial information, it’s essential for users to practice good security habits as well. This includes using strong and unique passwords, enabling biometric authentication if available, keeping devices and apps up to date, and being cautious of phishing attempts or suspicious links.
By implementing stringent security and privacy measures, Facebook Pay aims to provide users with a secure and trustworthy platform to conduct their financial transactions. However, it is important for users to remain vigilant and responsible when using any online payment service.
Troubleshooting and FAQs
Like any digital platform, Facebook Pay may encounter occasional issues or questions that require troubleshooting. Here are some common troubleshooting tips and frequently asked questions to help address any concerns you may have:
1. My payment is not going through. What can I do?
If you are experiencing issues with a payment, make sure you have a stable internet connection and sufficient funds in your linked payment method. Try closing and reopening the app, clearing cache and cookies, or updating your app to the latest version. If the problem persists, reach out to Facebook Pay support for further assistance.
2. Can I dispute a transaction or request a refund?
Yes, you can dispute a transaction or request a refund if there is a problem with a product or service you purchased through Facebook Pay. Contact the seller first to try resolving the issue. If unsuccessful, you can escalate the matter with Facebook Pay support, providing evidence and details of the transaction.
3. How long does it take for funds to be transferred to my bank account?
The timeline for funds to be transferred to your bank account depends on various factors, including your bank’s processing times. Generally, it may take anywhere from one to five business days for the funds to appear in your bank account.
4. What security measures should I take to protect my Facebook Pay account?
To protect your Facebook Pay account, ensure you have a strong, unique password and enable two-factor authentication if available. Avoid sharing your account details or payment information with anyone. Regularly monitor your transaction history and report any suspicious activities or unauthorized transactions to Facebook’s support team.
5. Can I link multiple payment methods to my Facebook Pay account?
Yes, you can link multiple payment methods, such as bank accounts or credit cards, to your Facebook Pay account. This provides flexibility and options when making payments or receiving funds.
6. Is Facebook Pay available in my country?
Facebook Pay is currently available in select countries. To check if Facebook Pay is available in your country, go to the Facebook Pay settings or refer to the Facebook Help Center for the most up-to-date information.
7. Can I use Facebook Pay to make purchases outside of the Facebook platform?
As of now, Facebook Pay is primarily designed for transactions within the Facebook ecosystem, including Facebook and Messenger. However, Facebook has plans to expand its payment capabilities beyond its platforms in the future.
8. What fees are associated with using Facebook Pay?
Facebook Pay does not currently charge any fees for sending or receiving money. However, fees may be imposed by your bank or payment provider for linking and processing transactions through Facebook Pay. Review the terms and conditions of your linked payment method for any applicable fees.
If you encounter any other issues or have further questions, it is recommended to visit the Facebook Help Center or contact Facebook Pay support for personalized assistance. They will be able to provide guidance and address any specific concerns related to your Facebook Pay account.