Introduction
Welcome to our comprehensive guide on where to plug an SSD into a motherboard. As storage technology continues to advance, Solid State Drives (SSDs) have become the go-to choice for users seeking faster performance and improved system responsiveness.
In this article, we will explore the benefits of using an SSD, discuss motherboard compatibility, highlight the different types of SSDs available on the market, and guide you step-by-step on where to plug an SSD into a motherboard.
SSDs, unlike traditional Hard Disk Drives (HDDs), do not rely on mechanical components to store and retrieve data. Instead, they use flash memory, making them faster, quieter, and more durable. With no moving parts, SSDs offer significant advantages such as reduced boot times, faster application launch speeds, improved multitasking capabilities, and enhanced overall system performance.
Motherboard compatibility is an essential factor to consider when installing an SSD. The motherboard acts as the central hub of your computer, connecting all components and peripherals. It determines the types of storage devices that can be installed and the available slots for connection.
There are several types of SSDs available, including SATA SSDs, M.2 SSDs, and PCIe SSDs. Each type has its own unique form factors and connection interfaces, so it’s crucial to understand the specific requirements for your motherboard to ensure compatibility.
By following the step-by-step guide in this article, you will learn exactly where to plug your SSD into your motherboard. Whether you’re upgrading your existing system or building a new one, this information will help you take full advantage of the benefits that SSDs offer.
In the following sections, we will discuss each topic in detail, providing you with the knowledge to successfully install and optimize your SSD on your motherboard. Let’s dive in!
What Is an SSD?
To understand where to plug an SSD into a motherboard, it’s important to first grasp what an SSD is. A Solid State Drive (SSD) is a storage device that stores data using flash memory chips instead of traditional mechanical components found in Hard Disk Drives (HDDs). This means that SSDs do not have moving parts, making them more durable and faster than HDDs.
The primary component in an SSD is the flash memory chip, which stores data electronically. When you save files or install applications on an SSD, the data is written onto these chips and retained even when the power is turned off. This allows for quicker access times and faster data transfer speeds compared to HDDs.
SSDs offer several advantages over traditional HDDs. One of the most significant benefits is the improved performance. With an SSD, your computer can boot up faster, programs can launch instantly, and file transfers can be completed in a fraction of the time. This is because SSDs have incredibly fast read and write speeds, allowing for rapid data retrieval and storage.
Another advantage of SSDs is their shock and vibration resistance. Since SSDs do not have any moving parts like HDDs, they are less prone to physical damage. This makes them ideal for laptops and portable devices that are constantly on-the-go.
In terms of lifespan, SSDs tend to outlast HDDs. Since there are no moving parts to wear out, SSDs can withstand a higher number of read and write cycles. Additionally, SSDs are less likely to suffer from fragmentation, a common issue that can slow down the performance of HDDs over time.
As technology advances, SSDs continue to evolve with new form factors and connection interfaces. This flexibility allows SSDs to be used in various computing devices, from desktops to laptops and even gaming consoles. Whether you’re a casual user or a professional in need of high-performance storage, an SSD can provide a significant boost to your system’s speed and responsiveness.
Now that you have a better understanding of what an SSD is and how it differs from HDDs, let’s explore the benefits of using an SSD in more detail in the next section.
Benefits of Using an SSD
Using a Solid State Drive (SSD) as your primary storage device offers a multitude of benefits that can drastically improve your computer’s performance and overall user experience. Let’s explore some of the key advantages of using an SSD.
1. Faster Performance: One of the most significant advantages of SSDs is their remarkable speed. Since SSDs do not have any moving parts, they can access and retrieve data almost instantaneously. This results in faster boot times, reduced application launch delays, and quicker file transfers. Tasks that used to take minutes with a traditional Hard Disk Drive (HDD) can now be completed in a matter of seconds with an SSD.
2. Improved System Responsiveness: SSDs can significantly enhance the responsiveness of your system. This is especially noticeable during multitasking and heavy workloads. With an SSD, you can smoothly switch between applications, open multiple tabs in your web browser, and run resource-intensive software without experiencing any lag or slowdown.
3. Enhanced Gaming Experience: Gamers can greatly benefit from using an SSD. Not only do SSDs decrease game loading times, but they also reduce in-game stuttering and provide faster asset streaming, resulting in a more immersive and seamless gaming experience. With an SSD, you can spend less time waiting for levels to load and more time enjoying your favorite games.
4. Durability and Reliability: SSDs are built to withstand shock, vibrations, and extreme temperatures better than HDDs. With no moving parts, there is a lower risk of mechanical failure, making SSDs more robust and reliable in portable devices such as laptops. This durability ensures that your data is safer and less likely to be lost due to physical damage.
5. Energy Efficiency: SSDs consume less power compared to HDDs. This energy efficiency translates into longer battery life for laptops and reduced electricity costs for desktops. If you are concerned about environmental impact or simply want to maximize the efficiency of your system, using an SSD can be a wise choice.
6. Noiseless Operation: Since SSDs lack the spinning disks and moving read/write heads found in HDDs, they operate silently. This absence of mechanical noise makes them an excellent choice for media centers, recording studios, or any environment where a silent operation is desired.
Overall, the benefits of using an SSD are undeniable. They offer superior speed, improved system responsiveness, durability, energy efficiency, and noiseless operation. Whether you are a casual user, gamer, or professional, upgrading to an SSD can significantly enhance your computing experience.
Next, let’s delve into the important aspect of motherboard compatibility to ensure a successful SSD installation.
Understanding Motherboard Compatibility
When it comes to installing an SSD into your motherboard, understanding compatibility is crucial. The motherboard serves as a central hub that connects various components and peripherals in your computer system. It determines the types of storage devices that can be installed and the available slots for connection.
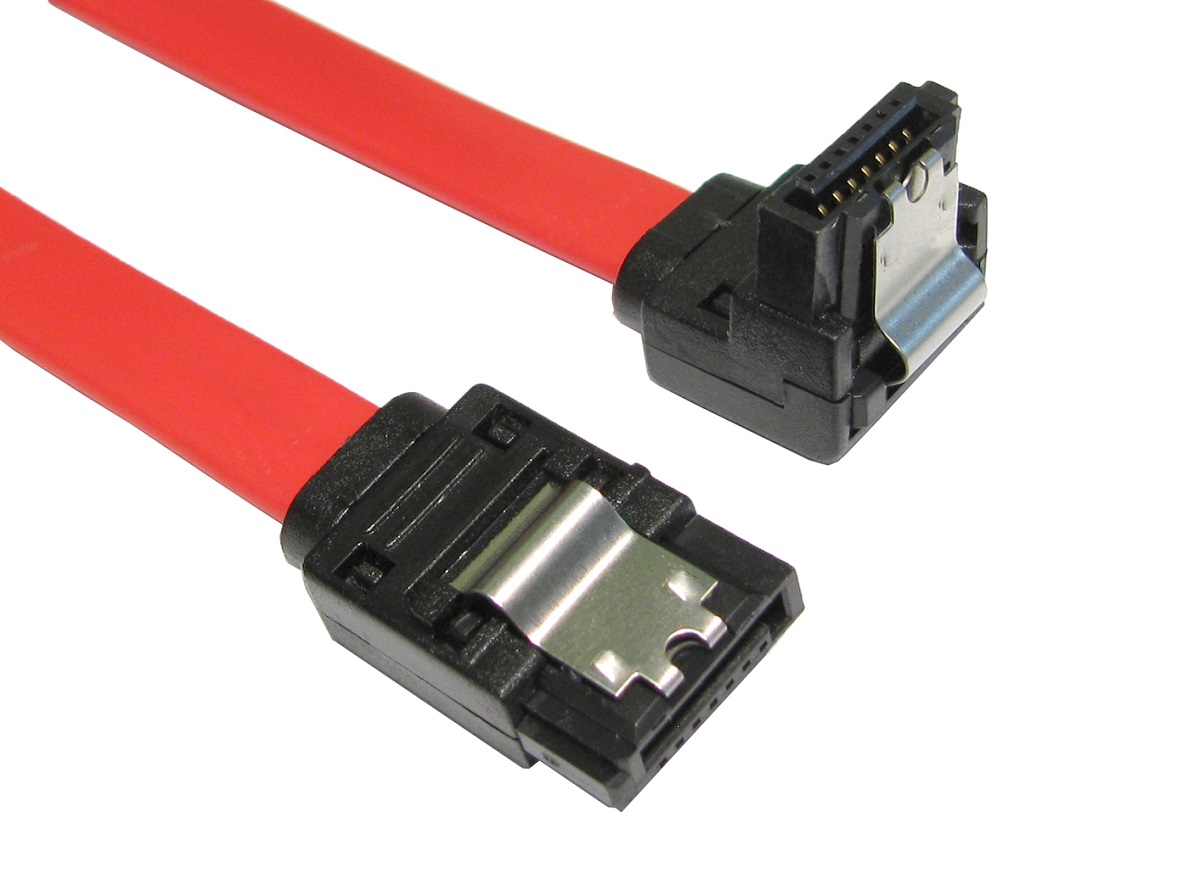
One important aspect of motherboard compatibility to consider is the interface that the motherboard supports. The most common interface for traditional SATA SSDs is the SATA (Serial ATA) interface. SATA SSDs use a data cable and a power cable to connect to the motherboard. The SATA interface is backward compatible, meaning you can connect newer SATA III SSDs to older SATA II or SATA I motherboard interfaces. However, it’s important to note that the speed of the SSD will be limited by the interface it’s connected to. Therefore, if your motherboard supports SATA III, it’s recommended to use an SSD with the same interface for optimal performance.
Another type of SSD that has gained popularity in recent years is the M.2 SSD. M.2 is a small form factor SSD that connects directly to the motherboard using the M.2 slot. The M.2 slot supports different interfaces, including SATA and PCIe (Peripheral Component Interconnect Express). It’s important to check your motherboard specifications to ensure that it has an M.2 slot and determine the type of interface it supports.
PCIe SSDs are another option to consider, especially if you’re seeking even faster speeds. PCIe SSDs connect to the PCIe slots on the motherboard, which are usually used for expansion cards like graphics cards or sound cards. However, not all motherboards support PCIe SSDs, so it’s essential to verify compatibility before purchasing one.
In addition to the interface, you also need to consider the form factor of the SSD. Common form factors for SSDs include 2.5-inch, which is the same size as traditional laptop HDDs, and the smaller M.2 form factor. It’s important to ensure that your motherboard has the appropriate slots or connectors to accommodate the form factor of the SSD you plan to install.
When it comes to compatibility, it’s always advisable to consult your motherboard’s user manual or the manufacturer’s website for detailed information on supported SSD interfaces, form factors, and specifications. This will help ensure that the SSD you choose is compatible with your motherboard, allowing for a seamless installation.
Now that you have a better understanding of motherboard compatibility, let’s explore the different types of SSDs available on the market in the next section.
Different Types of SSDs
When choosing an SSD for your computer, it’s important to understand the different types available and their respective advantages. Let’s explore the three main types of SSDs: SATA SSDs, M.2 SSDs, and PCIe SSDs.
1. SATA SSDs: SATA (Serial ATA) SSDs are the most common and widely used type of SSD. They connect to the motherboard using SATA cables and provide a significant improvement in speed and performance compared to traditional HDDs. SATA SSDs come in the standard 2.5-inch form factor, making them compatible with most desktops and laptops. They are often an affordable option and offer reliable storage solutions for everyday computing needs. SATA III is the latest and fastest version of the SATA interface, with speeds up to 6 gigabits per second (Gbps).
2. M.2 SSDs: M.2 SSDs are smaller, more compact storage devices that connect directly to the motherboard via an M.2 slot. They use either the SATA or PCIe interface to transfer data, offering faster speeds and higher performance compared to SATA SSDs. M.2 SSDs come in different lengths and key types, denoting the physical and electrical specifications of the drive. They are often found in newer laptops and desktops that prioritize space-saving designs and high-speed storage. M.2 SSDs can offer transfer speeds up to several gigabytes per second, depending on the interface and technology used.
3. PCIe SSDs: PCIe (Peripheral Component Interconnect Express) SSDs are the fastest and most advanced type of SSDs available. They directly connect to the PCIe slots on the motherboard, typically used for expansion cards like graphics cards. PCIe SSDs bypass the traditional SATA interface, resulting in significantly faster transfer speeds and lower latency. They are commonly used in high-performance computing systems, gaming rigs, and media production where speed and responsiveness are critical. PCIe SSDs can achieve transfer speeds of several gigabytes per second or more, depending on the specific model and configuration.
When choosing the right SSD for your needs, consider factors such as price, speed requirements, storage capacity, and compatibility with your motherboard. SATA SSDs are often a cost-effective choice for everyday computing, while M.2 and PCIe SSDs provide higher performance for demanding workloads and gaming applications. It’s essential to ensure that your motherboard supports the interface and form factor of the SSD you plan to purchase.
By understanding the different types of SSDs available, you can make an informed decision based on your specific requirements and budget. Now, let’s proceed to the core of our guide and explore where to plug an SSD into a motherboard in the next section.
Where to Plug an SSD Into a Motherboard
Once you have chosen the right SSD for your needs, it’s time to find the appropriate slot or connector on your motherboard to plug it in. The location may vary depending on the type of SSD and motherboard you have, so let’s explore the different possibilities.
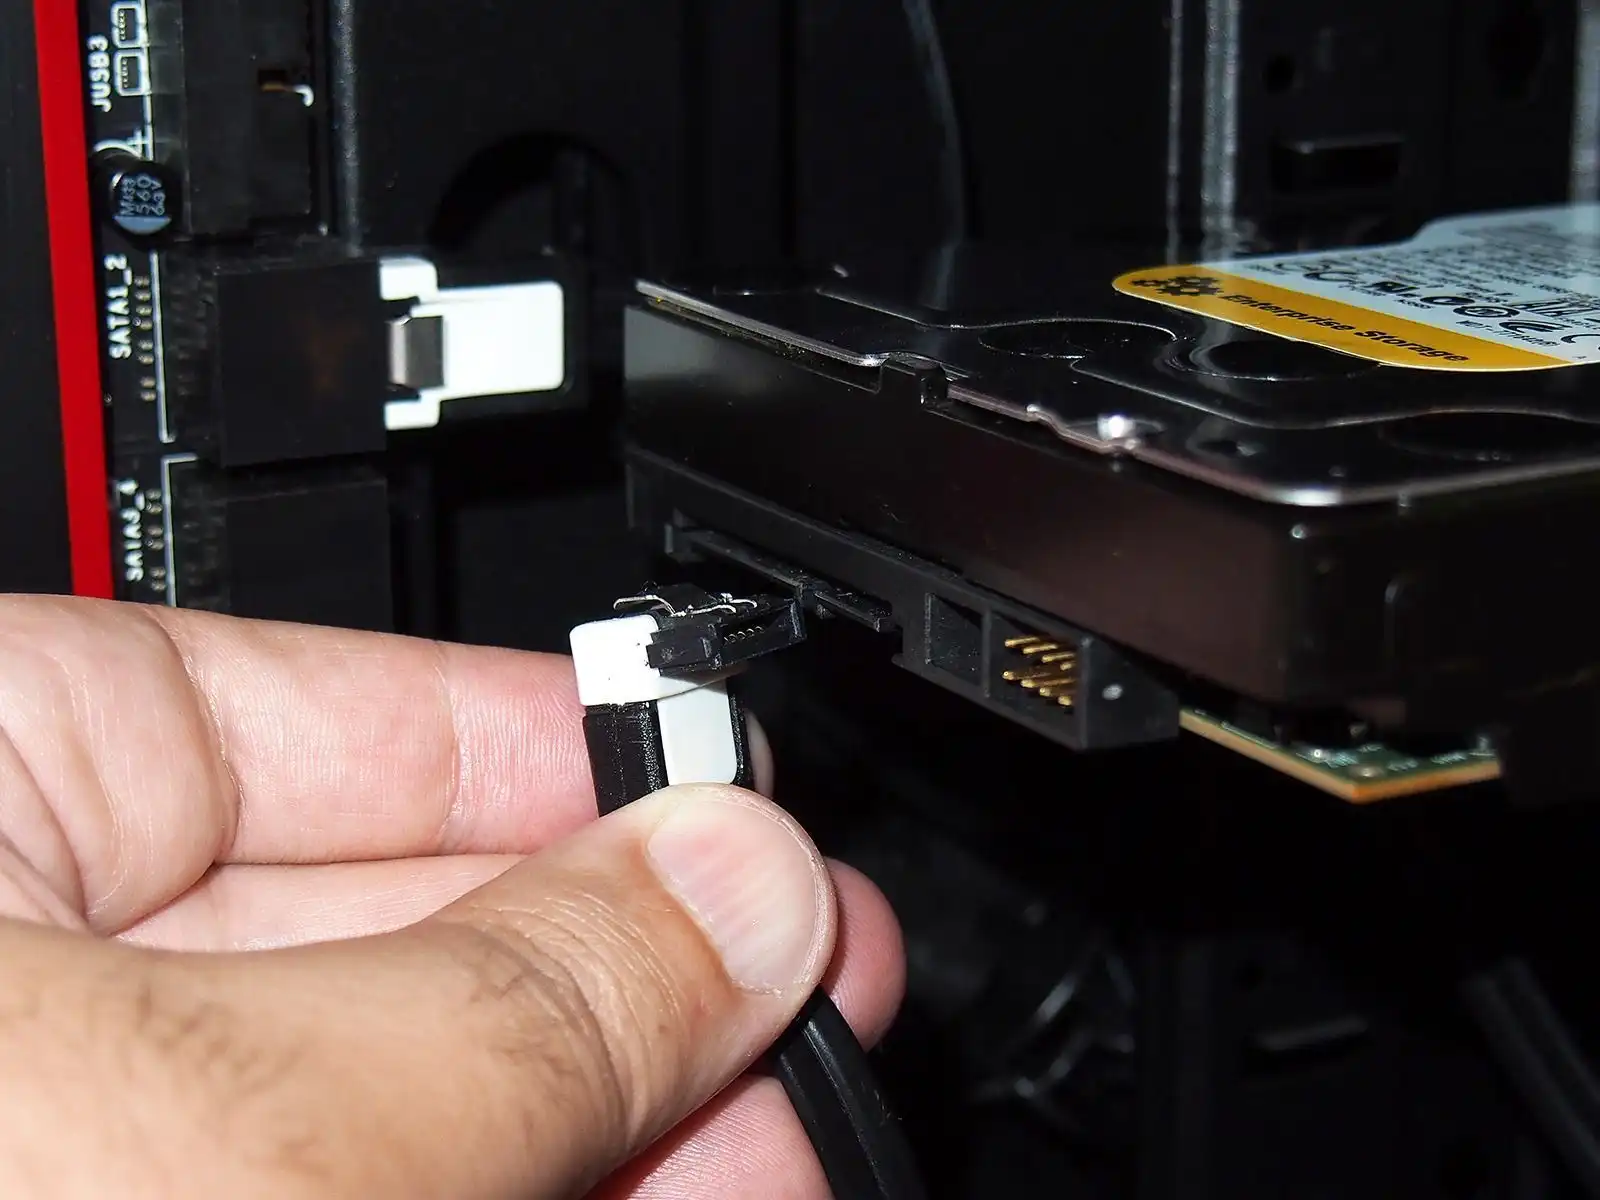
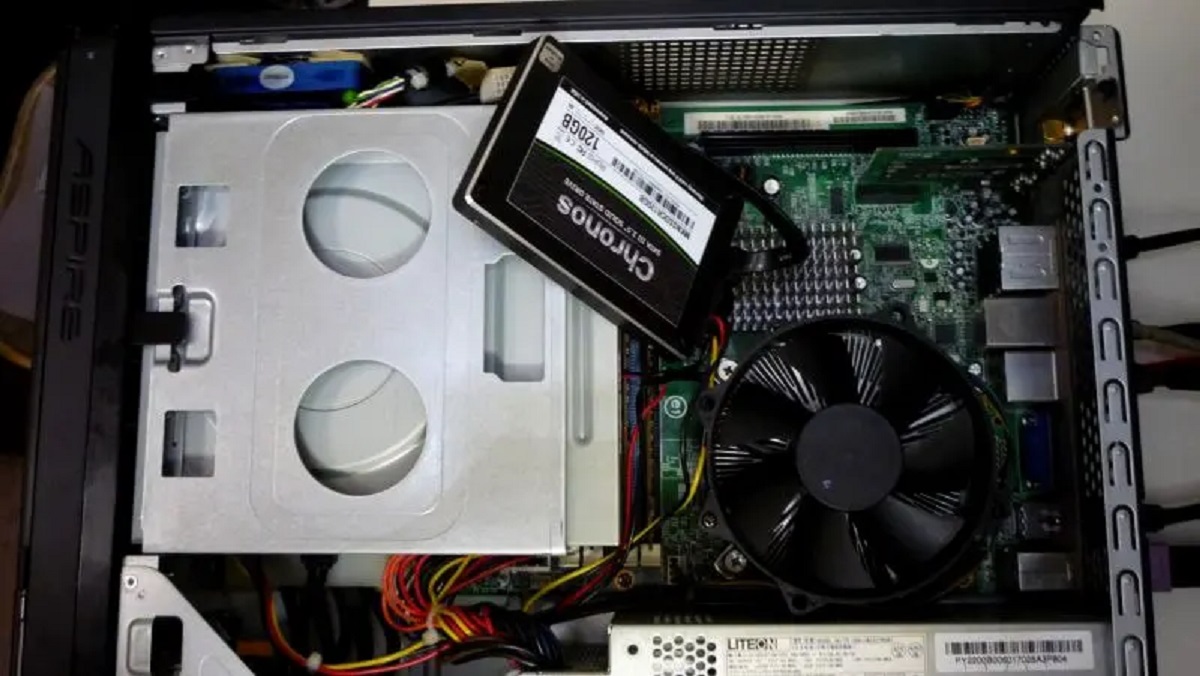
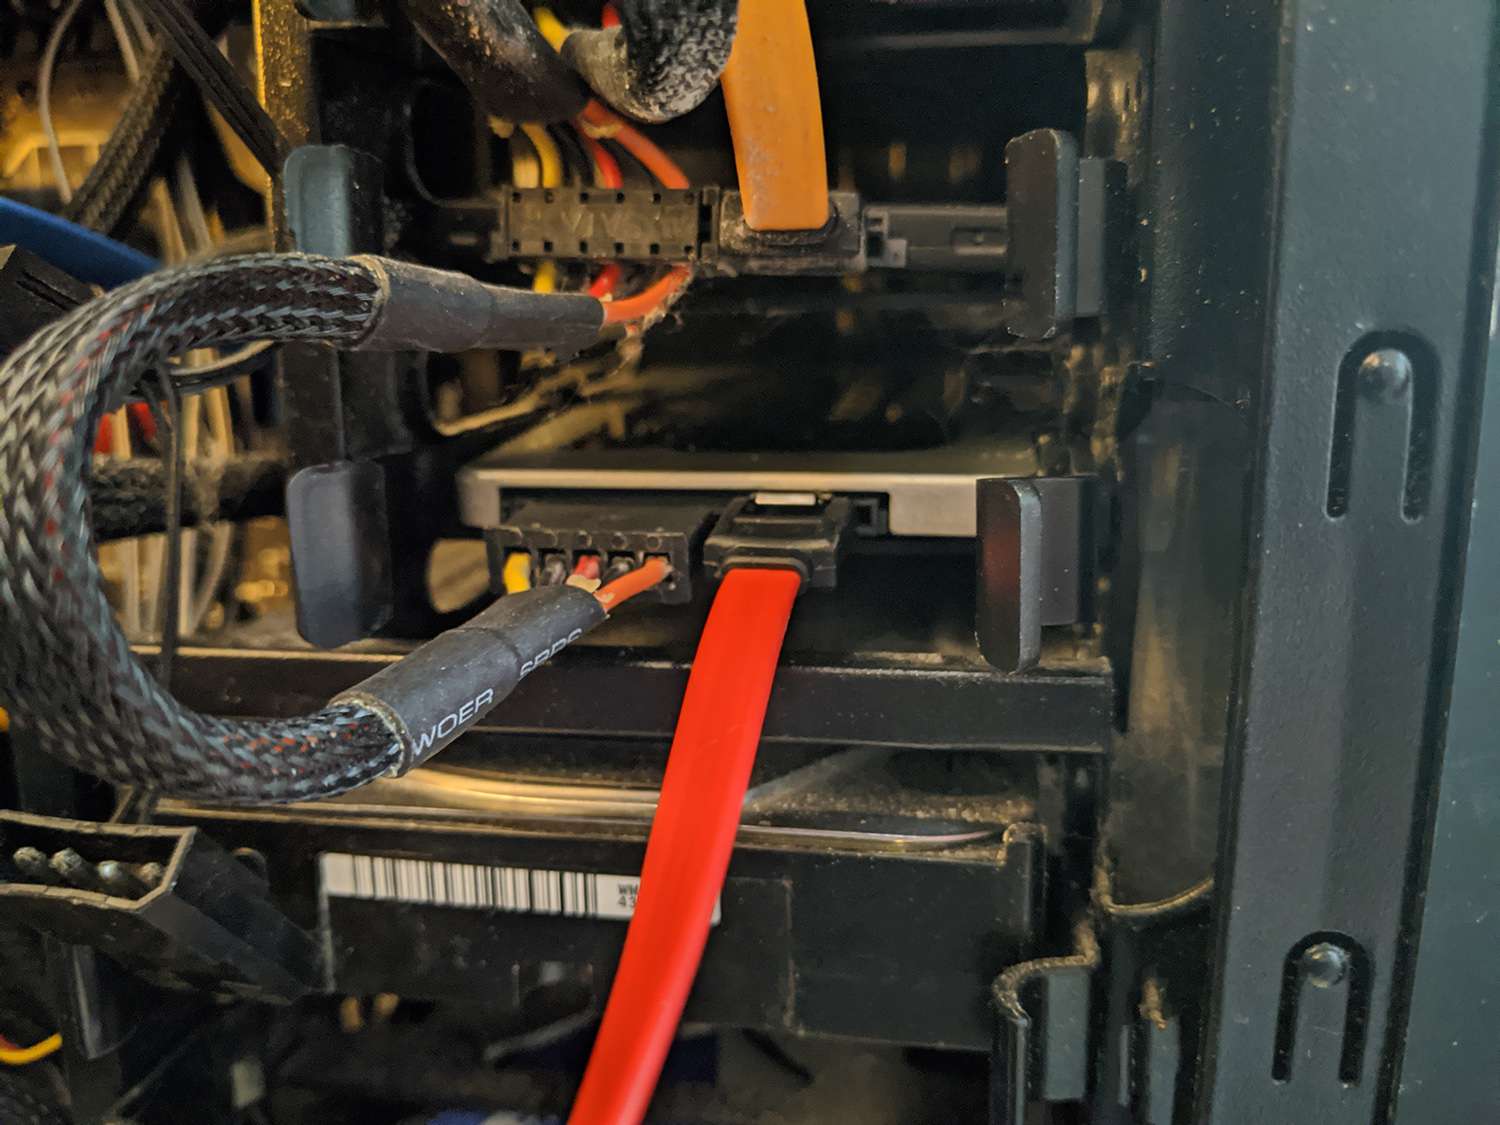
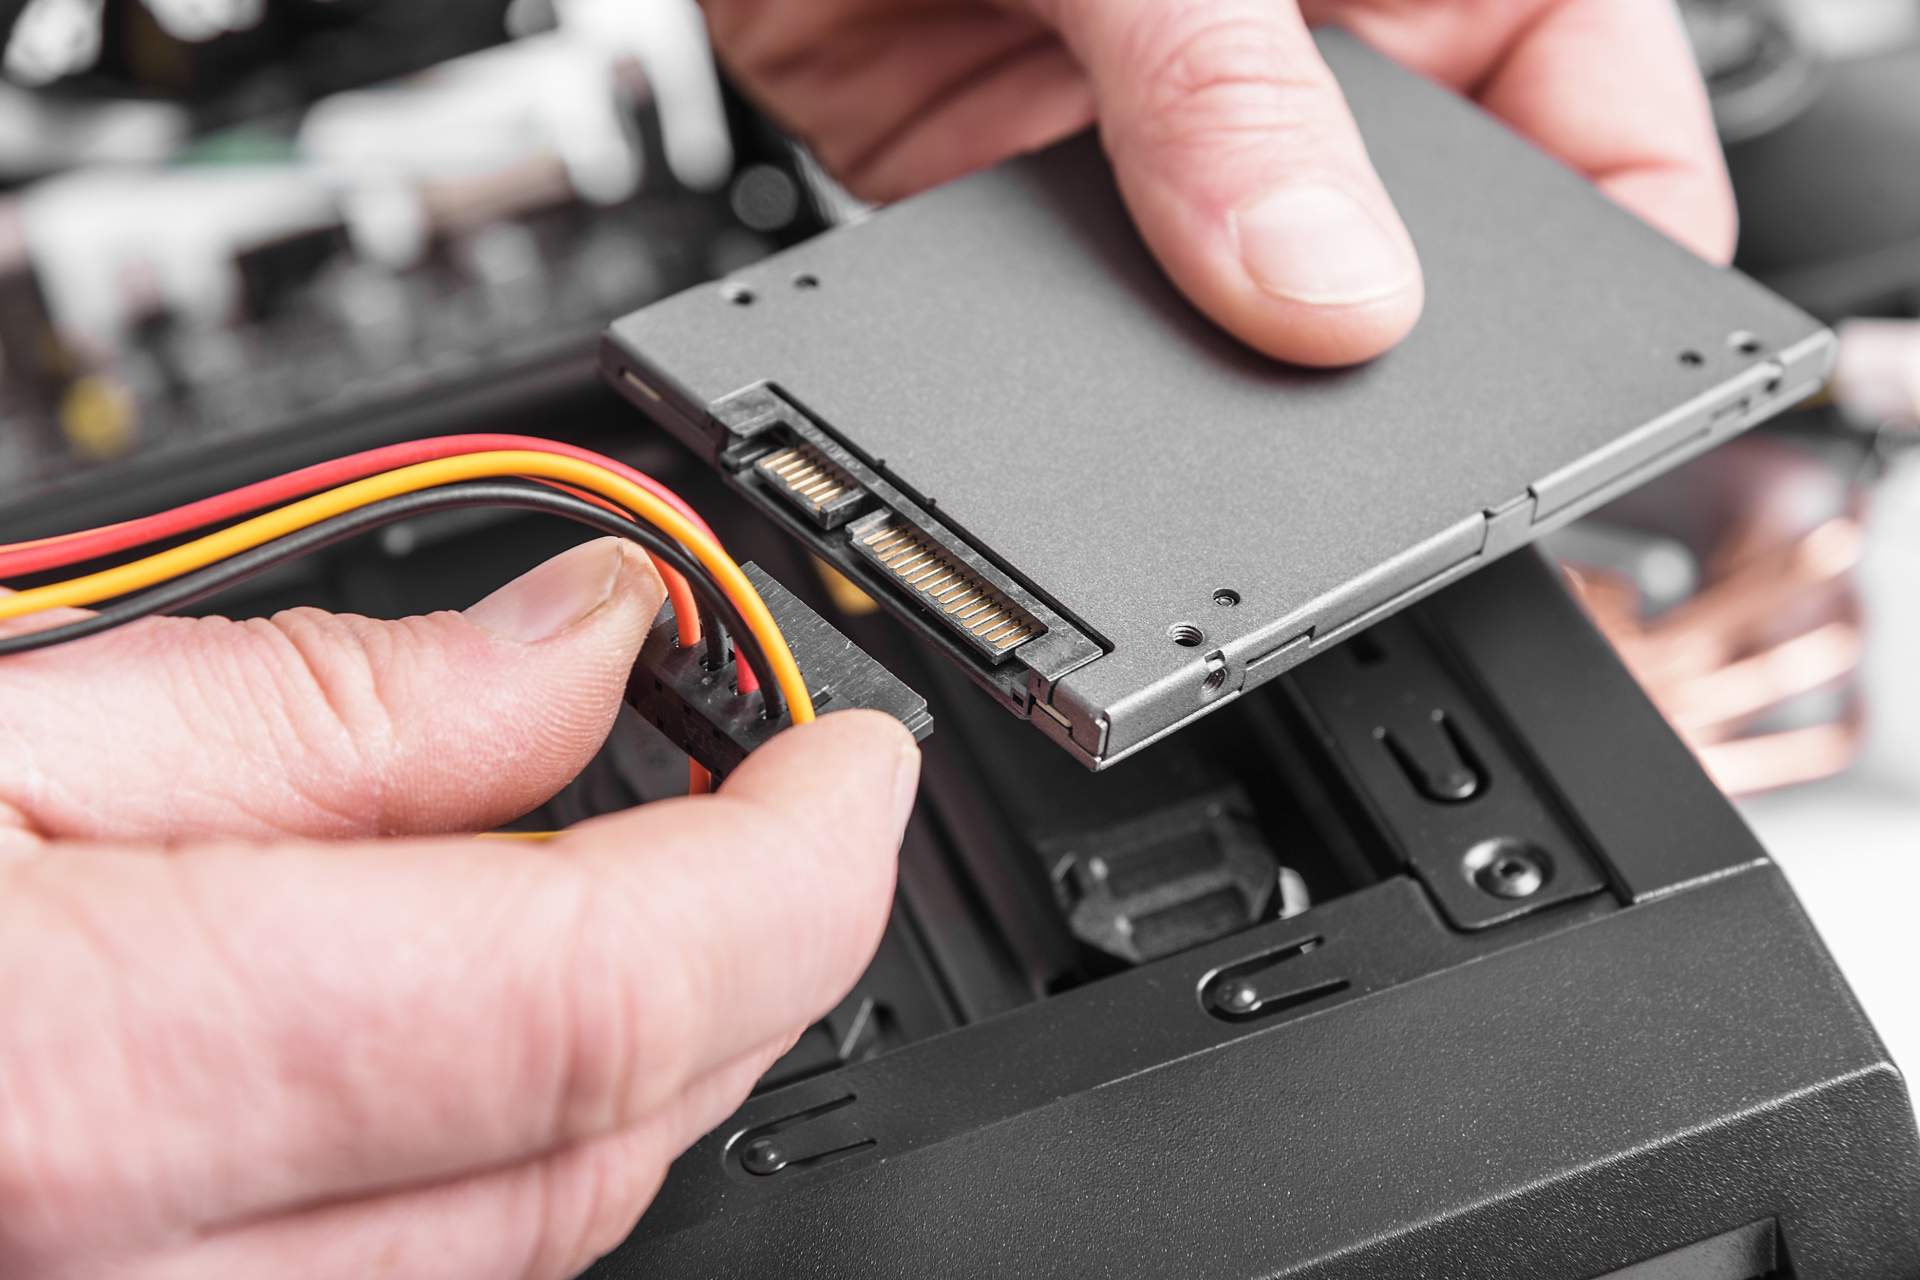
1. SATA SSDs: If you are using a SATA SSD, you will need to locate the SATA connectors on your motherboard. These connectors are often labeled “SATA” and come in the form of small rectangular ports. You will find both SATA data connectors (usually blue) and SATA power connectors (usually black or yellow). Connect the SATA data cable from the SSD to a free SATA data connector on the motherboard, and connect the SATA power cable from the power supply unit to a free SATA power connector on the motherboard. Ensure that the connections are secure but avoid applying excessive force.
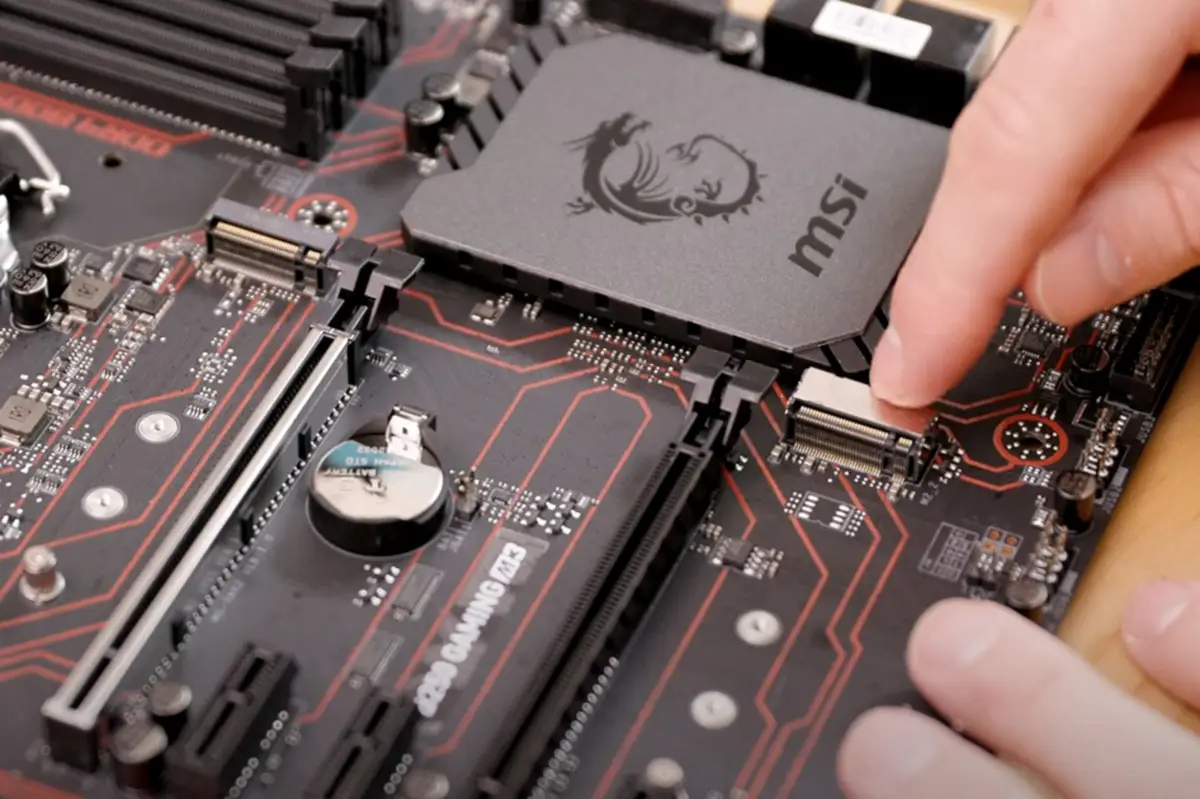
2. M.2 SSDs: For M.2 SSDs, you will need to identify the M.2 slot(s) on your motherboard. The M.2 slot is a small, narrow slot usually located near the center of the motherboard. It may be labeled as “M.2” or have a specific keying designation such as “M Key” or “B+M Key.” Make sure to consult your motherboard’s manual or manufacturer’s website to confirm the specific M.2 slot compatibility and key type required for your SSD. Insert the M.2 SSD into the slot at a slight angle, aligning the notches on the SSD with the corresponding key slots on the slot. Gently push the SSD down until it is fully seated and the screw hole on the SSD aligns with the standoff on the motherboard. Secure the SSD in place using the provided screw.
3. PCIe SSDs: If you have a PCIe SSD, you will need to locate the PCIe slots on your motherboard. These slots are longer than the other connectors and are typically used for graphics cards and other expansion cards. Identify an available PCIe slot that supports the generation and size of your PCIe SSD (e.g., PCIe 3.0 x4 or PCIe 4.0 x16). Insert the PCIe SSD into the appropriate slot, aligning the connector on the SSD with the slot on the motherboard. Apply gentle, even pressure to insert the SSD until it is fully seated. Depending on the SSD model, you may also need to secure it using screws or a retention clip.
Remember to consult your motherboard’s user manual or manufacturer’s website for detailed instructions specific to your motherboard model. It’s essential to follow proper installation procedures to ensure a secure and reliable connection between the SSD and the motherboard.
Now that you know where to plug an SSD into a motherboard, the next section will guide you through the step-by-step process of installing an SSD into a motherboard.
Step-by-Step Guide: Installing an SSD Into a Motherboard
Now that you understand where to plug an SSD into a motherboard, let’s walk through the step-by-step process of installing an SSD into your motherboard. Following these instructions will ensure a successful and secure installation.
1. Power off your computer: Before working inside your computer, make sure to shut it down completely and unplug the power cord from the wall outlet.
2. Open the computer case: Remove the screws or latches securing the side panel of your computer case. Slide the panel off to expose the internal components.
3. Locate the appropriate slot or connector: Identify the specific slot or connector where your SSD should be plugged in. Refer to the previous section for guidance based on your SSD type (SATA, M.2, or PCIe) and your motherboard’s specifications.
4. Connect SATA SSD: If using a SATA SSD, connect one end of the SATA data cable to an available SATA data connector on the motherboard. Connect the other end to the SSD. Then, connect the SATA power cable from the power supply unit to an available SATA power connector on the motherboard. Connect the other end to your SSD. Ensure the connections are secure but avoid applying excessive force.
5. Insert M.2 SSD: If using an M.2 SSD, locate the M.2 slot on the motherboard and remove any protective covers if necessary. Insert the M.2 SSD into the slot at a slight angle, aligning the notches on the SSD with the key slots on the slot. Gently push the SSD down until it is fully seated and the screw hole on the SSD aligns with the standoff on the motherboard. Secure the SSD in place using the provided screw.
6. Install PCIe SSD: If using a PCIe SSD, locate an available PCIe slot that supports the generation and size of your SSD. Insert the SSD into the slot, aligning the connector on the SSD with the slot on the motherboard. Apply gentle, even pressure to insert the SSD until it is fully seated. Depending on the SSD model, you may also need to secure it using screws or a retention clip.
7. Secure the case: Once the SSD is securely installed, replace the side panel of your computer case and secure it with the screws or latches. Make sure it is properly aligned and tightened.
8. Power on your computer: Plug the power cord back into the wall outlet and turn on your computer. The BIOS should automatically detect the newly installed SSD. If your SSD does not show up, you may need to enter the BIOS settings and enable the appropriate drive.
Congratulations! You have successfully installed an SSD into your motherboard. Your computer should now benefit from the improved speed and performance provided by the SSD. Remember to format and partition the SSD if necessary, and transfer your operating system and files to enjoy the full benefits of your new storage device.
In the next section, we will address common issues that may arise during the SSD installation process and provide troubleshooting tips to help you overcome them.
Troubleshooting Common Issues
During the installation process of an SSD into a motherboard, you may encounter a few common issues. Don’t panic – we’ve got you covered! Here are some troubleshooting tips to help you resolve these issues and ensure a successful installation.
1. SSD not detected: If your SSD is not being recognized by the system, double-check that it is securely connected to the motherboard. Ensure that the data and power cables are properly seated and that the connections are tight. If the problem persists, try connecting the SSD to a different SATA port or M.2 slot on the motherboard. Additionally, ensure that the SSD is compatible with your motherboard and that the motherboard firmware is up to date.
2. Incorrect drive partitioning: After installing the SSD, you may need to partition and format the drive before it can be used. To do this, go to the Disk Management utility in Windows or use third-party software. Locate the SSD drive, right-click on it, and select “New Simple Volume” or a similar option to create a partition and format it with the desired file system (e.g., NTFS). Follow the prompts to complete the process.
3. Incompatible interface or form factor: If the SSD you purchased is not compatible with your motherboard’s interface or form factor, you may need to consider returning or exchanging it for a compatible option. Double-check your motherboard’s specifications and consult the SSD manufacturer to ensure compatibility before making a purchase.
4. BIOS/UEFI settings: In some cases, the SSD may not show up in the system due to BIOS or UEFI settings. Access the BIOS or UEFI settings by pressing the appropriate key (usually Del, F2, or F12) during system boot-up. Verify that the SATA or PCIe controller mode is set to the appropriate option for your SSD (e.g., AHCI for SATA SSDs). Save the changes and restart the system.
5. Driver issues: If you’re using an M.2 or PCIe SSD, make sure you have the necessary drivers installed. Visit the motherboard manufacturer’s website and download the latest drivers for your specific motherboard model. Install the drivers and reboot the system to ensure that the SSD is recognized correctly.
6. Hardware conflicts: Sometimes, other hardware components may conflict with the SSD. Try removing any unnecessary devices or expansion cards and disconnecting any external drives temporarily. This can help isolate the issue and determine if there is a conflict with another hardware component.
If you experience any other issues or difficulties during the SSD installation process, consult your motherboard’s user manual or manufacturer’s support documentation. You can also seek assistance from online forums and communities specializing in SSDs and motherboard troubleshooting.
With these troubleshooting tips, you should be able to overcome common issues that may arise during the SSD installation process. Now that you’re equipped with the knowledge to install and troubleshoot SSDs, you can enjoy the improved performance and speed they offer to your computer system.
Conclusion
In this comprehensive guide, we have explored the process of installing an SSD into a motherboard. We started by discussing the benefits of using an SSD, highlighting their faster performance, improved system responsiveness, and durability compared to traditional HDDs. We then delved into the importance of understanding motherboard compatibility, focusing on the different types of SSDs and the corresponding slots or connectors on the motherboard.
We provided step-by-step instructions on where to plug an SSD into a motherboard, covering the installation process for SATA SSDs, M.2 SSDs, and PCIe SSDs. Additionally, we offered troubleshooting tips for common issues that may arise during the installation process, such as SSD detection problems, incorrect drive partitioning, and compatibility issues.
By following this guide, you are now equipped with the knowledge and confidence to successfully install an SSD into your motherboard. Whether you are upgrading your existing system or building a new computer, an SSD can provide a significant performance boost and improve your overall computing experience.
Remember to consult the user manual or manufacturer’s documentation specific to your motherboard and SSD for detailed instructions and compatibility information. Additionally, always ensure that you handle computer hardware with care and follow proper safety precautions.
We hope this guide has been helpful in your journey to enhance your computer’s storage capabilities. Enjoy the speed, responsiveness, and reliability of your new SSD, and get ready to experience a whole new level of computing efficiency.
If you have any further questions or need additional support, don’t hesitate to reach out to the respective manufacturer or consult online communities specializing in SSD and motherboard installations. Happy computing!