Introduction
A projector is a device that has revolutionized the way we view and share visual content. Whether you’re giving a business presentation, hosting a movie night at home, or teaching a class, a projector can enhance the experience by projecting images or videos onto a larger screen or surface. With advancements in technology, projectors have become more compact, affordable, and versatile, making them a popular choice for both professional and personal use.
By using the principles of optics, projectors can take an electronic signal and transform it into a projected image. This allows for a larger, more immersive display compared to traditional flat-screen TVs or monitors. A projector works by projecting light through a lens onto a surface, creating an enlarged version of the content being displayed.
There are various components that make up a projector, including a light source, optics system, image processor, and various connectivity ports. These components work together to ensure accurate and vibrant image reproduction on the screen. Projectors also come in different types, each with its own unique features and advantages.
In this article, we will explore the different types of projectors, explain key terms such as projector resolutions and lumens, and provide tips on choosing, setting up, and maintaining a projector. Whether you’re a business professional, educator, or movie enthusiast, understanding the fundamentals of projectors will help you make informed decisions when it comes to purchasing and utilizing this powerful technology.
Definition of a Projector
A projector is an electronic device that takes an input signal, such as a video or image, and projects it onto a larger screen or surface. It uses a combination of optics, light sources, and image processing technology to display content in a visually enhanced and enlarged format.
The main purpose of a projector is to create a large-scale image or video display that can be easily viewed by a group of people. This makes it ideal for various applications such as business presentations, educational lectures, movie screenings, and even gaming. Unlike traditional displays like televisions or monitors, projectors provide a more immersive and engaging visual experience.
Projectors can project images onto a wide range of surfaces, including walls, screens, and even curved surfaces. They are characterized by their ability to create larger display sizes compared to conventional displays. This makes projectors suitable for situations where a bigger image is required, such as in conference rooms, classrooms, or home theaters.
Projectors can be classified based on the technology they employ, such as LCD (Liquid Crystal Display), DLP (Digital Light Processing), LED (Light Emitting Diode), and laser. Each technology has its own advantages and disadvantages, and understanding these differences can help in selecting the right projector for specific needs.
Furthermore, projectors are available in various sizes and configurations, ranging from portable models that can easily fit in a bag to larger, more powerful units suitable for permanent installations. This versatility allows users to choose a projector that best suits their requirements in terms of portability, image quality, brightness, and connectivity options.
In summary, a projector is a device that projects images or videos onto a larger surface, providing a visually immersive and engaging experience. It utilizes technology and components to transform an input signal into a large-scale, high-quality display. Understanding the capabilities and features of different types of projectors can help users make informed decisions when it comes to choosing the right device for their specific needs.
Components of a Projector
A projector consists of several key components that work together to create a projected image. Understanding the different parts of a projector can help users make informed decisions when selecting and setting up a projector for their specific needs.
1. Light Source: The light source is a crucial component of a projector as it provides the illumination needed to project the image or video. The most common types of light sources used in projectors include lamps, LEDs, and lasers. Each type has its own advantages in terms of brightness, color accuracy, and longevity.
2. Optics System: The optics system determines how the light is directed and focused to create a clear and sharp image. It consists of lenses, mirrors, and other optical components that manipulate the light emitted from the light source. The quality of the optics system greatly influences the image quality and sharpness of the projected content.
3. Image Processor: The image processor is responsible for converting the input signal into a format that can be displayed on the projection screen. It handles tasks such as color correction, scaling, and image enhancement to ensure accurate and vibrant color reproduction. Advanced image processors can also handle 3D content and other specialized features.
4. Connectivity Ports: Projectors are equipped with various connectivity ports to allow for different types of input sources. Common ports include HDMI, VGA, USB, and audio jacks. These ports enable users to connect their devices, such as laptops, Blu-ray players, or gaming consoles, to the projector and project the content onto the screen.
5. Control Panel: The control panel is usually located on the projector itself and provides easy access to essential functions such as power on/off, input selection, menu navigation, and image adjustment. It allows users to configure and customize the projector settings according to their preferences.
6. Fan and Cooling System: As projectors generate heat during operation, they are equipped with a fan and cooling system to prevent overheating. The fan helps dissipate the heat, ensuring the projector stays within safe operating temperatures. It’s important to keep the projector’s vents clean and unobstructed for optimal cooling efficiency.
7. Keystone Correction: Keystone correction is a feature found in most projectors that helps correct distortion caused by the projector’s position relative to the projection surface. It allows users to adjust the shape of the image, compensating for trapezoidal distortion and ensuring a properly proportioned display.
By understanding the various components of a projector, users can make informed decisions when purchasing a projector and optimize its performance through proper setup and configuration. Whether using it for presentations, entertainment, or educational purposes, a well-selected and well-utilized projector can deliver high-quality and immersive visual experiences.
Types of Projectors
Projectors come in different types, each employing different technologies and catering to specific needs and applications. Understanding the different types of projectors can help users choose the one that best suits their requirements and desired features.
1. LCD Projectors: LCD (Liquid Crystal Display) projectors use liquid crystal panels to produce images. They are known for their accurate color reproduction and sharp image quality. LCD projectors are widely used in classrooms, boardrooms, and home theaters due to their reliability, affordability, and versatility.
2. DLP Projectors: DLP (Digital Light Processing) projectors use tiny mirrors to reflect light and create an image. They offer high contrast ratios and are capable of producing deep blacks and vibrant colors. DLP projectors are popular for home theaters and 3D applications.
3. LED Projectors: LED (Light Emitting Diode) projectors utilize LED lights as the light source. They offer advantages such as energy efficiency, long lamp life, and quick start-up times. LED projectors are often compact and lightweight, making them suitable for portable use and presentations on the go.
4. Laser Projectors: Laser projectors use laser light sources to illuminate the projected image. They deliver exceptional brightness, wide color gamut, and long-lasting performance. Laser projectors are commonly used in large-scale installations, such as museums, auditoriums, and outdoor events.
5. Portable Projectors: Portable projectors are compact and lightweight, making them easy to carry and set up in different locations. They are designed for on-the-go use and offer flexibility for professionals who frequently travel or need to present in different venues.
6. Home Theater Projectors: Home theater projectors are optimized for delivering immersive cinematic experiences. They typically offer higher resolutions, enhanced color accuracy, and support for features like HDR (High Dynamic Range) and wider color gamuts. Home theater projectors are ideal for creating a theater-like environment in the comfort of your own home.
7. Mini Projectors: Mini projectors are extremely compact and lightweight projectors designed for easy portability. Although they may sacrifice some features and brightness compared to larger projectors, they are perfect for casual use, impromptu movie nights, or displaying content in small spaces.
Each type of projector has its own advantages and disadvantages, and the choice depends on factors such as the intended usage, desired features, budget, and environment where the projector will be used. By understanding the different types, users can make an informed decision and find a projector that meets their specific needs.
LCD Projectors
LCD (Liquid Crystal Display) projectors are a popular choice for various applications due to their accurate color reproduction, sharp image quality, and versatility. They utilize liquid crystal panels to create images and offer several advantages that make them suitable for classrooms, boardrooms, and home theater setups.
One of the key advantages of LCD projectors is their ability to accurately reproduce colors. The liquid crystal panels act as filters, regulating the amount of light that passes through each pixel. This precise control over the light results in vibrant and realistic color reproduction, making LCD projectors ideal for applications where accurate color representation is crucial, such as graphic design or video editing.
In terms of image quality, LCD projectors are known for producing sharp and detailed images. The combination of high-resolution panels and the absence of the “screen door effect” – a visible grid pattern caused by the pixel structure in some other projector technologies – allows LCD projectors to provide clear and smooth visuals. This makes them suitable for displaying detailed presentations, educational content, and even movies with intricate visual elements.
Furthermore, LCD projectors tend to have higher brightness levels compared to other projector technologies. This makes them well-suited for use in well-lit environments or situations where a larger screen size is required. The brightness capability of LCD projectors ensures that the projected content remains visible and impactful, even in brightly lit rooms or during daytime presentations.
Another advantage of LCD projectors is their reliability. These projectors have a longer lifespan compared to some other types, such as DLP projectors. LCD panels do not suffer from the “color wheel effect” that can cause image distortion and may require periodic maintenance. This reliability factor makes LCD projectors a preferred choice, particularly in professional settings where consistent performance and minimal downtime are essential.
LCD projectors also offer a wide range of connectivity options, allowing users to connect different types of devices, including laptops, Blu-ray players, and gaming consoles. This versatility ensures compatibility with various input sources and makes it easy to switch between different content types without hassle.
In summary, LCD projectors provide accurate color reproduction, sharp image quality, high brightness levels, and reliable performance. They are versatile, making them suitable for a range of applications, from classrooms and boardrooms to home theater setups. The wide range of connectivity options further enhances their usability. When choosing a projector, considering the specific requirements and budget constraints can help determine whether an LCD projector is the right choice for your needs.
DLP Projectors
DLP (Digital Light Processing) projectors utilize a digital micromirror device (DMD) to create images. They offer several advantages, including high contrast ratios, vibrant color reproduction, and suitability for 3D applications, making them a popular choice for home theaters, professional presentations, and gaming setups.
One of the key advantages of DLP projectors is their ability to produce high contrast ratios. DLP technology uses tiny mirrors on a DMD to reflect light, creating a sharp image with deep blacks and bright whites. This results in excellent detail and dynamic range in the projected image, enhancing the visual experience, especially in darkened environments.
DLP projectors are well-regarded for their vibrant color reproduction. The fast response time of the DMD enables DLP projectors to project smooth and vivid colors, enhancing the overall visual quality. This makes DLP projectors particularly suited for applications that require accurate and vibrant color rendering, such as graphic design, photography, and video editing.
Another notable feature of DLP projectors is their compatibility with 3D content. DLP technology allows for efficient and high-quality 3D projection, making these projectors popular among movie enthusiasts and gamers. With the appropriate 3D glasses and content, DLP projectors can create immersive 3D visuals, bringing movies and games to life.
DLP projectors are known for their reliability and minimal maintenance requirements. Unlike LCD projectors, which use filters that may degrade over time, DLP projectors do not suffer from color degradation or the need for filter replacement. This results in consistent image quality and reduces potential downtime and servicing costs.
One aspect where DLP projectors excel is their ability to create smooth and fluid motion. The fast switching speeds of the micromirrors on the DMD result in crisp and clear motion representation, reducing motion blur or image artifacts. This is particularly advantageous for fast-paced sports, action movies, and gaming, where smooth motion portrayal is crucial for an immersive experience.
Additionally, DLP projectors generally have compact and lightweight designs, making them suitable for portable use. This portability allows users to easily transport the projector and set it up in different locations, whether for business presentations, educational purposes, or entertainment on the go.
In summary, DLP projectors offer high contrast ratios, vibrant color reproduction, compatibility with 3D content, and efficient motion representation. They are reliable and low maintenance, making them ideal for home theaters, professional presentations, and gaming applications. Their compact and lightweight designs further contribute to their versatility and portability. Understanding the features and advantages of DLP projectors can help users make informed decisions when selecting a projector that suits their specific needs and preferences.
LED Projectors
LED (Light Emitting Diode) projectors are known for their energy efficiency, long lamp life, and compact size. They utilize LED lights as the light source, offering several advantages that make them a popular choice for portable and multimedia applications.
One of the key advantages of LED projectors is their energy efficiency. LED lights require less power compared to traditional lamps used in other projector types, resulting in lower energy consumption and reduced operating costs. This energy efficiency also contributes to longer battery life when using portable LED projectors, making them ideal for presentations on the go or outdoor use.
LED projectors boast an impressive lamp life compared to other projector types. LEDs have a much longer lifespan, often ranging from 20,000 to 50,000 hours. This longevity means reduced maintenance and lamp replacement costs, making LED projectors a more cost-effective option in the long run.
LED projectors typically have quick start-up times, allowing users to instantly project their content without waiting for the projector to warm up. This is particularly advantageous in situations where time is limited, such as during impromptu presentations or when setting up for a spontaneous movie night.
LED projectors are usually compact and lightweight, making them highly portable. Their small size and low weight make them easy to carry, whether for business presentations, educational purposes, or entertainment on the go. Additionally, LED projectors tend to have a sleek and modern design, adding a touch of style to any setup.
While LED projectors provide numerous benefits, they do have some limitations. Compared to other projector types, LED projectors may have slightly lower brightness levels. This may restrict their use in well-lit environments or for large-scale projections. However, advancements in LED technology have led to brighter LED projectors, making them more versatile in various lighting conditions.
Furthermore, LED projectors may have limitations in terms of color reproduction compared to technologies like LCD or DLP. However, manufacturers are continually improving color accuracy and saturation in LED projectors, ensuring more vibrant and realistic image quality with each new model.
In summary, LED projectors offer energy efficiency, long lamp life, quick start-up times, and portability. They are an excellent choice for situations where portability and convenience are important factors. LED projectors are particularly popular for business presentations, educational settings, and casual entertainment purposes. Understanding the advantages and considerations of LED projectors can help users make informed decisions when selecting a projector that aligns with their specific needs and requirements.
Laser Projectors
Laser projectors are an advanced type of projector that utilize laser light sources to create images. They offer several advantages, including exceptional brightness, wide color gamut, long-lasting performance, and versatility, making them suitable for various applications and installations.
One of the key advantages of laser projectors is their impressive brightness capabilities. Laser light sources can produce significantly higher brightness levels compared to traditional lamp-based projectors. This makes laser projectors ideal for large venues, outdoor projections, or environments with high ambient light, ensuring that the projected image remains vibrant and visible.
Laser projectors also offer a wider color gamut compared to other projector types. The laser light sources provide a broader range of colors, resulting in more accurate and vibrant color reproduction. This is particularly beneficial for applications where color accuracy is crucial, such as digital signage, art installations, and immersive displays.
Another significant advantage of laser projectors is their long-lasting performance. Laser light sources have an extensive operational life, often lasting tens of thousands of hours. This significantly reduces the need for frequent lamp replacements, maintenance, and associated costs. The extended lifespan of laser projectors makes them highly reliable, ensuring consistent and high-quality performance over time.
Laser projectors offer flexibility and versatility in terms of installation options. They are commonly available in both single-chip and three-chip configurations. Single-chip laser projectors use a single DMD (Digital Micromirror Device) to create the image, while three-chip laser projectors use separate DMDs for the red, green, and blue color channels. This versatility allows for customizable setups based on specific needs and desired image quality.
Furthermore, laser projectors typically offer advanced features such as motorized lens adjustments, lens shift, and geometric correction. These features ensure precise image placement, alignment, and distortion correction, allowing for easy projection onto curved surfaces or at unconventional angles. Laser projectors are well-suited for applications where projection onto non-standard surfaces or advanced image adjustments are required.
It is worth noting that laser projectors may have a higher initial cost compared to other projector types. However, the long lifespan and low maintenance requirements compensate for the initial investment in the long run. Additionally, advancements in technology and increased availability of laser projectors have contributed to a wider range of price points, making them more accessible for various applications.
In summary, laser projectors offer exceptional brightness, wide color gamut, long-lasting performance, and installation flexibility. They are suitable for a wide range of applications, including large venues, outdoor projections, digital signage, and immersive displays. Understanding the advantages of laser projectors can help users make informed decisions when selecting a projector that aligns with their specific needs and desired features.
Portable Projectors
Portable projectors are compact and lightweight devices that offer flexibility and convenience for users who need to project content in different locations. These projectors are designed with portability in mind, allowing for easy transportation and setup in various environments.
One of the key advantages of portable projectors is their compact size and lightweight design. They are typically smaller and lighter than traditional fixed projectors, making them easy to carry in a bag or backpack. This portability allows users to take the projector with them for business presentations, classroom lectures, outdoor movie nights, and other on-the-go applications.
Portable projectors often come with built-in rechargeable batteries or can be powered by USB, eliminating the need for a direct power source. This feature adds to their convenience, allowing users to project content even in locations where power outlets are inaccessible or limited. The battery life of portable projectors can vary, with some models capable of projecting for several hours on a single charge.
Despite their small size, portable projectors can produce impressive image quality. Many models offer high-resolution capabilities, allowing for detailed and crisp projections. Additionally, advancements in LED and laser technologies have improved the brightness of portable projectors, ensuring clear visibility even in moderately lit environments.
Furthermore, modern portable projectors come equipped with a variety of connectivity options, including HDMI, USB, and wireless connectivity. This makes it easy to connect smartphones, laptops, gaming consoles, and other devices to the projector, allowing users to project a wide range of content without the need for additional adapters or cables.
Portable projectors offer versatility in terms of projection surfaces and setup options. They can project onto walls, screens, or any flat surface, allowing for creative and adaptable projection setups. Some portable projectors also come with adjustable keystone correction, enabling users to correct distortions and achieve a properly proportioned display, even on uneven surfaces.
It is important to note that while portable projectors offer convenience and portability, they may have some limitations compared to larger fixed projectors. Due to their small size, portable projectors generally have lower brightness levels and may not be suitable for large-scale presentations or rooms with high ambient light. Additionally, their built-in speakers may not provide the same audio quality as dedicated external speakers, especially in larger spaces.
In summary, portable projectors are compact, lightweight, and offer a convenient solution for on-the-go projections. They provide impressive image quality, versatile connectivity options, and the flexibility to project on various surfaces. Portable projectors are ideal for individuals who need to deliver presentations, share media, or create a portable home theater experience. Understanding the benefits and considerations of portable projectors can help users choose the right device that meets their specific needs and enhances their projection experience.
Home Theater Projectors
Home theater projectors are specifically designed to create an immersive cinematic experience in the comfort of your own home. They offer high-resolution capabilities, advanced image processing technologies, and customizable features that make them ideal for movie enthusiasts and those seeking a premium home entertainment setup.
One of the key advantages of home theater projectors is their ability to provide a large-screen viewing experience. With a projector, you can enjoy movies, TV shows, and sports events on a much larger projection surface compared to conventional TVs. This creates a more immersive experience that replicates the feeling of being in a theater.
Home theater projectors often offer high resolutions, such as Full HD (1080p) or even 4K Ultra HD, resulting in sharp and detailed images. This level of detail enhances the visual quality and allows you to fully appreciate the intricate details and textures in movies or TV shows. Some high-end models also support HDR (High Dynamic Range) technology, offering enhanced contrast and a wider color gamut for a more lifelike image.
These projectors are equipped with advanced image processing technologies that optimize the picture quality. They may include features like motion interpolation, which reduces motion blur and enhances the smoothness of fast-paced scenes. Additionally, they may have advanced color calibration options, allowing you to fine-tune the color accuracy and saturation to match your preferences.
Flexibility in installation is also a key advantage of home theater projectors. They typically offer various mounting options, lens shift, and zoom capabilities, allowing you to adjust the projection size and position according to your viewing area. This ensures optimal picture alignment and placement, even in rooms with limited space or unique setups.
Home theater projectors often come with multiple connectivity options, including HDMI, audio ports, USB, and wireless connectivity. This allows you to connect various devices such as Blu-ray players, streaming devices, gaming consoles, and sound systems to create a complete home theater setup.
It’s important to consider ambient light conditions when setting up a home theater projector. To enhance the viewing experience, it’s best to have a dedicated theater room with controlled lighting conditions. This can be achieved through the use of blackout curtains, dimmable lights, or opting for a projector with higher brightness levels if the room cannot be completely darkened.
Overall, home theater projectors provide cinema-quality visuals, advanced image processing, and customization options for a fully immersive home entertainment experience. By understanding the capabilities and considerations of home theater projectors, you can choose a projector that aligns with your preferences and creates a captivating cinematic ambiance in your own home.
Projector Resolutions
Projector resolution refers to the number of pixels that a projector is capable of displaying, determining the level of detail and sharpness in the projected image. The resolution of a projector is an important factor to consider when selecting a projector for your specific needs.
One common resolution for projectors is XGA (1024×768), which provides a 4:3 aspect ratio. XGA projectors are suitable for basic presentations and classroom use where high-definition visuals are not a priority.
Full HD (1920×1080) resolution has become a standard for home theater projectors and is also increasingly popular for professional settings. Full HD projectors deliver crisp and detailed images, allowing you to enjoy movies, TV shows, and gaming content with excellent clarity and sharpness.
For those seeking the highest level of detail, 4K Ultra HD (3840×2160) resolution projectors offer an unparalleled visual experience. With four times the resolution of Full HD, 4K projectors provide incredibly sharp and lifelike images, allowing you to fully appreciate the fine details and textures in content.
It’s important to note that true 4K resolution in projectors is achieved through technologies like native 4K or pixel shifting, which simulate a higher resolution image by rapidly shifting sub-pixels. While pixel shifting can provide impressive image quality, it is not as precise as native 4K, which uses individual physical pixels for each pixel on the screen.
Another resolution commonly found in projectors is WXGA (1280×800), which offers a widescreen aspect ratio of 16:10. WXGA projectors are popular for business presentations and educational purposes, as they can display widescreen content and offer higher resolution compared to XGA projectors.
In addition to these resolutions, there are various other options including SVGA (800×600) and HD (1366×768) projectors, each catering to specific requirements and budgets.
When choosing a projector resolution, it’s essential to consider the content you will be projecting and the screen size. Higher resolutions are ideal for larger screens or when you want to display intricate details with precision. However, it’s worth noting that higher resolution projectors often come with a higher price tag, so it’s important to strike a balance between resolution and budget.
In summary, projector resolution determines the level of detail and sharpness in the displayed image. Whether you need a basic projector for presentations, a Full HD projector for home theater setups, or a 4K projector for the highest level of detail, understanding the different resolutions available can help you choose the right projector that suits your specific needs and enhances your visual experience.
Projector Lumens
Projector lumens refer to the measurement of the brightness output of a projector. It is an important specification to consider when selecting a projector as it determines the visibility and clarity of the projected image, especially in different lighting conditions.
The brightness of a projector is measured in ANSI lumens, a standardized unit of measurement. Projectors with higher lumen ratings produce brighter images, making them suitable for environments with higher levels of ambient light.
For darker environments, such as dedicated home theaters or rooms that can be completely darkened, a projector with lower lumens can still provide an immersive viewing experience. In these settings, projectors with lumen ratings between 1000 to 2000 lumens are generally sufficient.
In moderately lit environments, like living rooms or conference rooms with some ambient light, projectors with lumen ratings between 2000 to 3000 lumens are recommended. These projectors offer good visibility, ensuring that the projected image remains clear and vibrant.
For spaces with higher levels of ambient light, such as classrooms, large conference rooms, or outdoor projections, projectors with higher brightness are required. In these cases, projectors with lumen ratings of 3000 lumens or higher are recommended to ensure adequate visibility and clarity.
It’s important to note that higher lumens do not necessarily mean better image quality. While a brighter projector may provide better visibility in well-lit environments, it’s crucial to consider other factors such as contrast ratio, color accuracy, and resolution to ensure optimal image quality.
Additionally, it’s important to consider the screen size when selecting a projector based on lumens. Larger screens require more brightness to maintain image quality, so it’s advised to choose a projector with higher lumens for larger projection sizes.
It’s worth bearing in mind that projectors with higher lumen ratings may have higher price points compared to lower lumen models. Therefore, it’s essential to strike a balance between required brightness and budget considerations.
In summary, projector lumens indicate the brightness output of a projector and play a significant role in determining the visibility and clarity of the projected image. The appropriate lumen rating depends on the lighting conditions of the environment and the desired screen size. By considering these factors, you can select a projector with an optimal lumen rating that ensures a visually pleasing viewing experience.
Choosing the Right Projector
Choosing the right projector requires careful consideration of various factors to ensure it meets your specific needs and provides an optimal projection experience. Here are some key factors to consider when selecting a projector:
Intended Use: Determine the primary purpose of the projector. Will you be using it for presentations, home theater, gaming, or a combination of these? Identifying the intended use will help narrow down the features and specifications you need.
Resolution: Consider the resolution that suits your content and preferences. Higher resolutions such as Full HD or 4K provide sharper and more detailed images, but they come at a higher cost. Choose a resolution that aligns with your viewing needs and budget.
Lumens: Evaluate the brightness requirements based on the environment and lighting conditions where the projector will be used. Higher lumen ratings are suitable for brighter environments, while lower lumens may suffice in darker spaces like dedicated home theaters.
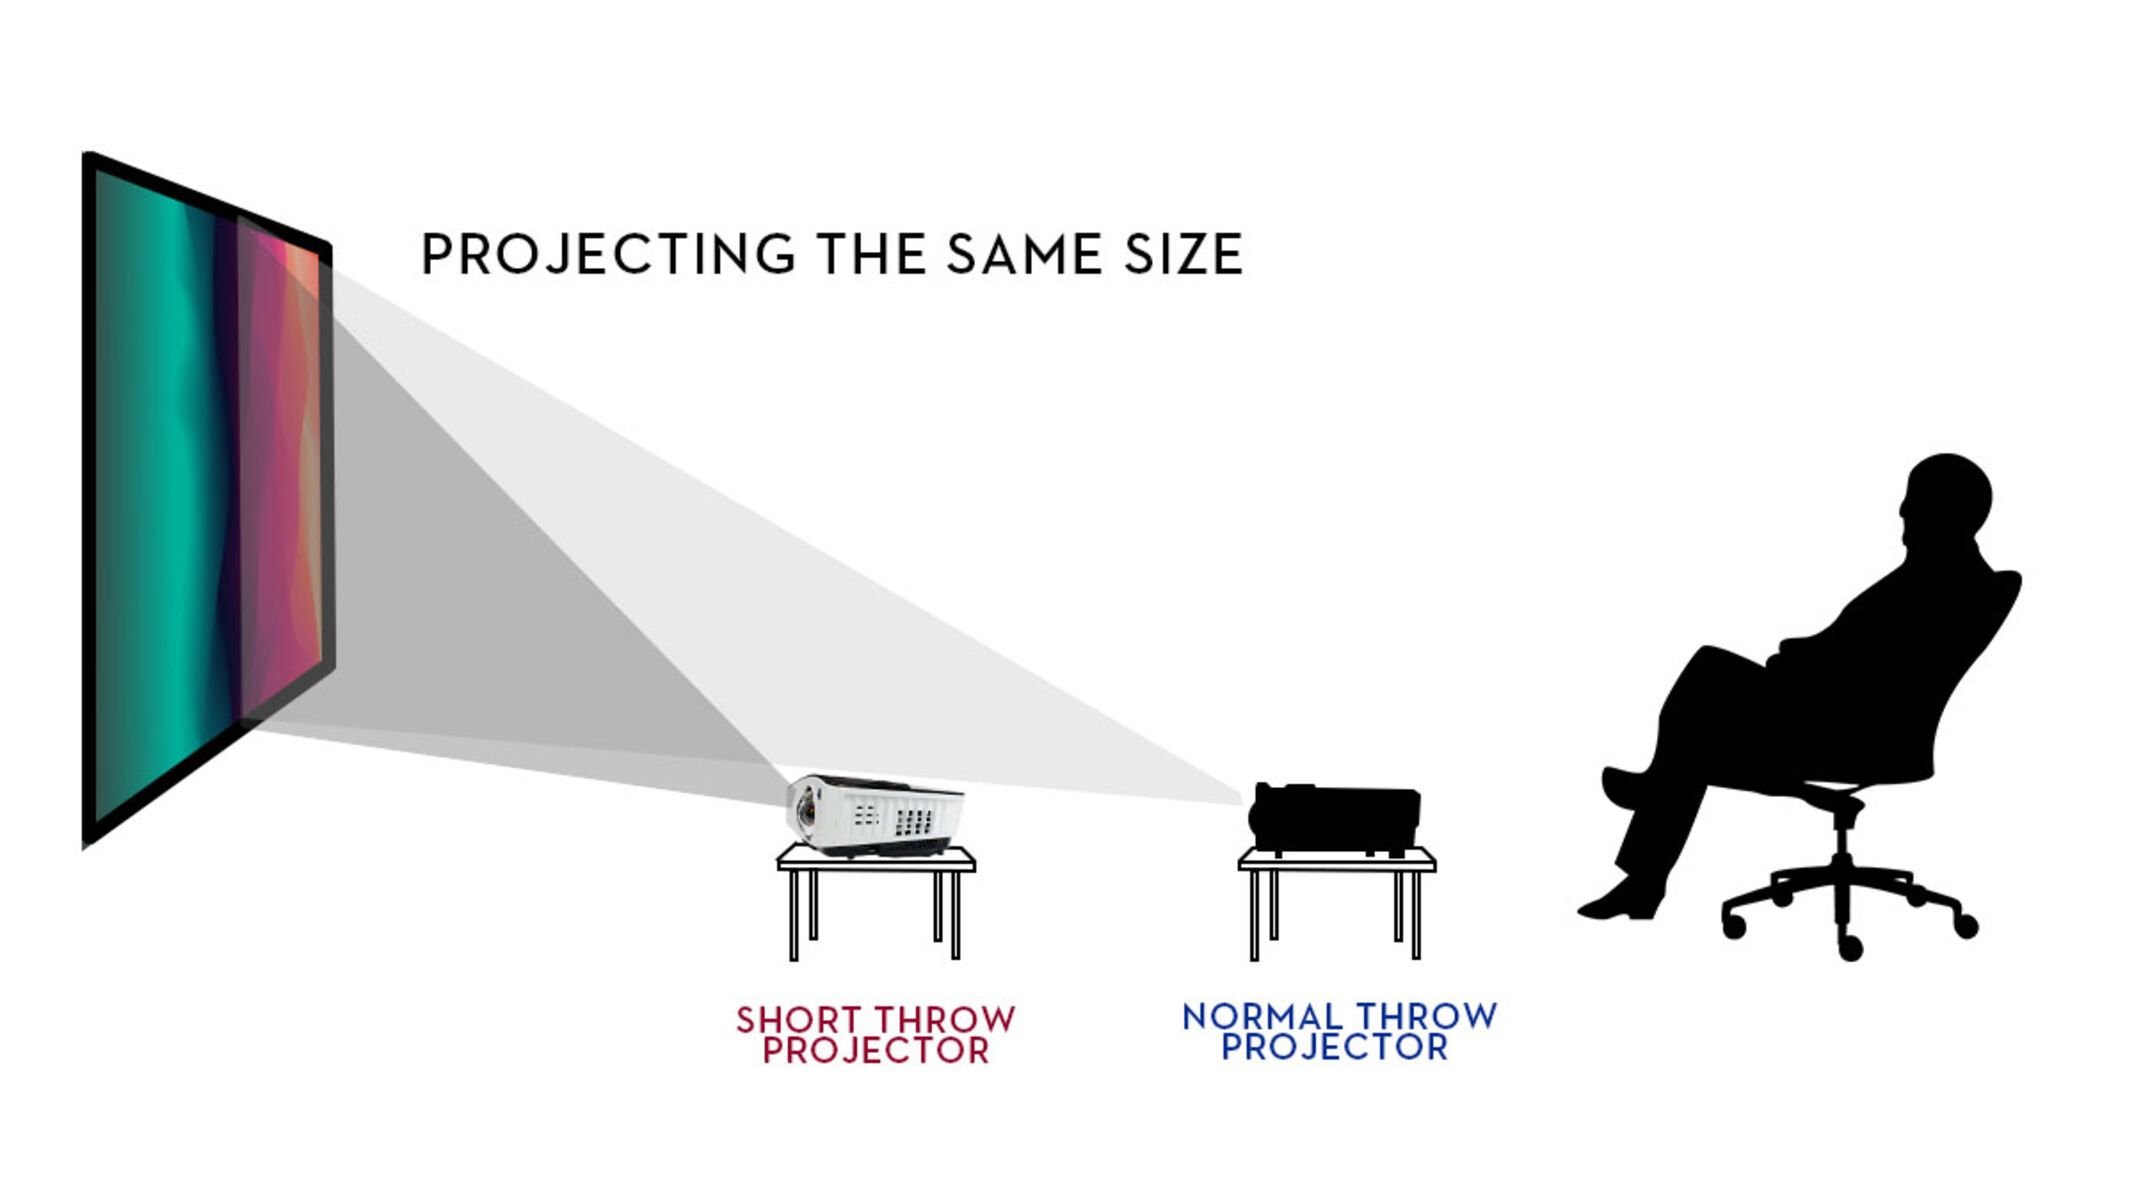
Throw Distance: Determine the distance between the projector and the screen or projection surface. Consider whether you need a short-throw or long-throw projector based on the available space and desired projection size.
Connectivity: Ensure the projector has the necessary connectivity options to connect your preferred devices, such as HDMI, USB, or wireless connectivity. This allows you to easily connect laptops, media players, gaming consoles, or streaming devices to the projector.
Contrast Ratio: Consider the contrast ratio of the projector, as it determines the difference between the darkest and brightest parts of an image. Higher contrast ratios result in more vibrant colors and better image depth, enhancing the overall visual experience.
Image Adjustability: Look for projectors with features like keystone correction, lens shift, and zoom capabilities. These features allow you to adjust the image placement, correct distortions, and achieve the desired projection alignment.
Longevity and Maintenance: Consider the lifespan of the projector’s light source, whether it uses lamps, LEDs, or lasers. Longer-lasting light sources translate to lower maintenance costs and reduced disruptions from replacing lamps or other components.
Budget: Determine a budget based on your preferences and requirements. Set a realistic budget range and focus on finding a projector that offers the best combination of features, performance, and value within your budget.
Keeping these factors in mind while choosing a projector will help you make an informed decision that meets your specific needs. It’s recommended to further research and compare different projector models, read reviews, and seek expert advice to find the projector that suits your requirements and provides an optimal viewing experience.
Setting up a Projector
Setting up a projector properly is essential to achieve optimal image quality and ensure a seamless projection experience. Here are some key steps to follow when setting up a projector:
1. Choose the Right Location: Select a suitable location for the projector, considering factors such as the available space, screen size, and viewing angle. Ensure the projection area is free from obstructions and that the projector is positioned at the correct distance and height for the desired screen size.
2. Prepare the Projection Surface: Set up the projection screen or prepare the wall for projection. Ensure the surface is clean, flat, and white or light-colored for optimal image reflection. If using a screen, securely mount it or set it up in the desired location.
3. Connect the Cables: Connect the necessary cables from the projector to the input source device, such as a laptop, Blu-ray player, or gaming console. Use appropriate cables, such as HDMI, VGA, or USB, and ensure they are securely connected to both the projector and the source device.
4. Power on the Projector: Plug in the power cord of the projector and turn on the device. Allow the projector to go through its start-up process and warm up, which may include displaying the brand logo or calibration patterns. Refer to the user manual for specific instructions related to your projector model.
5. Adjust the Projection Image: Use the projector’s keystone correction, zoom, and focus adjustment features to ensure a properly proportioned and sharp image on the screen. Keystone correction helps correct any trapezoidal distortions caused by the projector angle, while zoom and focus adjustments ensure the image appears crisp and properly aligned.
6. Fine-tune Picture and Sound Settings: Access the projector’s menu settings to make further adjustments. This may include adjusting the brightness, contrast, color temperature, and other image-enhancing settings. If using external speakers, connect them to the projector and adjust the audio settings for optimal sound output.
7. Test and Optimize the Image: Play different types of content, such as videos, images, or presentations, to ensure the image appears clear, vibrant, and properly aligned. Make further color or image adjustments if necessary to achieve the desired output. This step also allows you to assess the suitability of the brightness for the environment.
8. Consider Ambient Lighting: Depending on the lighting conditions, adjust the room’s lighting to enhance the projection experience. Dim lights or use curtains or blinds to minimize external light sources that may affect the projected image. This step is especially crucial for achieving optimal image visibility and contrast in darker or dedicated home theater environments.
9. Cable Management: Organize and secure the cables to ensure a neat and clutter-free setup. Use cable clips, ties, or cable management solutions to keep the cables organized and prevent trip hazards.
10. Projector Cooling: Ensure proper airflow and ventilation around the projector to prevent overheating. Check that the projector’s air vents are unobstructed and free from dust accumulation. If necessary, consider using a projector mount or a cooling pad to ensure adequate ventilation.
Following these steps will help you set up your projector correctly and optimize the image quality for an immersive projection experience. Be sure to consult the user manual of your specific projector model for additional instructions and recommendations.
Connecting a Projector
Connecting a projector properly is crucial to ensure seamless communication between the projector and the input source device. Here are the key steps to follow when connecting a projector:
1. Identify the Required Cables: Determine the appropriate cables needed to connect the projector to the input source device. Common connection cables include HDMI, VGA, USB, or audio cables. Consult the projector’s manual and the input source device’s specifications to identify the compatible connections.
2. Power off the Projector and Input Sources: Before connecting the cables, ensure that both the projector and the input source device, such as a laptop or DVD player, are powered off. This prevents potential electrical issues or damage during the connection process.
3. Connect the Power Cable: Plug one end of the power cable into the projector’s power input port and the other end into a power outlet or surge protector. Ensure a secure and proper connection to avoid any power-related issues.
4. Connect the Signal Cable: Connect the appropriate signal cable between the projector and the input source device. For example, use an HDMI cable to connect a digital video source, a VGA cable for analog video sources, or a USB cable for certain data transfers or smartphone connections. Insert the connectors firmly into the respective ports on both devices.
5. Secure the Cable Connections: After connecting the cables, ensure that all connections are secure and properly tightened. Loose connections can cause display issues, distorted images, or signal interruptions during operation.
6. Power on the Projector: After ensuring all cable connections are secure, power on the projector. Allow it to warm up and initialize, following the manufacturer’s instructions. This usually involves pressing the power button or using the remote control.
7. Power on the Input Source Device: Once the projector is powered on and ready, turn on the input source device. Depending on the device, this may involve pressing the power button or selecting the appropriate input source for display output.
8. Select the Correct Input Source: On the projector’s menu or using the remote control, select the correct input source that corresponds to the connected device. For example, if using an HDMI connection, select the HDMI input on the projector’s input menu.
9. Adjust the Display Settings: Depending on the input source device and the projector, you may need to adjust the display settings to optimize the image quality. This can include adjusting the aspect ratio, resolution, or display mode to match the content or desired viewing preferences.
10. Test the Connection and Adjust as Needed: Play a sample video or display some content from the input source device to test the connection. If the image or sound does not appear correctly, check the cable connections, input source settings, or both to ensure everything is properly set up.
Following these steps will help you connect your projector correctly and ensure seamless communication between the projector and the input source device. Consult the user manuals of your projector and input source device for any specific instructions or troubleshooting steps related to your particular setup.
Using a Projector
Using a projector involves more than just turning it on and projecting an image. It requires knowing how to navigate the projector’s settings, optimize image quality, and utilize additional features. Here are some key aspects to consider when using a projector:
1. Image Adjustment: Adjust the image settings on the projector to ensure optimal quality. This can include adjusting brightness, contrast, color temperature, and sharpness based on the environment and personal preferences.
2. Keystone Correction: Use the keystone correction feature to adjust the shape of the image, correcting any trapezoidal distortion caused by the projector’s position relative to the projection surface. It helps ensure a properly proportioned display.
3. Input Selection: Access the projector’s input menu to select the appropriate input source when using multiple devices. This allows you to switch between devices connected to the projector, such as laptops, DVD players, or gaming consoles.
4. Aspect Ratio: Adjust the aspect ratio on the projector to match the content being displayed. For example, widescreen content should be matched with a widescreen aspect ratio to avoid image distortion or cropping.
5. Sound Output: Connect external speakers or sound systems to the projector if higher-quality sound is desired. Adjust the projector’s audio settings or switch the audio output to the connected speakers for an enhanced audio experience.
6. Image Source Optimization: Adjust the image settings on the input source device to ensure compatibility with the projector. This can include resolution settings, refresh rates, or adjusting color profiles to achieve the best possible image quality.
7. Screen Size and Distance: Experiment with the projection distance and screen size to find the optimal viewing experience. This involves adjusting the projector’s position or zoom level to achieve the desired image size on the projection surface.
8. Maintenance: Regularly clean the projector’s air vents and filters to prevent overheating and ensure optimal performance. Additionally, clean the projection surface to maintain a clear and vibrant image without any distractions or visual artifacts.
9. Connectivity Options: Explore the various connectivity options available on the projector and take advantage of features such as USB playback, wireless screen mirroring, or network connectivity for streaming content or accessing online services.
10. Powering Off: Properly power off the projector and input source devices when finished. This ensures a safe shutdown and extends the lifespan of the projector’s components. Allow the projector to cool down before packing it away or moving it.
By understanding these aspects and taking advantage of the features offered by your specific projector model, you can ensure a seamless and enjoyable projection experience. Refer to the user manual for detailed instructions and explore any additional features or functionality provided by the projector to enhance your overall usage.
Maintaining a Projector
Maintaining a projector is essential to ensure its longevity, optimal performance, and image quality. Regular maintenance practices can help prevent technical issues and preserve the projector’s components. Here are some key maintenance tips for keeping your projector in optimal condition:
1. Cleaning the Air Vents: Regularly clean the projector’s air vents to prevent dust accumulation. Dust can obstruct the airflow, resulting in overheating and potential damage to the internal components. Use a can of compressed air or a soft brush to gently remove any dust or debris from the vents.
2. Cleaning the Projection Surface: Keep the projection surface clean to maintain a clear and vibrant image. Regularly wipe the surface with a soft, lint-free cloth or screen-cleaning solution to remove any fingerprints, smudges, or dust particles that may affect the image quality.
3. Cleaning or Replacing Filters: Some projectors have air filters that help prevent dust and debris from entering the device. Check the user manual to see if your projector has filters and follow the instructions for cleaning or replacing them at recommended intervals or when prompted by the projector.
4. Verifying and Cleaning Connections: Periodically check the cable connections to ensure they are secure and free from dirt or corrosion. If you notice any loose connections or degradation in the connection quality, clean the connectors and reconnect them properly to ensure a stable and reliable signal.
5. Avoiding Overheating: Ensure that the projector has proper ventilation and is not placed in an enclosed area. Avoid obstructing the projector’s air vents to allow for adequate airflow. Overheating can lead to performance issues, reduced lamp life, and potential damage to the projector’s components. If necessary, use a cooling pad or ensure the room is adequately ventilated.
6. Lamp Usage and Replacement: Be mindful of the projector’s lamp usage hours and keep track of its lifespan. Check the user manual or projector settings to find the lamp usage information. Prepare a replacement lamp in advance to avoid interruptions or sudden lamp failures. Follow the manufacturer’s instructions for replacing the lamp when it reaches the end of its lifespan.
7. Firmware Updates: Check for firmware updates for your projector model and follow the manufacturer’s instructions to keep the projector’s software up to date. Firmware updates often include performance improvements, bug fixes, and new features that enhance the projector’s functionality.
8. Safe Storage and Transportation: When storing or transporting the projector, ensure it is properly protected. Place it in a durable carrying case or padded bag to prevent damage from shocks, bumps, or exposure to dust. Avoid extreme temperatures or humidity when storing the projector to protect its internal components.
9. Regular Usage: Regularly use the projector, even if it is not required daily. Keeping the projector in regular operation helps prevent dust accumulation and lubricates internal parts, ensuring smoother performance and reducing the chances of malfunctions.
10. Periodic Maintenance Checks: Schedule periodic maintenance checks to ensure that the projector is operating optimally. This can involve professional servicing or calibration to fine-tune the projector’s performance and ensure accurate color reproduction.
By following these maintenance practices, you can maximize the lifespan of your projector and enjoy its optimal performance. Consult the user manual for specific maintenance instructions and recommendations provided by the manufacturer for your projector model.
Conclusion
Projectors have become an indispensable tool for a wide range of applications, from business presentations and educational lectures to home theaters and entertainment setups. Understanding the different types of projectors, their components, and how to effectively use and maintain them is crucial for achieving optimal performance and a seamless projection experience.
When choosing a projector, consider factors such as resolution, brightness (lumens), connectivity options, and the intended use to ensure it aligns with your specific requirements. LCD, DLP, LED, and laser projectors each offer unique advantages and cater to different needs and environments.
Setting up a projector correctly involves choosing the right location, connecting cables securely, adjusting image settings, and optimizing the projection surface. Taking these steps ensures that the projected image appears clear, vibrant, and properly aligned.
Maintaining a projector involves regular cleaning of air vents, filters (if applicable), and the projection surface. Checking and cleaning connections, avoiding overheating, and adhering to lamp replacement schedules also contribute to the projector’s long-term health and performance.
In conclusion, projectors have transformed the way we view and share visual content. By understanding the fundamentals of projectors and following best practices in choosing, setting up, using, and maintaining them, you can enhance your projection experience and unlock the full potential of this powerful technology.