Introduction
Having a projector at home or at work can greatly enhance your viewing experience and allow for more convenient presentations. However, it can be incredibly frustrating when your projector is not working as intended. Whether it’s a complete lack of power, no image being displayed, or issues with image quality, it can put a damper on your plans and leave you seeking answers.
In this article, we will explore some of the most common projector problems and provide troubleshooting steps to help you get your projector back up and running smoothly. We’ll cover issues such as power failures, connection problems, overheating, and remote control malfunctions. By following these steps, you can save yourself from the hassle of sending your projector for repairs or purchasing a new one.
Before we dive into the troubleshooting steps, it’s important to note that not all projector issues require the same solution. The cause of the problem can vary depending on the make and model of the projector, as well as the specific setup and circumstances. However, by following the general troubleshooting steps outlined in this article, you’ll have a good starting point for identifying and resolving the most common projector issues.
So if you’re ready to solve the mystery of why your projector is not working, let’s get started with the troubleshooting process. Whether you’re an experienced projector user or a beginner, this article will provide you with the necessary guidance to troubleshoot and resolve any projector problems you may encounter. Let’s jump right in and get your projector back in action!
Common Projector Problems
Projectors, like any electronic device, can experience a variety of issues that hinder their performance. Understanding the common problems that users encounter can help you quickly identify the root cause and address it effectively. Here are some of the most common projector problems you may encounter:
- No Power: One of the most frustrating problems is when your projector refuses to turn on or loses power unexpectedly. This can be caused by a faulty power cord, a blown fuse, or an issue with the power source.
- No Image Displayed: Another common issue is when the projector is powered on, but no image is displayed on the screen. This can be due to incorrect input selection, faulty cables or connectors, or problems with the projector’s lamp or display panel.
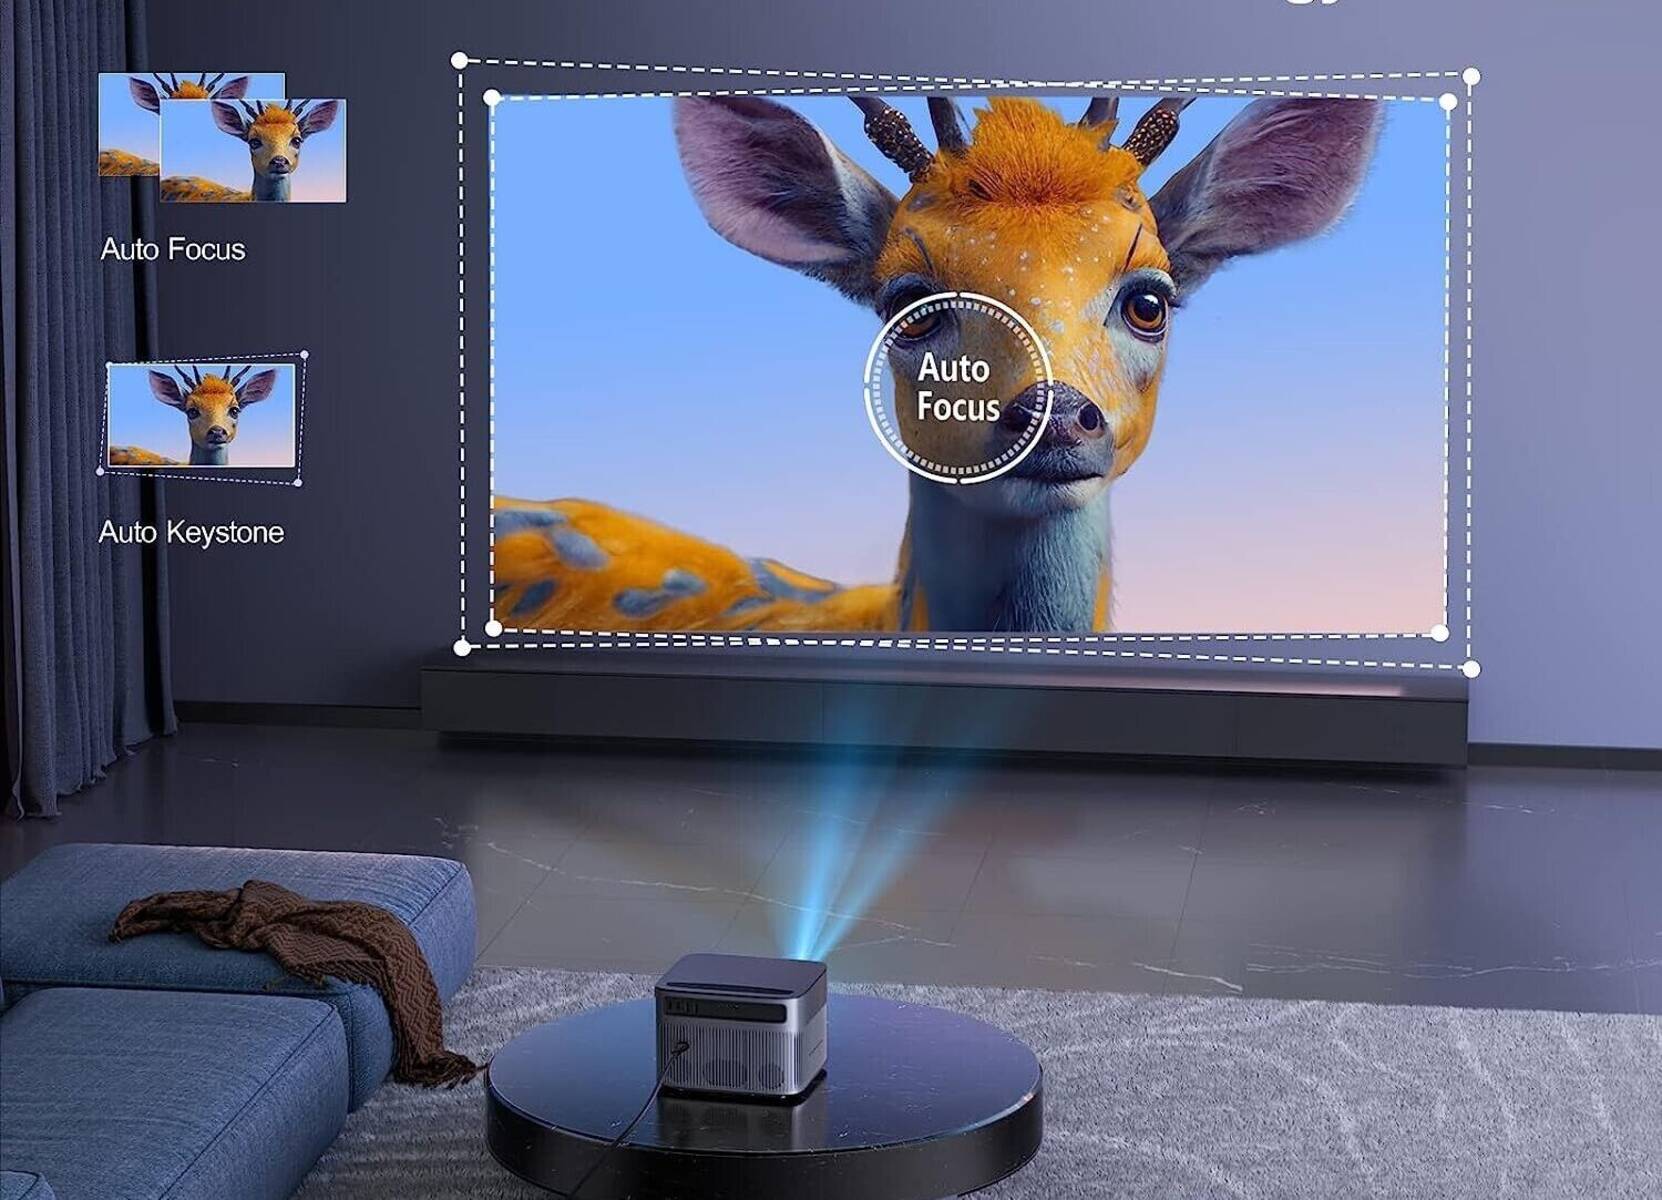
- Poor Image Quality: If the projected image appears blurry, distorted, or dim, it can significantly impact the viewing experience. This can be caused by issues such as improper focus adjustment, dirty or damaged projector lens, or a problem with the projection surface.
- Overheating: Many projectors are prone to overheating, especially when used for extended periods or in high-temperature environments. When a projector overheats, it may automatically shut down or display warning messages, affecting its overall performance and lifespan.
- Remote Control Issues: The remote control is an essential accessory for operating the projector conveniently. However, problems with the remote, such as unresponsiveness or difficulty in connecting, can make operating the projector a frustrating experience.
Understanding these common projector problems is the first step towards troubleshooting and resolving them. In the following sections, we will provide you with step-by-step solutions to address each of these issues. By following these troubleshooting steps, you can save time, money, and frustration, and get your projector working smoothly again.
Problem 1: No Power
One of the most frustrating projector problems is when it fails to power on or unexpectedly loses power. If you’re pressing the power button and nothing happens, there are a few potential causes to consider:
- Faulty Power Cord: Check the power cord for any signs of damage or wear. Ensure that it’s securely connected to both the projector and the power outlet. If you suspect a faulty power cord, try using a different one to see if it resolves the issue.
- Blown Fuse: Projectors may have a fuse that can blow out due to power surges or other electrical issues. Check the fuse and replace it if necessary. Refer to the user manual for instructions on locating and replacing the fuse.
- Power Source Issues: Ensure that the power outlet you’re using is working correctly. Try plugging in another device to verify if the outlet is providing power. Consider using a different outlet or power source to eliminate any problems with the current power source.
If none of these steps resolve the issue, there may be a more significant problem with the projector’s internal components. In such cases, it’s recommended to contact the manufacturer’s customer support or consult a professional technician for further assistance.
It’s important to note that some projectors have a power-saving mode or standby feature. If the projector has been idle for an extended period, it may have automatically entered standby mode. In this case, pressing the power button again may wake the projector and restore normal operation.
By addressing the power-related issues outlined above, you should be able to resolve the problem of a projector that is not powering on. However, if the problem persists or you’re unsure about performing any troubleshooting steps, it’s always best to seek professional assistance to avoid any potential damage to the projector.
Problem 2: No Image Displayed
One of the most frustrating projector issues is when it’s powered on, but no image is displayed on the screen. If you’re experiencing this problem, here are some troubleshooting steps to help you resolve it:
- Verify the Connection Setup: Check that the projector is properly connected to the input source, such as a computer, DVD player, or gaming console. Ensure that the cables are securely plugged into both the projector and the input device. Try using different cables or connectors to rule out any faulty connections.
- Check the Input Selection: Ensure that the correct input source is selected on the projector. Many projectors have multiple input options (HDMI, VGA, etc.), so make sure you have selected the appropriate input source using the projector’s menu or remote control.
- Inspect the Lamp and Display Panels: If the projector’s lamp is not working or has reached the end of its lifespan, it may need to be replaced. Refer to the user manual for instructions on checking the lamp’s status and replacing it if necessary. Additionally, inspect the display panels for any signs of damage or malfunction.
- Adjust the Display Settings: Check the projector’s display settings to ensure they are properly configured. Adjust the resolution, aspect ratio, and other settings to match the specifications of the input source and the desired output. Incorrect display settings can prevent the image from being properly displayed.
If none of these steps resolve the issue, there may be a more significant problem with the projector’s internal components or the input source device. In such cases, it’s recommended to contact the manufacturer’s customer support or consult a professional technician for further assistance.
Remember to also check if the projector’s lens cap is removed and whether there is sufficient light in the room. Some projectors have sensors that detect ambient light and may not display an image if the lighting conditions are too dim.
By following these troubleshooting steps, you should be able to identify and resolve the issue of your projector not displaying an image. However, if the problem persists or you’re unsure about performing any troubleshooting steps, it’s always best to seek professional assistance to avoid any potential damage to the projector.
Problem 3: Poor Image Quality
Having a projector with poor image quality can significantly impact your viewing experience. If you’re noticing blurry, distorted, or dim images, here are some troubleshooting steps to improve the image quality:
- Adjust the Focus: Check the focus adjustment on the projector lens. Sometimes, a simple adjustment can bring the image into sharper focus. Rotate the focus ring until the image appears clear and well-defined.
- Clean the Projector Lens: Over time, dust and debris can accumulate on the projector lens, affecting image quality. Gently clean the lens using a soft, lint-free cloth. Avoid using abrasive materials, as they can scratch the lens.
- Inspect the Projection Surface: The surface on which the image is projected can also impact its quality. Ensure that the screen or wall is clean and free from any wrinkles or imperfections that may distort the projected image. Consider using a dedicated projection screen for optimal image quality.
- Check the Input Source: The quality of the input source can affect the image displayed by the projector. Ensure that the input source device is set to its optimal resolution and quality settings. If using a computer, make sure the display settings are properly configured.
- Adjust the Brightness and Contrast: The projector’s brightness and contrast settings can have a significant impact on image quality. Experiment with adjusting these settings to find the optimal balance for your viewing environment.
If the above steps do not improve the image quality, there may be a problem with the projector lamp or the display panel. Check the lamp status and replace it if necessary, following the instructions in the user manual. If the display panel is damaged, it may require professional repair or replacement.
It’s important to note that the image quality of a projector can also be affected by the ambient lighting conditions in the room. Ensure that the room is sufficiently lit but avoid excessive brightness, as it can wash out the image. Consider using curtains or blinds to control the amount of natural light entering the room.
By following these troubleshooting steps, you should be able to improve the image quality of your projector. However, if the problem persists or if you’re unsure about performing any troubleshooting steps, it’s advisable to seek professional assistance to avoid any potential damage to the projector.
Problem 4: Overheating
Overheating is a common problem that many projectors can experience, especially when used for extended periods or in high-temperature environments. If you notice your projector shutting down unexpectedly or displaying warning messages related to overheating, here are some troubleshooting steps to address the issue:
- Adequate Ventilation: Ensure that the projector is placed in a well-ventilated area. Make sure there is enough space around the projector for proper airflow. Avoid placing the projector on surfaces that can block the vents, such as thick books or cloth.
- Clean the Air Filters: Dust and debris can accumulate in the projector’s air filters, restricting airflow and causing overheating. Regularly clean the filters according to the manufacturer’s instructions to maintain proper ventilation.
- Reduce Ambient Temperature: If the room temperature is too high, it can contribute to the projector’s overheating. Lower the room temperature by using air conditioning or fans to create a cooler environment for the projector to operate in.
- Reduce the Projector’s Brightness: High brightness settings can generate more heat. Try lowering the projector’s brightness levels or using an energy-saving mode, if available. This can help reduce the heat generated by the lamp and prolong its lifespan.
- Manage Usage Time: Continuous usage for long periods can cause projectors to overheat. If possible, take breaks between presentations or viewing sessions to allow the projector to cool down. Some projectors have built-in features that automatically shut down or activate a fan cooling system when the internal temperature reaches a certain threshold.
If the projector continues to overheat despite following these steps, there may be a problem with the internal cooling system or other hardware components. In such cases, it is recommended to contact the manufacturer’s customer support or consult a professional technician for further assistance.
Remember that different projectors have different thermal limits, and some may be more prone to overheating than others. It’s always a good practice to consult the projector’s user manual and follow the manufacturer’s recommendations to prevent overheating and ensure optimal performance.
By following the troubleshooting steps outlined above, you should be able to effectively manage and address any overheating issues with your projector. However, if the problem persists or you’re unsure about performing any troubleshooting steps, seeking professional assistance is always recommended to avoid any potential damage to the projector.
Problem 5: Remote Control Issues
The remote control is an essential accessory for convenient operation of your projector. But when it’s not working correctly, it can be frustrating. If you’re experiencing issues with your projector’s remote control, here are some troubleshooting steps to address the problem:
- Check the Batteries: Ensure that the batteries in the remote control are charged and properly inserted. Replace the batteries if they are old or depleted.
- Check for Obstructions: Make sure there are no obstacles between the remote control and the projector. Objects or furniture blocking the infrared (IR) signal can prevent the remote control from functioning properly.
- Verify Line of Sight: Ensure that you have a clear line of sight between the remote control and the projector. If there’s an obstruction, try moving closer to the projector or adjusting your position for better signal reception.
- Reset and Re-pair the Remote: Some projectors allow you to reset and re-pair the remote control. Refer to the user manual for instructions on how to perform this process specific to your projector model.
- Replace the Remote Control: If all else fails, it’s possible that the remote control itself is faulty. Consider purchasing a replacement remote control compatible with your projector model.
If the above steps do not resolve the remote control issues, there may be a problem with the projector’s IR sensor or remote control receiver. In such cases, it’s recommended to contact the manufacturer’s customer support or consult a professional technician for further assistance.
Remember to check that the remote control is within the range specified by the manufacturer. Operating the remote control from too far away may result in weak or unreliable signal reception.
By following these troubleshooting steps, you should be able to resolve most remote control issues with your projector. However, if the problem persists or you’re unsure about performing any troubleshooting steps, seeking professional assistance is always recommended to avoid any potential damage to the projector or remote control.
Troubleshooting Steps
When encountering problems with your projector, it’s important to follow a systematic approach to troubleshoot and resolve the issues. Here are some general troubleshooting steps you can take to address common projector problems:
- Step 1: Check the Power Source: Ensure that the projector is securely plugged into a working power outlet. Confirm that the power cord is not damaged and properly connected to both the projector and the power source.
- Step 2: Verify the Connection Setup: Check the cables and connectors connecting the projector to the input source. Ensure they are firmly plugged in and not damaged. Verify that the correct input source is selected on the projector.
- Step 3: Adjust the Projector Settings: Review and adjust the projector’s display settings, including resolution, aspect ratio, brightness, and contrast, to ensure optimal image quality.
- Step 4: Clean the Projector Lens and Filters: Remove any dust or debris from the projector lens using a soft, lint-free cloth. Clean or replace the air filters to maintain proper ventilation and prevent overheating.
- Step 5: Check for Obstructions: Ensure there are no objects blocking the ventilation vents, the projector lens, or the remote control signal. Clear any obstructions that may hinder proper operation.
- Step 6: Update Firmware and Software: Check for any available firmware or software updates for your projector. Updating to the latest version can help resolve compatibility issues and improve performance.
- Step 7: Manage Overheating Issues: Ensure proper ventilation and airflow around the projector. Clean the air filters regularly and reduce the projector’s brightness if necessary to prevent overheating.
- Step 8: Troubleshoot Remote Control Problems: Check the batteries in the remote control and ensure there are no obstructions or interference. Reset or re-pair the remote control if necessary, or consider replacing it if all else fails.
Remember that each projector model may have specific troubleshooting steps outlined in the user manual. It’s important to consult the manual for your specific projector model to ensure you follow the recommended troubleshooting procedures.
By following these general troubleshooting steps, you should be able to identify and resolve most common projector problems. However, if the issue persists or you’re unsure about performing any troubleshooting steps, it’s always best to seek professional assistance to avoid any potential damage to the projector or its components.
Step 1: Check the Power Source
When your projector is experiencing power-related issues, it’s important to start by checking the power source and related components. By verifying the power supply, you can eliminate potential causes and ensure that your projector has the necessary power to operate. Follow these steps to check the power source:
- Inspect the Power Cord: Examine the power cord for any signs of damage or wear. Look for frayed or exposed wires, and ensure that the plug is intact. If you notice any issues, replace the power cord with a new one.
- Secure Connections: Ensure that the power cord is securely connected to both the projector and the power outlet. Sometimes, a loose connection can cause power failure. Firmly plug in the power cord, making sure it is snug in the sockets on both ends.
- Test the Power Outlet: Plug another electrical device into the same power outlet to verify if it is functioning correctly. If the outlet is faulty, try using a different outlet to power your projector.
- Check for Power Surges: Power surges can damage electronic devices, including projectors. To protect your projector from power surges, consider using a surge protector or an uninterruptible power supply (UPS).
Once you have checked the power source and ensured that all connections are secure, try turning on your projector again. If the issue persists, move on to the next troubleshooting step to further investigate the cause of the problem.
It’s worth noting that some projectors have external power supply units. If your projector has one, check the power cord between the unit and the projector for any loose connections or signs of damage.
By starting with this first troubleshooting step, you can quickly identify and resolve power-related issues with your projector. However, if the problem persists or you’re unsure about performing any troubleshooting steps, it’s recommended to seek professional assistance to avoid any potential damage to the projector or associated components.
Step 2: Verify the Connection Setup
When your projector is not displaying an image or showing any signs of connectivity, it’s crucial to examine the connection setup. Verify that all the necessary cables and connectors are properly connected and configured to ensure a stable and correct signal transmission. Follow these steps to confirm the connection setup:
- Check Cable Connections: Examine the cables connecting your projector to the input source device. Ensure that they are securely plugged into both the projector and the input source device. Wiggle the cables gently to confirm they are not loose or damaged.
- Confirm the Correct Input Source: Most projectors offer multiple input options such as HDMI, VGA, or AV. Confirm that you have selected the correct input source on the projector. Use the projector’s remote control or on-screen menu to change the input selection.
- Test with a Different Cable or Connector: If you suspect a faulty cable or connector, try replacing it with a known working cable or connector. This can help determine if the issue lies with a specific cable or connector.
- Verify Signal Output from the Source Device: Ensure that the input source device, such as a laptop or DVD player, is sending a video signal to the projector. Check the display settings on the source device and verify that it is configured to output to an external display.
After verifying the connection setup, attempt to turn on your projector and check if an image is displayed. If the problem persists, proceed to the next troubleshooting step to further investigate the issue.
Keep in mind that different projectors may have different input options and connection types, so consult your projector’s user manual if you’re unsure about the correct configuration.
By going through this second troubleshooting step, you can ensure that your projector is properly connected and configured, eliminating any connection-related issues. However, if the problem persists or you’re unsure about performing any troubleshooting steps, it’s advisable to seek professional assistance to avoid any potential damage to the projector or associated components.
Step 3: Adjust the Projector Settings
If your projector is powered on but not displaying the desired image quality, it’s important to check and adjust the projector settings. Fine-tuning the settings can significantly improve the clarity, color accuracy, and overall visual performance of your projector. Follow these steps to adjust the projector settings:
- Resolution: Verify that the projector’s resolution matches the resolution of the input source device. Adjust the resolution settings using the projector’s menu or remote control to ensure a proper match.
- Aspect Ratio: Set the correct aspect ratio on the projector to match the aspect ratio of the input source or the desired viewing format. Common aspect ratios include 16:9 (widescreen) and 4:3 (standard).
- Brightness and Contrast: Adjust the brightness and contrast settings to optimize the image quality. Increase the brightness if the image appears too dim, and adjust the contrast to control the distinction between light and dark areas of the image.
- Color Calibration: Use the projector’s color calibration settings to achieve an accurate and vibrant color reproduction. Adjust the color temperature, saturation, and tint levels to your preference or to match the content being projected.
- Keystone Correction: If the projector is projecting a trapezoidal or distorted image, use the keystone correction feature to correct the image shape. Adjust the vertical or horizontal keystone settings to align the image properly.
After making adjustments, evaluate the projected image and assess if the quality has improved. If necessary, fine-tune the settings further until you achieve the desired image quality.
Keep in mind that the exact adjustment options and menu navigation may vary depending on your projector model. Refer to the user manual for specific instructions on accessing and adjusting the settings.
By properly adjusting the projector settings, you can enhance the visual experience and ensure that the projected image meets your requirements. However, if the problem persists or you’re unsure about performing any troubleshooting steps, it’s recommended to seek professional assistance to avoid any potential damage to the projector or associated components.
Step 4: Clean the Projector Lens and Filters
Over time, dust and debris can accumulate on the projector lens and filters, impacting the image quality and overall performance. Cleaning these components is an essential step in maintaining optimal projector functionality. Follow these steps to clean the projector lens and filters:
- Turn off the Projector: Make sure the projector is turned off and unplugged from the power source before cleaning. This ensures your safety and prevents any potential damage to the projector.
- Clean the Lens: Gently wipe the projector lens using a soft, lint-free cloth. Start from the center of the lens and move in a circular motion towards the outer edges. Avoid using excessive force and be cautious to prevent scratching the lens surface.
- Clean the Filters: Check the user manual to locate the air filters in your projector. Remove the filters according to the manufacturer’s instructions and clean them gently using a soft brush or compressed air. Take care to remove any accumulated dust or debris that may obstruct airflow.
- Reinstall the Filters: After cleaning, ensure the filters are completely dry before reinstalling them in the projector. Make sure they are securely and correctly placed according to the manufacturer’s instructions.
Regularly cleaning the projector lens and filters can help maintain optimal image quality and prevent overheating. It’s recommended to clean these components every few months or as necessary, depending on the operating environment and usage conditions.
Note that some projectors may have additional cleaning requirements or specific cleaning solutions recommended by the manufacturer. Consult the user manual for detailed instructions and guidelines specific to your projector model to ensure proper cleaning procedures.
By taking the time to clean the projector lens and filters, you can restore image clarity and prevent potential performance issues caused by dust and debris accumulation. If the problem persists or you’re unsure about performing any troubleshooting steps, it’s advisable to seek professional assistance to avoid any potential damage to the projector or associated components.
Step 5: Check for Obstructions
Sometimes, the projection quality of your projector can be affected by physical obstructions that impede clear visibility or interfere with the projector’s functionality. To ensure unobstructed projection and smooth operation, follow these steps to check for and remove any obstructions:
- Inspect the Projection Area: Examine the area in front of the projector screen or wall. Look for any objects, furniture, or obstacles that may obstruct the path of the projection. Move or remove any items that are blocking the projection, ensuring a clear line of sight between the projector lens and the projection surface.
- Clear the Ventilation Vents: Check for any objects or debris blocking the ventilation vents of the projector. These vents are essential for proper airflow and heat dissipation. Clear away any obstructions to allow the projector to cool effectively and prevent overheating.
- Ensure Proper Remote Control Signal Reception: If you’re experiencing issues with the projector’s remote control functionality, make sure there are no obstacles between the remote control and the projector. Remove any objects that may block the infrared (IR) signal between the remote control and the projector’s IR receiver.
- Eliminate Signal Interference: In some cases, electronic devices in close proximity to the projector can cause signal interference or poor image quality. Move any devices such as speakers, routers, or other electronics away from the projector to minimize interference and optimize the projection performance.
Clearing obstructions is essential for ensuring optimal projection quality and preventing potential performance issues. By eliminating physical barriers and interference, you can enhance the viewing experience and enjoy a seamless projection experience.
Remember to periodically check for new obstructions in the projection area, especially if the environment is subject to change or if items are frequently moved around. Regularly inspect the projector’s ventilation vents and clean them as needed to ensure proper airflow and prevent overheating.
By following these steps to check for and remove obstructions, you can ensure unimpeded projection and optimize the performance of your projector. If the problem persists or you’re unsure about performing any troubleshooting steps, it’s recommended to seek professional assistance to avoid any potential damage to the projector or associated components.
Step 6: Update Firmware and Software
Just like any other electronic device, projectors can benefit from firmware and software updates. These updates often include bug fixes, feature enhancements, and improved compatibility with various input sources. By updating the firmware and software of your projector, you can ensure optimal performance and resolve potential issues. Follow these steps to update the firmware and software:
- Check for Updates: Visit the manufacturer’s website or check the projector’s user manual for information on firmware and software updates. Look for the latest version available for your specific projector model.
- Download the Update: If an update is available, download it from the manufacturer’s website and save it to your computer. Make sure to choose the correct update file that corresponds to your specific projector model.
- Prepare the USB Drive (if required): In some cases, firmware updates are performed via a USB flash drive. Format the USB drive using the FAT32 file system and ensure it’s empty. Follow the manufacturer’s instructions on how to prepare the USB drive for the update.
- Install the Update: If a firmware update is available, follow the manufacturer’s instructions to install the update. This typically involves transferring the update file to the projector via a USB drive or connecting the projector to your computer and running the update software.
- Restart and Verify: After the update is installed, restart the projector as instructed. Once the projector has rebooted, verify that the firmware or software version has been successfully updated by accessing the appropriate menu option.
Updating the firmware and software of your projector can resolve potential issues, provide new features, and ensure compatibility with the latest input sources. It’s recommended to periodically check for updates and install them as they become available to maintain the optimal performance of your projector.
Note that the exact process and instructions for updating firmware and software may vary depending on your projector model. Refer to the user manual or the manufacturer’s website for specific instructions and guidelines for your projector.
By following these steps to update the firmware and software, you can maximize the functionality of your projector and address any software-related issues. If the problem persists or you’re unsure about performing any troubleshooting steps, it’s advisable to seek professional assistance to avoid any potential damage to the projector or associated components.
Step 7: Manage Overheating Issues
Overheating can be a common problem for projectors, especially when used for extended periods or in environments with high temperatures. To prevent overheating and ensure the optimal functioning of your projector, follow these steps to manage overheating issues:
- Ensure Proper Ventilation: Make sure the projector is placed in a well-ventilated area with sufficient space around it. Avoid placing it on surfaces that can block the ventilation, such as soft fabrics or uneven surfaces.
- Clean the Air Filters: The air filters in projectors can accumulate dust and debris over time, restricting airflow and causing overheating. Regularly clean the air filters according to the manufacturer’s instructions to maintain proper ventilation.
- Reduce Brightness: High brightness settings generate more heat. Lower the projector’s brightness level or switch to an energy-saving mode to reduce the amount of heat generated by the lamp.
- Control Room Temperature: If possible, regulate the temperature in the room where the projector is used. Keep the room well-ventilated and at a moderate temperature to prevent excessive heat buildup.
- Manage Usage Time: Continuous usage of the projector for extended periods can contribute to overheating. If possible, allow the projector to cool down by taking breaks between presentations or viewing sessions.
- Use External Cooling Methods: In extreme cases or for projectors that frequently encounter overheating, consider using external cooling methods. This can involve using additional fans or cooling pads designed specifically for projectors to help dissipate heat.
By managing overheating issues, you can prevent performance issues, extend the lifespan of your projector, and ensure uninterrupted usage. It’s essential to follow these steps regularly, especially if your projector is used in demanding conditions or for prolonged periods.
Keep in mind that different projectors have different thermal limits, and some may be more prone to overheating than others. It’s always a good practice to consult the projector’s user manual and follow the manufacturer’s recommendations regarding usage guidelines and preventative measures.
If the overheating issue persists or you’re unsure about performing any troubleshooting steps, it’s advisable to seek professional assistance. Professional technicians can provide additional insights and help you address any underlying issues related to overheating effectively.
Step 8: Troubleshoot Remote Control Problems
The remote control is an essential accessory for conveniently operating your projector. If you’re facing issues with your projector’s remote control, follow these troubleshooting steps to identify and resolve the problem:
- Check Batteries: Ensure that the batteries in the remote control are inserted correctly and have sufficient charge. Replace the batteries if necessary, as weak batteries can affect the remote control’s functionality.
- Clear Line of Sight: Make sure there are no obstacles or objects blocking the line of sight between the remote control and the projector. Remove any obstructions or reposition yourself to establish clear, unobstructed communication.
- Verify Range: Confirm that you’re within the appropriate range for the remote control to work effectively. Remote control range can vary depending on the projector model, so ensure you’re within the specified range.
- Reset and Re-pair: Some projectors have a reset or re-pairing function for the remote control. Consult the user manual to identify the specific steps involved in resetting or re-pairing the remote control with the projector.
- Test with a Different Remote Control: If possible, try using a different compatible remote control to see if the issue lies with the original remote or the projector itself. If the alternative remote works, consider replacing the original remote control.
If the above steps do not resolve the remote control issues, there may be a problem with the projector’s IR sensor or the remote control receiver. In such cases, contacting the manufacturer’s customer support or consulting a professional technician is recommended for further assistance.
Keep in mind that some projectors may have additional options for controlling the projector without a remote control, such as using the on-board control buttons or smartphone apps. Refer to the user manual or manufacturer’s guidelines for alternative control methods if the remote control is not functioning properly.
By troubleshooting remote control problems using these steps, you can regain control over your projector’s functions. If the problem persists or you’re unsure about performing any troubleshooting steps, seeking professional assistance is advised to avoid any potential damage to the projector’s remote control or associated components.
Conclusion
In conclusion, troubleshooting common projector problems can be a straightforward and effective way to regain functionality and optimal performance. By following the step-by-step troubleshooting process, you can identify and resolve issues such as power failures, connectivity problems, image quality issues, overheating, and remote control malfunctions.
It’s important to start by checking the power source and verifying the connection setup, ensuring all cables and connectors are securely connected. Adjusting the projector’s settings, cleaning the lens and filters, and checking for obstructions can greatly improve image quality and prevent performance issues. Updating the firmware and software of the projector can also provide bug fixes and enhance compatibility.
Additionally, tackling overheating problems involves maintaining proper ventilation, cleaning air filters, and managing the usage time. Troubleshooting remote control issues may require checking batteries, ensuring clear line of sight, and resetting or re-pairing the remote control.
Remember to consult the user manual specific to your projector model for detailed instructions and recommendations. If the problem persists or you’re unsure about performing any troubleshooting steps, it’s always best to seek professional assistance to avoid any potential damage to the projector or associated components.
By following these troubleshooting steps, you can save time, money, and frustration by resolving projector problems on your own without the need for costly repairs or replacements. Enjoy uninterrupted viewing and seamless presentations by actively troubleshooting and maintaining your projector’s optimal performance.