Introduction
Welcome to our comprehensive guide on how to wipe an SSD with Windows on it. If you’re looking to safely and effectively erase the data on your solid-state drive (SSD), you’re in the right place. Whether you’re planning to sell or give away your SSD, or simply want to start fresh with a clean slate, it’s essential to ensure that all your personal and sensitive information is properly erased.
Before we delve into the various methods of wiping an SSD, let’s quickly understand what an SSD is and why it’s essential to use the appropriate techniques for data wiping.
SSDs, or solid-state drives, are storage devices that use flash memory to store data. Unlike traditional hard disk drives (HDDs), which consist of spinning disks and read/write heads, SSDs have no moving parts. This makes them faster, more reliable, and less prone to physical damage. However, the unique design of SSDs poses some challenges when it comes to data wiping.
When you delete files or perform a standard format on an SSD, the data is not immediately erased. Instead, the SSD marks the space previously occupied by the data as “free” and ready for new data to be written. This is due to a technology called “wear leveling,” which aims to distribute data evenly across the SSD to maximize its lifespan.
While this feature is beneficial for SSD performance and longevity, it also means that your data can still be recoverable by someone with the right tools and knowledge. Therefore, to ensure the complete removal of your data, it’s essential to use specialized methods specifically designed for SSDs.
In this guide, we will explore several methods to wipe an SSD with Windows on it. From the built-in options in Windows to third-party software solutions, we’ll cover the step-by-step process for each method, highlighting any considerations or precautions you should be aware of.
Now that we have a basic understanding of SSDs and the importance of proper data wiping, let’s move on to the different methods you can utilize to securely erase your SSD.
Understanding SSDs and Data Wiping
Before we jump into the different methods of data wiping, let’s take a closer look at SSDs and why they require specialized techniques for proper data eradication.
SSDs, or solid-state drives, have become increasingly popular due to their faster performance and reliability compared to traditional hard disk drives. Unlike HDDs, which use mechanical components to read and write data, SSDs utilize flash memory chips to store information, resulting in faster access times and improved durability.
One of the key differences between SSDs and HDDs is the way data is stored and erased. In HDDs, when you delete a file or format the drive, the operating system marks the space as available for new data, but the actual content remains intact until overwritten. However, SSDs work differently due to a feature called “wear leveling.”
Wear leveling is a process that ensures available space is evenly distributed across the NAND flash memory cells in an SSD. This helps to prevent specific cells from wearing out faster than others, prolonging the lifespan of the drive. However, it also means that simply deleting files or performing a standard format on an SSD is not sufficient to fully erase data.
When you delete a file on an SSD, the operating system marks the memory cells as available while leaving the data still intact. This means that with specialized tools and knowledge, someone can potentially recover this data even though it’s technically marked as deleted. Therefore, if you’re planning to sell, donate, or dispose of your SSD, it’s crucial to use proper data wiping techniques to ensure your personal information cannot be retrieved.
Now that we understand the unique characteristics of SSDs, let’s explore the various methods you can use to securely wipe the data from your SSD. From built-in Windows options to third-party software solutions, we’ll cover step-by-step instructions for each method, enabling you to choose the one that best fits your needs.
It’s important to note that data wiping permanently removes all data from your SSD. Therefore, before proceeding with any of the methods we’ll discuss, it’s essential to back up any important files or documents that you want to keep.
Now that we have a solid understanding of SSDs and the importance of proper data wiping, let’s move on to the different methods available to securely erase your SSD and protect your sensitive information.
Backup Your Data
Before you proceed with any data wiping method, it’s crucial to back up your important files and data. Wiping an SSD will permanently remove all data on the drive, so it’s essential to ensure you have a copy of anything you want to keep.
There are several methods you can use to back up your data, depending on your preferences and available resources. Here are a few options:
- External Hard Drive: Connect an external hard drive to your computer and copy the files you want to keep onto the external drive. This provides a physical backup that you can access even if your computer’s internal drive is wiped or damaged.
- Cloud Storage: Use a cloud storage service such as Google Drive, Dropbox, or Microsoft OneDrive to upload and store your important files. This provides an off-site backup that you can access from any device with an internet connection.
- Network Attached Storage (NAS): If you have a NAS device or a home server, you can back up your data directly to the network storage. This allows for easy access and retrieval of your files within your local network.
- Transfer to Another Device: If you have another computer or device with sufficient storage capacity, you can transfer your files to that device as a backup.
Ensure that your backup is complete and verify that you can access and open the files on the backup device. This step is crucial to prevent any data loss during the data wiping process.
Once you have successfully backed up your data, double-check to make sure you haven’t missed any important files or folders. It’s better to be thorough in your backup process to avoid any regrets later on.
Remember to keep your backup in a safe place, whether that’s a secure location for physical backups or a reliable cloud storage service. Regularly update your backups to include any new or modified files to keep your data safe and up to date.
Now that you have your data securely backed up, you can proceed with confidence to the next step: wiping your SSD. The following sections will guide you through various methods to wipe an SSD with Windows on it, ensuring that your personal and sensitive information is permanently removed.
Option 1: Factory Reset
If you’re looking for a simple and built-in method to wipe your SSD, a factory reset can be a convenient option. A factory reset will restore your computer to its original state, eliminating all installed programs, settings, and personal files.
Here’s how you can perform a factory reset on your Windows computer:
- Go to the “Settings” menu by clicking on the Windows Start menu and selecting the gear icon.
- In the Settings menu, click on “Update & Security.”
- From the left sidebar, select “Recovery.”
- Under the “Reset this PC” section, click on “Get started.”
- You will be presented with two options: “Keep my files” and “Remove everything.” Select the latter if you want to completely wipe your SSD.
- Next, you may be asked to choose whether you want to remove files only or remove files and clean the drive. Select the option to “Remove files and clean the drive” to ensure thorough data wiping.
- Follow the on-screen prompts to confirm your action and start the factory reset process. The duration of the reset may vary depending on the speed of your computer and the amount of data on the SSD.
- Once the process is complete, your computer will be restored to its original state, and all data on the SSD should be permanently erased.
It’s important to note that the factory reset option is designed to remove files and reset the operating system, but it may not guarantee complete data eradication. While this method should be sufficient for regular users, it may not meet the strict standards required for data privacy and security in certain situations.
If you have sensitive or confidential data on your SSD, it’s recommended to use additional methods to ensure complete data wiping. In the following sections, we’ll explore other options that provide more robust data erasure solutions.
Now that you’re familiar with the factory reset option, let’s dive into alternative methods to wipe your SSD with Windows on it.
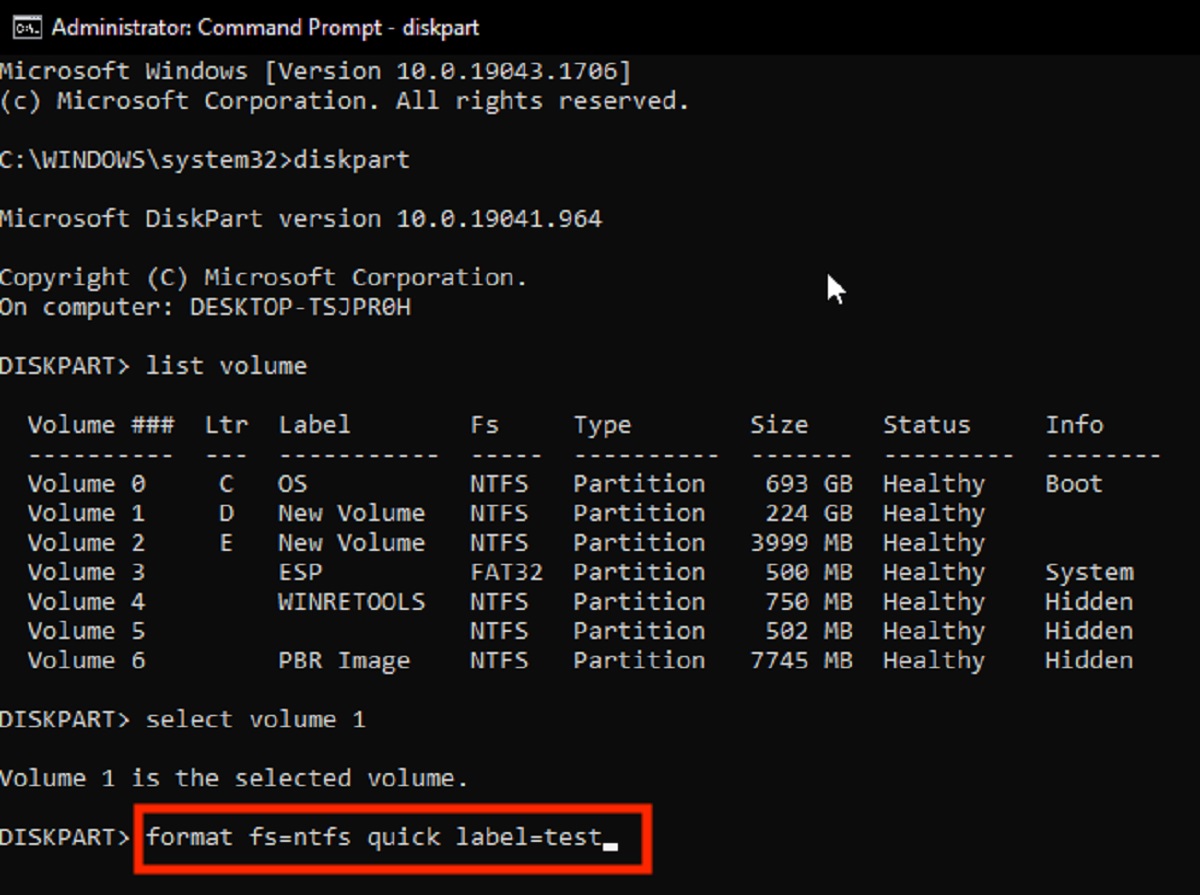
Option 2: Diskpart Clean Command
If you’re looking for a more thorough method to wipe your SSD with Windows on it, the Diskpart Clean command can be a powerful tool. Diskpart is a command-line utility built into Windows that allows you to manage disks, partitions, and volumes.
Here’s how you can use the Diskpart Clean command to wipe your SSD:
- Open the Command Prompt on your Windows computer by typing “cmd” in the search bar and selecting the Command Prompt app.
- Type “diskpart” and press Enter. This will launch the Diskpart utility.
- Within Diskpart, type “list disk” and press Enter. This command will display a list of all the disks connected to your computer.
- Identify the SSD you want to wipe based on its size and other relevant information. Make note of the disk number associated with the SSD.
- Type “select disk [disk number]” and press Enter. Replace “[disk number]” with the actual number of your SSD.
- Once the disk is selected, type “clean” and press Enter. This command will start the process of cleaning the SSD, effectively wiping all data on the disk.
- Wait for the command to complete. The duration will depend on the size of your SSD. During this process, all data on the selected disk will be permanently erased.
It’s important to exercise caution when using the Diskpart Clean command, as it erases data without any confirmation prompts. Double-check that you have selected the correct disk to avoid accidentally wiping the wrong drive.
Once the Diskpart Clean command has finished, you can exit the Diskpart utility by typing “exit” and pressing Enter. Your SSD should now be wiped clean and ready for reuse or disposal.
While the Diskpart Clean command is an effective way to erase data on your SSD, it’s essential to remember that it doesn’t provide secure data erasure. If you have sensitive or confidential information on your SSD, it’s advisable to utilize methods that offer more advanced data wiping techniques.
Now that you’re familiar with the Diskpart Clean command, let’s explore another option that specifically addresses wiping data on SSDs: SSD Secure Erase.
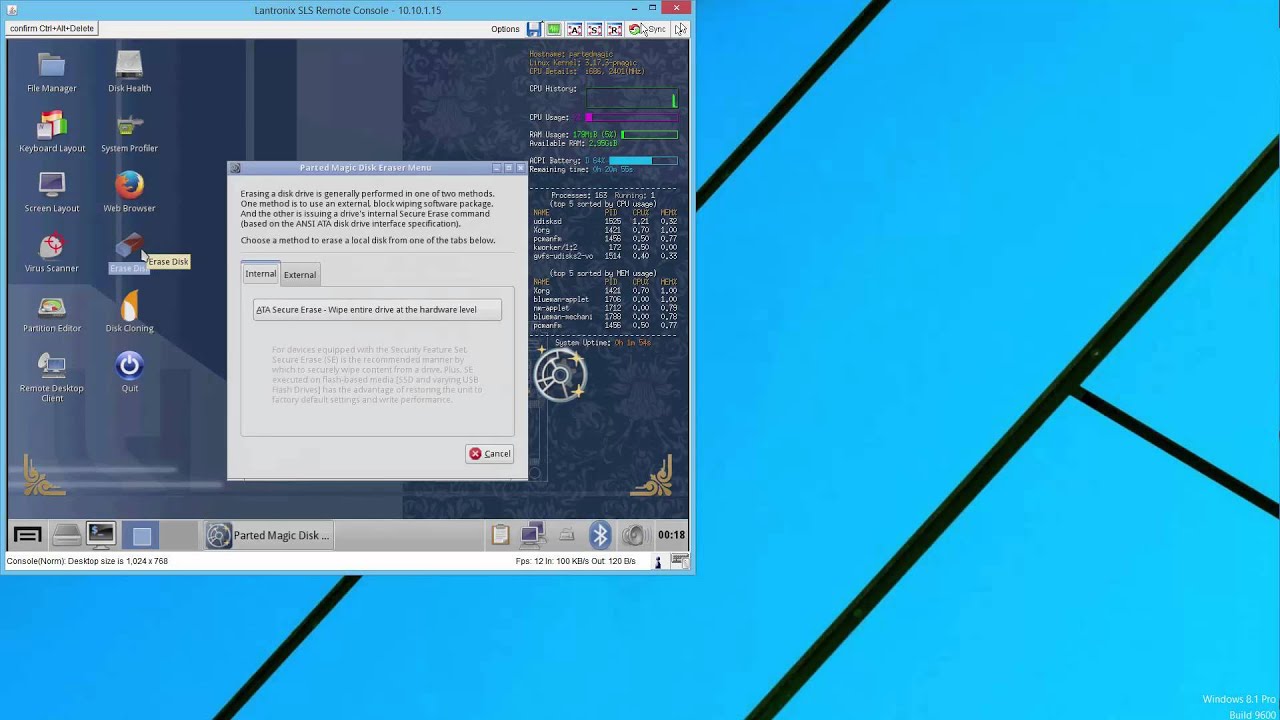
Option 3: SSD Secure Erase
When it comes to securely wiping data from your SSD, one of the most effective methods is using an SSD-specific feature called Secure Erase. This feature allows you to erase all data on your SSD, including files, partitions, and even the operating system, while also restoring the drive to its original factory state.
Here’s how you can perform an SSD Secure Erase:
- Start by identifying the make and model of your SSD. You can usually find this information on the SSD itself or in the documentation provided by the manufacturer.
- Visit the website of the SSD manufacturer and search for tools or software specific to your SSD model. Look for an SSD management tool that includes the Secure Erase feature.
- Download and install the SSD management software on your computer.
- Launch the SSD management tool and locate the Secure Erase feature. It may be listed as “Secure Erase,” “Erase Drive,” or something similar.
- Follow the on-screen instructions to select the SSD you want to erase and initiate the Secure Erase process.
- Be aware that the Secure Erase process may take some time, depending on the size of your SSD and the speed of your computer. During this process, all data on the SSD will be permanently erased.
- Once the Secure Erase process is complete, your SSD will be wiped clean and restored to its factory default settings.
Using the SSD manufacturer’s specific tool and Secure Erase feature ensures that the process is optimized for your SSD model. This leads to more reliable and thorough data wiping, providing peace of mind that your information is securely erased.
It’s important to note that the exact steps and availability of the Secure Erase feature may vary depending on the SSD manufacturer and model. If you’re unable to find an SSD management tool with a Secure Erase feature, you can contact the SSD manufacturer’s support for guidance on how to perform a secure erase.
Now that you’re familiar with the SSD Secure Erase method, let’s explore another option that involves using third-party software for data wiping.
Option 4: Use Third-Party Software
If you’re looking for a more versatile and customizable approach to wiping an SSD with Windows on it, utilizing third-party software can be an excellent option. There are several reliable and reputable data wiping tools available that offer advanced features and secure erasure methods.
Here’s how you can wipe your SSD using third-party software:
- Research and select a reputable data wiping software that supports SSDs. Look for software that offers secure erase options specifically designed for SSDs to ensure thorough data eradication.
- Download and install the chosen data wiping software on your computer.
- Launch the software and navigate to the section or feature that allows you to wipe SSDs.
- Follow the on-screen instructions provided by the software to select your SSD and configure the wiping options. These options may include multiple erase passes for enhanced data security.
- Take note of any additional features or settings that the software offers, such as the ability to create a bootable USB drive for wiping your SSD.
- Once you have configured the wiping options, initiate the process and allow the software to perform the data wiping on your SSD.
- Be patient and let the software complete the wiping process, as it may take some time depending on the size of your SSD and the software’s capabilities.
- Once the process is finished, verify that all data has been successfully wiped from your SSD.
Using third-party software for data wiping provides flexibility and additional features that may not be available with built-in Windows options. These software solutions often offer multiple wiping algorithms and verification methods to ensure comprehensive and reliable data eradication.
When selecting third-party software, be sure to choose a reputable and trusted provider. Read reviews, check for user testimonials, and consider software that has been independently audited for its data wiping capabilities.
Remember, third-party software solutions may come with a cost, but they often provide a higher level of customization, security, and peace of mind when it comes to securely wiping your SSD.
Now that you’re familiar with the option of using third-party software, let’s move on to important considerations to keep in mind when wiping an SSD with Windows on it.
Important Considerations
When it comes to wiping an SSD with Windows on it, there are several important considerations to keep in mind to ensure the process is smooth and effective. These considerations will help you make informed decisions and avoid any potential pitfalls during the data wiping process.
1. Backup your data: Before proceeding with any data wiping method, it’s crucial to back up your important files and data. This ensures that you have a copy of anything you want to keep in case of accidental data loss during the wiping process.
2. Double-check the drive: Take extra caution to select the correct SSD when performing any data wiping method. Accidentally wiping the wrong drive can result in irreversible data loss, so double-check the drive’s identification before proceeding.
3. Security and privacy: If you have sensitive or confidential information on your SSD, it’s advisable to use methods that offer secure erasure techniques, such as SSD Secure Erase or third-party software that employs advanced wiping algorithms. This ensures that your data is thoroughly and securely erased.
4. Verify the wiping process: After completing the data wiping process on your SSD, it’s important to verify that all data has been successfully erased. Check for any remaining files or partitions on the SSD to ensure a complete wipe. You can use file recovery software to attempt to recover any data and verify that it’s no longer accessible.
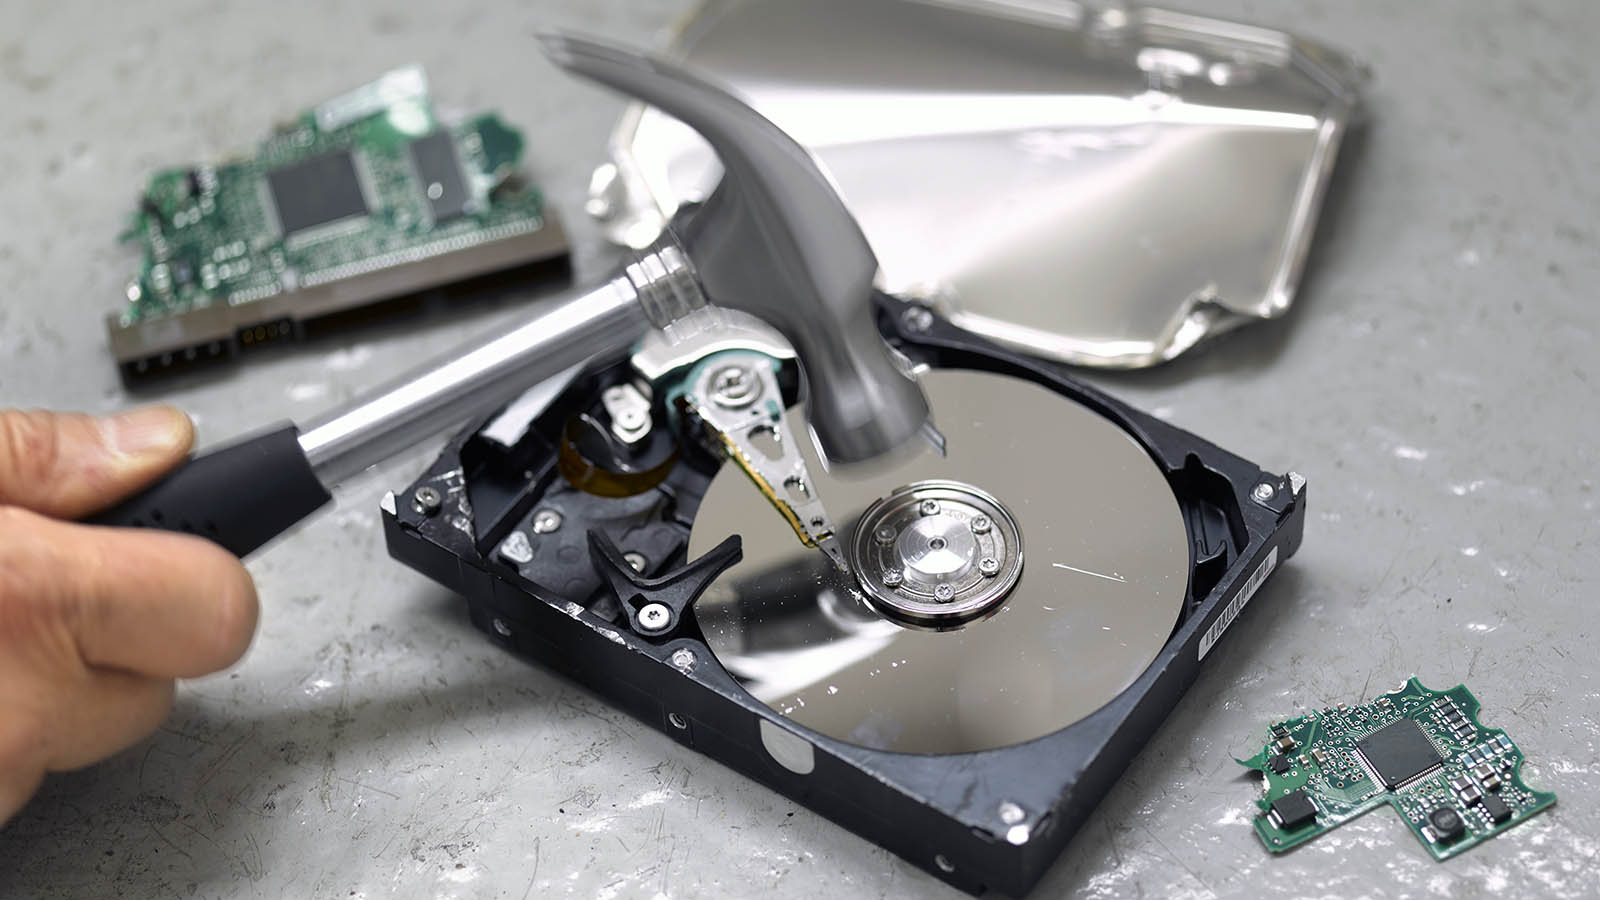
5. Dispose of the SSD properly: If you’re planning to dispose of or recycle your SSD, make sure to follow proper disposal guidelines. This may include physically damaging the drive or utilizing secure e-waste recycling services to ensure that your data cannot be recovered.
6. Stay up to date: Technology and data wiping methods evolve over time, so it’s important to stay updated on the latest best practices and recommendations. Check for any firmware updates or software updates provided by the SSD manufacturer to enhance security and wiping capabilities.
By considering these factors and taking the necessary precautions, you can ensure a smooth and successful data wiping process for your SSD with Windows on it. Remember, the goal is to protect your sensitive information and ensure that it cannot be accessed by unauthorized individuals.
Now, armed with these considerations, you are ready to choose the most suitable method for wiping your SSD and proceed with confidence in protecting your data privacy and security.
Conclusion
Wiping an SSD with Windows on it is crucial to ensure the complete removal of your personal and sensitive data. Throughout this guide, we have explored various methods for effectively wiping an SSD, each with its own advantages and considerations.
From the convenient option of a factory reset to the advanced techniques offered by third-party software, there are choices available to suit your needs and level of data sensitivity. However, it’s essential to remember that the process of wiping an SSD requires careful attention and consideration to avoid any accidental data loss or incomplete erasure.
Back up your important data before proceeding with any method to prevent any unintentional loss. Be mindful of verifying the wiping process and selecting the correct drive to avoid any irreversible mistakes.
If you have sensitive or confidential data on your SSD, it’s recommended to utilize methods that provide secure erasure, such as SSD Secure Erase or third-party software with advanced wiping algorithms.
Lastly, consider the proper disposal of your SSD after the wiping process. Follow the necessary steps to physically damage the drive or utilize secure e-waste recycling services to ensure that your data remains irretrievable.
Now equipped with the knowledge and understanding of various methods and important considerations, you can confidently proceed to wipe your SSD, safeguarding your data privacy and security.
Remember to stay informed about the latest best practices and recommendations as technology evolves and new data wiping methods emerge.
By taking the necessary precautions and utilizing the appropriate techniques, you can effectively wipe your SSD and maintain peace of mind, knowing that your personal information is safely and permanently removed.