Introduction
Upgrading the RAM on your HP laptop can significantly improve its overall performance, allowing you to handle more demanding tasks and applications with ease. Whether you’re a gamer, a graphic designer, or simply want to multitask without experiencing slowdowns, increasing your laptop’s RAM capacity is a practical and cost-effective solution.
Random Access Memory (RAM) serves as the temporary storage space for data that your laptop actively uses. The more RAM you have, the faster and smoother your laptop will operate, as it can hold more information readily available for processing. However, not all laptops support RAM upgrades, and it’s important to determine the compatibility of your HP laptop before proceeding with the upgrade.
In this guide, we will walk you through the step-by-step process of upgrading the RAM on your HP laptop. From identifying the compatible RAM for your specific model to correctly installing the new RAM module, this article will provide you with the necessary knowledge and guidance to successfully complete the upgrade.
Before we delve into the technicalities, it’s worth noting that upgrading the RAM on your laptop may void the warranty, so proceed with caution and ensure any necessary precautions are taken. Additionally, if you’re not comfortable working with computer hardware, it’s advisable to seek professional assistance to avoid any damage to your laptop.
Now that we’ve established the importance of RAM and the precautions associated with the upgrade process, let’s move on to the first step: determining the compatible RAM for your HP laptop.
Step 1: Determine the compatible RAM for your HP laptop
The first step in upgrading the RAM on your HP laptop is to determine the compatible RAM module that your laptop can support. To do this, you will need to gather some information about your laptop’s specifications.
Start by identifying your laptop’s model number, which can usually be found on the bottom of the laptop or in the system information. Once you have the model number, visit the HP support website or refer to the user manual to find the technical specifications for your specific model.
Look for information regarding the maximum supported RAM capacity and the type of RAM module required. The RAM capacity can vary depending on the model and manufacturer, so it’s crucial to check this to ensure you don’t exceed the maximum supported capacity.
Additionally, there are different types of RAM, such as DDR3, DDR4, or LPDDR4. Make sure to note the exact type required by your laptop. The frequency or speed of the RAM is another important factor to consider. While higher frequencies can enhance your laptop’s performance, make sure to verify the maximum speed supported by your laptop.
Once you have gathered this information, you can start looking for compatible RAM modules. There are various online retailers and computer hardware stores that offer a wide range of RAM modules. Use the specifications you gathered earlier to search for RAM modules that meet your laptop’s requirements.
Keep in mind that if your laptop has multiple RAM slots, you may need to purchase multiple modules to increase the total RAM capacity. In such cases, make sure that the modules are identical in terms of type, speed, and capacity for optimal performance.
While it’s tempting to opt for higher capacity or faster RAM modules, it’s crucial to stick to the specifications recommended by the manufacturer. Upgrading with incompatible or mismatched RAM modules can lead to system instability or even cause damage to your laptop.
With the compatible RAM module(s) in hand, you can now proceed to the next step: acquiring the new RAM module.
Step 2: Acquire the new RAM module
Once you have determined the compatible RAM for your HP laptop, the next step is to acquire the new RAM module. There are several options available for acquiring the RAM module, including online retailers, computer hardware stores, and authorized HP resellers.
Before making a purchase, it’s important to consider a few factors. Firstly, ensure that you are purchasing a genuine and compatible RAM module that meets the specifications of your laptop. Look for reputable sellers and check for customer reviews to ensure reliability.
When selecting the RAM module, consider the capacity and speed that best suits your needs. If you are primarily using your laptop for basic tasks like web browsing and word processing, a moderate capacity RAM module with standard speed may suffice. However, if you are a gamer or work with demanding applications, opting for higher capacity and faster RAM modules can provide enhanced performance.
Additionally, consider the warranty and return policy offered by the seller. It’s always a good idea to choose a RAM module that comes with a warranty, as it provides assurance and protection against any defects or issues that may arise.
Once you have made your decision, proceed with the purchase and wait for the delivery of your new RAM module. While waiting, be sure to handle your laptop with care to avoid any damage to the existing components.
With the new RAM module in your possession, you are now ready to move on to the next step: powering off your HP laptop and unplugging all cables.
Step 3: Power off your HP laptop and unplug all cables
Before you begin the process of upgrading the RAM on your HP laptop, it is essential to power off the device and disconnect all cables. This step ensures your safety and prevents any electrical damage during the upgrade process.
To power off your laptop, save any open documents or files and close all running applications. Then, click on the “Start” button in the bottom left corner of your screen, followed by “Power,” and select “Shut down.” Allow your laptop a few moments to shut down completely.
Once your laptop is powered off, unplug the power adapter from the electrical outlet and disconnect it from your laptop. It’s also important to remove any other external cables or devices that may be connected, such as USB drives or headphones.
Take a moment to inspect your laptop and ensure that all cables and peripherals are disconnected. This step is crucial to prevent any accidental damage during the upgrade process.
Now that your HP laptop is powered off and all cables are unplugged, you are ready to move on to the next step: locating the RAM upgrade compartment.
Keep in mind that the location of the RAM upgrade compartment may vary depending on your specific HP laptop model. However, most laptops have a designated area on the bottom or back of the device that allows easy access to the RAM modules.
Before proceeding to open your laptop, ensure you are working in a clean and static-free environment. Consider using an antistatic wrist strap to prevent any static electricity from damaging sensitive components.
In the following step, we will guide you through locating the RAM upgrade compartment and preparing your laptop for the RAM module installation process.
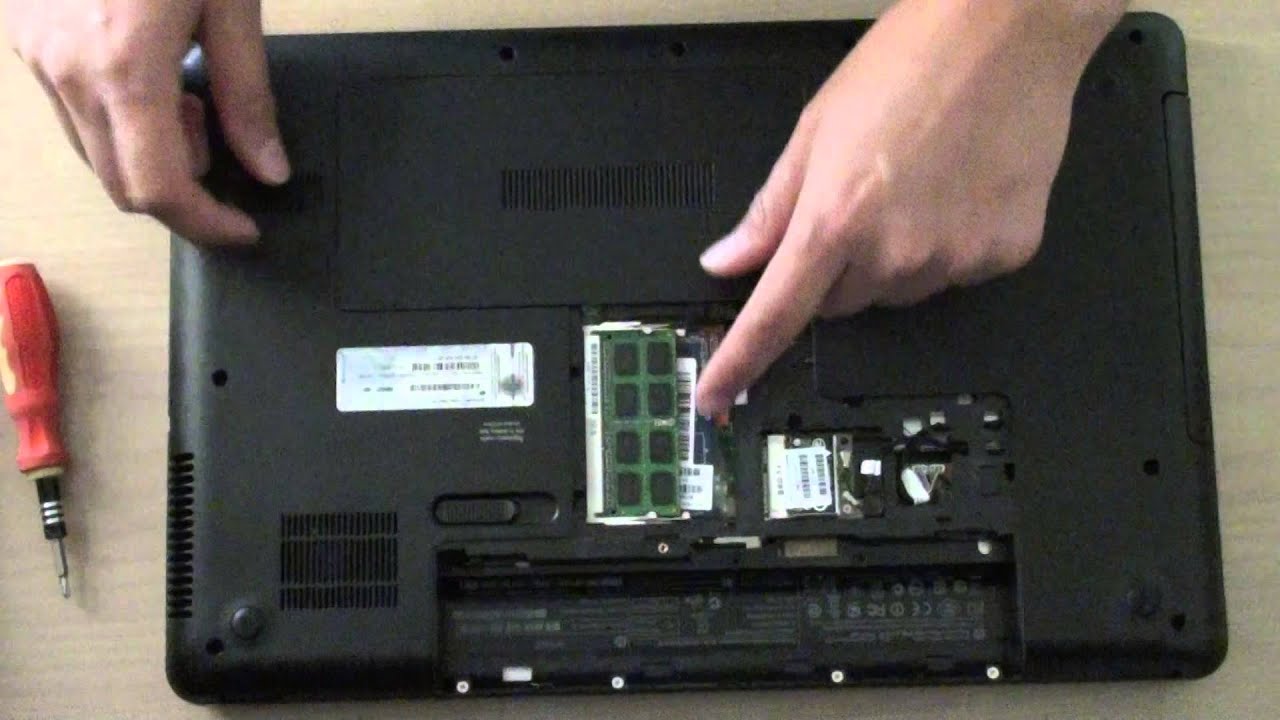
Step 4: Locate the RAM upgrade compartment
Locating the RAM upgrade compartment is an important step in upgrading the RAM on your HP laptop. The exact location of the compartment may vary depending on your laptop model, but it is typically accessible from the bottom or back of the device.
Start by carefully flipping your laptop over and inspecting the bottom panel. Look for any screw markings or indications of a removable compartment. In most cases, you should be able to identify a panel specifically designed for RAM upgrades, although some laptops may have multiple compartments.
If you are unable to locate the RAM upgrade compartment by simply inspecting the bottom panel, consult your laptop’s user manual or the HP support website for specific instructions. It’s important to avoid unnecessary force or unscrewing panels that are not intended for RAM upgrades, as this could potentially damage your laptop.
Once you have identified the RAM upgrade compartment, you may need to remove screws or release latches in order to open it. Use a screwdriver or any necessary tools as recommended by your laptop’s manufacturer to safely open the compartment.
Pay close attention to any markings or instructions inside the compartment that indicate the correct orientation for installing the RAM module. Note that some laptops have multiple slots for RAM modules, while others may only have one.
Before proceeding to the next step, ensure that you have familiarized yourself with the specific instructions and precautions provided by your laptop’s manufacturer. Taking these precautions will help ensure a smooth and successful RAM upgrade process.
Now that you have located the RAM upgrade compartment, it’s time to continue with the next step: removing the old RAM module.
Step 5: Remove the old RAM module
Removing the old RAM module is a crucial step in upgrading the RAM on your HP laptop. Before you begin, make sure you are working in a static-free environment and have taken appropriate precautions to avoid damaging any components.
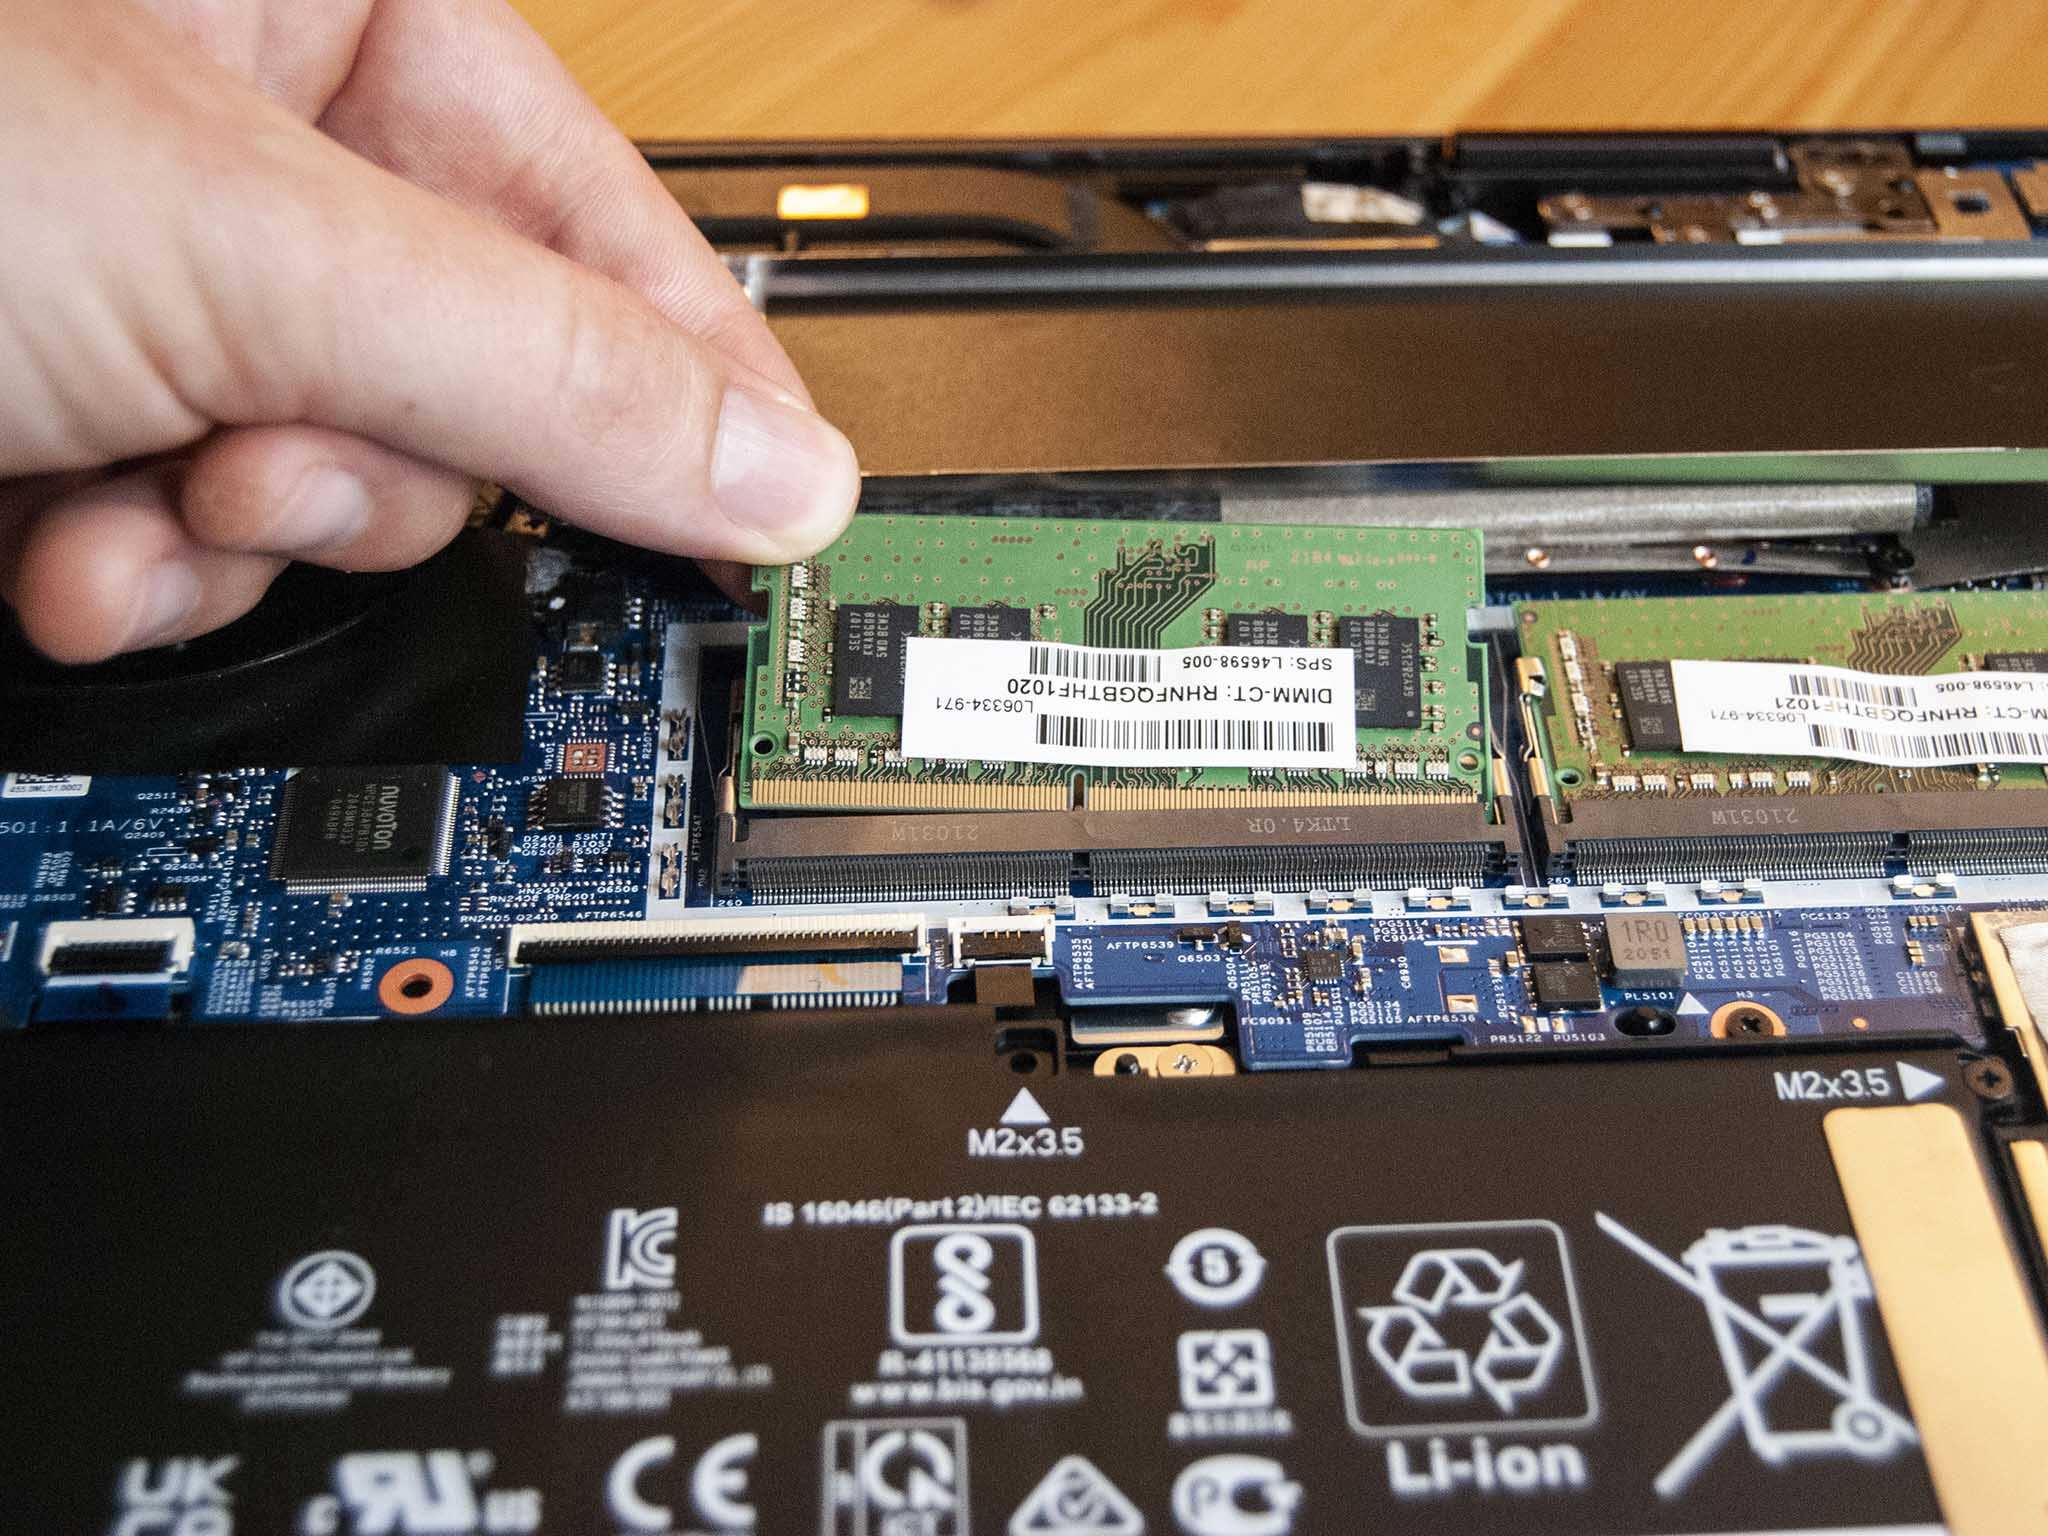
Start by gently spreading apart the retention clips on each side of the RAM module. These clips are designed to hold the RAM module in place. Once they are released, the RAM module should pop up at a slight angle.
While supporting the module with one hand, use your other hand to carefully pull it out of the slot. Make sure to exert even pressure on both sides of the module to prevent any bending or damage.
Once the old RAM module is removed, place it in an anti-static bag or on an anti-static surface to protect it from any electrostatic discharge.
Take a moment to inspect the RAM slot and ensure there are no debris or dust particles. If necessary, use a can of compressed air or a soft brush to gently clean the slot before proceeding.
It’s important to note that some laptops may have multiple RAM slots. If you plan to replace all the existing RAM modules, repeat this step for each module in the system. However, if you are planning to add additional RAM without replacing the existing modules, ensure you are inserting the new modules in the correct slots as per your laptop’s specifications.
With the old RAM module(s) safely removed, you are now ready to move on to the exciting step of installing the new RAM module(s) in your HP laptop.
Remember to handle the RAM modules with care and avoid touching the gold contacts on the underside as it can cause damage. Additionally, if you encounter any difficulties during this process, consult the user manual or seek professional assistance to avoid any mistakes.
Proceed to the next step once you are confident and prepared for the RAM module installation.
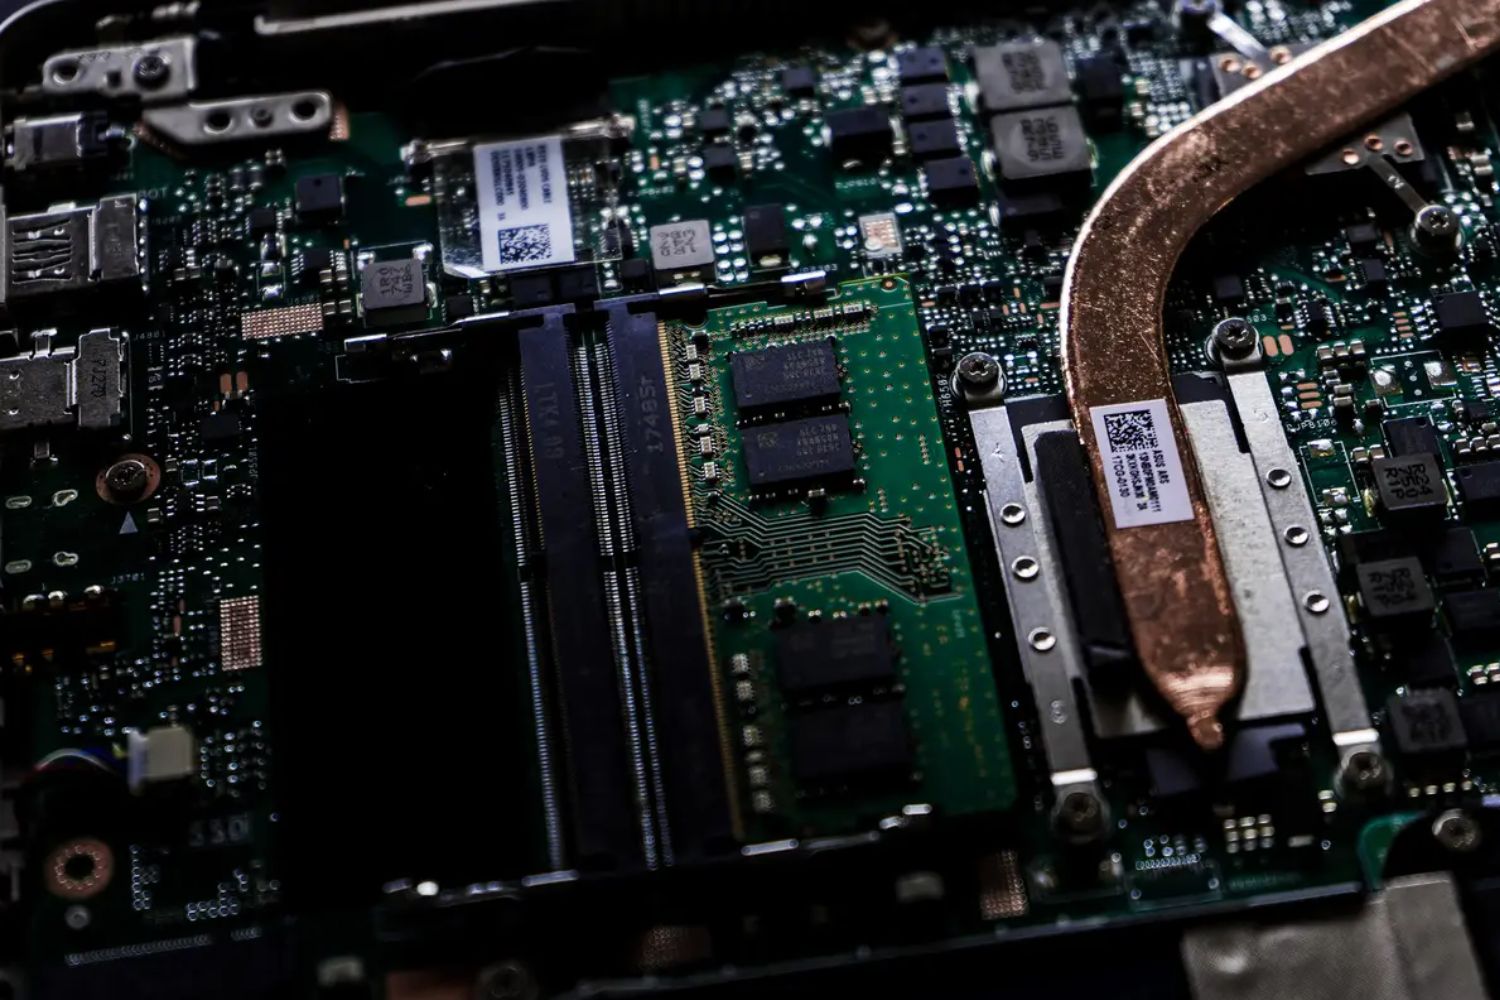
Step 6: Install the new RAM module
Now that you have removed the old RAM module(s) from your HP laptop, it’s time to install the new RAM module(s). Before proceeding, ensure that you have the correct RAM module(s) that are compatible with your laptop’s specifications.
Begin by holding the new RAM module carefully by its edges, making sure not to touch the gold contacts on the underside. Align the notches on the module with the slot in the RAM compartment, ensuring it is inserted in the proper orientation.
With the module aligned, gently press it into the slot at a slight angle until it is fully seated. You should hear a click sound as the retention clips on both sides of the slot lock the module into place.
Ensure that the retention clips are securely holding the RAM module in place. Give it a light tug to verify that it is properly seated and not loose. If the module doesn’t click into place or feels loose, remove it and reinsert it, ensuring it is inserted at the correct angle.
If you are installing multiple RAM modules, repeat the above steps for each module, ensuring that they are all properly inserted and secured.
After installing the new RAM module(s), take a moment to inspect the RAM compartment and surrounding area for any loose screws or cables. Ensure that everything is appropriately secured and in its proper place.
Remember that it’s crucial to only use the recommended RAM modules and follow the manufacturer’s specifications to avoid any compatibility issues or damage to your laptop.
Now that you have successfully installed the new RAM module(s), you are almost finished with the RAM upgrade process. The next step is to securely fasten the new RAM module(s) in place and reassemble your HP laptop.
Continue reading to learn how to secure the new RAM module(s) and complete the upgrade process.
Step 7: Secure the new RAM module in place
After successfully installing the new RAM module(s) into your HP laptop, it’s important to secure them in place to ensure optimal performance and prevent any issues with the connection.
Start by aligning the retention clips on both sides of the RAM slot with the notches on the sides of the RAM module. These clips are designed to hold the module firmly in place.
Once aligned, carefully press down on both sides of the module until you hear a distinct click. This indicates that the retention clips have securely locked the RAM module in place.
After securing the RAM module, give it a gentle tug to ensure it is firmly seated and does not come loose. A properly installed RAM module should be secure and not move when gently tugged.
It’s important to ensure that all the retention clips are securely holding the RAM module(s) in place. Loose or improperly seated modules can cause instability or even result in data corruption.
If you are installing multiple RAM modules, repeat the above steps for each module, ensuring they are all securely fastened in place.
Double-check the surrounding area to make sure no loose screws or cables are obstructing the RAM compartment. Any loose objects can potentially cause interference or damage to the RAM modules.
With the new RAM module(s) securely fastened in place, you are now ready to reassemble your HP laptop and complete the RAM upgrade process.
Proceed to the next step to learn how to reassemble your laptop and prepare it for the final step.
Step 8: Reassemble your HP laptop
With the new RAM module(s) securely installed in your HP laptop, it’s time to reassemble the various components and prepare your laptop for the final step of the RAM upgrade process.
Start by carefully aligning the bottom panel of your laptop with the chassis. Ensure that all the screw holes and clips are properly aligned.
If you had removed any screws or latches to access the RAM compartment, reinsert and tighten them as per your laptop’s specifications. Use a screwdriver or any necessary tools recommended by the manufacturer to securely fasten the screws.
Be cautious not to overtighten the screws as this may damage the laptop’s casing or strip the threads in the screw holes.
Once the bottom panel is securely fastened, take a moment to inspect the surrounding area for any loose components or cables. Ensure that everything is back in its proper place and securely connected.
Connect the power adapter to your laptop and plug it into an electrical outlet. This step is necessary to provide power to your laptop during the final step of the RAM upgrade process.
Check that all other cables, such as USB devices or headphones, are properly connected to their respective ports.
Now that you have reassembled your HP laptop, it’s time to proceed to the next step: power on your laptop and check the RAM upgrade.
Double-check that the RAM module(s) are securely installed, all screws are tightened correctly, and all cables and components are properly connected before proceeding with powering on your laptop.
Continue reading to learn how to power on your laptop and verify the RAM upgrade in the final step.
Step 9: Power on your laptop and check the RAM upgrade
After reassembling your HP laptop, it’s time to power it on and verify the success of the RAM upgrade. This final step will ensure that your laptop recognizes and utilizes the new RAM module(s) effectively.
Connect the power adapter to your laptop if you haven’t already done so, and plug it into a power outlet. Ensure that the battery is sufficiently charged, or keep the laptop connected to the power adapter during this process.
Press the power button on your laptop to turn it on. Wait for the operating system to load and the desktop or login screen to appear. This may take a few moments, depending on your laptop’s specifications.
Once your laptop is powered on, open the Task Manager or System Information application to check the recognized amount of RAM. On Windows, you can access the Task Manager by pressing Ctrl + Shift + Esc and navigating to the Performance tab. On macOS, go to the Apple menu, select About This Mac, and click on the Memory tab.
Verify that the total amount of RAM displayed matches the expected value considering the RAM module(s) you installed. If the displayed amount is incorrect or lower than expected, there may be an issue with the installation.
If you encounter any issues or inconsistencies, first power off your laptop and double-check that the RAM module(s) are securely seated in their respective slots. Ensure that the retention clips are properly engaged, and there is no visible damage to the RAM modules or connectors.
If you are still experiencing problems, consult the user manual, contact HP support, or seek assistance from a professional to resolve the issue.
Congratulations! You have successfully upgraded the RAM on your HP laptop. Enjoy the improved performance and the ability to handle more demanding tasks and applications with ease.
Remember to keep your laptop’s operating system and drivers up to date to fully optimize the new RAM module’s capabilities and ensure the laptop’s stability and compatibility.
Thank you for following this step-by-step guide. We hope it has been helpful and that you have a positive experience with your new RAM upgrade.
Conclusion
Upgrading the RAM on your HP laptop can have a significant impact on its overall performance and usability. By increasing your laptop’s RAM capacity, you can enjoy smoother multitasking, faster data processing, and improved performance with resource-intensive applications.
In this step-by-step guide, we have walked you through the process of upgrading the RAM on your HP laptop. From determining the compatible RAM module to securely installing and verifying the upgrade, you now have the knowledge and guidance to successfully complete the RAM upgrade process.
Remember to always consult your laptop’s user manual or the manufacturer’s website for specific instructions and precautions. Ensure that you are working in a static-free environment and take appropriate measures to handle the RAM and laptop components with care.
With each step, we have emphasized the importance of compatibility, proper installation, and thorough inspection. These precautions are essential for a successful RAM upgrade, as an incorrect installation or incompatible RAM module can lead to system instability or other issues.
Once you have successfully upgraded the RAM on your HP laptop, be sure to take advantage of the improved performance by exploring new possibilities for productivity, gaming, and multimedia experiences.
Remember to periodically check for software and driver updates, as these updates can further optimize your laptop’s performance and ensure compatibility with the new RAM module. Regular maintenance, including cleaning the laptop and keeping it free from dust and debris, can also contribute to its longevity and performance.
If you encounter any difficulties or have concerns during the RAM upgrade process, do not hesitate to seek professional assistance or reach out to the laptop manufacturer’s support team for guidance.
By successfully upgrading the RAM on your HP laptop, you have taken a significant step towards enhancing its capabilities and extending its lifespan. Enjoy the benefits of improved performance and see the difference that upgraded RAM can make in your daily computing experience.
Thank you for following this guide. We hope it has been informative and helpful in your RAM upgrade endeavor.