Introduction
Upgrading the RAM in your Dell laptop can significantly improve its performance and speed, allowing you to seamlessly run multiple applications and handle resource-intensive tasks with ease. Whether you’re a professional needing to work on complex programs or a gamer looking for smoother gameplay, adding more RAM is a cost-effective way to enhance your laptop’s capabilities.
Increasing the RAM, short for Random Access Memory, provides your laptop with more temporary storage space to store and access data quickly. This means that your laptop can handle more tasks simultaneously without experiencing lag or slowdowns. With a RAM upgrade, you can experience faster boot times, smoother multitasking, improved overall system performance, and increased responsiveness.
However, before diving into the RAM upgrade process, it’s essential to familiarize yourself with the necessary steps, as well as ensure compatibility with your Dell laptop model. This guide will walk you through the process of upgrading RAM in a Dell laptop, from preparing for the upgrade to verifying its success.
It’s important to note that upgrading RAM is relatively straightforward, even for those with limited technical expertise. With the right tools and instructions, you can confidently perform the RAM upgrade yourself, saving both time and money in the process. So, let’s get started and unlock the full potential of your Dell laptop by upgrading its RAM!
Preparing for the Upgrade
Before diving into the RAM upgrade process, there are a few essential steps you need to take to ensure a smooth and successful upgrade. By properly preparing for the upgrade, you’ll minimize the risk of any potential issues and make the process much more manageable.
1. Check the warranty: Start by checking your Dell laptop’s warranty status. If your laptop is still under warranty, it’s recommended to consult with Dell support or an authorized technician before attempting to upgrade the RAM. This will help you avoid inadvertently voiding the warranty or causing any damage.
2. Backup your data: While upgrading the RAM does not typically involve data loss, it’s always a good idea to back up your important files, documents, and personal data. You can either create a backup on an external storage device or use cloud storage services to ensure that your data is safe and easily accessible.
3. Gather necessary information: Familiarize yourself with your laptop’s specifications, including the maximum RAM capacity and the type and speed of the compatible RAM modules. You can find this information in the laptop’s user manual or by visiting Dell’s official website and entering your laptop’s model number.
4. Find a suitable workspace: It’s crucial to have a clean and well-lit workspace to perform the RAM upgrade. Choose a flat and stable surface with sufficient room to lay out your tools and components. Consider using an anti-static mat or grounding yourself by touching a metal object to prevent any damage from electrostatic discharge.
5. Gather the necessary tools: To successfully upgrade the RAM, you’ll need a few essential tools, including a small Phillips screwdriver, an anti-static wrist strap (optional but recommended), and a soft cloth or microfiber cloth to clean the laptop’s surface.
By taking the time to prepare for the RAM upgrade, you’ll have a clearer understanding of the process and ensure that you have all the necessary information and tools. This will help make the upgrade go as smoothly as possible, reducing the chances of any complications or mishaps along the way.
Checking Compatibility
Before proceeding with the RAM upgrade, it’s crucial to ensure compatibility between your Dell laptop and the new RAM modules you plan to install. Incompatible RAM can cause system instability or prevent your laptop from booting up. Here are the key factors to consider when checking compatibility:
1. Laptop model and specifications: Determine your laptop’s specific model and specifications, including the maximum RAM capacity, type, and speed supported. This information can usually be found in the laptop’s user manual or by visiting the manufacturer’s website.
2. Form factor: RAM modules come in different form factors, such as DIMM (Desktop) or SODIMM (Laptop). Ensure that you select the appropriate form factor that matches your laptop’s RAM slot design.
3. RAM type and speed: Check the type and speed of the current RAM installed in your laptop. To maintain compatibility, it’s recommended to match the type (DDR3, DDR4, etc.) and speed (e.g., 2400MHz) of the existing RAM.
4. Maximum RAM capacity: Determine the maximum RAM capacity your laptop can support. Some laptops have a maximum RAM limit, and exceeding this limit may not provide any additional benefits. Ensure that the total capacity of the new RAM modules doesn’t exceed the specified limit.
5. Operating system requirements: Certain operating systems, especially older versions, may have limitations on the maximum amount of RAM they can utilize. Verify that your operating system supports the desired RAM upgrade.
Ensuring compatibility between your laptop and the new RAM modules is crucial for a successful upgrade. If you are unsure about any of the compatibility factors, it’s recommended to consult Dell’s support documentation, contact their customer service, or seek assistance from a professional technician to avoid any potential issues during the upgrade process.
Gathering the Necessary Tools
Before you begin the RAM upgrade process, it’s essential to gather all the necessary tools to ensure a smooth and efficient upgrade. Having the right tools on hand will make the process much more straightforward and minimize the risk of damage to your laptop or components. Here are the tools you’ll need:
1. Small Phillips screwdriver: Most laptops use small Phillips screws to secure the access panel or the bottom cover of the laptop. Make sure you have a suitable Phillips screwdriver to safely remove and reattach these screws during the upgrade.
2. Anti-static wrist strap: While not mandatory, an anti-static wrist strap can help ground you and prevent any electrostatic discharge that could potentially damage sensitive electronic components. It’s especially useful when working on internal laptop components, such as the RAM.
3. Soft cloth or microfiber cloth: In the process of upgrading the RAM, you might come across some dust or fingerprints on your laptop’s surface. It’s a good practice to have a soft cloth or microfiber cloth handy to clean the surface before and after the upgrade.
4. Container or magnetic tray: As you remove screws during the upgrade, it’s important to have a container or magnetic tray to keep them organized and prevent any loss. This will make it easier to reassemble the laptop when the RAM installation is complete.
5. Clear workspace: Ensure you have a clutter-free workspace where you can comfortably lay out your tools and components. Having a clean and organized area will minimize the risk of losing any small parts or damaging any important components during the upgrade.
By gathering these essential tools before starting the RAM upgrade, you’ll have everything you need to confidently complete the installation. It’s always better to be prepared and have the right tools at your disposal to make the process smoother and more efficient.
Shutting Down and Disconnecting
Before you begin the RAM upgrade process, it’s essential to shut down your Dell laptop properly and disconnect it from any power source. Following these steps will ensure your safety and prevent any damage to the internal components during the upgrade:
1. Save your work and close all applications: Before shutting down, make sure to save any open documents, close all applications, and properly exit any running programs. This will prevent any potential data loss or damage to files.
2. Shut down your laptop: Click on the Windows Start button, select the Power option, and choose Shut down. Allow your laptop to fully shut down before proceeding to the next step.
3. Disconnect from the power source: Unplug the power adapter from your laptop and remove any other connected cables. This step ensures that there is no electrical current flowing through your laptop during the upgrade process.
4. Remove the battery (if applicable): If your Dell laptop has a removable battery, carefully remove it to eliminate any residual power supply or potential electrical hazards. Refer to your laptop’s user manual for specific instructions on removing the battery.
5. Ground yourself: To prevent any static electricity discharge that could damage internal components, it’s important to ground yourself. You can either wear an anti-static wrist strap connected to a grounded object or touch a metal surface to discharge any built-up static.
By properly shutting down your laptop, disconnecting it from the power source, and grounding yourself, you’ll ensure a safer environment for the RAM upgrade. Taking these precautionary steps helps prevent any accidental power surges or damage to your laptop’s delicate internal components.
Locating the RAM Slots
Before you can begin the RAM upgrade process in your Dell laptop, you need to locate the RAM slots where the memory modules are inserted. The location of the RAM slots may vary depending on the specific laptop model, but here are some common methods to find them:
1. Check the user manual: The easiest and most reliable way to find the RAM slots is by referring to your Dell laptop’s user manual. The manual typically includes a detailed diagram or description of the laptop’s internal components and their locations.
2. Inspect the bottom cover: In some cases, the RAM slots are accessible by removing the bottom cover of the laptop. Carefully flip your laptop over and look for a panel or compartment that can be easily removed. This panel is often held in place by screws and may be labeled with a RAM symbol.
3. Search online resources: If you don’t have access to the user manual, or if it doesn’t provide the necessary information, you can search for your specific Dell laptop model online. Many websites and forums offer detailed guides, tutorials, or even videos specifically addressing how to locate the RAM slots in different laptop models.
4. Consult Dell support: If you’re still having trouble finding the RAM slots or need additional guidance, consider reaching out to Dell’s support team. They can provide you with specific information related to your laptop model and guide you through the process of locating the RAM slots.
Remember to handle your laptop with care when searching for the RAM slots. Avoid applying excessive force or using sharp objects that could cause damage to the internal components or the laptop’s exterior. Taking the time to locate the RAM slots accurately is crucial for a successful upgrade.
Removing the Old RAM
Once you have located the RAM slots in your Dell laptop, you are ready to remove the old RAM modules. The process involves a few simple steps to ensure proper removal without causing any damage to the components. Here’s how to remove the old RAM:
1. Ensure the laptop is powered off and disconnected: Before proceeding, make sure your laptop is completely shut down and disconnected from any power source. This will prevent any potential electrical damage while handling the RAM modules.
2. Ground yourself: To discharge any static electricity, ground yourself by touching a metal surface or wearing an anti-static wrist strap. This step prevents any electrostatic discharge that could harm the internal components.
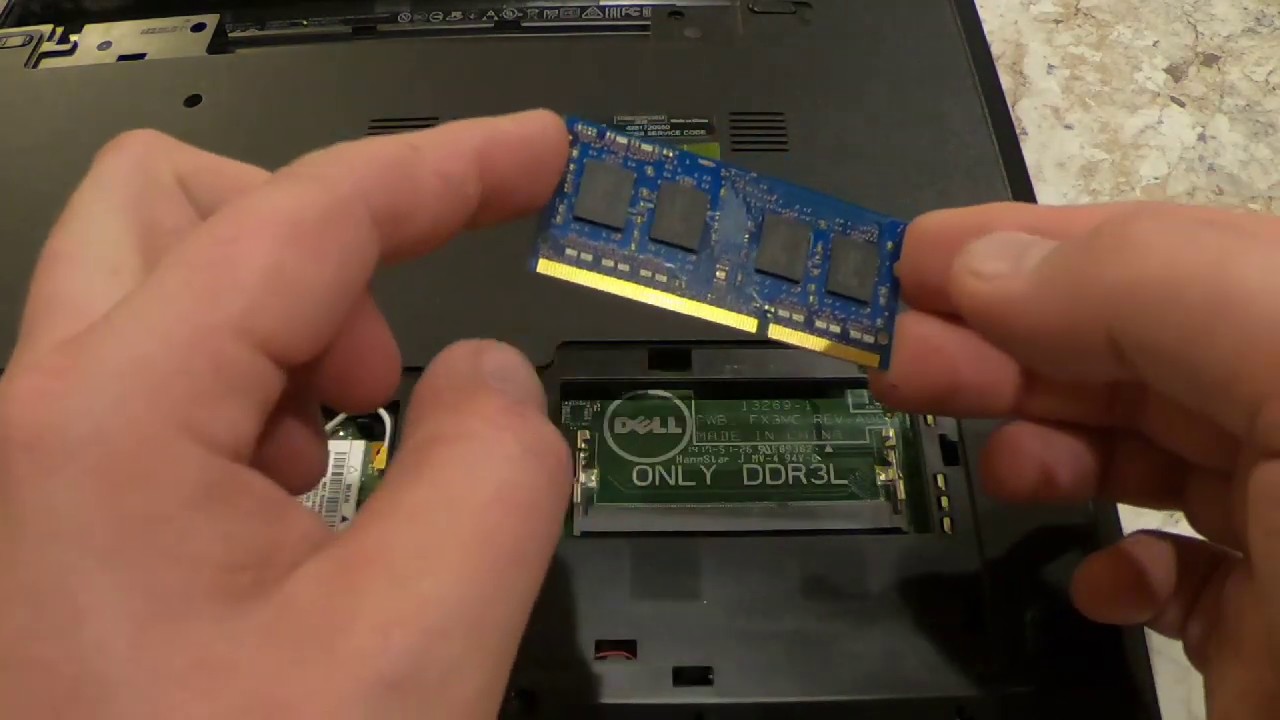
3. Locate the old RAM modules: Identify the slots occupied by the existing RAM modules. Most laptops have two slots, but this can vary depending on the specific model. Take note of the release mechanisms or locking tabs on either side of the modules.
4. Release the locking tabs: Gently push outward on the small metal or plastic tabs on either side of the RAM modules. This action will cause the modules to pop up at a slight angle, indicating that they have been released from the slot.
5. Remove the old RAM modules: Once the locking tabs have been released, carefully pull the RAM modules out of their slots at the same angle they popped up. Handle the modules by their edges to avoid touching the sensitive gold contacts on the bottom.
6. Set aside the old RAM modules: Place the old RAM modules on an anti-static surface or in an anti-static bag. Keep them in a safe place in case you need to reinstall them or wish to keep them as backup modules.
By following these steps, you can safely remove the old RAM modules from your Dell laptop. Take your time, be gentle, and be cautious not to force or bend anything during the removal process. Properly removing the old RAM sets the stage for smoothly inserting and installing the new memory modules.
Inserting the New RAM
After removing the old RAM modules from your Dell laptop, it’s time to insert the new RAM modules. This process is relatively straightforward and requires careful handling to ensure a successful installation. Here’s a step-by-step guide on how to insert the new RAM:
1. Ensure the laptop is powered off and disconnected: Before proceeding with the RAM installation, make sure your laptop is completely shut down and disconnected from any power source. This is crucial to avoid any potential electrical damage during the process.
2. Ground yourself: To discharge any static electricity, ground yourself by touching a metal surface or wearing an anti-static wrist strap. This step prevents any electrostatic discharge that could harm the internal components.
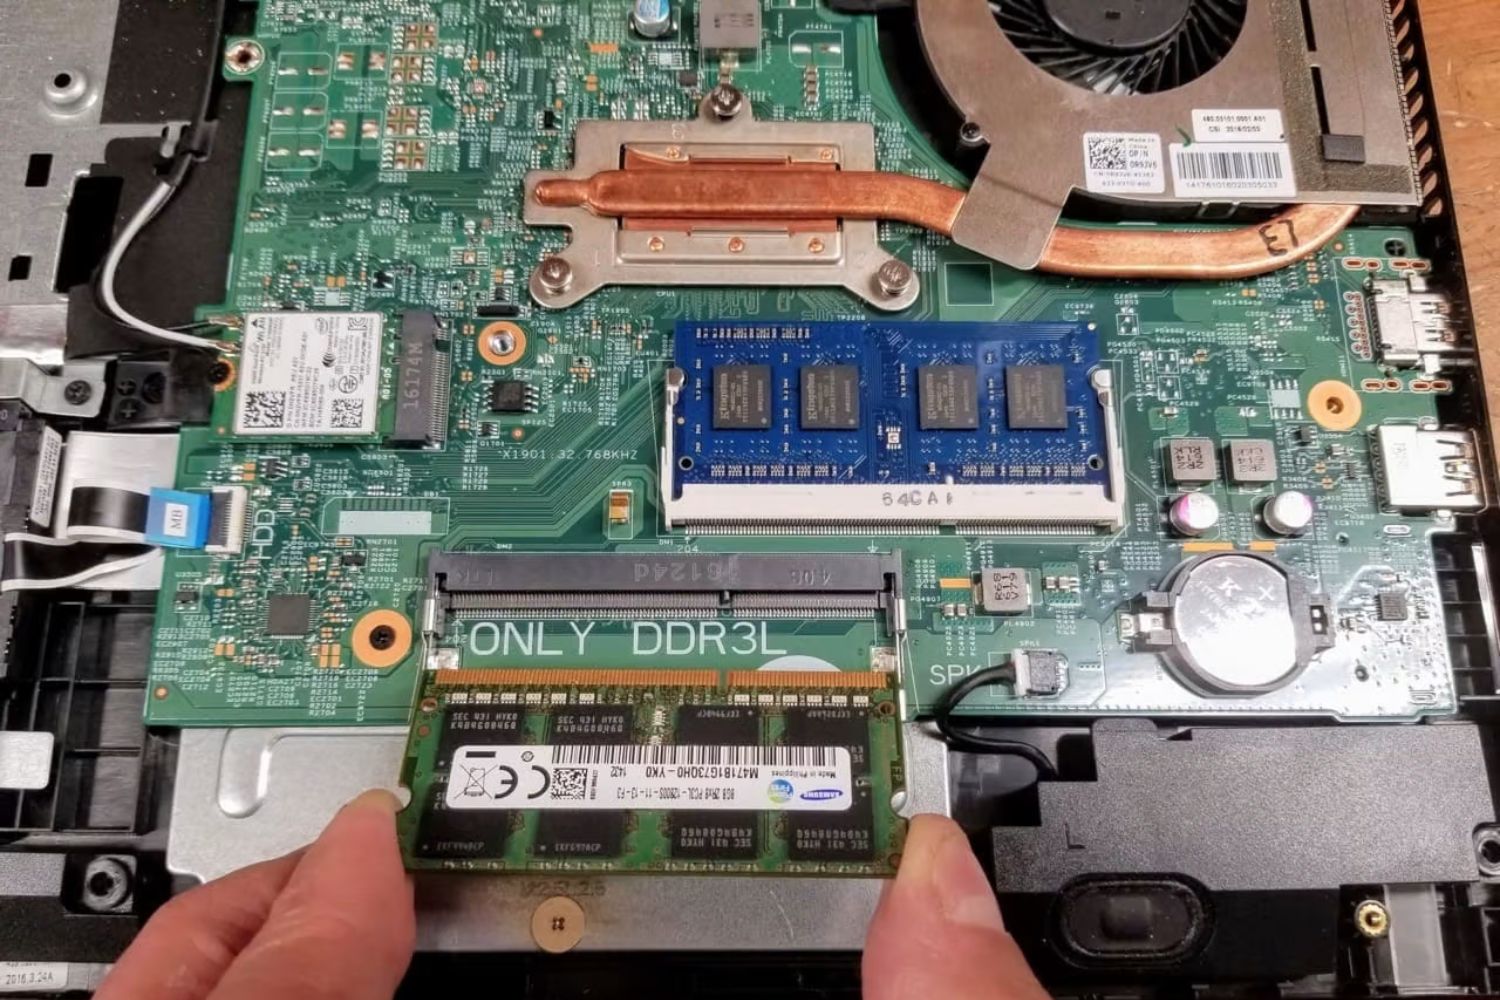
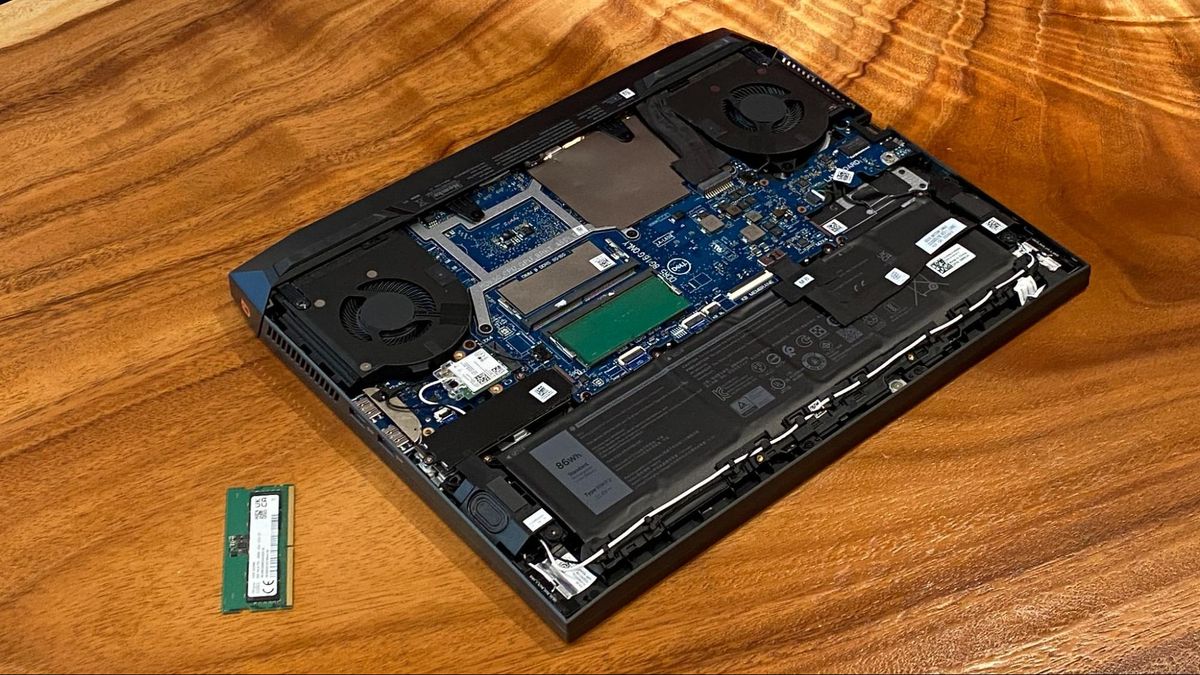
3. Identify the RAM slots: Take note of the slots where the old RAM modules were located. Ensure you are aligning the new RAM modules with the correct slots on your laptop’s motherboard.
4. Align the notch on the RAM module: Look for the notch on the bottom edge of the new RAM module. Align this notch with the corresponding slot in the RAM slot on the motherboard. This ensures proper orientation and prevents the module from being inserted incorrectly.
5. Insert the RAM module at a slight angle: Holding the RAM module by its edges, insert it into the slot at a 30-45 degree angle. Gently push it down until the gold contacts are fully seated and the module is parallel to the motherboard.
6. Apply equal pressure to both ends: Using your fingers, apply equal pressure to both ends of the RAM module, ensuring it is firmly seated in the slot. You should hear a clicking sound when the module locks into place. Double-check that the locking tabs on both sides of the slot are secured in their locked positions.
7. Repeat for additional RAM modules: If you are adding more than one RAM module, repeat the above steps for each module. Ensure that you install them in sequential slots, following the manufacturer’s recommended configuration.
8. Close up the laptop: Once the new RAM modules are securely installed, close up the laptop by reattaching any removed panels or covers that were taken off earlier in the process.
By following these steps, you can confidently insert the new RAM modules into your Dell laptop. Remember to handle the modules carefully and avoid touching the sensitive gold contacts. Proper installation of the new RAM sets the stage for improved performance and enhanced multitasking capabilities for your laptop.
Closing the Laptop
After successfully installing the new RAM modules in your Dell laptop, it’s time to close up the laptop and secure everything in place. Properly closing the laptop ensures that the new RAM is protected and that the laptop is ready for use. Here are the steps to close the laptop:
1. Check the RAM modules: Before closing the laptop, double-check that the new RAM modules are securely seated in their slots. Ensure that the locking tabs on both sides of the slots are properly engaged and holding the modules in place.
2. Inspect the area around the RAM slots: Take a brief moment to make sure there are no loose screws or other debris near or around the RAM slots. Clear away any unwanted debris using a can of compressed air or a soft brush.
3. Align the bottom cover: With the RAM modules securely in place, align the bottom cover with the screw holes or clips on the laptop’s base. Carefully align the cover and make sure it fits snugly into place without forcing it.
4. Reattach the screws or clips: If the bottom cover is held in place by screws, use the small Phillips screwdriver to reattach them one by one. Tighten the screws firmly, but not excessively, ensuring they are snug without damaging the laptop’s housing or threads.
5. Test the closure: Once all the screws are secure, gently press on the bottom cover to check that it is properly closed and seated. Ensure there are no gaps or loose areas. The cover should be flush with the laptop’s base.
6. Verify the integrity of the laptop: Give your Dell laptop a quick visual inspection to ensure that everything is in place, all panels are closed properly, and there are no visible signs of damage or loose parts.
By following these steps, you can confidently close your Dell laptop after installing the new RAM modules. Taking the time to ensure a proper closure safeguards the internal components and promotes the overall longevity and reliability of your upgraded laptop.
Verifying the RAM Upgrade
After completing the RAM upgrade in your Dell laptop, it’s important to verify that the new RAM modules are functioning correctly and have been recognized by the system. Verifying the RAM upgrade ensures that your laptop is benefiting from the increased memory capacity. Here are the steps to verify the RAM upgrade:
1. Power on your laptop: Start by powering on your laptop as you normally would. Allow it to boot up completely and reach the desktop or login screen.
2. Check the system properties: Right-click on the Windows Start button and select “System” from the context menu. In the System window, you should see the total installed RAM displayed next to “Installed memory (RAM)”. It should reflect the new RAM capacity you have installed.
3. Confirm the RAM speed and type: To ensure that the new RAM modules are recognized correctly, you can use a system information tool. One common tool is CPU-Z, which provides detailed information about various hardware components, including RAM speed and type. Download and install CPU-Z, and then navigate to the “Memory” tab to confirm the information.
4. Perform a RAM stress test: To further validate the stability and performance of the new RAM, you can run a RAM stress test. Tools like MemTest86 or Windows Memory Diagnostic can help identify any potential errors or issues with the RAM. Run these tests for a sufficient duration to ensure thorough testing.
5. Observe the system performance: Pay attention to the overall system performance after the RAM upgrade. Notice if your laptop feels more responsive, applications launch faster, and multitasking is smoother. These improvements are indications that the RAM upgrade has been successful.
If you encounter any issues during the verification process, such as the system not recognizing the new RAM, computer crashes, or error messages, it’s recommended to double-check the installation. Ensure that the RAM modules are properly seated, the slots are clean, and the modules are compatible with your laptop model.
By verifying the RAM upgrade and confirming that your laptop is benefiting from the increased memory capacity, you can have confidence that the upgrade was successful and that your laptop’s performance and capabilities have been improved.
Final Thoughts
Upgrading the RAM in your Dell laptop can have a significant impact on its overall performance, allowing you to run more demanding software, multitask efficiently, and experience faster boot times. By following the steps outlined in this guide, you can successfully upgrade the RAM in your Dell laptop and enhance its capabilities without needing to seek professional assistance.
Remember to always conduct thorough research beforehand to ensure compatibility between your laptop model and the new RAM modules. Safely shut down your laptop, disconnect it from power, and ground yourself before proceeding with the upgrade. Take your time during the removal and installation of the RAM modules, being careful not to apply excessive force or cause any damage to the delicate components.
Verifying the RAM upgrade is crucial to ensure that the new RAM is recognized by the system and functioning properly. Check the system properties and use diagnostic tools to confirm the RAM capacity, speed, and stability. Observe the system’s performance for improved responsiveness and smoother multitasking.
By following these steps and guidelines, you can confidently upgrade the RAM in your Dell laptop, unleashing its full potential and maximizing your productivity and enjoyment. Enjoy the benefits of increased memory capacity and improved performance as you tackle more demanding tasks and applications with ease.
Remember to consult Dell’s official documentation or seek professional assistance if you face any difficulties or have specific questions regarding your Dell laptop model’s RAM upgrade process. With the right tools, knowledge, and patience, you can successfully upgrade your Dell laptop’s RAM and enhance its performance for a more seamless computing experience.