Introduction
When it comes to upgrading or troubleshooting your computer, knowing the type of RAM (Random Access Memory) you have is crucial. RAM is an essential component that affects the overall performance and speed of your system. Whether you want to add more memory or optimize compatibility, identifying your RAM type is the first step. In this guide, we will explore various methods to determine the RAM type on different operating systems and through different tools.
Understanding your RAM type is essential for a few reasons. Firstly, it helps you ascertain the maximum capacity of RAM your system supports. Additionally, it enables you to identify the correct type and speed of RAM to purchase if you plan on upgrading your memory. Moreover, knowing your RAM type helps you troubleshoot compatibility issues or any performance-related problems.
There are several ways to check your RAM type, depending on the operating system you are using. Windows, Mac, and Linux all have different methods, as do the BIOS/UEFI settings. You can also determine your RAM type using the command prompt or terminal, or by utilizing third-party software.
In the following sections, we will delve into each method in detail, providing step-by-step instructions and tips. Whether you are a Windows, Mac, or Linux user, or if you prefer the command line over graphical interfaces, you will find a suitable method to check your RAM type.
Checking the RAM Type on Windows
Windows offers multiple ways to determine the RAM type on your computer. Here are a few methods you can try:
- Task Manager: Press Ctrl + Shift + Esc to open the Task Manager. Click on the “Performance” tab and select “Memory” from the left sidebar. Under “Physical Memory,” you will find information about your RAM, including the type.
- System Information: Open the Start menu and type “System Information” in the search bar. Launch the System Information utility and navigate to “System Summary” in the left sidebar. Look for the “Installed Physical Memory (RAM)” field, which displays the details of your RAM, including the type.
- Command Prompt: Open the Command Prompt by searching for “cmd” in the Start menu. Type the command “wmic memorychip get Manufacturer, PartNumber, SerialNumber, Speed, MemoryType” (without quotes) and press Enter. This will provide a detailed list of each installed RAM module, including the type.
These methods allow you to check your RAM type directly from your Windows system. They provide quick and easy access to the necessary information without the need for additional software.
If you prefer a more comprehensive overview of your system’s hardware, using third-party software can be a viable option. Programs like CPU-Z, Speccy, or HWiNFO provide in-depth details about your computer’s components, including RAM type and specifications. Simply download and install the software, and it will display all the relevant information in a user-friendly interface.
By utilizing these methods, you can easily determine the RAM type on your Windows computer. Whether you prefer the built-in tools or opt for third-party software, having this knowledge empowers you to make informed decisions when it comes to upgrading or troubleshooting your system’s memory.
Checking the RAM Type on Mac
If you are a Mac user, there are a few simple methods to check the RAM type on your computer:
- About This Mac: Click on the Apple menu in the top-left corner of your screen and select “About This Mac.” In the Overview tab, you will see the basic information about your Mac, including the installed memory (RAM) type.
- System Information: Open the Apple menu, select “About This Mac,” and click on the “System Report” button. This will open the System Information utility. In the hardware section, you can find details about your RAM, including the type and speed.
- Terminal: Open the Terminal by going to Applications > Utilities > Terminal, or by using Spotlight search. Type the command “system_profiler SPMemoryDataType” (without quotes) and press Enter. This command will display detailed information about your system’s memory, including the RAM type.
These methods provide a convenient way to check your RAM type directly from your Mac’s system settings or using the Terminal for more in-depth information. By following these steps, you can quickly identify the type of RAM installed on your Mac.
If you prefer a more user-friendly and comprehensive overview of your system’s hardware, there are third-party applications available for Mac users as well. Applications like iStat Menus, Macs Fan Control, or coconutBattery provide detailed information about your Mac’s components, including RAM type and specifications.
With these methods at your disposal, you can easily determine the RAM type on your Mac. Knowing the RAM type is essential if you plan on upgrading your memory or troubleshooting any performance issues related to your Mac’s RAM. Armed with this knowledge, you can make informed decisions about your system’s memory and optimize its performance.
Checking the RAM Type on Linux
If you are using Linux, there are various methods to check the RAM type on your system:
- Terminal: Open the Terminal by pressing Ctrl + Alt + T or by searching for it in the applications. Type the command “sudo dmidecode –type 17” (without quotes) and enter your password when prompted. This command will display detailed information about your system’s memory, including the RAM type.
- Hardinfo: Install the Hardinfo application by opening the Terminal and typing “sudo apt install hardinfo” (without quotes) and entering your password. Once installed, launch Hardinfo and navigate to “Devices” > “Memory” to find information about your RAM, including the type.
- System Monitor: Open the System Monitor application by searching for it in the applications or pressing Ctrl + Alt + Del and selecting “System Monitor” from the options. In the “Resources” tab, you can find information about your RAM type and usage.
These methods provide easy access to the necessary information about your RAM type on a Linux system. By utilizing these built-in tools, you can quickly identify the type of RAM installed on your computer.
If you prefer a more comprehensive overview of your system’s hardware, you can install third-party applications like lshw or inxi. These applications provide detailed information about your Linux system’s components, including RAM type and specifications.
With these methods, you can easily determine the RAM type on your Linux system. Whether you prefer the command line tools or opt for third-party software, having this knowledge allows you to make informed decisions when it comes to upgrading or troubleshooting your system’s memory.
Checking the RAM Type on BIOS/UEFI
To check the RAM type on your computer’s BIOS (Basic Input/Output System) or UEFI (Unified Extensible Firmware Interface), you will need to access the system settings during startup. Here’s how you can do it:
- Restart your computer: Start by restarting your computer. As it boots up, look for the key or combination of keys you need to press to access the BIOS/UEFI settings. This key varies depending on the manufacturer, but it is commonly Del, F2, F12, or Esc. Refer to your computer’s documentation or look for on-screen prompts for the correct key to enter the BIOS/UEFI settings.
- Enter the BIOS/UEFI settings: Once you have identified the correct key, press it repeatedly during the startup process until the BIOS/UEFI settings screen appears. This may take a few attempts, so be patient.
- Navigate to the memory settings: Once inside the BIOS/UEFI settings, navigate to the memory or system information section. This section may be labeled differently depending on your system, but it generally contains information about your RAM.
- Find the RAM details: Look for the RAM information, which should include details like the type, speed, and capacity of your installed memory modules. Note down the RAM type for future reference.
Accessing the BIOS/UEFI settings and checking the RAM type may vary depending on your computer’s manufacturer and BIOS/UEFI version. It’s important to carefully follow the instructions specific to your system to avoid making any unintended changes.
Once you have obtained the RAM type, you can exit the BIOS/UEFI settings. Restart your computer to boot back into your operating system.
By checking the RAM type in the BIOS/UEFI settings, you can have a direct and reliable source of information about your computer’s installed memory. This knowledge is valuable for upgrading or troubleshooting purposes.
Determining RAM Type using Command Prompt or Terminal
If you prefer using the command line interface, both Windows and Linux offer a method to determine your RAM type using the Command Prompt or Terminal. Here’s how:
- Windows (Command Prompt): Open the Command Prompt by searching for “cmd” in the Start menu. Type the command “wmic memorychip get Manufacturer, PartNumber, SerialNumber, Speed, MemoryType” (without quotes) and press Enter. This command will display a detailed list of each installed RAM module, including the memory type.
- Linux (Terminal): Open the Terminal by pressing Ctrl + Alt + T or searching for it in the applications. Type the command “sudo dmidecode –type 17” (without quotes) and enter your password when prompted. This command will provide detailed information about your system’s memory, including the RAM type.
Using the Command Prompt or Terminal allows you to access system information directly and obtain detailed information about your RAM type. It eliminates the need to navigate through different menus or install additional software.
Simply execute the appropriate command for your operating system, and the output will display the RAM type along with other relevant details about your memory modules.
It’s worth noting that these command-line methods provide you with raw data, which may require some technical knowledge to interpret. However, they are highly reliable and give you accurate information about your RAM type.
By utilizing the Command Prompt or Terminal, you can quickly and efficiently determine the RAM type on your computer. This information is valuable for upgrading your memory or troubleshooting any performance issues related to your RAM.
Determining RAM Type using Third-Party Software
If you prefer a more user-friendly and comprehensive way to determine your RAM type, you can utilize third-party software. There are several applications available that provide detailed information about your computer’s hardware, including the RAM type. Here are a few popular options:
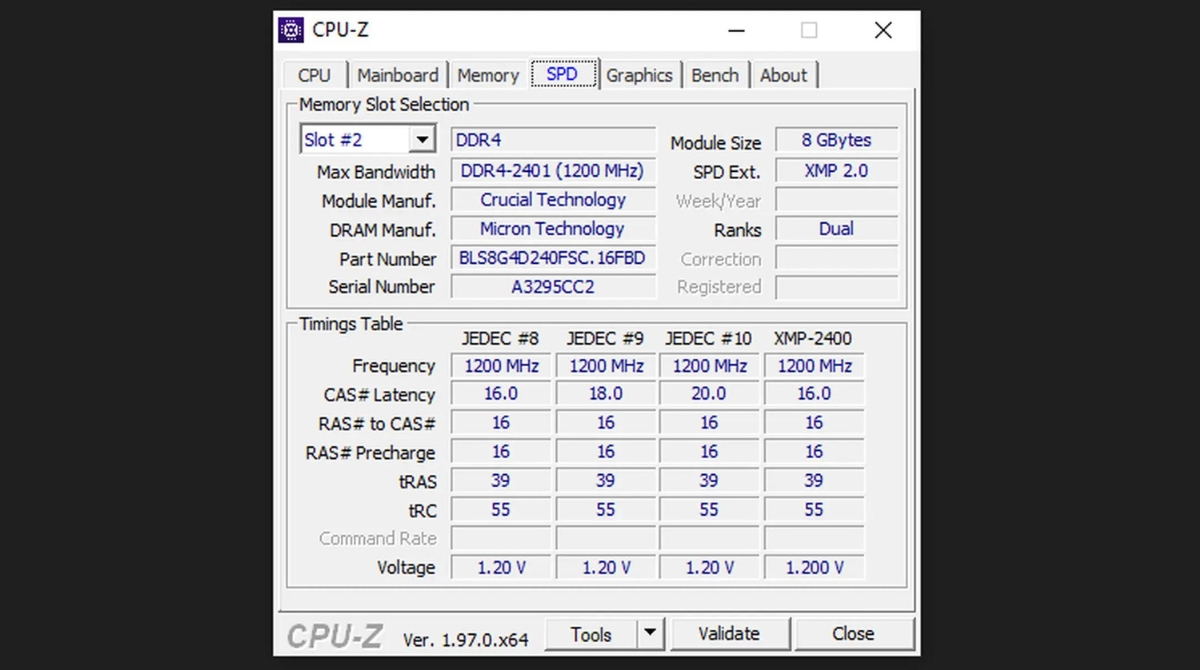
- CPU-Z: CPU-Z is a widely used tool for gathering information about your computer’s hardware. It provides detailed specifications about your CPU, motherboard, and RAM. After installing CPU-Z, launch the software and navigate to the “Memory” tab. Here, you will find comprehensive details about your installed RAM modules, including the type.
- HWiNFO: HWiNFO is a powerful hardware information and diagnostic tool. It offers in-depth information about various components, including RAM. After installing HWiNFO, open the program and navigate to the “Memory” section. Here, you will find detailed information about your RAM, such as the type, speed, and capacity.
- Speccy: Speccy is another popular option for obtaining information about your computer’s hardware. It provides detailed information about your CPU, motherboard, RAM, and more. Once you have installed Speccy, launch the program and select the “RAM” option from the left sidebar. Here, you will find detailed information about your RAM type.
These third-party software options offer a user-friendly interface and provide easy access to detailed information about your RAM type. They present the data in a more organized and understandable way, making it easier for users without technical expertise to interpret the information.
By utilizing third-party software, you can quickly and effortlessly determine the RAM type on your computer. This knowledge is valuable for upgrading your memory, troubleshooting any issues, or gaining a better understanding of your system’s hardware configuration.
Remember to download these applications from reputable sources and always stay cautious when installing software from unknown or unreliable websites.
Conclusion
Knowing the type of RAM installed on your computer is essential for various reasons, such as upgrading your memory, troubleshooting performance issues, or ensuring compatibility with new hardware. Fortunately, there are multiple methods to determine your RAM type on different operating systems.
On Windows, you can use built-in tools like Task Manager and System Information, or utilize the Command Prompt for more detailed information. Mac users can check their RAM type through the “About This Mac” or System Information utility, as well as using the Terminal for more in-depth details. Linux users have options like the Terminal and third-party applications like Hardinfo to determine their RAM type. Additionally, accessing the BIOS/UEFI settings allows you to check the RAM type directly on any operating system.
If you prefer a more technical approach, using the Command Prompt or Terminal provides you with accurate and reliable information about your RAM type. On the other hand, third-party software like CPU-Z, HWiNFO, or Speccy offers a user-friendly interface and comprehensive hardware information, making it easier to identify the RAM type.
Whichever method you choose, understanding your RAM type empowers you to make informed decisions when it comes to managing your computer’s memory. Whether you are looking to upgrade your RAM, troubleshoot performance issues, or ensure compatibility with new hardware, having this knowledge saves you time and effort.
Always remember to ensure your computer’s security by downloading software from reputable sources and following proper procedures when accessing system settings like the BIOS/UEFI. With the right tools and knowledge, you can confidently identify your RAM type and optimize the performance of your computer.