Introduction
Welcome to the world of computer memory! When it comes to upgrading or troubleshooting your computer’s RAM, it’s essential to determine the type of RAM your system requires. RAM, or Random Access Memory, is the temporary storage space that stores data that the computer needs to access quickly. Understanding the different types of RAM is crucial as it ensures compatibility and maximizes the performance of your computer.
In this article, we will explore the various types of RAM and guide you on how to determine the RAM type in your computer. Whether you are a curious tech enthusiast or someone looking to upgrade their RAM, this information will prove invaluable.
Before we dive into the details, let’s briefly discuss the two most common types of RAM: DDR and SDRAM. DDR, or Double Data Rate, is a type of RAM that has evolved over the years with different versions like DDR2, DDR3, and DDR4. SDRAM, or Synchronous Dynamic Random Access Memory, is an older form of RAM commonly found in older systems.
Now that we have a basic understanding of RAM types, let’s explore the methods you can use to determine the type of RAM in your computer. We will cover various operating systems, including Windows, macOS, and Linux, as well as BIOS/UEFI settings and software tools.
So, if you’re ready to dive deeper into the world of RAM and uncover the secrets of your computer’s memory, let’s begin the journey!
Types of RAM
When it comes to RAM, there are several types available in the market. Let’s take a closer look at these different types of RAM:
- DDR: DDR, or Double Data Rate, is a commonly used type of RAM. It has evolved over the years with different versions, such as DDR2, DDR3, and DDR4. DDR RAMs offer higher data transfer rates compared to their predecessors, allowing for faster performance and improved multitasking capabilities.
- SDRAM: SDRAM, or Synchronous Dynamic Random Access Memory, was the standard type of RAM used in computers before DDR RAMs became prevalent. SDRAM operates synchronously with the computer’s bus speed, delivering data at a specific clock cycle. Though relatively slower compared to DDR RAMs, SDRAM is still found in older systems.
- DDR2: DDR2 RAM is an advancement over DDR RAM and offers improved speed and reliability. It operates at higher clock frequencies, resulting in better overall performance. DDR2 RAM has higher data transfer rates and can be found in computers released from around 2003 to 2007.
- DDR3: DDR3 RAM is the next iteration of DDR2 and provides even faster data transfer rates. It operates at higher clock frequencies and consumes less power. DDR3 RAM can be found in systems released around 2007 to 2014.
- DDR4: DDR4 RAM is the latest standard for computer memory. It offers significant improvements over DDR3, including higher data transfer rates and enhanced power efficiency. DDR4 RAM is found in modern systems, released from around 2014 onwards.
- DDR5: DDR5 RAM is the latest generation of RAM and is expected to provide even higher data transfer rates and improved performance compared to DDR4. It is gradually being implemented in newer systems and offers future-proofing for faster computing needs.
These are the main types of RAM that you may encounter when determining the RAM type in your computer. It’s important to note that compatibility is essential when selecting RAM for your system. Consult your computer’s documentation or manufacturer’s website to determine the specific RAM type and maximum capacities supported by your system for optimal performance.
Checking the RAM Type on Windows
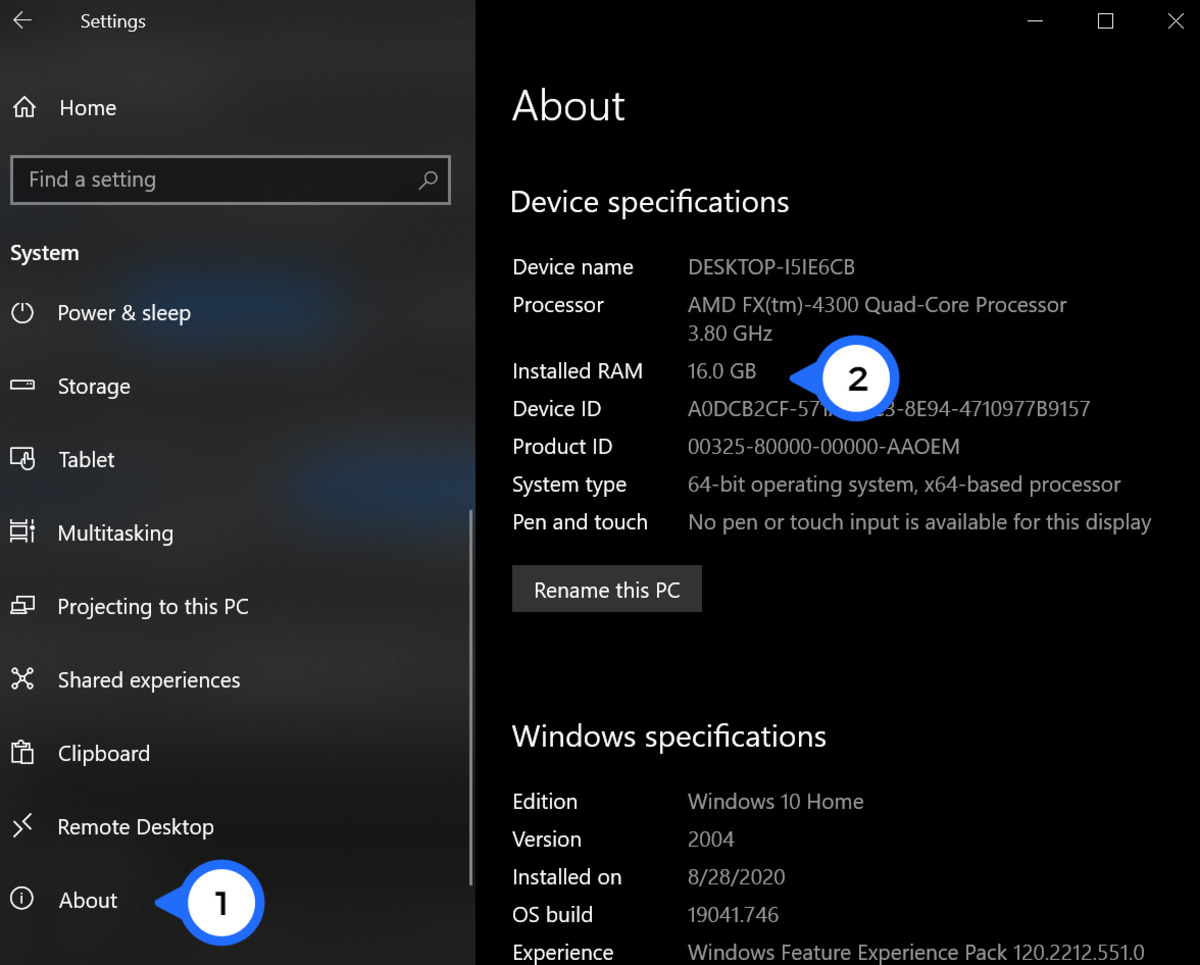
If you’re using a Windows operating system, there are multiple ways to determine the type of RAM installed in your computer:
- Task Manager: Right-click on the taskbar and select “Task Manager” from the menu. In the Task Manager window, click on the “Performance” tab. Under the “Memory” section, you’ll find information about the RAM type, including the speed and form factor.
- System Information: Press the Windows key + R to open the Run dialog box. Type “msinfo32” and hit Enter. This will launch the System Information window. In the left pane, navigate to “Components” > “Memory,” and you’ll find detailed information about the installed RAM, including the type and capacity.
- Command Prompt: Open the Command Prompt by pressing the Windows key + R, typing “cmd,” and hitting Enter. In the Command Prompt window, type “wmic memorychip get MemoryType” and press Enter. This command will display the RAM type in numerical form. Refer to the manufacturer’s documentation to decode the numerical value into the RAM type.
- Third-Party Software: There are various third-party software tools available that provide detailed information about your computer’s hardware, including the RAM type. Programs like CPU-Z, Speccy, and HWiNFO are popular choices that display comprehensive hardware information, including the RAM type, speed, and other relevant details.
Using these methods, you can easily determine the type of RAM installed in your Windows computer. Make sure to check the compatibility requirements before upgrading or replacing your RAM modules to ensure the best performance and compatibility with your system.
Checking the RAM Type on macOS
If you’re using a macOS system, you can easily find out the type of RAM installed by following these steps:
- About This Mac: Click on the Apple menu in the top-left corner of your screen and select “About This Mac.” In the Overview tab, you’ll see information about the installed memory, including the type and speed.
- System Information: In the About This Mac window, click on the “System Report” button. This will open the System Information window. In the left sidebar, select “Memory” under the Hardware section. Here, you’ll find detailed information about the RAM, including the type, size, and speed.
- Terminal: Open the Terminal application. You can do this by searching for “Terminal” in Spotlight or navigating to Applications > Utilities > Terminal. In the Terminal window, type the following command:
system_profiler SPHardwareDataType. This will display a detailed system profile, including information about the installed memory. - Third-Party Software: There are several third-party tools available for macOS that can provide comprehensive hardware information. Applications like iStat Menus, Macs Fan Control, and MacTracker can display detailed RAM information, including the type and other relevant details.
By using these methods, you can easily determine the type of RAM installed in your macOS system. This information will be helpful if you are planning to upgrade or replace your RAM modules to ensure compatibility and optimal performance.
Checking the RAM Type on Linux
If you’re using a Linux-based operating system, such as Ubuntu, Fedora, or CentOS, there are several ways to check the type of RAM installed on your system:
- Terminal: Open the Terminal application by searching for it in the applications menu or pressing Ctrl+Alt+T. In the Terminal window, type the following command:
sudo dmidecode -t 17. This command will display detailed information about the installed memory, including the type, speed, and size. - System Information: Many Linux distributions have a built-in system information tool that provides hardware information. Look for an application called “System Information” or “System Profiler” in your applications menu. Once open, navigate to the memory or RAM section to find details about the RAM type and other relevant information.
- Command Prompt: Open the Command Prompt or Terminal and type the command
lshw -class memory. This will display a detailed list of all memory devices in your system, including the RAM type. - Third-Party Software: There are various third-party software tools available for Linux that can provide comprehensive hardware information. Applications like Hardinfo, lshw-gtk, and neofetch can display detailed RAM information, including the type and other relevant details.
Using these methods, you can easily determine the type of RAM installed in your Linux system. Remember to check the compatibility requirements if you’re planning to upgrade or replace your RAM modules to ensure the best performance and compatibility with your Linux distribution.
Checking the RAM Type on BIOS/UEFI
Another way to determine the RAM type installed in your computer is by accessing the BIOS or UEFI settings. Here’s how you can do it:
- Restart your computer: Start by restarting your computer. As it powers on, immediately press the key or combination of keys (such as Del, F2, or Esc) to enter the BIOS/UEFI settings. The specific key(s) to access the BIOS/UEFI may vary depending on your computer’s manufacturer.
- Navigate to the Memory section: Once you’re in the BIOS/UEFI settings, navigate to the Memory or System Information section. The exact location and naming may vary depending on your computer’s BIOS/UEFI version.
- Check the RAM Type: In the Memory section, you should find information about the installed RAM, including the type, capacity, and other details. The RAM type may be displayed as DDR, DDR2, DDR3, DDR4, or possibly even the specific model name or part number.
- Take note of the details: Make sure to take note of the RAM type information displayed in the BIOS/UEFI settings. You can either write it down or take a photo for future reference or when purchasing new RAM modules.
Accessing the BIOS/UEFI settings provides direct information about the installed RAM type and eliminates any discrepancies or uncertainties that might arise from software-based checks. However, it’s essential to be cautious when making any changes in the BIOS/UEFI settings to avoid any unintended consequences to your system.
Remember to consult your computer’s documentation or manufacturer’s website for more specific instructions on accessing and navigating the BIOS/UEFI settings.
Checking the RAM Type with Software Tools
If you prefer a more user-friendly and convenient method to determine the RAM type in your computer, you can use various software tools specifically designed for this purpose. Here are some popular options:
- CPU-Z: CPU-Z is a widely used software tool that provides detailed information about the hardware components of your computer. It displays comprehensive details about the RAM, including the type, size, speed, and other relevant information. CPU-Z is available for both Windows and Linux operating systems.
- Speccy: Speccy is another popular tool that provides detailed system information, including RAM information. It gives you a comprehensive overview of the installed RAM type, capacity, speed, and other specifications. Speccy is available for Windows operating systems.
- HWiNFO: HWiNFO is a powerful hardware information and diagnostic tool that provides extensive information about the hardware components of your computer. It offers detailed insights into the RAM, including the type, module specifications, capacity, and other relevant details. HWiNFO is compatible with both Windows and Linux operating systems.
- Task Manager (Windows): As mentioned earlier, the Windows Task Manager provides basic information about the installed RAM type and speed. You can access the Task Manager by right-clicking on the taskbar and selecting “Task Manager” from the menu. In the Performance tab, under the Memory section, you can find details about the RAM type.
Using these software tools, you can quickly and easily determine the type of RAM installed in your computer. They provide a user-friendly interface and display comprehensive details that are helpful for troubleshooting, upgrading, or purchasing new RAM modules.
Remember to download these software tools from official and reputable sources, ensuring you have the latest versions to guarantee accurate and reliable information about your system’s RAM.
Conclusion
Understanding the type of RAM installed in your computer is essential for upgrading, troubleshooting, or purchasing new RAM modules. Whether you’re using Windows, macOS, Linux, or accessing the BIOS/UEFI settings, there are various methods available to determine the RAM type.
On Windows, you can use the Task Manager, System Information, Command Prompt, or third-party software tools like CPU-Z to gather detailed information about the RAM type. If you’re on macOS, you can find the RAM type through the About This Mac window, System Information, Terminal, or third-party software options like iStat Menus.
For Linux users, checking the RAM type can be done through the Terminal, System Information tools, Command Prompt, or third-party software such as Hardinfo. And if you prefer a more direct approach, accessing the BIOS/UEFI settings will provide you with precise information about the RAM type installed in your computer.
Alternatively, software tools like CPU-Z, Speccy, and HWiNFO offer a user-friendly interface and detailed insights into your computer’s hardware, including the RAM type, capacity, and speed.
By utilizing these methods and tools, you can easily determine the RAM type in your computer, ensuring compatibility and optimal performance when upgrading or replacing your RAM modules.
Remember to consult your computer’s documentation or manufacturer’s website for specific instructions and compatibility guidelines for your system. Whether you’re a tech enthusiast or simply looking to optimize your computer’s performance, understanding your RAM type is an important step in enhancing your computing experience.