Introduction
Chromebooks have become increasingly popular as affordable and efficient devices for students and professionals alike. While they are primarily used for web browsing and productivity tasks, they also come equipped with built-in cameras that allow you to capture photos and videos. Whether you want to document your adventures, create content for social media, or record important moments in your life, knowing how to take videos on a Chromebook is a useful skill to have.
In this article, we will guide you through the process of capturing videos on your Chromebook and share tips to help you improve the quality of your recordings. We will also provide instructions on editing your videos and saving and sharing them with others.
Before we delve into the details, it’s important to note that the camera capabilities of Chromebooks can vary depending on the model. Some Chromebooks may have a front-facing camera, while others may have both front-facing and rear-facing cameras. Additionally, the camera resolution and features may differ. However, the overall process of taking videos remains similar across different Chromebook models.
So, whether you are using a Chromebook for school, work, or personal use, let’s explore how you can make the most of its camera functionality and create impressive videos to capture and share your memories.
Understanding the Camera on Chromebook
Before you start capturing videos on your Chromebook, it’s important to familiarize yourself with the camera interface and settings. Understanding the camera features will enable you to make necessary adjustments and ensure that you capture the best footage possible.
The camera app on Chromebook allows you to switch between the front-facing and rear-facing cameras, depending on your needs. The front-facing camera is ideal for video calls and selfies, while the rear-facing camera is better suited for capturing the world around you.
Many Chromebooks also come with additional camera settings that you can explore. These settings may include adjusting the resolution and quality of the video, enabling or disabling flash, and controlling other features such as exposure and white balance. To access these settings, open the camera app, and look for the gear icon or settings menu.
It’s worth mentioning that Chromebooks have limited storage capacity, so make sure you have enough space before recording lengthy videos. Consider transferring files to an external storage device or cloud storage to free up space and ensure smooth recording.
Another important aspect to consider is the lighting conditions. Like any camera, the performance of the Chromebook’s camera is affected by lighting. When shooting indoors, make sure you have adequate artificial lighting or utilize natural light sources for better results. When shooting outdoors, be aware of the position of the sun and choose the time of day that provides the best lighting conditions for your video.
Understanding these camera basics will help you navigate the camera app settings and optimize the camera performance on your Chromebook. Now that we have covered the camera fundamentals, let’s move on to the next step: recording a video on your Chromebook.
Adjusting Camera Settings
Once you are familiar with the camera interface on your Chromebook, it’s important to know how to adjust the camera settings to get the desired results. Here are some key settings you can explore:
1. Resolution and Quality: Chromebooks typically offer different resolution options for videos. Higher resolutions result in more detailed videos, but they also take up more storage space. Consider your intended use for the video and the available storage before selecting a resolution. Additionally, you can adjust the quality settings to prioritize either a higher-quality video or a smaller file size.
2. Flash: The Chromebook camera app usually includes an option to enable or disable the flash. Use the flash when shooting in low-light situations to illuminate the subject and improve the overall quality of your videos.
3. Exposure and White Balance: Some Chromebooks provide manual controls for exposure and white balance. These settings allow you to manually adjust the brightness and color temperature of your videos. Experiment with these settings to achieve the desired look and feel of your footage.
4. Timer and Countdown: If you need a few seconds to get in position before recording, make use of the timer or countdown feature. Set the timer for a specific duration, and the camera will automatically start recording after the countdown.
5. Gridlines and Level: Gridlines help you compose your shots and maintain a balanced frame. They are particularly useful when recording videos that require precise framing. Some Chromebook camera apps also provide a level tool to ensure your videos are properly aligned and straight.
These are just a few of the camera settings you can explore on your Chromebook. Experiment with different options and find the settings that work best for your specific video recording needs. Now that you are familiar with adjusting the camera settings, let’s move on to the exciting part: recording a video on your Chromebook.
Recording a Video on Chromebook
Recording a video on your Chromebook is a straightforward process. Follow these steps to capture your memorable moments:
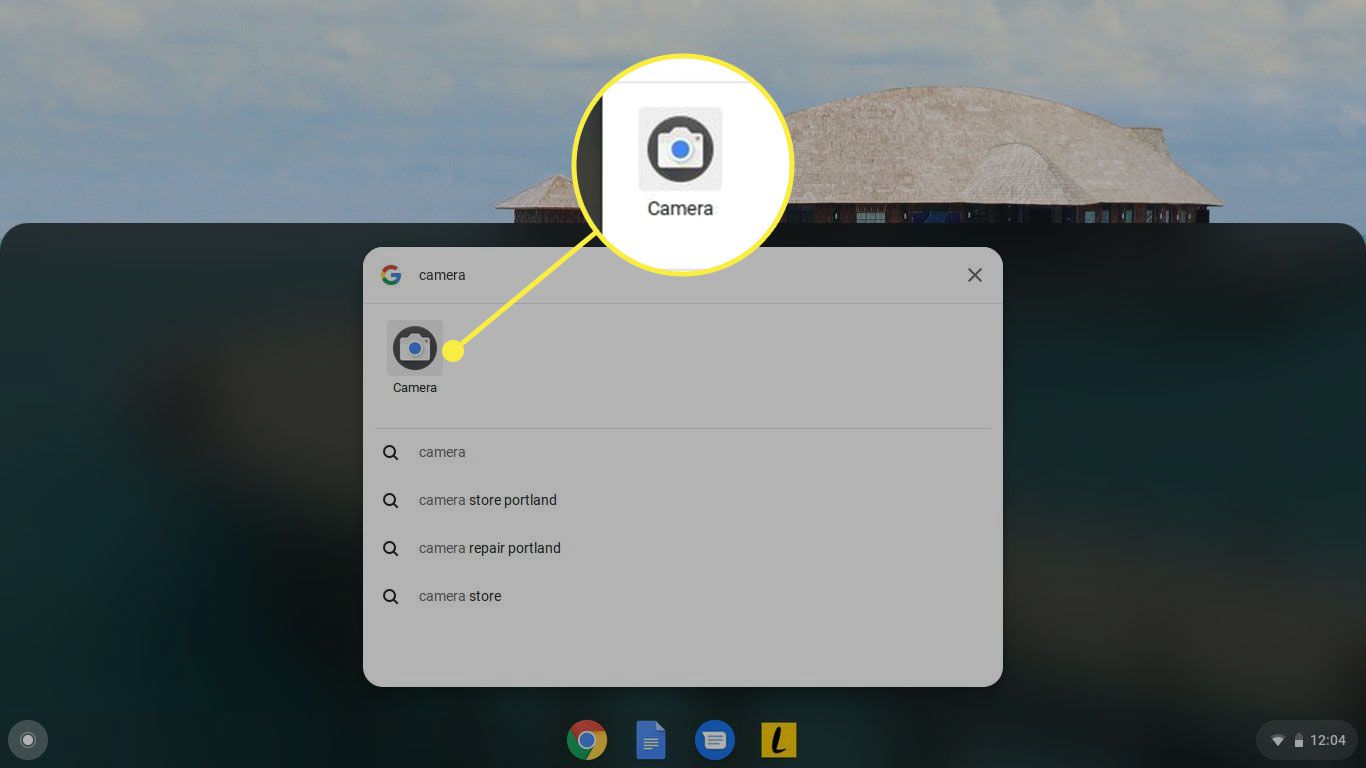
1. Open the Camera App: Locate the camera app on your Chromebook. It is typically found in the app launcher or taskbar. Click on the app icon to open it.
2. Choose the Camera: If your Chromebook has both a front-facing and rear-facing camera, select the desired camera by clicking on the camera switch icon. This allows you to switch between selfie mode and capturing the world around you.
3. Frame Your Shot: Position your Chromebook to frame the shot you want to capture. You can use the gridlines (if available) to help with composition and alignment.
4. Start Recording: Once you are ready to start recording, click on the record button. The button usually resembles a red circle. The camera app will indicate that the recording has started, and a timer or progress bar will show the duration of your video.
5. Capture Smooth Footage: To ensure smooth footage, hold your Chromebook steady while recording. Avoid abrupt movements or shakes that can result in shaky videos. If you need to move while recording, do so slowly and smoothly.
6. Stop Recording: When you are finished capturing your video, click on the stop button. It is usually represented by a square icon. The camera app will indicate that the recording has stopped, and your video will be saved automatically.
7. Preview Your Video: Most Chromebook camera apps allow you to preview your recorded video. Take this opportunity to review your footage and ensure it meets your expectations. If needed, you can re-record the video to get the desired result.
That’s it! You have successfully recorded a video on your Chromebook. Now, let’s explore how you can edit your video to enhance its visual appeal and storytelling.
Editing Your Video
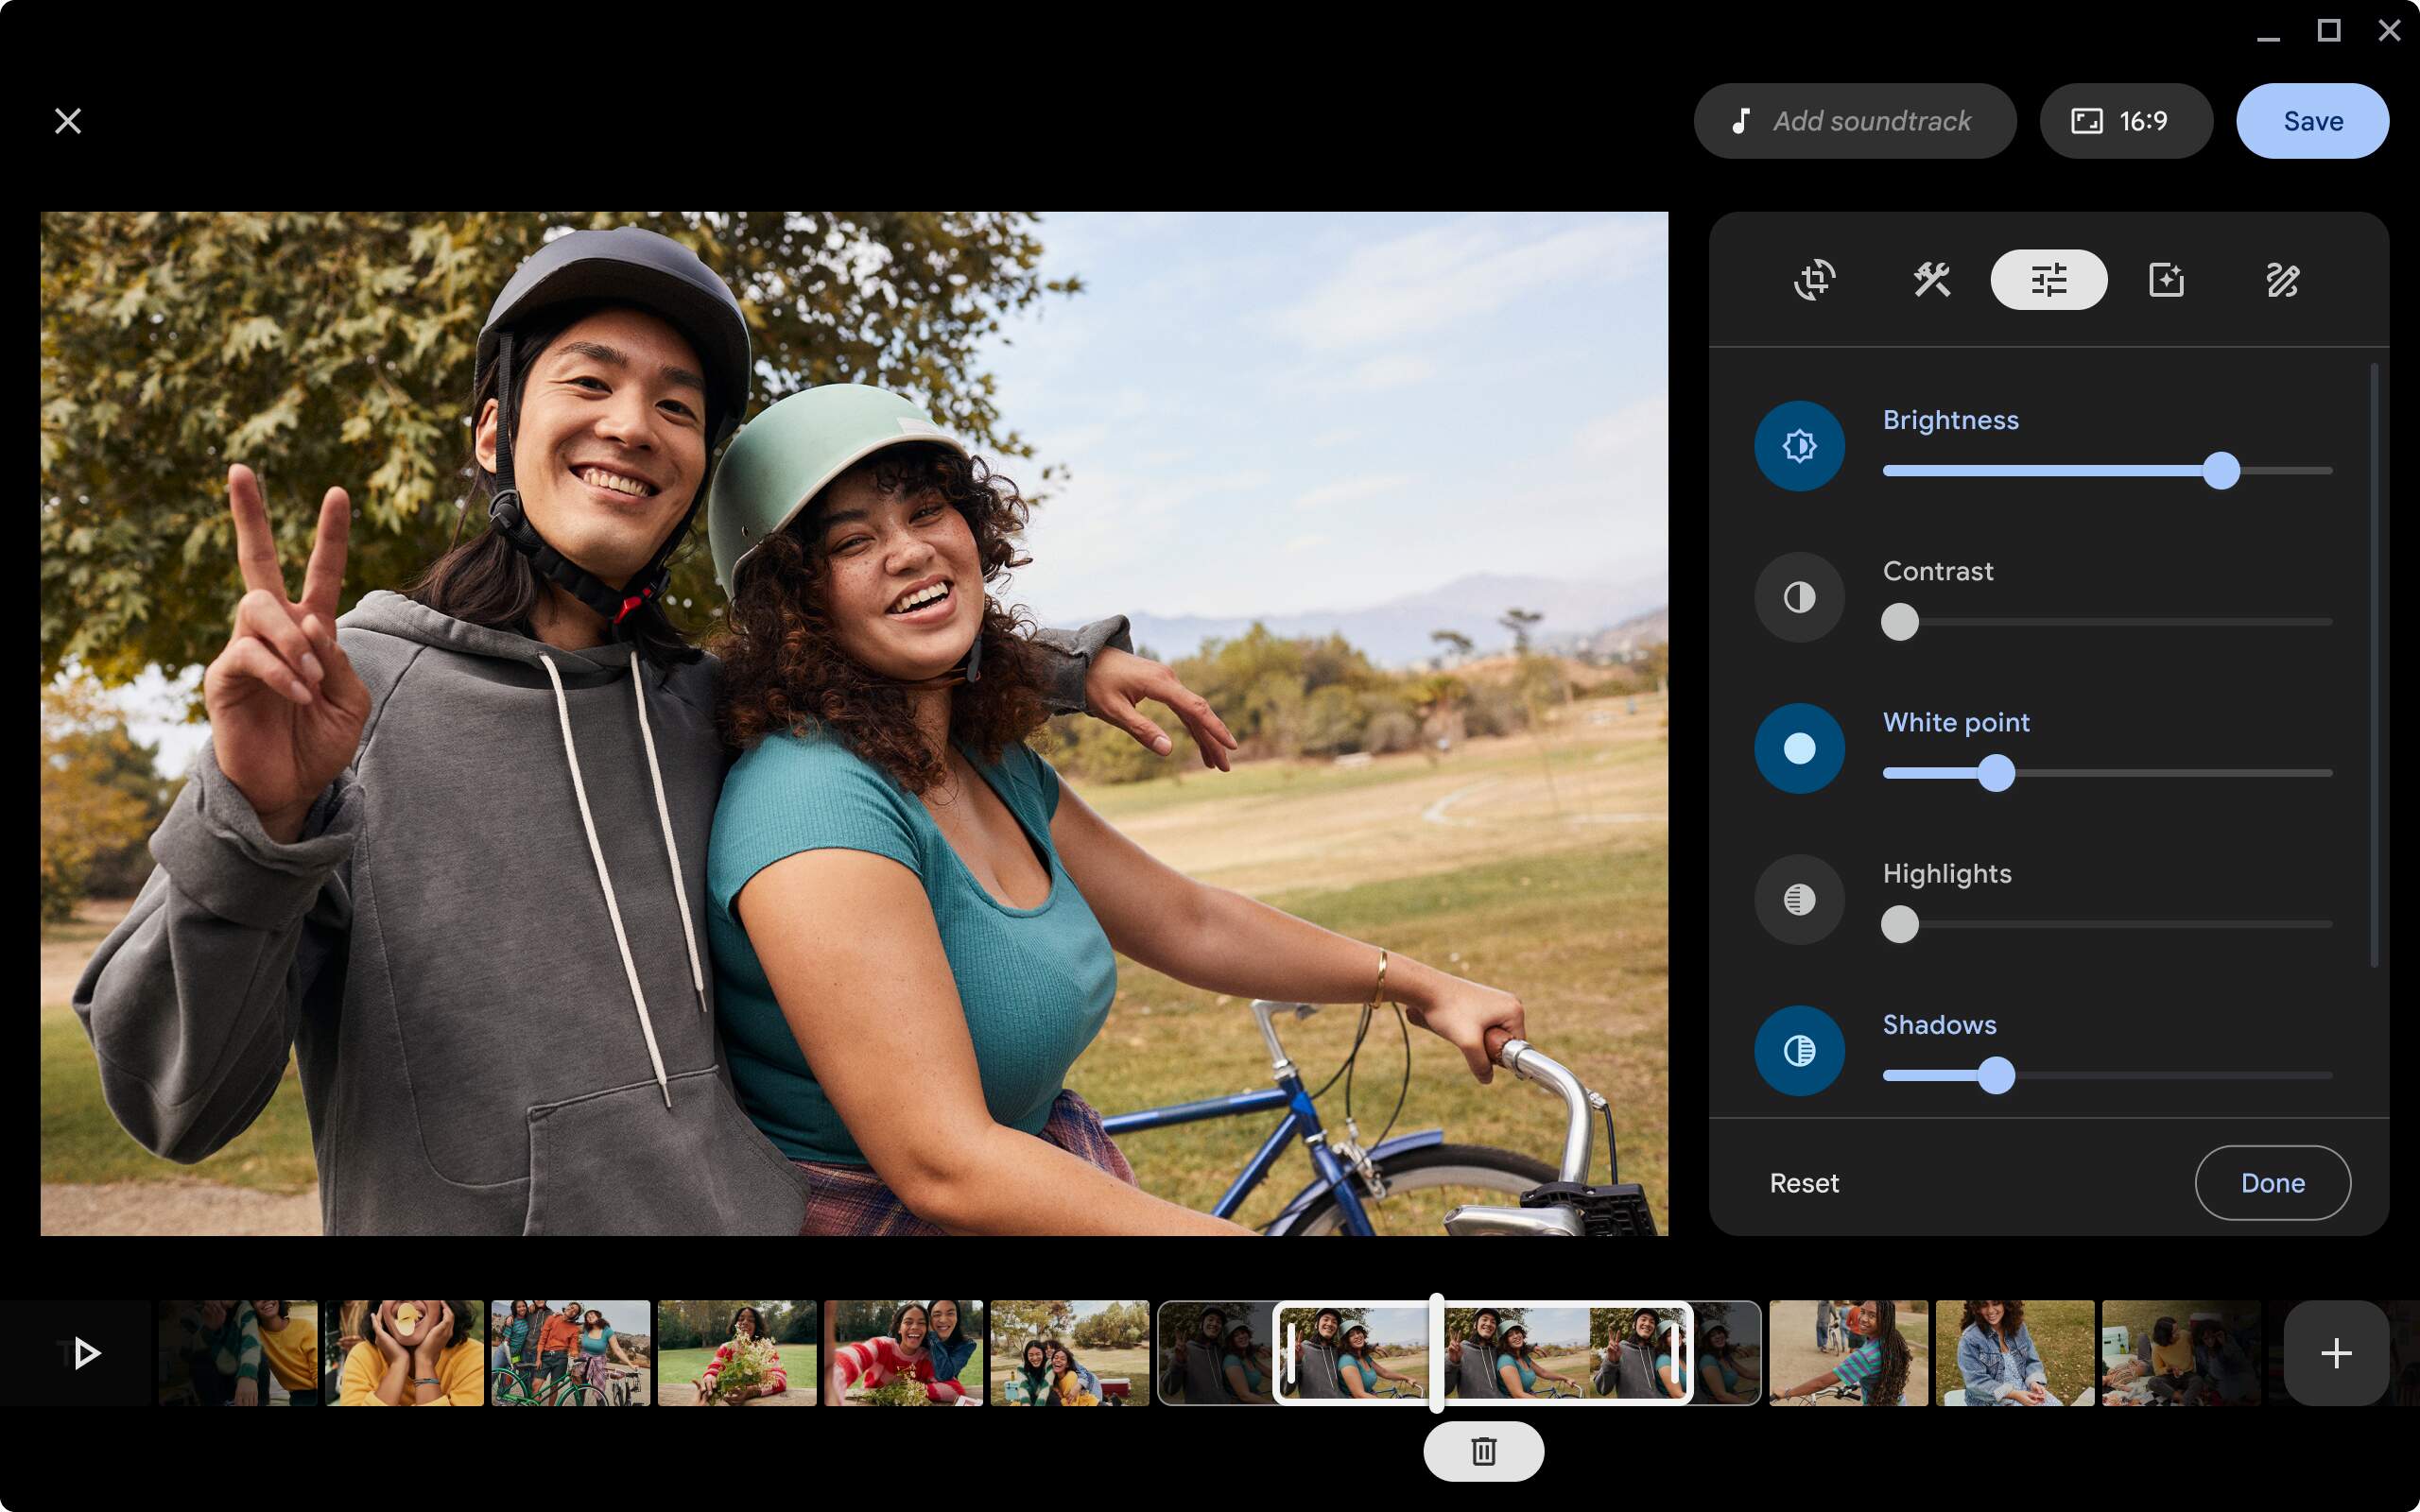
After capturing a video on your Chromebook, you have the option to enhance it further through editing. Editing allows you to refine the visual elements, add effects, trim unnecessary footage, and make your video more engaging. Here are some steps to guide you through the editing process:
1. Open a Video Editor: There are several video editing applications available on Chromebooks that you can use to edit your videos. Some popular options include WeVideo, PowerDirector, and Kdenlive. Open the app of your choice and import your recorded video.
2. Trim and Cut: If your video includes any unwanted or unnecessary footage, use the video editor’s trimming tools to remove it. This allows you to focus on the most impactful parts of your video. You can also cut, rearrange, and merge different clips as needed.
3. Add Effects and Transitions: Enhance the visual appeal of your video by adding effects and transitions. Experiment with different filters, color adjustments, and special effects to achieve the desired look and mood. Use transitions to create smooth and seamless transitions between different clips.
4. Incorporate Music and Audio: To make your video more engaging, consider adding background music or audio. Most video editors on Chromebook allow you to import audio files and adjust their volume levels. You can also include voiceovers or narration to provide context or explanations for your video.
5. Text and Titles: If you want to add captions, titles, or text overlays to your video, the video editor should have text tools or pre-designed templates you can use. This is particularly useful for adding context, emphasizing key points, or providing additional information to your viewers.
6. Preview and Fine-Tune: After making the necessary edits, preview your video to ensure everything looks and sounds as intended. Take note of any areas that may need further adjustments or refinements. Continue to fine-tune your video by making small tweaks until you are satisfied with the final result.
7. Export and Save: Once you are happy with your edited video, export it in your desired format and quality. Choose an appropriate file size and resolution that suits your intended use—whether it’s for sharing on social media platforms, uploading to video hosting sites, or keeping it for personal viewing.
By editing your video, you can take your footage to the next level and turn it into a polished and professional-looking final product. Now that you know how to edit your video on a Chromebook, let’s explore how you can save and share your masterpiece.
Saving and Sharing Your Video
Once you have finished editing your video on your Chromebook, it’s time to save and share your creation with the world. Here are the steps to follow:
1. Save Your Video: Before sharing, make sure to save your edited video. Most video editors on Chromebooks have a “Save” or “Export” option that allows you to choose the file name, location, and format to save your video. Select a location on your Chromebook’s storage or an external storage device to save the file.
2. Choose the Right Format: Consider the intended use and platform for your video when choosing the format. Common formats such as MP4 and MOV are widely supported and compatible with most devices and video sharing platforms.
3. Share on Social Media: If you want to share your video on social media, you can directly upload it to platforms such as YouTube, Facebook, Instagram, or Twitter. Most video editors offer built-in sharing options that allow you to enter your account credentials and publish your video seamlessly.
4. Use Cloud Storage: Another option is to upload your video to cloud storage services like Google Drive, Dropbox, or OneDrive. This allows you to easily share the video by generating a shareable link or granting access to specific individuals.
5. Send via Messaging or Email: If you want to share the video privately with friends, family, or colleagues, you can send it via messaging apps like WhatsApp, Messenger, or email. Compress the video file if needed to ensure it can be easily sent and received.
6. Embed on Websites or Blogs: If you have a website or blog, you may want to embed your video in a post or page. Most video hosting services provide embed codes that you can copy and paste into your website’s HTML editor.
7. Create a Local Backup: Lastly, it’s always a good practice to create a local backup of your edited video. Copy it to an external hard drive or another storage device to ensure you have a copy in case anything happens to the original file.
By following these steps, you can easily save and share your edited video from your Chromebook. Now, let’s explore some tips to help you capture even better videos on your Chromebook.
Tips for Taking Better Videos on Chromebook
While capturing videos on your Chromebook, there are several techniques and tips you can employ to ensure you create the best possible footage. Here are some tips to help you take better videos:
1. Plan Your Shots: Before hitting the record button, take a moment to plan your shots. Think about the story you want to tell, the angles you want to capture, and the composition of each scene. This will help you create more visually interesting and engaging videos.
2. Stability is Key: Keep your Chromebook as steady as possible while recording to avoid shaky footage. If you don’t have a tripod, try resting your Chromebook on a stable surface or use both hands to hold it firmly. Alternatively, you can use accessories like a smartphone tripod adapter to stabilize your device.
3. Utilize Natural Lighting: Good lighting can significantly enhance the quality of your videos. When possible, try to shoot in natural light. Position yourself or your subject in front of a window or outdoor light source to take advantage of soft and diffused lighting. Avoid shooting against bright lights or direct sunlight, as it can cause overexposure or unwanted shadows.
4. Pay Attention to Audio: Clear and high-quality audio is crucial for a professional-looking video. Minimize background noise by choosing a quiet location or using an external microphone if necessary. When recording voiceovers or interviews, get closer to the microphone to ensure clear and crisp audio.
5. Vary Your Shots: To make your videos more visually appealing, experiment with different camera angles and perspectives. Mix wide shots, close-ups, and medium shots to add variety and capture different details. Don’t be afraid to move closer or further away from your subject to create interesting visual dynamics.
6. Experiment with Time-lapse and Slow Motion: Many Chromebook camera apps offer additional features like time-lapse and slow-motion modes. Take advantage of these options to add a creative touch to your videos. Time-lapse can compress long processes into a short time frame, while slow motion can capture details that are not easily visible to the naked eye.
7. Tell a Story: A compelling video tells a story. Before you start recording, think about the narrative you want to convey. Create a beginning, middle, and end, and make sure your footage connects cohesively. Use a combination of wide shots, close-ups, and cutaways to effectively tell your story.
These tips will help you take better videos on your Chromebook and improve the overall quality of your footage. Experiment with different techniques, have fun, and let your creativity shine through your videos.
Conclusion
Capturing and editing videos on your Chromebook opens up a world of creative possibilities. Whether you’re a student, professional, or simply an avid videographer, knowing how to utilize the camera features and editing tools on your Chromebook can help you create stunning videos.
In this article, we discussed the basics of using the camera on your Chromebook, including adjusting settings and capturing videos. We also explored the process of editing your videos, adding effects, and refining them to make them more engaging and visually appealing.
Additionally, we provided guidance on saving and sharing your videos, whether it be on social media platforms, through messaging apps, or on your own website. Sharing your videos allows you to showcase your creativity and connect with others, whether they be friends, family, or a wider audience.
To ensure you capture the best videos possible, we shared valuable tips such as planning your shots, maintaining stability, utilizing natural lighting, paying attention to audio quality, varying your camera angles, and telling a compelling story.
Now that you have a solid understanding of how to take videos on your Chromebook, don’t hesitate to explore and experiment with your newfound skills. The possibilities are endless, and with practice, you will continue to refine and improve your video-making abilities.
So grab your Chromebook, unleash your creativity, and start capturing incredible videos that truly showcase your unique perspective and storytelling abilities.