Introduction
Welcome to the world of Chromebooks! These sleek and lightweight devices have gained immense popularity for their simplicity, efficiency, and affordability. Whether you’re a student, professional, or simply someone who enjoys capturing special moments, you’ll be delighted to know that Chromebooks come equipped with a built-in camera.
The camera on a Chromebook allows you to snap photos and record videos right from your laptop without the need for additional hardware or complicated setups. It’s perfect for video conferencing, capturing memories, or even creating content for your social media channels.
In this article, we will guide you through the process of using the camera on your Chromebook. We’ll cover everything from accessing the camera app to adjusting settings, taking photos, recording videos, editing your captures, and sharing them with ease. So, let’s dive in!
Before we get started, it’s important to note that the availability and features of the camera may vary depending on the model of your Chromebook. However, the general principles and steps discussed in this guide should apply to most devices.
Now, let’s explore the wonderful world of Chromebook photography and videography!
Getting Started
If you’re new to Chromebooks or haven’t used the camera before, getting started is a breeze. Follow these simple steps to activate and access the camera app:
- Power on your Chromebook and log in to your account.
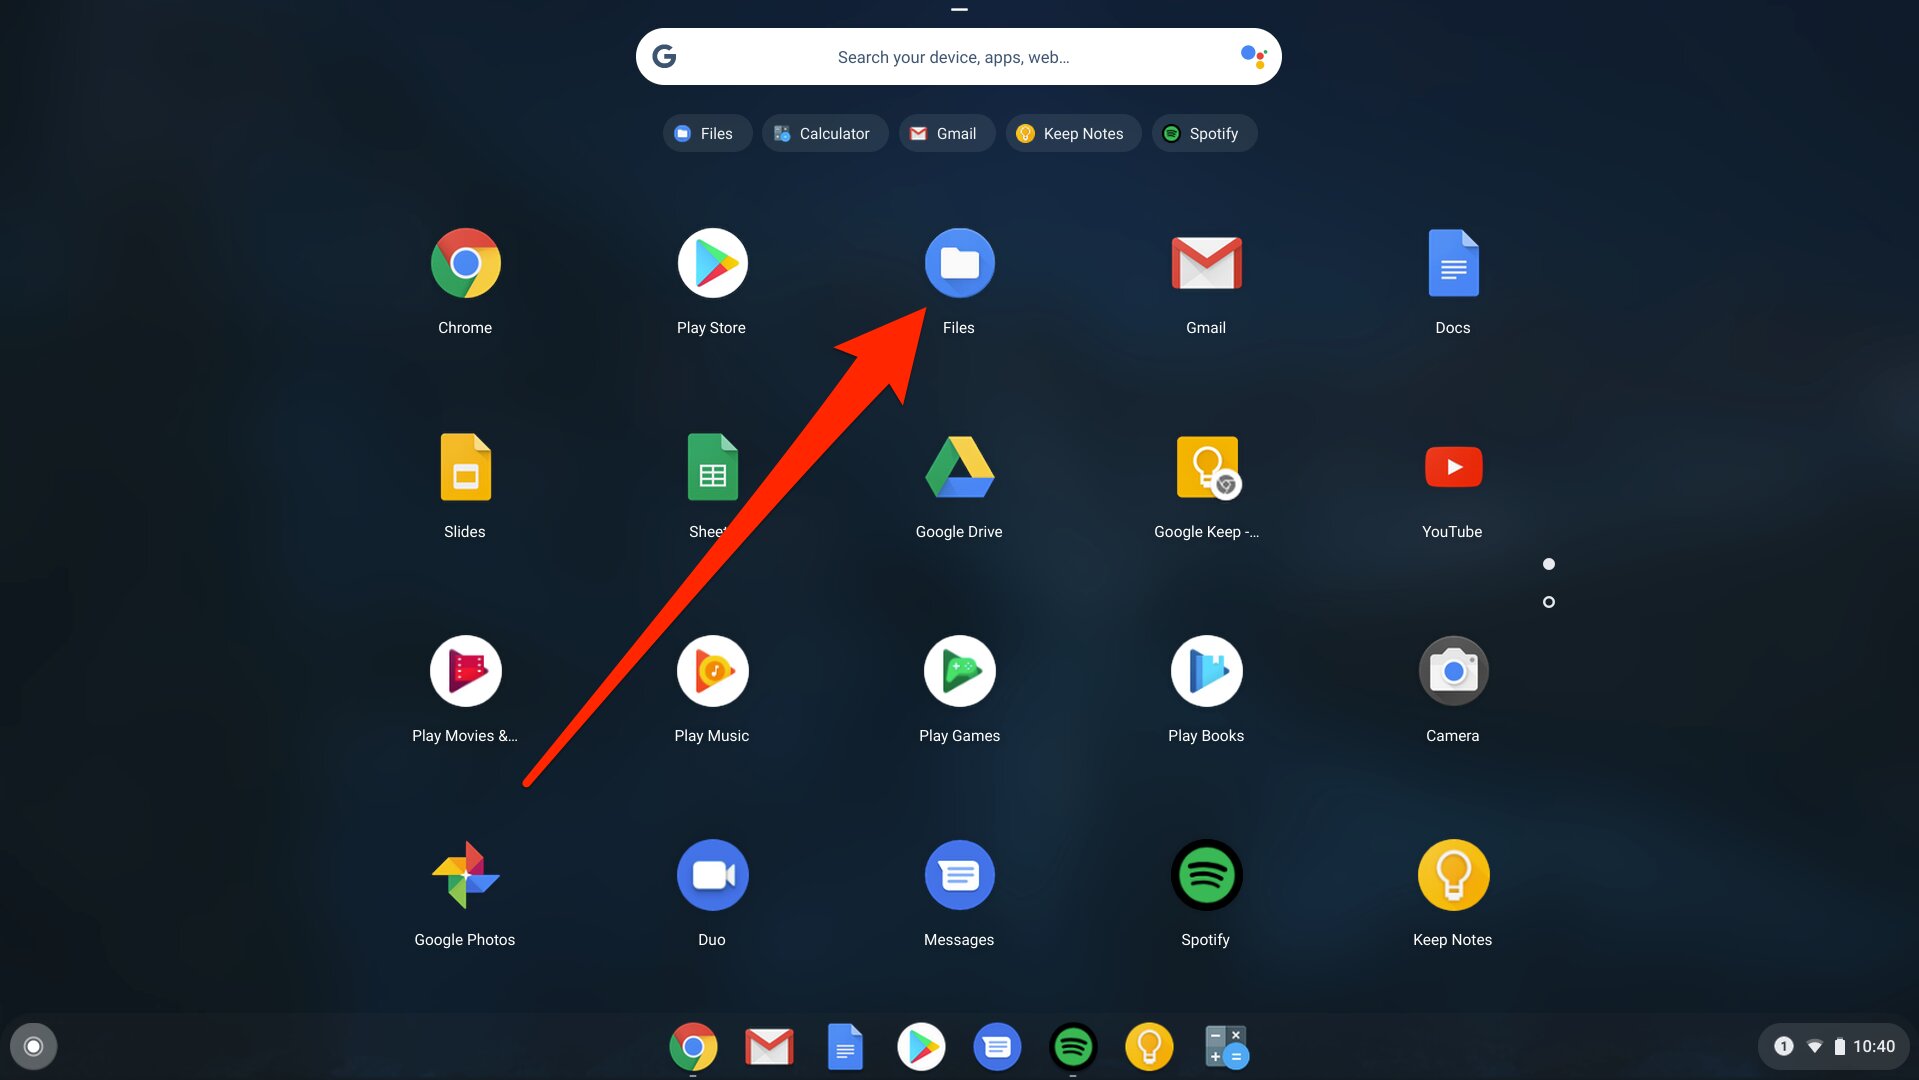
- Once you’re on the home screen, look for the app launcher icon at the bottom left corner of the screen. It resembles a circle with a dot inside.
- Click on the app launcher icon to open the app drawer, where you’ll find all the available applications on your Chromebook.
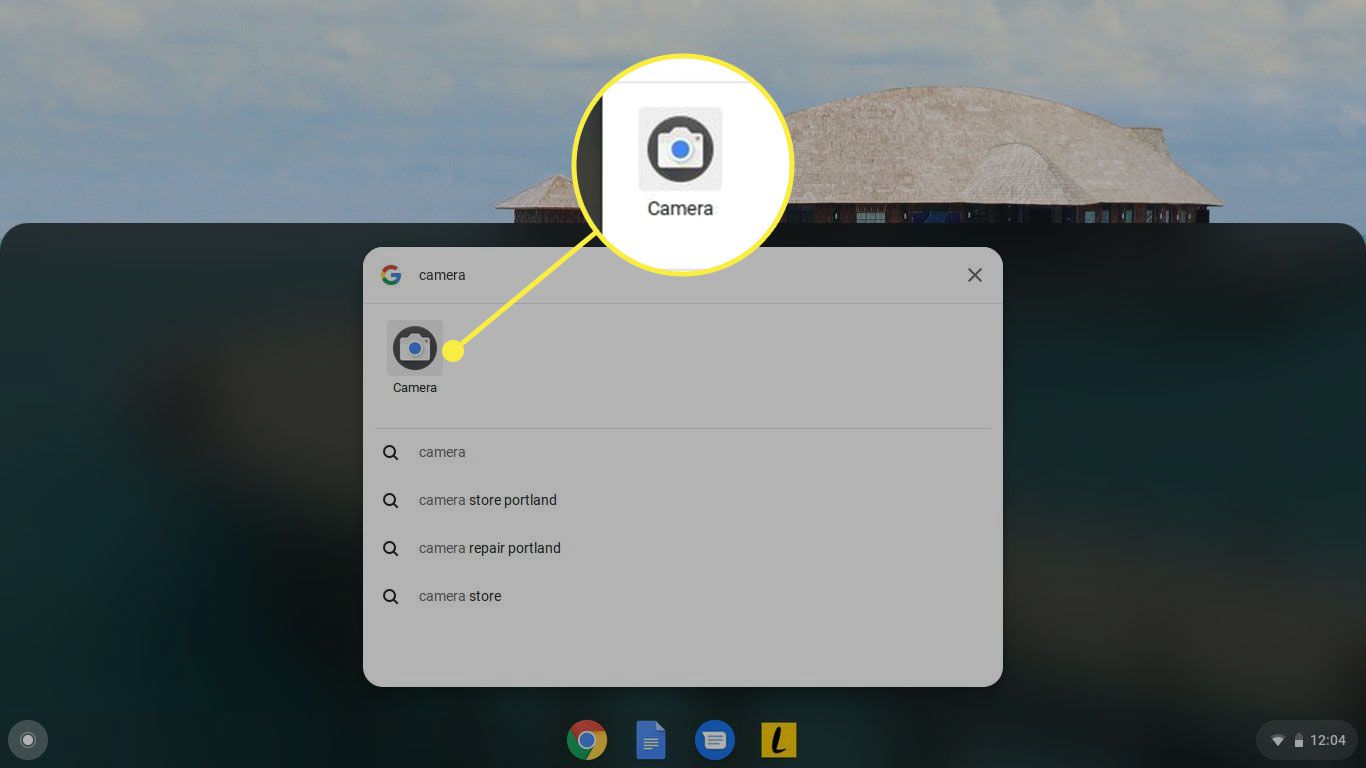
- Search for the camera app by typing “camera” into the search bar at the top of the app drawer. As you type, the search results will update in real-time.
- Once you see the camera app icon, click on it to launch the camera.
Alternatively, you can access the camera app using the keyboard shortcut. Press the “Ctrl + Alt + Shift + R” keys simultaneously, and the camera app will open immediately.
Once you’ve successfully opened the camera app, you’ll be greeted with a live viewfinder displaying the image from your camera. At this point, you’re ready to capture stunning photos and record videos using your Chromebook’s camera.
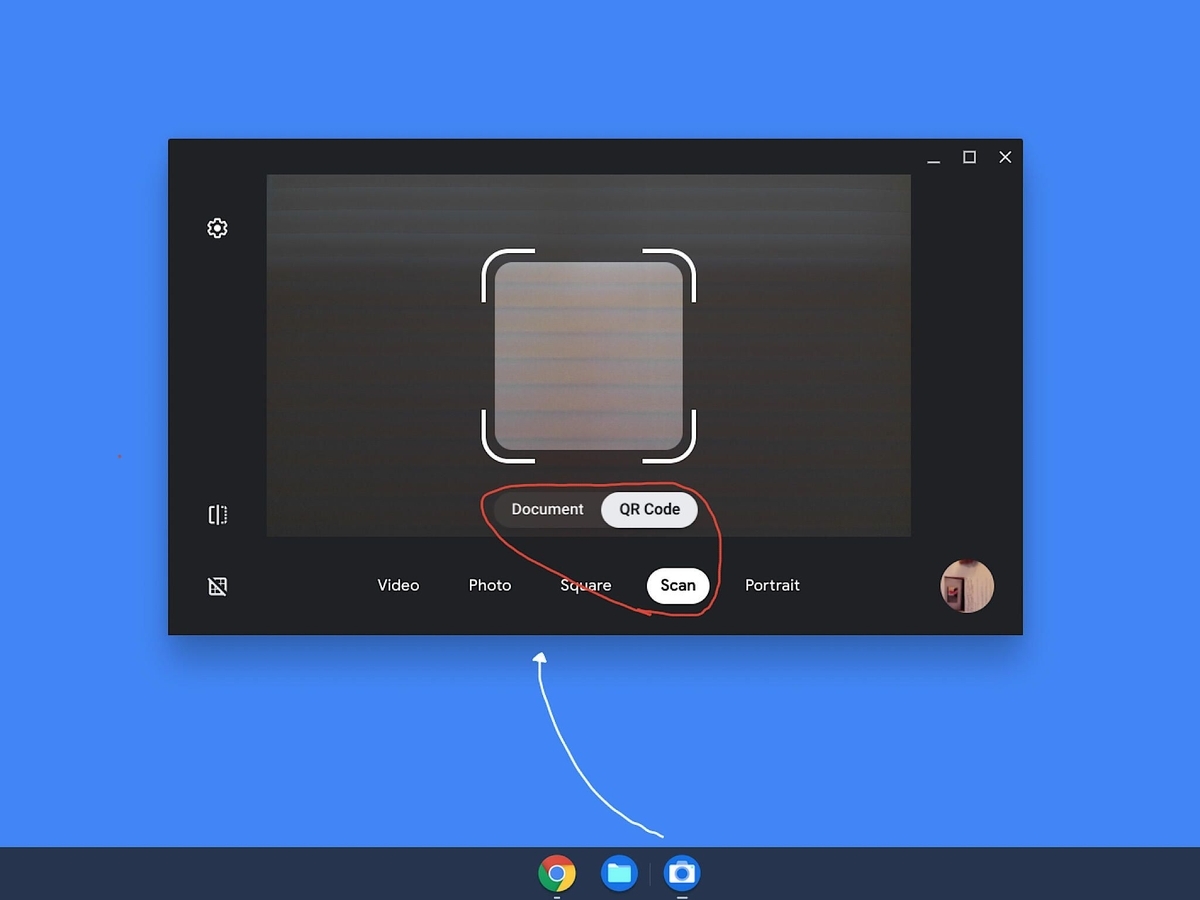
Before we delve into the various features and options available in the camera app, let’s take a moment to familiarize ourselves with the layout. The camera app interface is designed to be user-friendly and intuitive.
The viewfinder allows you to preview the image or scene before taking a photo or recording a video. The shutter button, typically located at the center bottom of the screen, is used to take photos with a single click. For video recording, you’ll find a dedicated button labeled “Record” or a circle icon with a red dot.
Additionally, you may have icons or menus to access advanced camera settings, switch between front and rear cameras (if applicable), and enable features such as flash or timer.
Now that you’re familiar with the basics, it’s time to start exploring the camera app’s features and settings to capture amazing photos and videos on your Chromebook!
Accessing the Camera App
Accessing the camera app on your Chromebook is quick and easy. There are a few different methods you can use to open the camera app:
- Using the app launcher: Click on the app launcher icon, usually found in the bottom left corner of the screen, and search for “camera” in the app drawer. Once you find the camera app, click on it to open.
- Using the keyboard shortcut: Press the “Ctrl + Alt + Shift + R” keys simultaneously to open the camera app directly.
- Using the quick settings menu: Click on the system clock in the bottom right corner of the screen, then select the camera icon from the quick settings menu that appears.
Once you’ve successfully opened the camera app, you’ll see the live viewfinder displaying the image from your camera. The camera app interface may vary depending on the model of your Chromebook, but generally, you’ll find the shutter button at the bottom center of the screen, ready for you to capture memorable moments with a simple click.
If your Chromebook has both front and rear cameras, you can switch between them by clicking on the camera icon or selecting the appropriate option from the camera settings menu.
Some Chromebooks also offer additional features such as flash, timer, and gridlines. These options can be accessed through the camera settings menu, typically represented by an icon that resembles a gear or three dots.
By exploring and experimenting with these options, you can customize your camera experience and enhance your photos and videos.
Now that you know how to access the camera app on your Chromebook, it’s time to learn more about adjusting camera settings to optimize your captures. Let’s move on to the next section!
Adjusting Camera Settings
Once you’ve accessed the camera app on your Chromebook, you can fine-tune the camera settings to capture the perfect shot. Here are some key camera settings you can adjust:
- Flash: If your Chromebook has a built-in flash, you can enable or disable it depending on the lighting conditions. The flash option is usually represented by a lightning bolt icon in the camera settings menu.
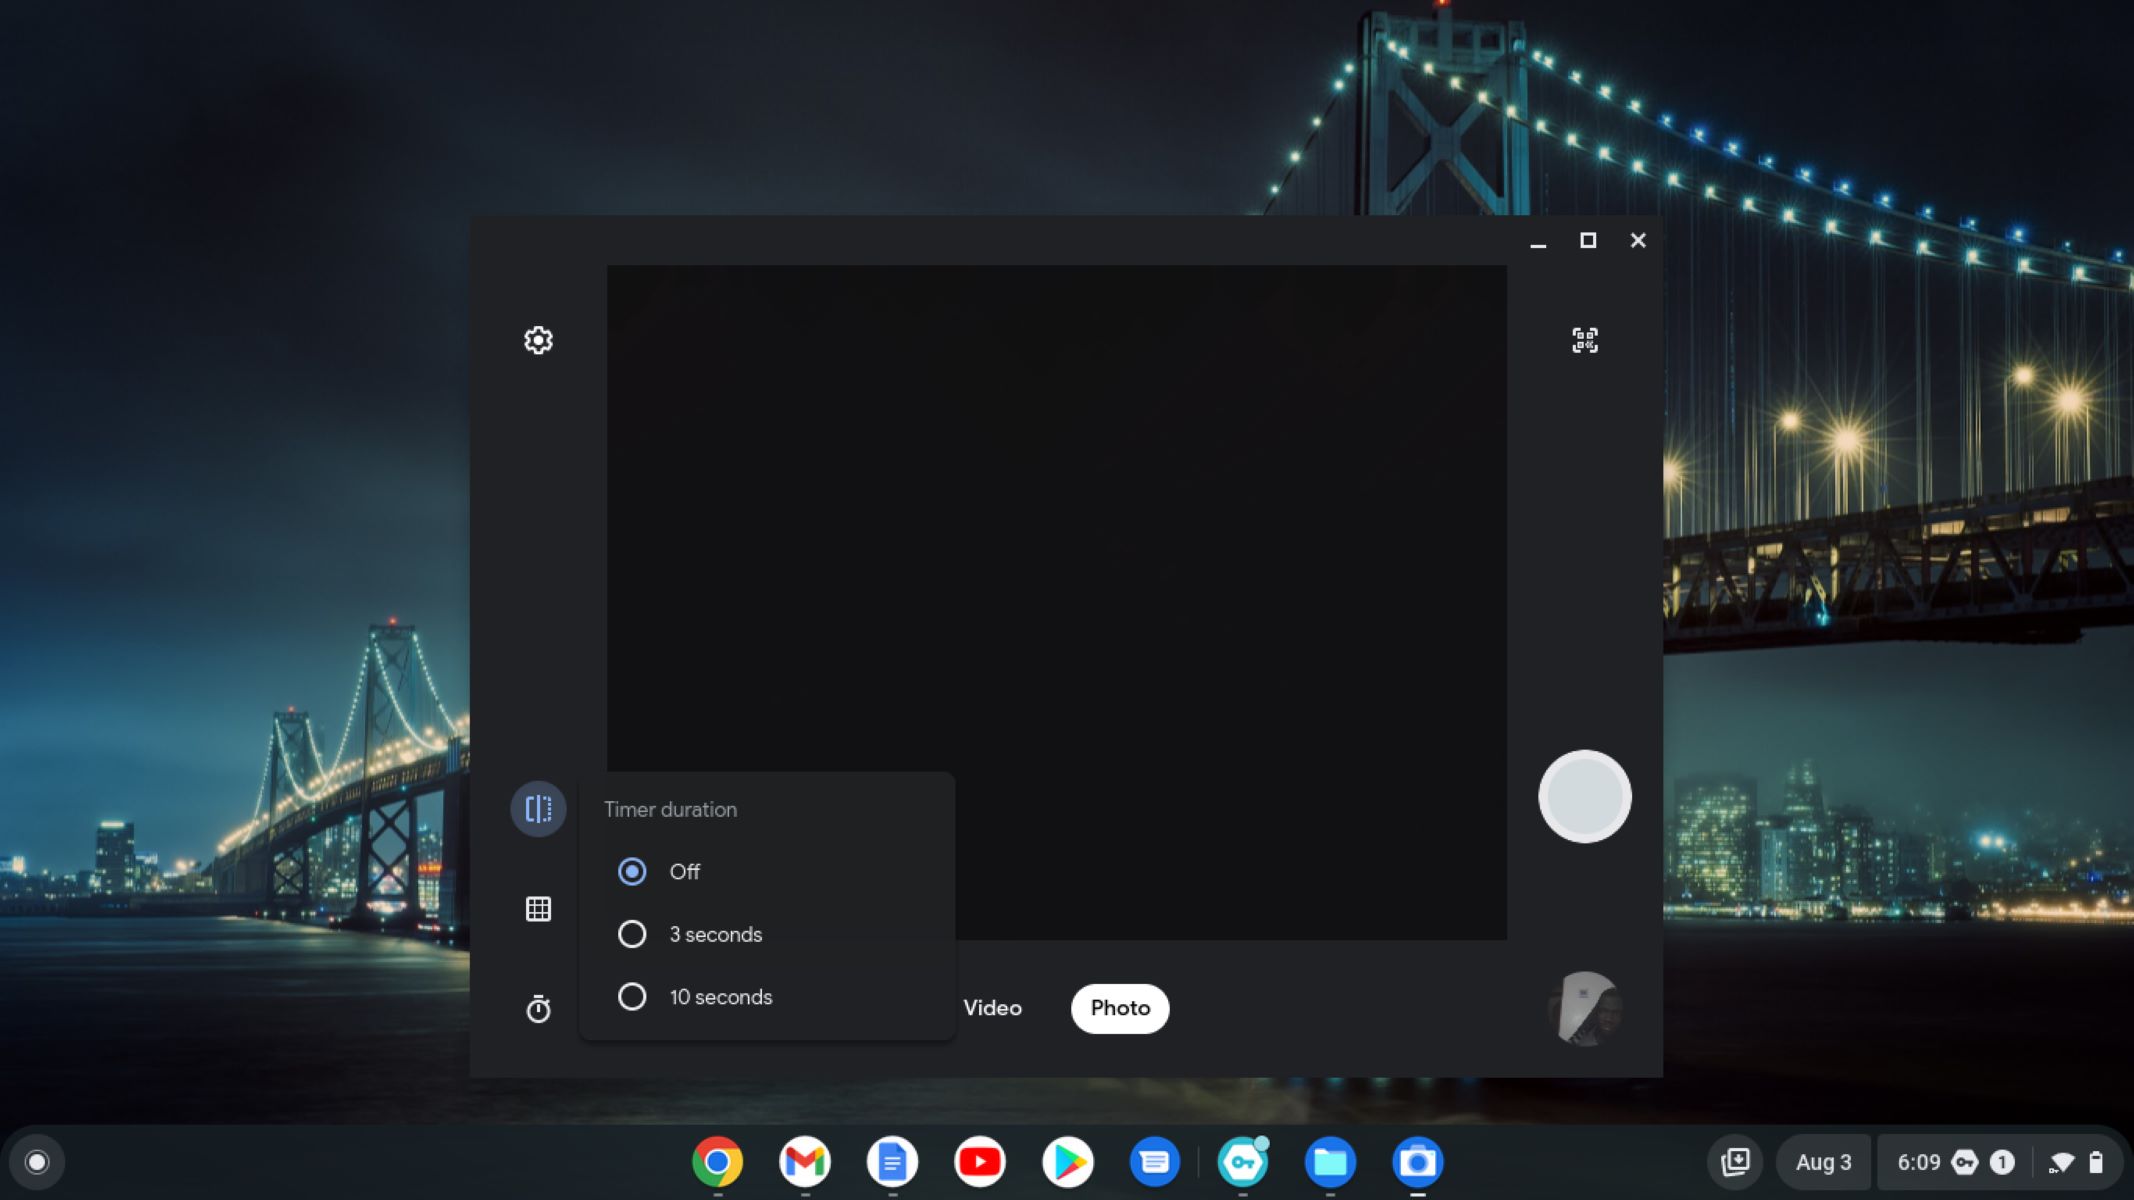
- Timer: The timer feature allows you to set a delay before the camera captures a photo or starts recording a video. This is useful for group shots or when you want to be in the frame yourself. Look for the timer option in the camera settings menu, typically indicated by a clock icon.
- Gridlines: Gridlines help you align your subject and compose your shots more effectively. These lines, displayed on the viewfinder, divide the frame into a grid pattern. You can enable or disable gridlines from the camera settings menu to assist in achieving better composition.
- Image quality: Depending on your needs and storage capacity, you can adjust the image quality settings to capture higher-resolution photos or conserve storage space. Higher resolution photos may offer more detail, but they also require more storage. Look for the image quality or resolution settings in the camera settings menu.
- Video resolution: Similarly to image quality, you can adjust the video resolution settings to record videos in different quality levels. Higher resolution videos offer better clarity but require more storage. Find the video resolution settings in the camera settings menu to choose the desired video quality.
Keep in mind that not all Chromebook models may have these exact settings, and the options available can vary. However, most devices will offer a range of basic settings to customize your camera experience.
Feel free to experiment with these settings to find what works best for your specific photography or videography needs. You can always revert to the default settings if you’re unsure or want to start fresh.
Now that we’ve covered adjusting camera settings, it’s time to learn how to capture beautiful photos using the camera on your Chromebook. Let’s jump into the next section!
Taking Photos
With the camera app open on your Chromebook, you’re ready to start capturing stunning photos. Follow these steps to take a photo:
- Ensure that the subject you want to capture is framed within the viewfinder.
- Adjust the camera settings, such as flash or timer, if needed.
- When you’re ready, simply click on the shutter button, usually located at the bottom center of the screen.
After clicking the shutter button, your Chromebook will capture the image and save it to your device’s storage. The photo will be displayed momentarily for your review, allowing you to decide if you’re satisfied with the result.
If you’re not satisfied with the photo, you can retake it by clicking the shutter button again. This gives you the opportunity to experiment with different angles, compositions, and settings to capture the best possible shot.
Once you’re happy with a photo, it’s a good idea to review it in the gallery or file manager app on your Chromebook. From there, you can delete unwanted photos, organize them into albums, or even edit them to enhance their appearance.
When taking photos, it’s important to keep the following tips in mind:
- Steady your Chromebook: To avoid blurry photos, try to keep your Chromebook steady while taking a picture. Using two hands and bracing your elbows against your body can help stabilize the device.
- Experiment with angles and perspectives: Don’t be afraid to get creative with your photography. Try shooting from different angles or perspectives to add interest and variety to your photos.
- Lighting: Pay attention to the lighting conditions when taking photos. Natural light or well-lit environments tend to produce better results. If necessary, adjust the flash setting or position yourself and your subject in a way that maximizes the available light.
- Composition: Consider the composition of your photo by following the rule of thirds, leading lines, or other composition techniques. This can help create visually appealing and balanced images.
By keeping these tips in mind and exploring different photography techniques, you’ll be able to capture captivating and memorable moments with the camera on your Chromebook.
Now that you’ve mastered the art of taking photos, let’s move on to recording videos with your Chromebook’s camera.
Recording Videos
In addition to taking photos, the camera on your Chromebook allows you to record high-quality videos. Follow these steps to start recording a video:
- Position your Chromebook to frame the desired subject within the viewfinder.
- Adjust any relevant camera settings, such as flash or video resolution.
- When you’re ready, locate the video recording button, typically represented by a red dot or the word “Record”.
- Click on the video recording button to start recording. You’ll see a timer or progress indicator on the screen to indicate the duration of your recording.
- To stop recording, click the video recording button again.
Once you’ve finished recording, your video will be saved to your Chromebook’s storage. You can access and view your videos in the gallery or file manager app just like photos.
Recording videos opens up a world of possibilities, whether you’re capturing a special moment, creating content for social media, or documenting an event. Here are a few tips to help you make the most out of your video recordings:
- Plan your shots: Before pressing the record button, think about the story or message you want to convey through your video. Plan your shots and consider the composition and framing to create visually compelling footage.
- Use stable footage: Shaky videos can be distracting. To achieve stable footage, try using a tripod or rest your Chromebook on a stable surface. If you need to hold it, use both hands and steady yourself to minimize camera shake.
- Explore different angles and perspectives: Just like with photography, experimenting with different angles and perspectives can add interest and variety to your videos. Try shooting from unique angles or using different camera movements to make your footage more dynamic.
- Consider lighting and audio: Good lighting and clear audio are essential for high-quality videos. Whenever possible, record in well-lit environments and ensure that the audio is clear and free from background noise.
- Edit your videos: After recording, you can further enhance your videos by editing them. Chromebooks offer various video editing apps and software that enable you to add transitions, trim clips, add music, and more.
By applying these tips and experimenting with different techniques, you’ll be able to capture and create impressive videos with your Chromebook’s camera.
Now that you’re familiar with recording videos, let’s discover how you can edit your photos and videos to make them even more memorable.
Editing Photos and Videos
Editing is a crucial step in transforming your photos and videos into polished and visually compelling creations. Chromebooks offer a range of editing tools and apps that allow you to enhance your captures. Here’s how you can edit your photos and videos:
- Edit Photos: To edit photos on your Chromebook, you can use various photo editing apps available from the Chrome Web Store. These apps offer a wide range of features, such as adjusting brightness, contrast, saturation, cropping, applying filters, and much more. Simply search for “photo editor” in the Chrome Web Store and choose an app that suits your editing needs.
- Edit Videos: To edit videos on your Chromebook, you can use video editing software or apps specifically designed for video editing. There are several options available, ranging from basic editing tools to more advanced features. Some popular video editing apps for Chromebooks include WeVideo, Adobe Spark, and PowerDirector. These apps allow you to trim clips, add transitions, apply filters, incorporate text, and even add music or sound effects to your videos.
When editing your photos and videos, here are a few tips to keep in mind:
- Keep it balanced: Adjust the brightness, contrast, and saturation of your photos and videos to create a balanced and visually appealing result. Be careful not to overdo it, as excessive editing can lead to unnatural-looking images.
- Experiment with filters and effects: Apply different filters and effects to add artistic flair to your captures. Filters can change the mood, color palette, and overall style of your photos and videos.
- Crop and resize: Use the cropping tool to remove unwanted elements from your photos or videos and improve the composition. Additionally, resizing your images or videos can make them more suitable for specific platforms or display sizes.
- Add text or captions: Consider adding text or captions to provide context or tell a story with your visuals. This can be especially useful for videos or when sharing your creations on social media.
- Experiment and have fun: Editing is a creative process, so don’t be afraid to experiment with different editing techniques and styles. Allow your imagination to guide you and have fun with it.
Remember, the goal of editing is to enhance your photos and videos, not to completely alter them. The key is to find a balance that showcases your unique vision and brings out the best in your captures.
Once you’re satisfied with the edits, you can save your edited photos or export your edited videos in the desired format. Be sure to keep a backup of your original files in case you want to make further adjustments in the future.
Now that you know how to edit your photos and videos, it’s time to learn how to easily share your creations with others.
Sharing Photos and Videos
After capturing and editing your photos and videos on your Chromebook, it’s time to share them with the world. Chromebooks offer various methods to easily share your creations with others. Here are a few ways to share your photos and videos:
- Social Media: One of the most popular ways to share visual content is through social media platforms such as Facebook, Instagram, Twitter, and YouTube. You can upload your photos and videos directly from your Chromebook to these platforms, allowing you to share your moments with friends, family, and followers.
- Email: If you prefer to share your photos and videos privately, you can send them via email. Simply attach the files to an email and send them to your desired recipients.
- Cloud Storage: Another convenient option is to upload your photos and videos to cloud storage services such as Google Drive, Dropbox, or OneDrive. Once uploaded, you can share a link to the files, granting others access to view or download them.
When sharing your photos and videos, keep the following tips in mind:
- Consider privacy settings: Depending on the platform or method you choose, you may have the option to adjust the privacy settings. Determine who you want to share your content with and choose the appropriate settings accordingly.
- Optimize file size: To ensure smoother uploading and downloading, consider compressing your photos and videos before sharing them. This reduces the file size without compromising too much on quality.
- Add captions or descriptions: When sharing your visual content, consider adding captions or descriptions to provide context or convey your message more effectively. This helps viewers understand the story behind your photos and videos.
- Note copyright and permissions: If your photos or videos contain copyrighted material or if you’ve captured images of individuals, be mindful of the necessary permissions or copyrights. Respect the intellectual property and privacy rights of others.
By utilizing these sharing methods and following these tips, you can easily showcase your creative work and connect with others through your photos and videos.
Now that you’re armed with the knowledge of how to share your creations, let’s address some common issues you may encounter when using the camera on your Chromebook.
Troubleshooting Common Issues
While using the camera on your Chromebook, you may encounter a few common issues that can hinder your photography and videography experience. Here are some troubleshooting tips to resolve these issues:
- Camera not working: If the camera app doesn’t open or you see a black screen, try restarting your Chromebook. If the problem persists, check your Chromebook’s system updates and ensure that you have the latest version of Chrome OS installed. Additionally, make sure that no other applications or browser tabs are using the camera simultaneously.
- Blurry photos: Blurry photos can be caused by various factors, such as camera shake or incorrect focus. To reduce camera shake, try holding your Chromebook steady, using a tripod, or increasing the shutter speed if available. Also, ensure that the subject is in focus by tapping on it on the viewfinder before taking the photo.
- Poor lighting: In low-light situations, your photos may appear dark or grainy. Try adjusting the camera settings, such as enabling the flash or increasing the ISO sensitivity. Alternatively, find a well-lit area or use external lighting sources to improve the lighting conditions for your photos.
- Noise in videos: If your videos have excessive background noise or static, consider using an external microphone for better audio quality. Additionally, minimize any ambient noise during recordings by choosing a quiet environment and positioning the microphone closer to the sound source.
- Storage full: Running out of storage space can prevent you from capturing more photos or videos. Delete unnecessary files or move them to external storage or cloud storage to free up space on your Chromebook.
If you’re still experiencing issues with your camera after trying these troubleshooting tips, you may need to consult the support resources provided by your Chromebook’s manufacturer or seek assistance from a professional technician.
Remember, practice makes perfect, and becoming proficient in using the camera on your Chromebook may take some time. Don’t be discouraged by initial obstacles; each challenge presents an opportunity to learn and grow as a photographer or videographer.
Now that you’re equipped with troubleshooting tips, you’re ready to capture and share your memorable moments with confidence. Let’s conclude this guide on using the camera on a Chromebook!
Conclusion
Congratulations on mastering the art of using the camera on a Chromebook! By following the steps outlined in this guide, you can now confidently capture stunning photos and record high-quality videos using your Chromebook’s built-in camera.
We began by getting started with accessing the camera app and familiarizing ourselves with the camera interface. We then explored how to adjust camera settings to optimize our captures, including features like flash, timer, gridlines, and image/video quality.
Next, we delved into the process of taking photos, providing tips on stability, composition, lighting, and angles to enhance your photography skills. After that, we learned how to record videos, discussing techniques like stabilization, varying perspectives, and paying attention to lighting and audio quality.
Editing plays a crucial role in transforming your captures into visually compelling creations. We explored editing options for both photos and videos, encouraging experimentation and balance to achieve desired results.
Sharing your creations with others is an important aspect of the creative process. We discussed various methods like social media, email, and cloud storage, along with tips on optimizing file size, privacy settings, and adding captions or descriptions.
Finally, we addressed common troubleshooting issues that you may encounter and provided tips to overcome them, ensuring a smooth and enjoyable camera experience on your Chromebook.
Now that you have a solid foundation in using the camera on a Chromebook, it’s time to unleash your creativity and capture moments that matter to you. Remember to continue learning and experimenting to hone your skills and discover new techniques.
Happy capturing and sharing!