Introduction
Are you tired of constantly switching between different windows and applications on your laptop? Do you wish you could view multiple screens simultaneously to improve your productivity? Look no further – split screen functionality is here to save the day!
Split screen is a feature that allows you to divide your laptop screen into two or more sections, enabling you to view and work on multiple applications or documents at the same time. This feature is especially useful when you need to reference information from one source while typing on another, or when you want to compare and analyze data from different documents side by side.
By utilizing split screen on your laptop, you can streamline your workflow, enhance multitasking capabilities, and increase your overall efficiency. Whether you are a student, a professional, or an avid gamer, the ability to have multiple screens displayed simultaneously can immensely benefit your daily tasks.
In this guide, we will walk you through the process of connecting your laptop to an external monitor and explore the different split screen options available for Windows, macOS, and Linux laptops. We will also provide step-by-step instructions on how to enable and use split screen on each of these operating systems. By the end of this guide, you’ll be a split screen pro!
What is split screen?
Split screen is a display mode that allows you to divide your laptop or monitor screen into multiple sections, each showing a different application or document. It enables you to view and interact with multiple screens simultaneously, without the need for constantly minimizing and maximizing windows. This feature is particularly useful when you need to multitask, compare information, or work with different applications side by side.
Split screen functionality varies depending on the operating system you are using. In general, it allows you to allocate a specific portion of your screen to each application, providing a seamless and efficient way to work with multiple windows at once. Instead of switching between different tabs or windows, you can have everything you need visible on one screen.
With split screen, you have the flexibility to choose how you want to divide your screen. You can have two applications displayed side by side, or you can divide the screen into more sections, depending on your preferences and the tasks at hand. This feature is especially beneficial for activities such as writing and researching, designing and editing, comparing documents or data, and monitoring multiple applications simultaneously.
Split screen is not limited to a single monitor. If you have a laptop connected to an external monitor, you can extend the split screen functionality to both screens, maximizing your workspace and productivity.
Overall, split screen is a convenient and efficient way to organize and manage your work environment. It allows for better multitasking, improved productivity, and a more streamlined workflow. Whether you are a student, a professional, or a casual user, split screen can greatly enhance your computing experience.
Benefits of using split screen
Split screen functionality offers a range of benefits that can significantly improve your productivity and enhance your overall user experience. Here are some of the key advantages of using split screen on your laptop or monitor:
- Improved multitasking: Split screen allows you to work on multiple applications or documents simultaneously, eliminating the need to constantly switch between windows. Whether you need to reference information while writing, compare and analyze data, or monitor multiple applications, split screen makes multitasking a breeze.
- Enhanced productivity: By having multiple screens visible at once, you can easily access and interact with different applications or documents without the hassle of locating and opening them individually. This streamlined workflow reduces distractions and helps you stay focused on the task at hand, ultimately boosting your productivity.
- Better organization: Split screen provides a visually organized workspace, allowing you to arrange and view multiple windows side by side. This enables you to keep related applications or documents in a single view, making it easier to manage and navigate between them. You can have your email client open on one side while referencing a spreadsheet or a website on the other, creating a more structured and efficient work environment.
- Effective collaboration: When working on projects or collaborating with others, split screen allows you to have communication tools, project management platforms, and reference materials all visible simultaneously. This promotes seamless collaboration, as you can easily share and discuss information with team members while simultaneously working on your individual tasks.
- Optimal use of screen real estate: Utilizing split screen on a larger monitor or dual monitors enables you to make the most of the available screen space. This is particularly advantageous for design work, video editing, coding, and any tasks that require a wide workspace. With split screen, you can view multiple windows without compromising on screen size or resolution.
Overall, split screen offers a range of benefits that can greatly enhance your work efficiency and user experience. It enables you to multitask effectively, stay organized, collaborate seamlessly, and make optimal use of your screen real estate. By taking advantage of split screen, you can work smarter, save time, and increase your overall productivity.
How to connect your laptop to a monitor
If you want to take advantage of split screen functionality on a larger display, such as a monitor, you’ll need to connect your laptop to the monitor. The process is straightforward and requires the following steps:
- Check the compatibility: Ensure that your laptop and the monitor have compatible video ports. The most common video ports are HDMI, DisplayPort, and VGA. If your laptop and monitor have different ports, you may need an adapter or cable to connect them.
- Gather the necessary cables: Depending on the ports available on your laptop and monitor, gather the appropriate cables to establish the connection. For example, if your laptop has an HDMI port and the monitor has an HDMI port as well, you’ll need an HDMI cable to connect them.
- Power off both devices: Before connecting the laptop and monitor, it’s important to power off both devices to avoid any potential damage or issues.
- Connect the laptop to the monitor: Take one end of the cable and plug it into the video port of your laptop. Then, take the other end of the cable and plug it into the corresponding video port on the monitor.
- Power on the devices: Once the laptop and monitor are physically connected, power on both devices.
- Configure display settings: Depending on your operating system, you may need to adjust the display settings to enable the external monitor and determine how you want it to function. This includes options like duplicating the laptop screen on the monitor or extending the display to utilize split screen functionality.
- Set the resolution: Ensure that the resolution settings on the external monitor match your preferences. You can adjust the resolution within the display settings of your operating system.
- Test the connection: Finally, verify that the laptop and monitor are properly connected by checking if the external monitor displays the laptop’s screen. You can drag an application window to the second screen to test the split screen functionality.
Once you have successfully connected your laptop to the monitor, you can start taking advantage of split screen capabilities and enjoy the benefits of a larger working space.
Split screen options on Windows laptops
Windows laptops offer several built-in options to enable and use split screen functionality. These options may vary slightly depending on the version of Windows you are using. Here are some common split screen options available on Windows laptops:
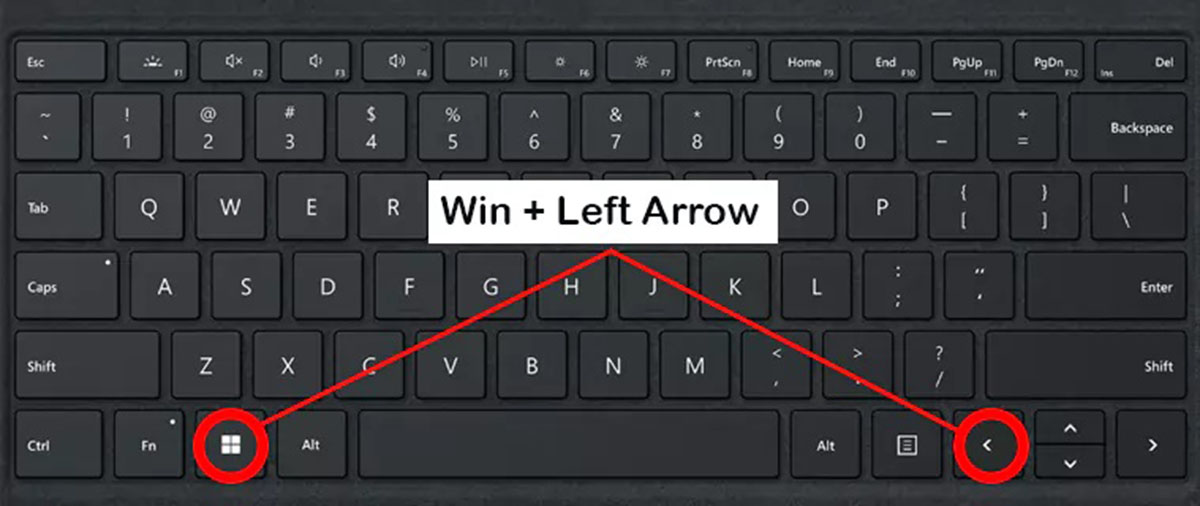
- Snap Assist: Snap Assist is a feature that allows you to easily snap windows to the sides or corners of your screen. To use Snap Assist, simply drag a window to the edge of the screen until it snaps into place. You can then select another window to snap to the other side, creating a split screen setup. Alternatively, you can use the Windows key along with the left or right arrow key to snap windows to the sides of the screen.
- Task View: Task View is a virtual desktop feature in Windows that enables you to create multiple desktops and switch between them. To use Task View, press the Windows key along with the Tab key. From there, you can create a new desktop, move windows between desktops, and arrange windows side by side on the same desktop to achieve split screen mode.
- Keyboard shortcuts: Windows laptops provide keyboard shortcuts to quickly enable split screen functionality. Press the Windows key along with the left or right arrow key to snap a window to the corresponding side of the screen. Pressing the Windows key along with the up arrow key maximizes the active window, while pressing Windows key + down arrow key minimizes it.
- Using the Charms Bar: In some versions of Windows, you can access split screen options through the Charms Bar. Simply swipe from the right edge of the screen or press the Windows key along with the C key to open the Charms Bar. Then, select the Devices option and choose the external monitor to enable split screen.
These split screen options provide flexible ways to divide and arrange applications on your Windows laptop. Experiment with different methods to find the one that suits your workflow and preferences best. Remember that these options may vary slightly depending on the version of Windows you are using, so make sure to explore the specific split screen features available on your laptop.
Split screen options on macOS laptops
macOS laptops, such as those from Apple, offer their own set of split screen options to enhance productivity and multitasking. Here are some common split screen options available on macOS laptops:
- Split View: Split View is a feature that allows you to divide your screen between two applications, each taking up half of the screen. To activate Split View, click and hold the green full-screen button on the top left of the window you want to resize. Then, drag it to the left or right side of the screen until it occupies half of the display. Release the button, and macOS will show you the other open windows to choose the second application for the split screen.
- Mission Control: Mission Control enables you to view all open windows, applications, and desktops in a single view. To access Mission Control, swipe up with three fingers on the trackpad or press the Mission Control key on your keyboard. From there, you can drag windows into different desktops and arrange them side by side to create a split screen setup.
- Keyboard shortcuts: macOS laptops provide keyboard shortcuts for split screen functionality. Pressing the Control key along with the left or right arrow key will snap the active window to the corresponding side of the screen. Pressing the Control key along with the up arrow key maximizes the active window, while pressing the Control key along with the down arrow key minimizes it.
- Third-party apps: In addition to the built-in split screen options, there are also third-party applications available for macOS laptops that offer advanced split screen features. These apps provide more customization options, allowing you to create split screens with multiple applications and different window arrangements.
With the split screen options available on macOS laptops, you can easily divide your screen, organize applications, and improve your multitasking capabilities. Whether you prefer the simplicity of Split View or the versatility of Mission Control, macOS provides a seamless and efficient split screen experience to enhance your productivity.
Split screen options on Linux laptops
Linux laptops offer a variety of split screen options to help users effectively manage their workspace and multitask efficiently. Although the exact options may vary depending on the Linux distribution and desktop environment you are using, here are some common split screen options available:
- Tiling window manager: Many Linux distributions come with a tiling window manager, such as i3, Awesome, or Xmonad. These window managers automatically divide your screen into tiles, allowing you to organize and resize windows easily. With a tiling window manager, you can create custom split screen layouts, arrange windows side by side or in a grid, and navigate between them using keyboard shortcuts.
- Workspaces: Linux desktop environments typically provide multiple workspaces, which are virtual desktops where you can organize your windows and applications. Each workspace functions as a separate area, allowing you to switch between them and arrange windows independently. To use workspaces for split screen, you can open different applications or windows on separate workspaces and navigate between them using keyboard shortcuts or the workspace switcher.
- Third-party applications: Linux users also have the option of utilizing third-party applications to enable split screen functionality. There are several tools available, such as i3-gaps, Polybar, or Tilix, which offer advanced split screen features and customization options. These applications provide more control over window placement, resizing, and behavior, allowing you to create a split screen setup that suits your preferences.
- Keyboard shortcuts: Linux laptops commonly offer customizable keyboard shortcuts that allow users to perform various actions, including split screen functions. Depending on the desktop environment, you can assign keyboard shortcuts to move windows to specific positions, maximize or restore windows, or switch between workspaces efficiently.
Linux provides a highly customizable and flexible environment for split screen functionality. Whether you prefer using a tiling window manager, taking advantage of workspaces, or utilizing third-party applications, Linux offers versatility and control to optimize your multitasking experience.
Steps to split screen on Windows laptops
Windows laptops provide several methods to enable and use split screen functionality, allowing you to work with multiple applications side by side. Here are the steps to split screen on Windows laptops:
- Method 1: Using Snap Assist:
- Open the first application or window you want to include in the split screen.
- Click and hold the title bar of the window and drag it to the left or right side of the screen until the cursor reaches the edge.
- Release the mouse button to snap the window to that side of the screen.
- Windows will display thumbnails of your other open windows.
- Select the second application or window you want to include in the split screen by clicking on its thumbnail.
- The two windows will now be arranged side by side in a split screen configuration.
- Method 2: Using keyboard shortcuts:
- Open the first application or window you want to include in the split screen.
- Press the Windows key along with the left or right arrow key to snap the window to the corresponding side of the screen.
- The window will be resized and snapped to that side.
- Open the second application or window you want to include in the split screen.
- Press the Windows key and the other arrow key (left or right) to snap the window to the other side of the screen.
- The two windows will now be arranged side by side in a split screen configuration.
- Method 3: Using Task View:
- Open the first application or window you want to include in the split screen.
- Press the Windows key along with the Tab key to open Task View.
- Click on the thumbnail of the first application and drag it to the desktop on the left or right side.
- Open the second application or window you want to include in the split screen.
- Click on the thumbnail of the second application and drag it to the desktop on the other side.
- The two applications will now be arranged side by side in a split screen configuration.
Experiment with these methods to find the one that suits your workflow and preferences. These steps may vary slightly depending on the version of Windows you are using, but the overall process remains similar. Using split screen on Windows laptops can greatly enhance your productivity and multitasking capabilities.
Steps to split screen on macOS laptops
macOS laptops offer a convenient Split View feature, allowing users to easily split their screen between two applications. Here are the steps to split screen on macOS laptops:
- Open the applications:
- Launch the first application you want to include in the split screen.
- Make sure the application is not in full-screen mode. If it is, you can exit full-screen mode by clicking the green full-screen button in the upper-left corner of the window.
- Open the second application you want to include in the split screen.
- Activate Split View:
- Click and hold the green full-screen button in the upper-left corner of the window of the first application.
- The screen will split, and the first application will occupy one side while the other side displays all available windows and open applications.
- Drag the thumbnail of the second application to the side where you want it to be placed in the split screen.
- Release the mouse button to activate Split View with the two applications side by side.
- Adjust the split screen:
- To resize the windows, move the cursor to the center of the screen.
- A vertical bar will appear, allowing you to click and drag to adjust the size of each application’s window in the split screen.
- You can also drag the dividing bar to the left or right to give more space to one application.
- Exit Split View:
- To exit Split View, click the green full-screen button at the top of either application’s window.
- Both applications will return to their original window sizes and positions.
By following these steps, you can easily utilize Split View on macOS laptops to increase your productivity and multitasking capabilities. Enjoy the benefits of having two applications side by side and manage your work more efficiently.
Steps to split screen on Linux laptops
Linux laptops offer various options to enable split screen functionality, depending on the desktop environment and window manager being used. Here are general steps to split screen on Linux laptops:
- Using a tiling window manager:
- If you are using a tiling window manager like i3 or Awesome, the split screen functionality is inherent.
- By default, new windows will automatically fill the available space, creating a split screen setup.
- You can navigate between windows and resize them using keyboard shortcuts specific to your window manager.
- Using workspaces:
- If you are using a Linux desktop environment with workspaces, open the first application you want to include in the split screen.
- Switch to a new workspace by using the designated keyboard shortcut or workspace switcher.
- Open the second application you want to include in the split screen on the new workspace.
- Switch back to the original workspace.
- You can now navigate between the two workspaces and have a split screen setup.
- Using third-party applications:
- Some Linux distributions provide third-party applications like i3-gaps or Tilix that allow for advanced split screen features.
- Install and configure the desired split screen application based on your preferences and requirements.
- These applications typically offer customization options to create, resize, and manage split screens.
- Using keyboard shortcuts:
- Many Linux desktop environments allow you to create custom keyboard shortcuts for managing windows and split screens.
- Assign a keyboard shortcut to quickly resize and arrange windows side by side.
- Activate the keyboard shortcut to split the screen and position the desired windows in the split screen arrangement.
These steps serve as a general guideline to split screen on Linux laptops. The exact steps may vary depending on the window manager, desktop environment, or third-party applications you are using. Explore the specific options available on your Linux setup to optimize your multitasking experience and make the most of your screen real estate.
Troubleshooting common issues with split screen
While split screen functionality can greatly enhance your productivity, you may encounter some common issues when using split screen on your laptop. Here are a few troubleshooting tips to address these issues:
- Application compatibility:
- In some cases, certain applications may not work well in split screen mode.
- If an application appears distorted or does not function properly, try resizing the window to a different size or maximizing it to fill the screen.
- You can also try using an alternative application or exploring different split screen options specific to that application.
- Screen resolution:
- If you experience issues with split screen, such as text or images appearing too small or too large, it could be related to your screen resolution settings.
- Adjust the resolution settings to find a balance that works well for your split screen configuration.
- You can usually access the display settings in your operating system’s system preferences or control panel.
- Maximizing windows:
- When using split screen, it’s important to remember that some windows may automatically feature a maximize button rather than resizing properly.
- If a window does not resize correctly in split screen mode, try maximizing it to fill the entire screen and then resize it again to fit the desired portion of the split screen.
- Keyboard shortcuts:
- While using keyboard shortcuts to enable split screen can be convenient, it’s crucial to ensure that the shortcuts are correctly set up and enabled on your laptop.
- Check your operating system’s keyboard settings to make sure the shortcuts are correctly assigned and functioning as intended.
- You may need to customize or reassign the shortcuts to align with your desired split screen setup.
- Dual monitor setup:
- If you are using a dual monitor setup, ensure that your laptop and the external monitor are properly connected and recognized by your operating system.
- Check the display settings to verify that both monitors are detected and configured correctly.
- If you are experiencing issues with split screen on the external monitor, try disconnecting and reconnecting the monitor or adjusting the display settings.
By following these troubleshooting tips, you can overcome common issues and enjoy a smooth split screen experience. Remember that specific solutions may depend on the operating system, window manager, or applications you are using. If problems persist, refer to the documentation or support resources specific to your setup for further assistance.
Conclusion
Split screen functionality on laptops and monitors is a powerful tool that enhances productivity and multitasking capabilities. Whether you are using a Windows, macOS, or Linux laptop, the ability to view and work on multiple applications or documents simultaneously can greatly streamline your workflow and improve efficiency.
By following the steps outlined in this guide, you can easily activate split screen mode and take full advantage of the available screen real estate. From snapping windows to the sides or corners of the screen, to utilizing virtual desktops and customizing window managers, there are various methods to enable split screen on different operating systems.
Split screen offers numerous benefits including improved multitasking, enhanced productivity, better organization, effective collaboration, and optimal use of screen real estate. It enables you to work smarter, save time, and switch seamlessly between different applications or documents.
However, it is important to be aware of potential issues and troubleshoot them accordingly. If you encounter problems with application compatibility, screen resolution, maximizing windows, or keyboard shortcuts, follow the troubleshooting tips provided to resolve them.
Ultimately, split screen functionality empowers you to create a more flexible and efficient work environment. Whether you are a student, professional, or casual computer user, incorporating split screen into your workflow can significantly improve your productivity and multitasking capabilities.
So, why limit yourself to a single window or application when you can expand your horizons with split screen? Explore the options available on your laptop or monitor, experiment with different methods, and discover the power of multitasking at your fingertips.