Introduction
In today’s multitasking world, split screen functionality has become an essential feature for laptop users. Split screen allows you to view and work on multiple applications or documents simultaneously, improving productivity and efficiency. If you own a Dell laptop and want to make the most out of your screen real estate, you’re in luck. Dell laptops come with built-in features and options that make it easy to split your screen in various ways.
This article will guide you through three different methods to split the screen on your Dell laptop. Whether you prefer using the native features of your operating system or exploring third-party applications, we have you covered. With these methods, you’ll be able to work on multiple tasks side by side, making multitasking a breeze.
Before we delve into the methods, it’s important to note that the specific steps may vary depending on your Dell laptop model and the operating system you are using. However, the concepts discussed should apply to most recent Dell laptops running Windows 10.
So, let’s dive into the world of split-screen functionality and discover how you can maximize your productivity on your Dell laptop.
Method 1: Using Snap Assist
Dell laptops running Windows 10 come with a built-in feature called Snap Assist, which allows you to easily split your screen between two applications. Here’s how you can use Snap Assist:
-
Open the first application you want to work with and position it on one side of the screen.
-
Drag the second application window to the opposite side of the screen. As you move the window, you’ll see a translucent outline indicating where the window will snap into place.
-
Release the mouse button to snap the second application window into place.
-
To adjust the size of the split screen, click and hold the separator line between the two application windows. Drag it left or right to resize the windows according to your preference.
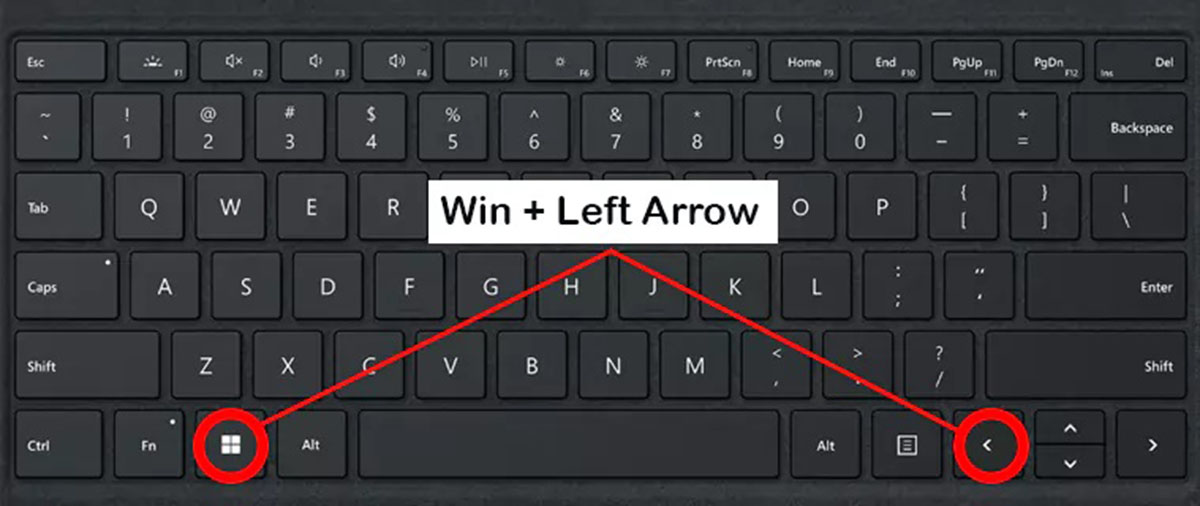
You can also use keyboard shortcuts to activate Snap Assist. Press the Windows key and the left or right arrow key to snap the current window to the corresponding side of the screen. Additionally, you can use the Windows key and the up or down arrow key to maximize or minimize the current window.
Using Snap Assist, you can easily work on two applications side by side, allowing you to compare data, copy and paste between documents, or simply keep an eye on multiple tasks simultaneously. This feature is particularly useful for students, researchers, and professionals who need to reference information from one application while working on another.
Now that you’re familiar with using Snap Assist, let’s explore another method to split your screen on a Dell laptop.
Method 2: Using Display Settings
If you prefer more control over your screen layout and want to customize the size and position of each application window, you can use the Display Settings feature on your Dell laptop. Here’s how:
-
Right-click on an empty area of the desktop and select “Display settings” from the context menu.
-
In the Display settings window, scroll down to the “Multiple displays” section and click on the “Detect” button.
-
Once the second display is detected, scroll down to the “Multiple displays” section again and select “Extend these displays” from the drop-down menu.
-
Now, drag and position the application windows to the desired screen. You can resize, maximize, or minimize the windows as you normally would.
-
To split the screen, drag an application window to the extreme left or right of the screen until the cursor reaches the edge. You’ll notice that the window will snap into position, occupying half of the screen.
-
Repeat the process for the second application window, but ensure it is on the opposite side of the screen.
Using the Display Settings method provides you with more flexibility in arranging your application windows on multiple screens. This is particularly beneficial for tasks that require extended displays or when working with multiple monitors.
Now that you’re familiar with using Display Settings, let’s explore another option for splitting your screen on a Dell laptop.
Method 3: Using Third-Party Window Management Applications
If you want even more advanced window management capabilities and additional features, you may consider using third-party applications specifically designed for window management. Here are a few popular options:
-
Divvy: Divvy is a powerful window manager that allows you to create custom keyboard shortcuts to resize and position your application windows. With Divvy, you can effortlessly split your screen into customizable layouts, making it ideal for users who frequently work with specific window arrangements.
-
Spectacle: Spectacle is a free and open-source window management application for macOS. While it’s not designed specifically for Dell laptops, it offers a wide range of options to resize, move, and arrange windows using keyboard shortcuts. Spectacle also supports custom layouts and can be a handy tool for split-screen multitasking.
-
DisplayFusion: DisplayFusion is a feature-rich window management application that offers advanced options for users working with multiple monitors. It provides a wide range of customization options, including taskbar management, hotkey support, and window snapping features, all of which can greatly enhance your multitasking experience.
When choosing a third-party window management application, make sure to research and evaluate each option to find the one that best suits your needs and preferences. Additionally, pay attention to compatibility with your Dell laptop model and the operating system you are using.
Third-party window management applications give you even more control over your screen layout and provide additional features that may not be available through the built-in methods. Explore these options to enhance your productivity and streamline your workflow.
Now that you’re familiar with using third-party window management applications, let’s conclude our exploration of split screen methods for Dell laptops.
Conclusion
In today’s fast-paced digital age, the ability to split your screen on a Dell laptop is an invaluable tool for maximizing productivity. Whether you’re a student juggling multiple research papers, a professional multitasking on various applications, or simply someone who likes to have multiple windows open at once, the methods outlined in this article can help you achieve an efficient split-screen setup.
Using the built-in Snap Assist feature allows you to effortlessly snap two application windows side by side, providing a quick and convenient way to multitask. If you prefer more control over your screen layout, the Display Settings method allows you to customize the size and position of each window to your liking. And for those seeking even more advanced window management capabilities, third-party applications like Divvy, Spectacle, and DisplayFusion offer a wide range of features to enhance your multitasking experience.
It’s important to remember that the specific steps outlined in this article may vary slightly depending on your Dell laptop model and the operating system you are using. However, the concepts discussed should apply to most recent Dell laptops running Windows 10.
By implementing these split-screen methods, you can make the most out of your Dell laptop’s screen real estate and effortlessly manage multiple tasks. Whether you’re working on projects, conducting research, or simply organizing your digital workspace, split-screen functionality can greatly enhance your productivity and efficiency.
So go ahead, try out these methods and find the one that works best for you. Embrace the power of split screen on your Dell laptop and unlock new levels of multitasking prowess.