Introduction
The Turcom Tablet is a versatile and powerful tool that can greatly enhance your digital artistry, graphic design, and overall creative workflow. Whether you are a professional artist or a hobbyist, this tablet offers a seamless experience for creating digital masterpieces. With its precise pen sensitivity and customizable settings, the Turcom Tablet provides a natural and immersive drawing experience.
In this guide, we will walk you through the step-by-step process of setting up your Turcom Tablet. From unboxing the tablet to configuring its settings, we will cover everything you need to know to get started.
Setting up the Turcom Tablet is a relatively straightforward process, but it’s important to follow each step carefully to ensure proper installation and optimal performance. By the end of this guide, you will be ready to unleash your creativity and take advantage of the extensive features offered by the Turcom Tablet.
So, let’s dive in and learn how to set up your Turcom Tablet for an exceptional digital art experience!
Step 1: Unboxing the Turcom Tablet
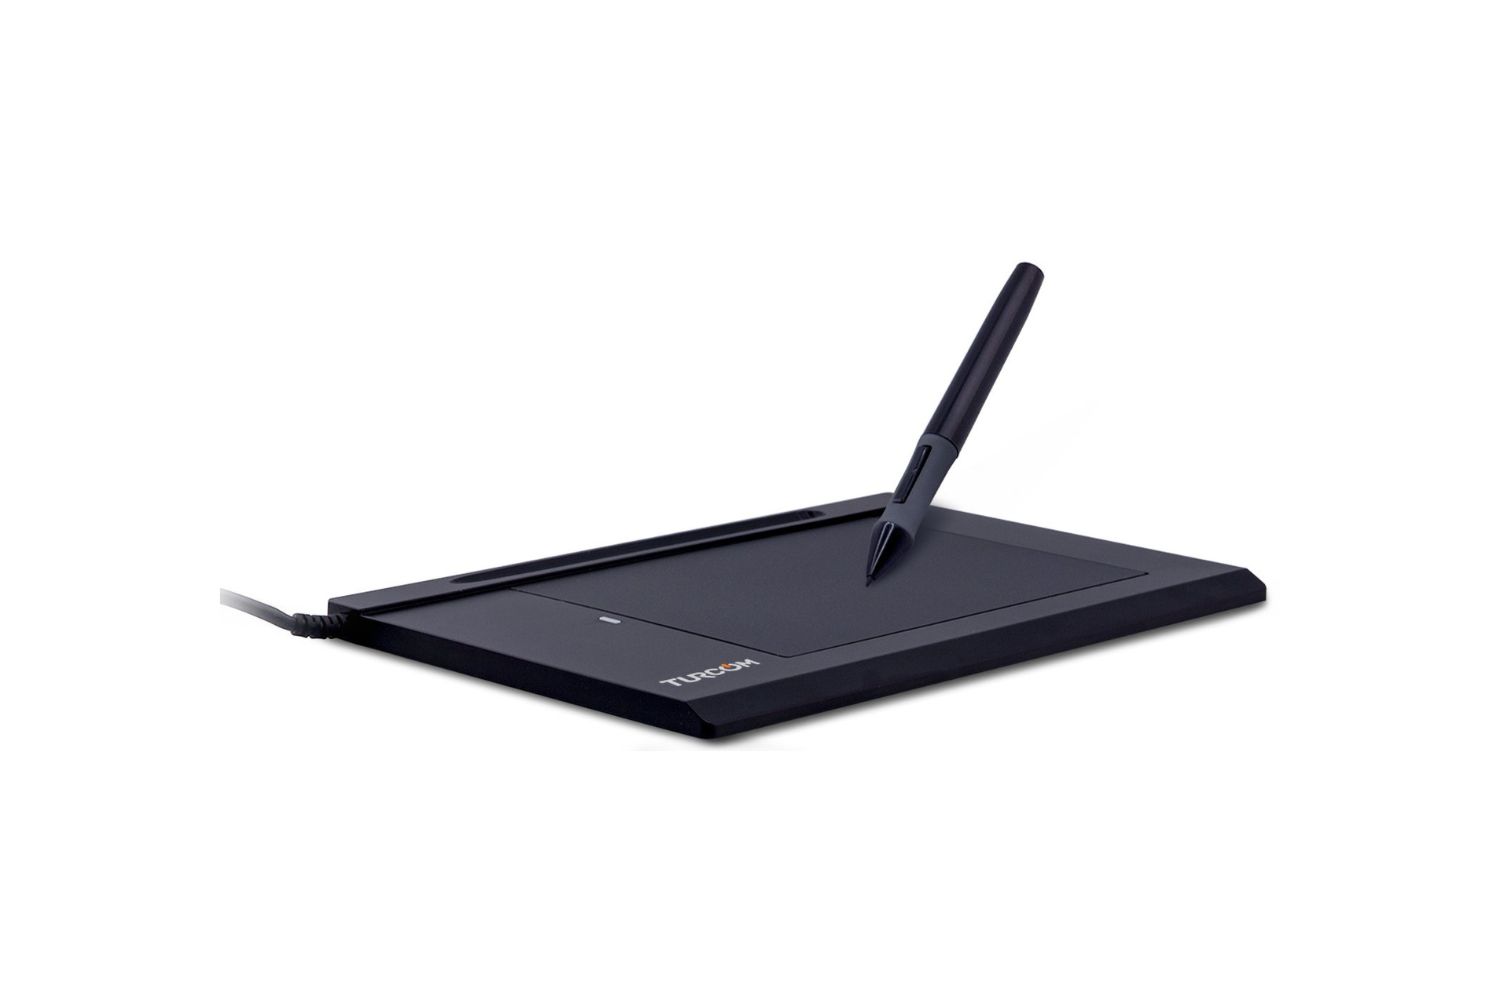
The first step in setting up your Turcom Tablet is unboxing the package and familiarizing yourself with the contents. When you open the box, you will find the Turcom Tablet, a pressure-sensitive pen, a USB cable, and any additional accessories that may come with your specific model.
Before proceeding, ensure that all items are undamaged and in good condition. If you notice any defects or missing components, contact Turcom customer support for assistance.
Next, find a suitable location for your tablet setup. Choose a well-lit area with enough space to comfortably work on your tablet. It’s also essential to have a nearby power outlet or accessible USB port to connect your tablet.
Once you have prepared your workspace, connect the USB cable to both the Turcom Tablet and your computer. The tablet may require a direct connection or can be connected via a USB hub, depending on the model. Consult the user manual for specific instructions for your tablet.
With the tablet and computer connected, power on your computer if it’s not already running. The tablet should automatically be recognized by your operating system, but in some cases, you may need to install drivers to ensure proper functionality. We will cover driver installation in the next step.
Now, let’s move on to step 2 to learn how to install the necessary drivers for your Turcom Tablet.
Step 2: Connecting the Tablet to your Computer
After unboxing your Turcom Tablet, the next step is to connect it to your computer properly. Connecting the tablet correctly ensures smooth communication between the tablet and your computer, allowing you to fully utilize its features.
Start by ensuring that your computer is powered on. Locate an available USB port on your computer or USB hub and insert one end of the provided USB cable into the tablet’s USB port. Insert the other end of the USB cable into the USB port on your computer.
It’s important to note that some Turcom Tablets may require an external power supply in addition to the USB connection. If this is the case with your tablet, make sure to connect the power supply to a power outlet before proceeding.
Once the tablet is connected to your computer, your operating system should automatically recognize the tablet and install the appropriate drivers. If the drivers are not automatically installed, you may need to manually install them using the software provided by Turcom. Refer to the user manual or visit the Turcom website for driver installation instructions specific to your tablet model.
Once the drivers are successfully installed, you can start exploring the features and settings of your Turcom Tablet. It’s a good idea to restart your computer after driver installation to ensure that the tablet is fully integrated with your system.
With your tablet properly connected and the necessary drivers installed, you are now ready to move on to the next step: calibrating your Turcom Tablet. Calibration ensures that your tablet accurately translates your pen movements onto the digital canvas, providing a precise and natural drawing experience. So, let’s proceed to step 3!
Step 3: Installing Drivers for the Tablet
Installing the drivers for your Turcom Tablet is crucial to ensure optimal performance and compatibility with your computer. The drivers allow your operating system to recognize and communicate effectively with the tablet, enabling you to harness its full potential.
Begin by checking whether the drivers are included in the package or need to be downloaded from the official Turcom website. If the drivers are included, insert the provided CD into your computer’s CD/DVD drive and follow the on-screen instructions to install them. Alternatively, visit the Turcom website and navigate to the support or downloads section to find the latest drivers for your tablet model.
When obtaining drivers from the Turcom website, ensure that you download the correct version that corresponds to your tablet model and operating system. Follow the instructions provided on the website to complete the installation process. It may require running an executable file or following a setup wizard.
During the installation, you may be prompted to restart your computer. It is important to promptly follow these instructions to finalize the installation and have the drivers fully integrated with your operating system.
After the restart, your computer should recognize the connected Turcom Tablet, and you can verify this by checking the Device Manager on Windows or System Information on macOS. Look for your tablet under the “Human Interface Devices” or “Input Devices” category.
To ensure that your drivers are up to date, periodically check the Turcom website for any driver updates or software enhancements. Keeping your drivers updated can fix potential bugs, improve performance, and provide compatibility with new operating system updates.
With the drivers successfully installed, you are now ready to proceed to the next step: calibrating your Turcom Tablet. Calibration ensures accurate pen tracking and enhances the precision of your digital artwork. Let’s move on to step 4!
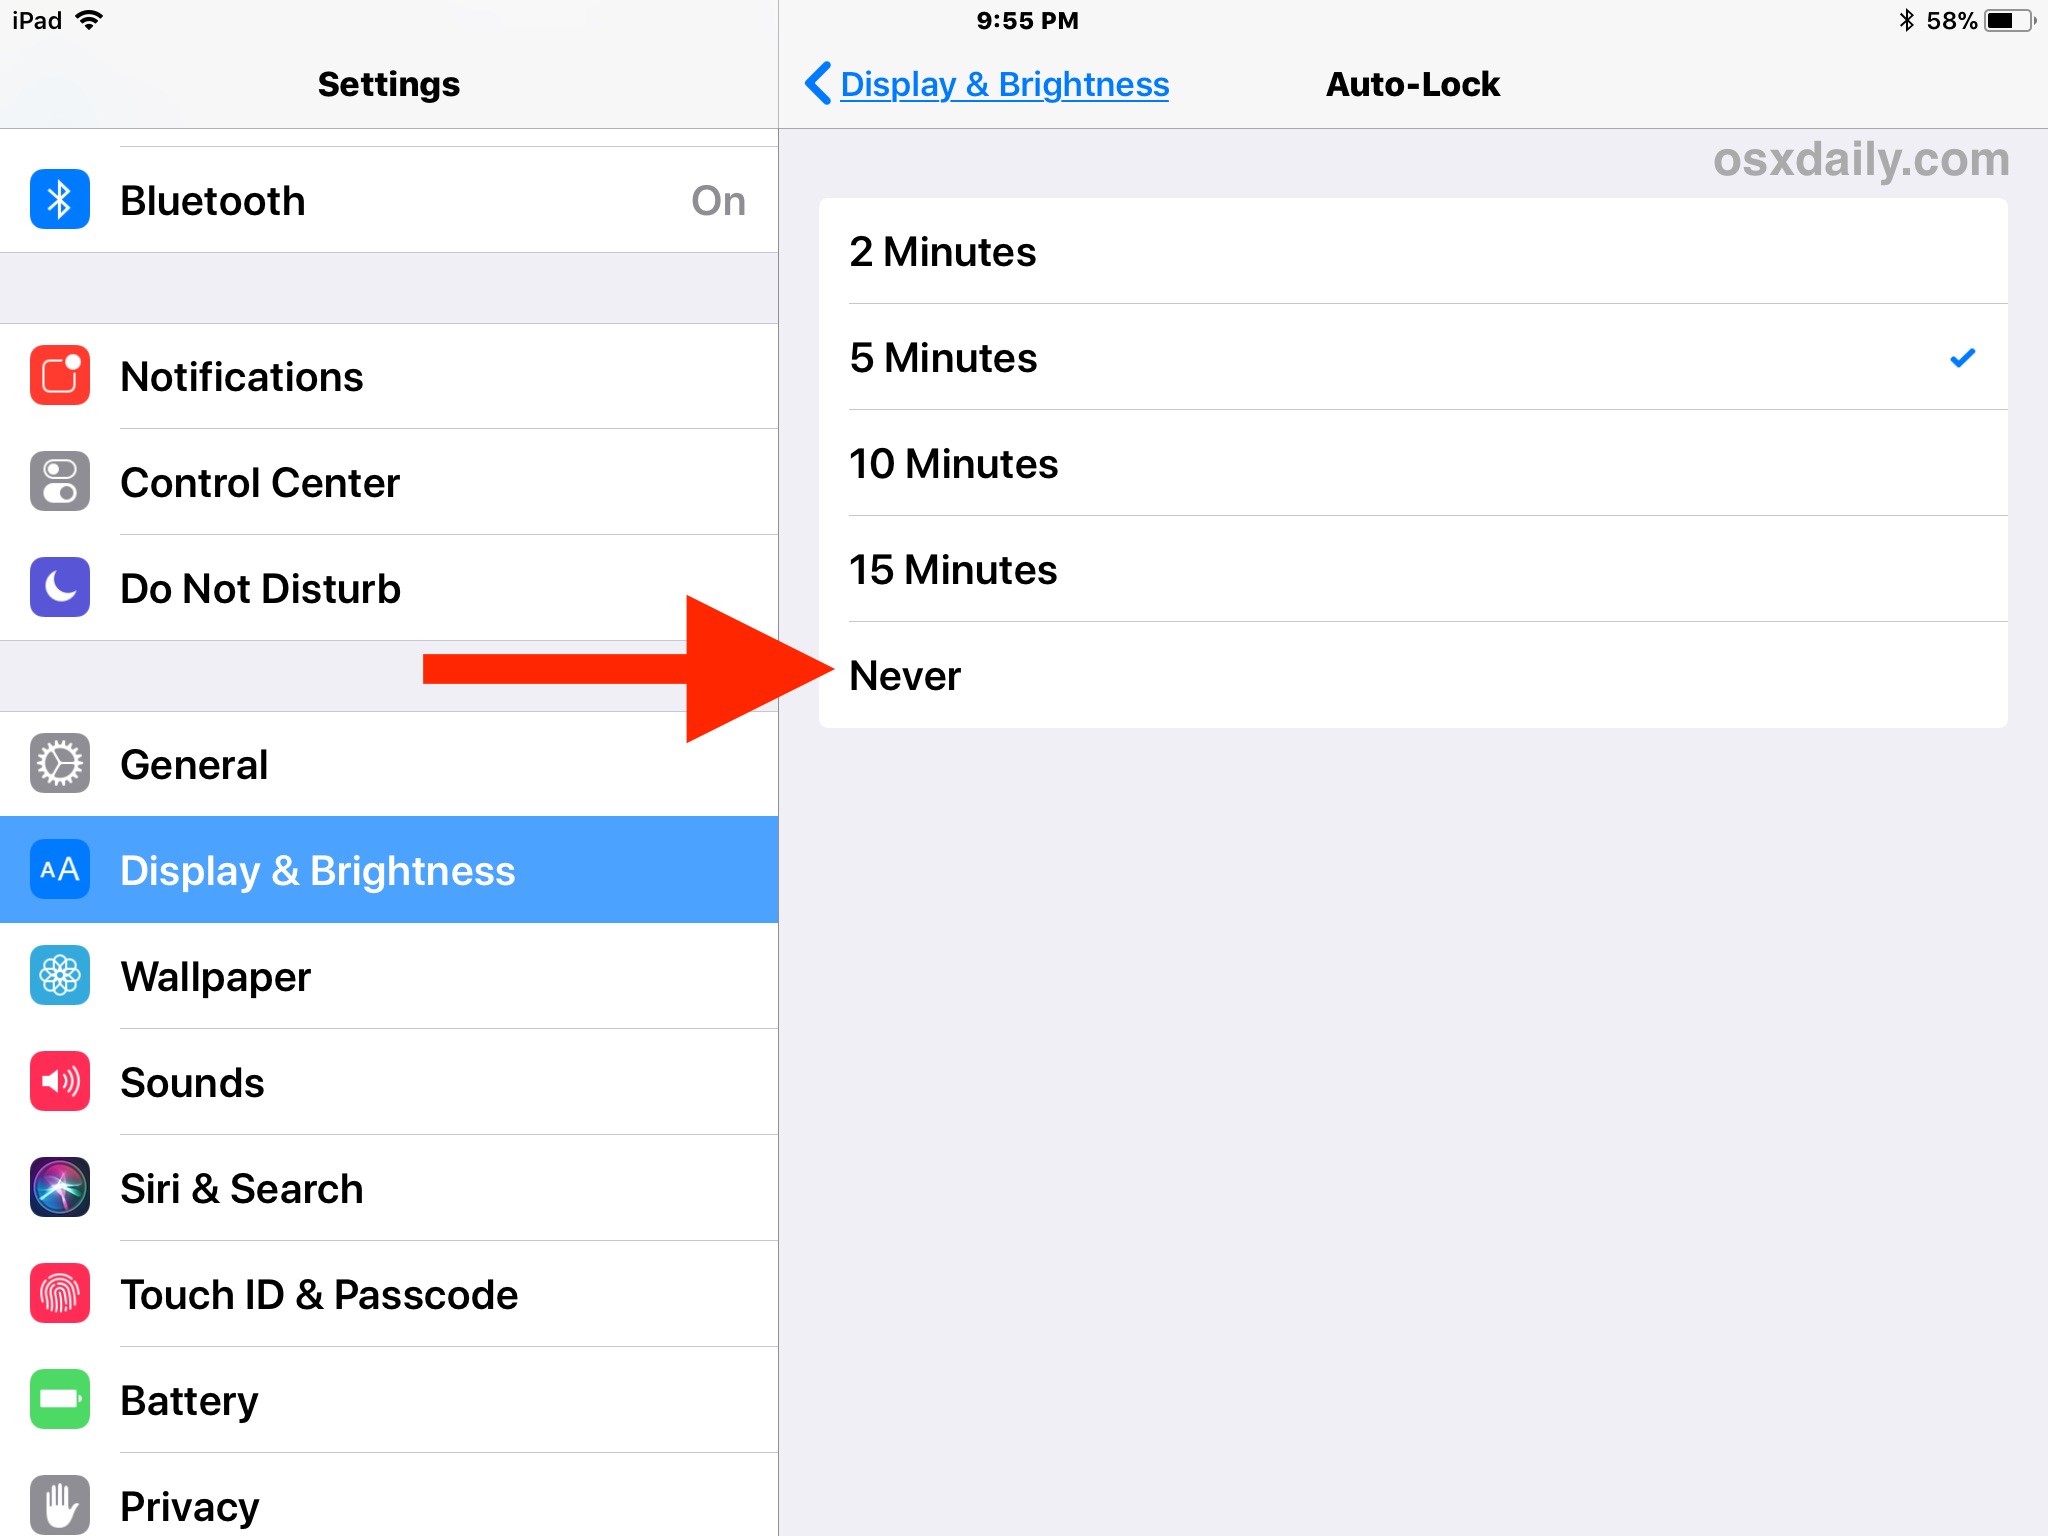
Step 4: Calibrating the Tablet
Calibrating your Turcom Tablet is an essential step to ensure accurate pen tracking and optimal drawing performance. Calibration adjusts the tablet’s settings to match the display’s dimensions, making your digital strokes appear precisely where you intend them to.
To begin the calibration process, open the Turcom Tablet settings or control panel software on your computer. This software allows you to customize various settings and preferences of your tablet. Look for the calibration or pen settings section within the software.
Next, follow the on-screen instructions provided by the software to initiate the calibration process. Typically, this involves aligning your pen with a series of targets or dots that appear on your screen. Carefully follow the instructions, and be sure to use your pen precisely to calibrate accurately.
During calibration, your tablet may display a crosshair or indicator to guide your pen movements. Follow the crosshair precisely and tap on each target or dot as prompted. This process ensures that the tablet can accurately interpret the position of your pen on the screen.
It’s important to note that for optimal results, minimize any external factors that may interfere with the calibration process. Close any unnecessary programs, ensure good lighting conditions, and keep any other electronic devices away from the tablet during calibration.
Once the calibration process is complete, the software will confirm the successful calibration. You can now test your Turcom Tablet by drawing on digital programs or applications. Pay attention to the responsiveness and accuracy of the pen movements to ensure the calibration was successful.
If you feel that the tablet’s performance is not accurate or doesn’t meet your expectations after the initial calibration, you can repeat the process or make further adjustments in the tablet settings. The settings software should provide options to fine-tune sensitivity, pressure levels, and other parameters to suit your preferences.
With the Turcom Tablet calibrated and customized to your liking, you are ready to explore its full potential in various digital art applications. Before diving into your creative journey, let’s proceed to step 5, where we will discuss customizing the tablet settings to suit your unique style and preferences.
Step 5: Customizing Tablet Settings
Customizing the settings of your Turcom Tablet allows you to personalize your digital art experience and optimize the tablet’s performance according to your unique preferences. By customizing the tablet settings, you can fine-tune various parameters to suit your workflow, drawing style, and software compatibility.
Start by accessing the Turcom Tablet settings or control panel software on your computer. This software provides a range of options and configurations to customize the tablet settings. Look for the settings section that allows you to modify sensitivity, pressure levels, pen buttons, and other features.
Adjusting sensitivity settings is essential to match the tablet’s responsiveness to your drawing style and pressure levels. Experiment with different sensitivity levels to find the one that feels most comfortable and natural to you. Higher sensitivity may allow for lighter strokes, while lower sensitivity may provide better control for heavier strokes.
Mapping the tablet’s active area is another important customization aspect. The active area refers to the specific region on the tablet’s surface that translates into the corresponding area on your computer screen. You can adjust the active area to match your display’s dimensions, ensuring that your pen movements align accurately with the digital canvas.
Furthermore, explore the options to assign specific functions or keystrokes to the tablet’s pen buttons. This allows you to access frequently used commands or shortcuts directly from the tablet, eliminating the need to switch between the tablet and keyboard. Assign commands such as undo, eraser, brush size adjustment, or any other functions based on your workflow and software preferences.
Additionally, some tablets offer tilt sensitivity, which responds to the angle at which you hold the pen. If your Turcom Tablet supports tilt sensitivity, ensure that it is enabled and adjust the sensitivity levels to your liking. Tilt sensitivity can enhance your artistic versatility by allowing you to create varied brush strokes based on pen angle.
Remember to save and apply your customized settings once you are satisfied with the adjustments. Take some time to experiment and familiarize yourself with the changes you have made to ensure they enhance your digital art workflow.
Lastly, keep in mind that customization preferences may vary depending on the software you use. Some digital art programs offer additional settings specific to the tablet, allowing you to further optimize the tablet experience within those programs.
With the Turcom Tablet settings customized to suit your style and preferences, you are now ready to unleash your creativity and explore the vast possibilities of digital art. In the next step, we will discuss how to test and ensure that the tablet is functioning correctly across different applications. So, let’s move on to step 6!
Step 6: Testing the Tablet in Different Applications
Once you have completed the setup and customization of your Turcom Tablet, it’s time to put it to the test in various digital art applications. Testing the tablet across different software allows you to ensure compatibility and optimal performance, enabling you to create digital masterpieces seamlessly.
Start by launching your preferred digital art program, such as Adobe Photoshop, Corel Painter, or Clip Studio Paint. These programs often have specific tablet settings that you can further customize to maximize your tablet’s performance within the software.
Begin by testing the pen sensitivity and pressure levels. Create a new canvas or open an existing project and start making strokes with your pen. Observe how the software responds to different pressure levels and adjust the settings if desired. This allows you to achieve varying line thicknesses and brush effects based on how lightly or firmly you press the pen against the tablet surface.
Explore the different brushes and tools available in your digital art program. Test the tablet’s responsiveness to these tools and experiment with different stroke techniques. This will give you a better understanding of how the tablet interacts with the software and allow you to utilize its features to their full potential.
Try out different drawing techniques, such as sketching, shading, or creating detailed line work. Test the tablet’s accuracy by drawing complex shapes, curves, and fine details. Take note of any inconsistencies or issues in the tablet’s performance and make necessary adjustments in the tablet settings or software preferences as needed.
If you use multiple digital art programs, it’s crucial to test your Turcom Tablet in each of them. Different software may have varying levels of compatibility or require specific settings to optimize tablet performance. By testing the tablet in each software, you can ensure a smooth and consistent experience across all of your creative projects.
Additionally, consider testing your tablet in other applications beyond digital art software. Explore how it interacts with image editing programs, 3D modeling software, or even general productivity applications. This will give you a comprehensive understanding of the tablet’s versatility and its compatibility in various use cases.
Throughout the testing process, pay attention to any issues such as lag, erratic cursor movement, or unresponsiveness. These issues may indicate a need for further troubleshooting or adjustments. Refer to the Turcom support documentation or reach out to their customer support for assistance in resolving any technical challenges you may encounter.
With rigorous testing in different applications completed, you can be confident in the functionality and performance of your Turcom Tablet. Now it’s time to let your creativity flow and create magnificent digital artworks!
Conclusion
Setting up and configuring your Turcom Tablet is an exciting and rewarding journey that opens up a world of creativity and digital art possibilities. By following the step-by-step process outlined in this guide, you have successfully unboxed the tablet, connected it to your computer, installed the necessary drivers, calibrated it for precise pen tracking, customized the settings to suit your preferences, and tested it in various digital art applications.
The Turcom Tablet offers an immersive and natural drawing experience, with its precise pen sensitivity and customizable settings. Whether you are a professional artist, designer, or hobbyist, this tablet provides the tools you need to bring your creative ideas to life.
Throughout the setup process, remember to reference the user manual and any additional documentation provided by Turcom for specific instructions related to your tablet model. If you encounter any issues or need further assistance, don’t hesitate to reach out to Turcom’s customer support for guidance.
Now that your Turcom Tablet is all set up and tailored to your preferences, the stage is set for you to unleash your artistic potential. Take advantage of the tablet’s features, explore various digital art applications, and continue to experiment and refine your skills.
It’s time to dive into your creative journey and embark on a path of endless artistic possibilities. Enjoy your Turcom Tablet and create stunning digital artworks that showcase your unique style and imagination!