Introduction
Welcome to the world of custom fan curves! If you’re someone who wants to optimize their computer’s cooling system and keep those temperatures in check, you’ve come to the right place.
When it comes to maintaining optimal temperatures for your computer components, having a robust cooling system is of utmost importance. While your system’s fans do a good job of cooling things down, they often operate at predefined settings that may not be ideal for your specific needs.
That’s where setting a custom fan curve comes in. By manually adjusting your fans’ speeds based on temperature thresholds, you can create a personalized cooling profile that ensures your system runs smoothly and efficiently. This allows you to strike a balance between keeping your components cool and reducing unnecessary noise.
In this guide, we’ll walk you through the process of setting a custom fan curve for your case fans. Whether you’re a seasoned computer enthusiast or a novice looking to learn more about PC cooling, this guide is designed to help you navigate the intricacies of fan control software and optimize your system’s airflow.
Before we delve into the steps, it’s important to note that setting a custom fan curve requires some basic technical knowledge. Familiarity with your computer’s hardware, software installation, and BIOS settings is recommended. However, fear not, as this guide aims to provide clear instructions to help you along the way.
So, if you’re ready to take control of your fan speeds and improve your computer’s cooling capabilities, let’s dive in!
Why Set a Custom Fan Curve?
Setting a custom fan curve for your case fans involves adjusting the fan speeds based on temperature thresholds. While it may sound complex, the benefits of doing so are worth the effort. Here are a few reasons why you should consider setting a custom fan curve:
- Optimize Cooling: A custom fan curve allows you to tailor your cooling system to the specific needs of your computer components. By adjusting the fan speeds, you can ensure that your system stays at an optimum temperature, preventing overheating and potential damage to your hardware.
- Noise Reduction: By default, many fans operate at speeds higher than necessary, leading to excessive noise. With a custom fan curve, you can lower the fan speeds during times of lower heat generation, reducing overall noise levels. This is especially useful if you use your computer in a quiet environment or during tasks that don’t require intensive cooling.
- Extend Fan Lifespan: Constantly running fans at high speeds can put strain on them, potentially shortening their lifespan. By setting a custom fan curve, you can avoid unnecessary wear and tear on your fans, helping to prolong their lifespan and reduce the need for replacements.
- Energy Efficiency: Running fans at maximum speeds consumes more power, resulting in higher energy costs. With a custom fan curve, you can optimize the fan speeds to use only the required amount of energy, contributing to a more energy-efficient system.
- Personalization: Setting a custom fan curve gives you full control over your cooling system. You can fine-tune the fan speeds based on your specific preferences and requirements, allowing you to achieve the perfect balance between performance, noise levels, and temperatures.
Overall, a custom fan curve offers a myriad of benefits, including improved cooling performance, reduced noise levels, extended fan lifespan, energy efficiency, and the ability to personalize your system’s cooling. So, whether you’re a gamer, content creator, or simply a PC enthusiast, taking the time to set a custom fan curve is a worthwhile endeavor that can enhance your computing experience.
What is a Fan Curve?
A fan curve represents the relationship between the temperature of your computer components and the corresponding speeds of your case fans. It enables you to control the behavior of your fans based on temperature thresholds.
In a typical setup, the fan curve is characterized by three key elements:
- X-Axis (Temperature): This represents the temperature of your computer’s components, typically measured in degrees Celsius (°C) or Fahrenheit (°F). The temperature can be obtained from various sensors, such as those integrated into your motherboard or through specialized software.
- Y-Axis (Fan Speed): This represents the speed at which your case fans are running, typically measured in revolutions per minute (RPM). Fan speed can be adjusted by manipulating the voltage supplied to the fan or by using software-based controls.
- Points on the Curve: The fan curve consists of points that indicate specific temperature values and the corresponding fan speeds. These points determine how the fan reacts as the temperature changes. By carefully selecting and adjusting these points, you can create a custom curve that suits your cooling needs.
Typically, a fan curve is designed to be a smooth curve with increasing fan speeds as the temperature rises. This ensures that your system remains cool under heavy loads when temperatures are high. Conversely, as the temperature decreases, the fan speeds can be reduced to minimize noise output and save energy.
By customizing your fan curve, you can tailor your cooling system to your specific requirements. For example, if you want your computer to prioritize quiet operation over maximum cooling performance, you can adjust the fan curve to keep fan speeds low even under heavy load conditions. On the other hand, if you need maximum cooling performance, you can set the fan curve to ramp up fan speeds aggressively as the temperature increases.
It’s important to note that the fan curve is specific to each fan in your system, allowing you to individually control and optimize the behavior of each fan. This flexibility ensures that you can fine-tune the cooling performance of your computer to achieve the best results.
Now that we understand what a fan curve is and its components, let’s move on to the steps involved in setting a custom fan curve for your case fans.
Step 1: Installing Fan Control Software
The first step in setting a custom fan curve for your case fans is to install fan control software on your computer. This software enables you to monitor and adjust the fan speeds and create custom profiles.
There are several popular fan control software options available, each with its own features and compatibility. Some common choices include:
- SpeedFan: SpeedFan is a widely used software that offers extensive fan control options. It supports a wide range of motherboards and provides detailed monitoring and fan speed adjustment capabilities.
- Argus Monitor: Argus Monitor is another popular choice that provides comprehensive fan control features. It offers real-time monitoring, temperature alerts, and the ability to create custom fan curves.
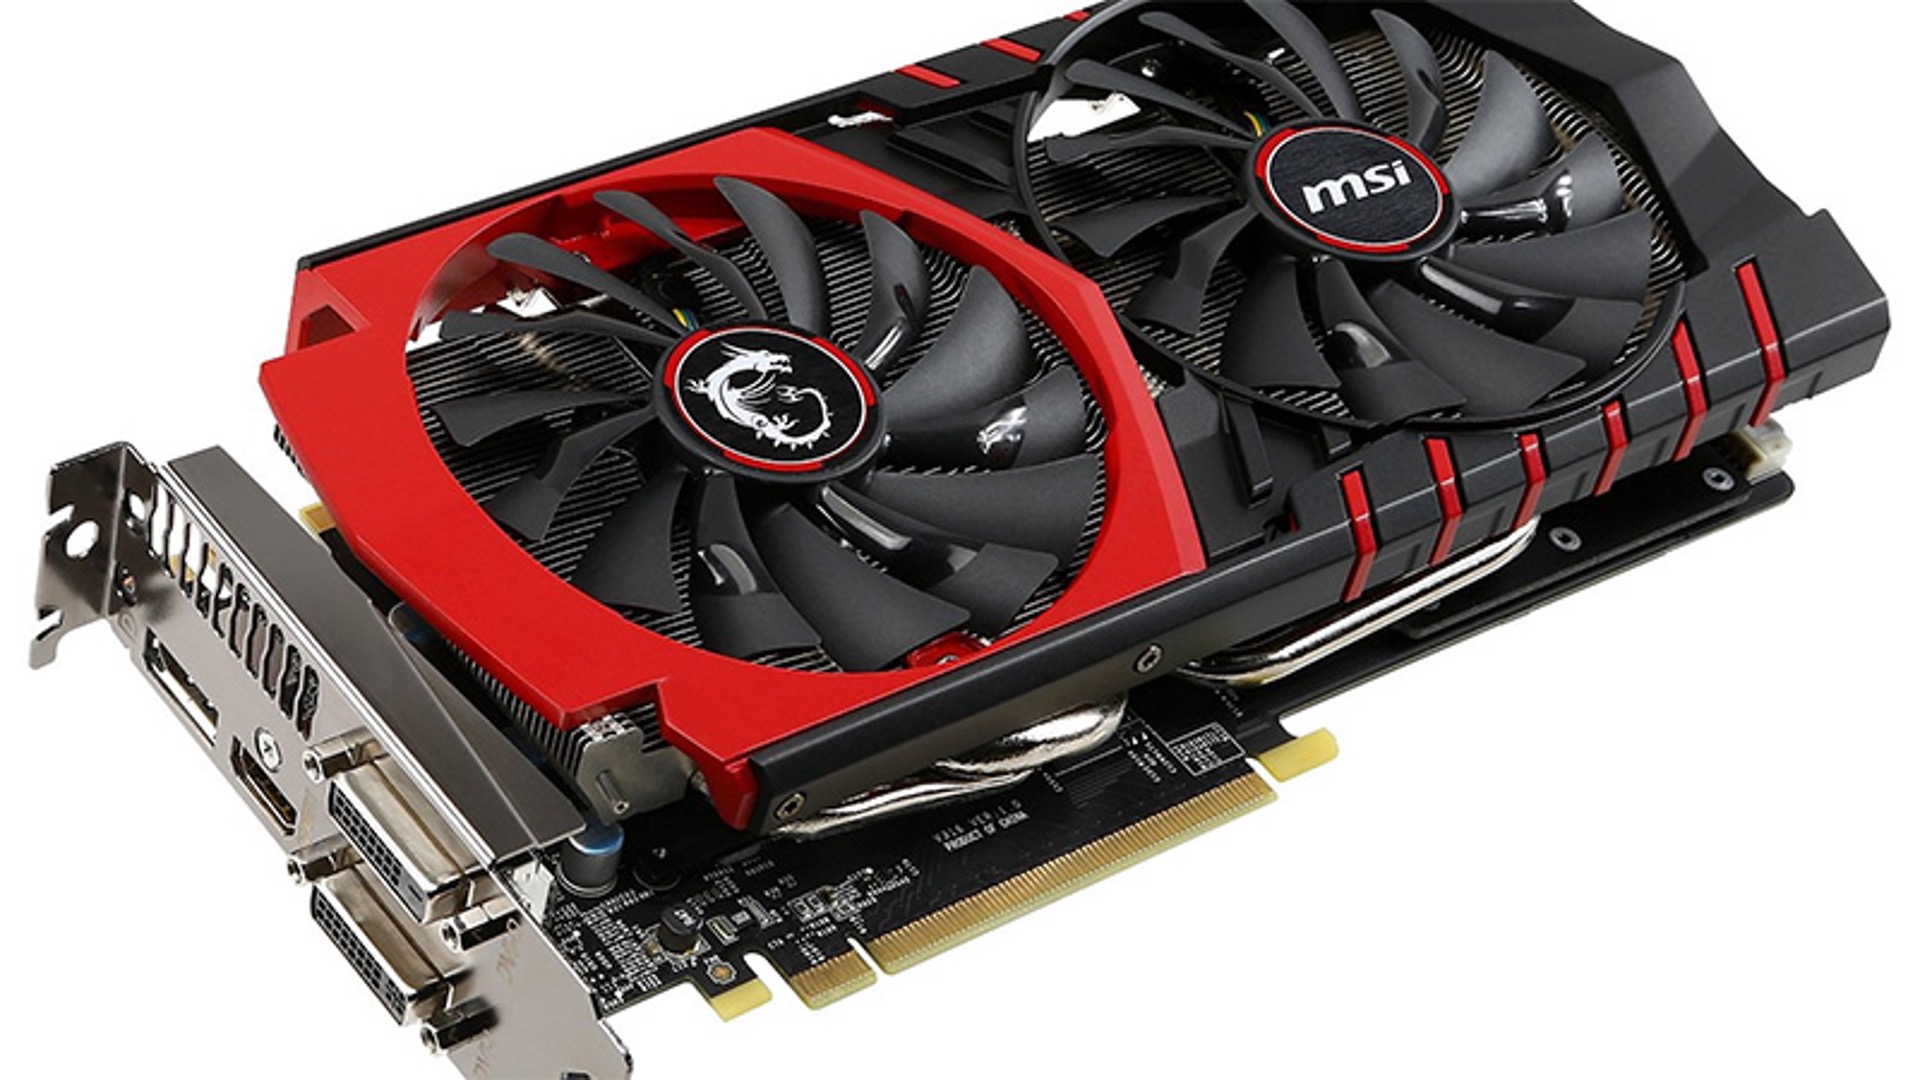
- MSI Afterburner: While primarily known for its GPU overclocking capabilities, MSI Afterburner also allows you to control the fan speeds of your case fans. It is compatible with a range of MSI graphics cards and motherboards.
- Corsair iCUE: Corsair iCUE is a software suite specifically designed for Corsair hardware. It provides control over Corsair fans, RGB lighting, and other system components.
Before installing any fan control software, it’s essential to check if it is compatible with your motherboard and fans. Visit the software’s official website to review the system requirements and compatibility information.
Once you have identified the software that suits your needs, download and install it following the instructions provided by the software developer. Make sure to download the latest version to ensure compatibility and access to any bug fixes or new features.
After the installation is complete, open the fan control software and familiarize yourself with its user interface and features. Take the time to explore the available options, as they may vary depending on the software you have chosen.
With the fan control software installed, you are ready to proceed to the next step of identifying your fan models. This will help you customize the fan curve for each fan in your system effectively.
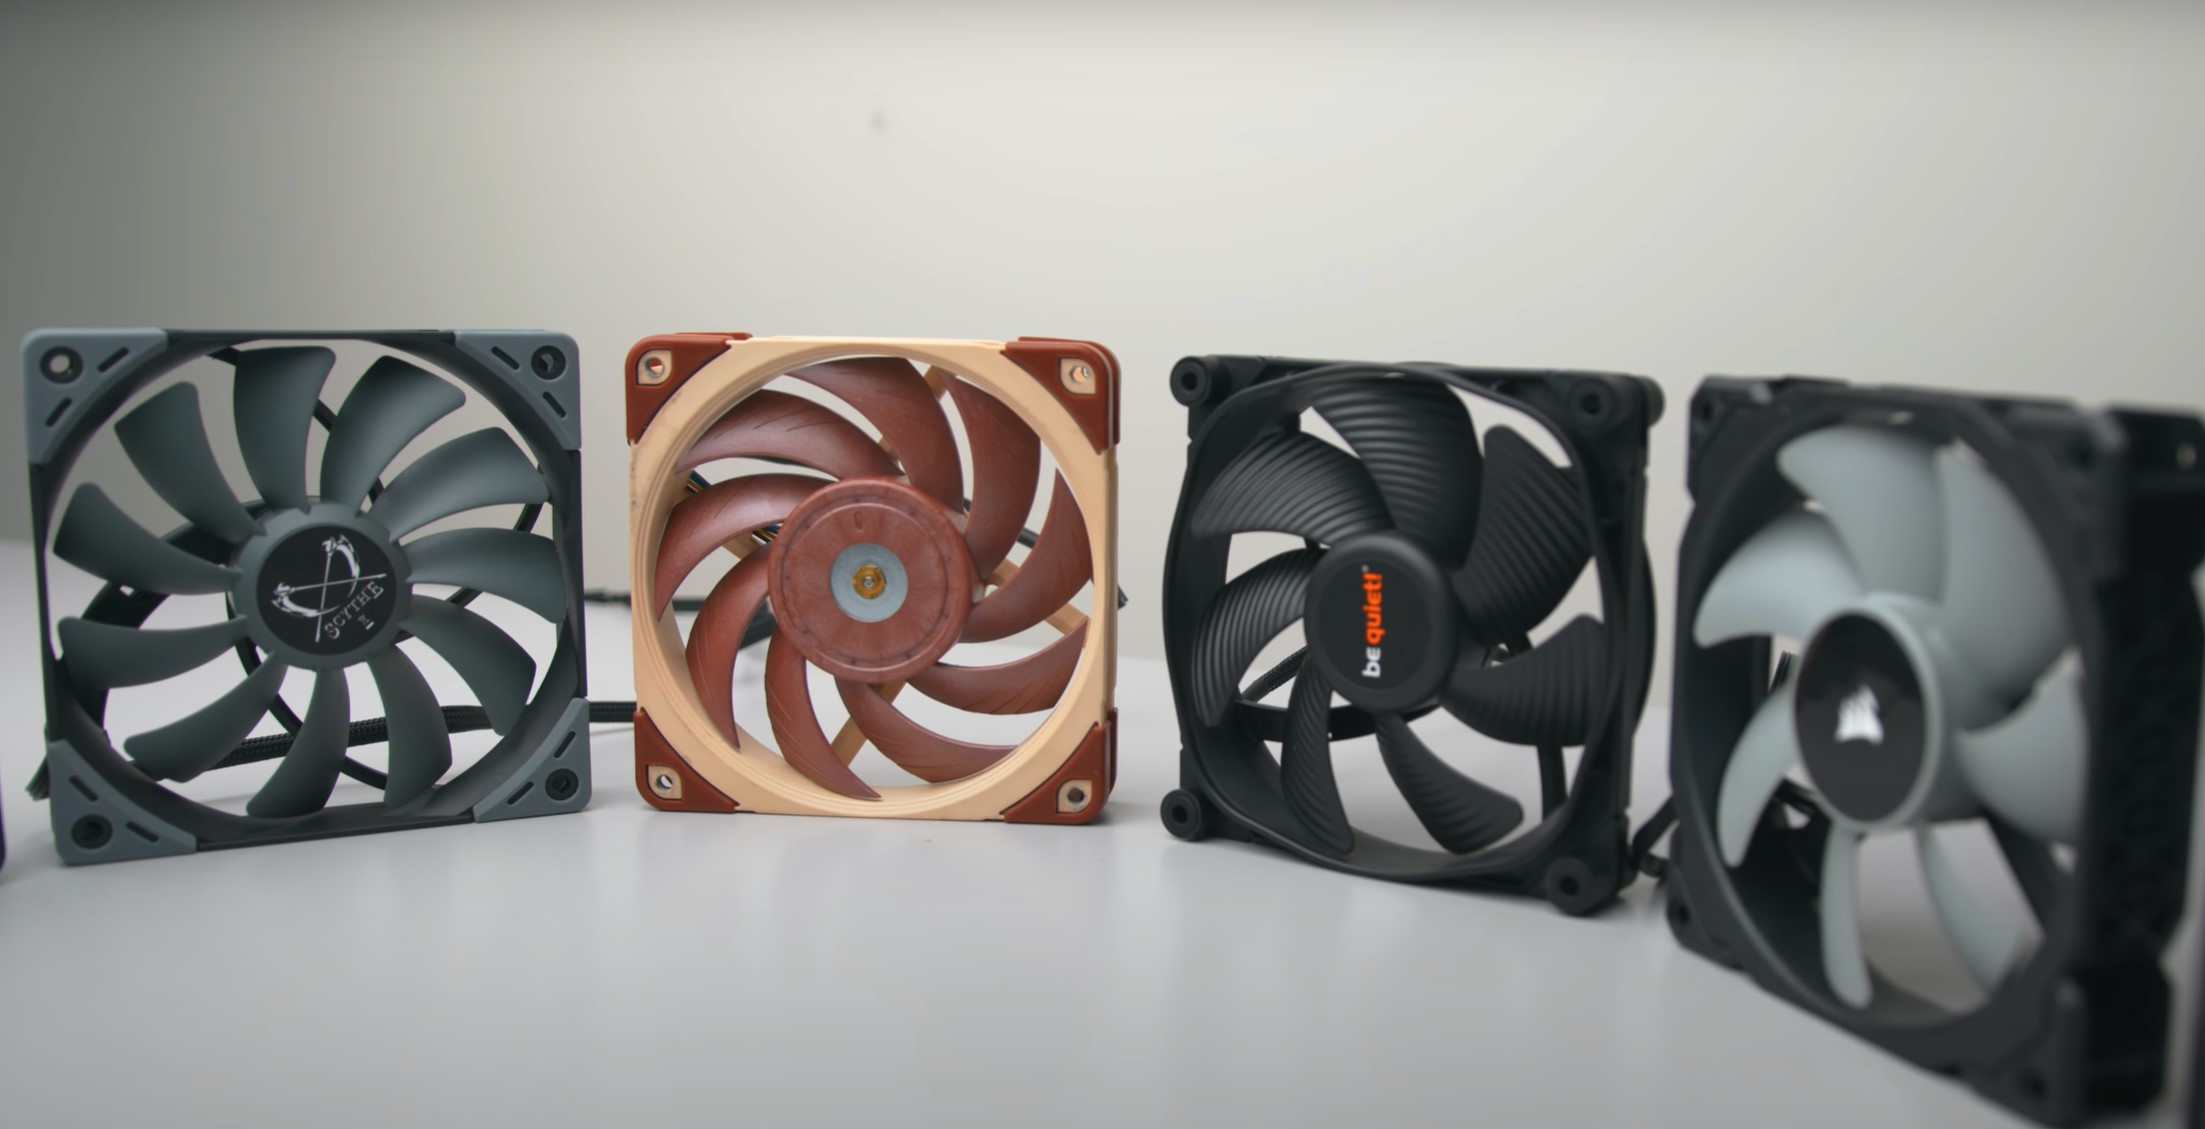
Step 2: Identify Your Fan Model
Before you can effectively set a custom fan curve, it’s important to identify the fan models in your system. This will enable you to adjust the fan speeds accurately and create individual profiles for each fan.
To identify your fan model, you can follow these steps:
- Physical Inspection: Open up your computer case and visually inspect the fans. Look for any labels or markings on the fans themselves. These labels often include the manufacturer’s name and model number.
- Manufacturer’s Documentation: Consult the documentation or manuals that came with your computer, motherboard, or fans. These documents often provide details about the hardware components used in your system, including the fan models.
- Online Research: If you are unable to find the necessary information through physical inspection or documentation, consider conducting an online search. Using the manufacturer’s name and any other identifying information you can find, search for the specific fan model to gather more details.
- Software Monitoring: Some fan control software programs, such as SpeedFan or Argus Monitor, have the ability to detect and display information about the connected fans. Open the software and navigate to the fan monitoring or information section to view the detected fan models.
Once you have identified the fan models, take note of their names or model numbers for future reference. Having this information on hand will make it easier to create custom profiles for each fan and adjust their speeds accurately in the fan control software.
If you have multiple fans of the same model in your system, it’s important to differentiate them to ensure that you can identify and adjust each one individually. You can do this by noting their physical locations, connecting them to different fan headers on your motherboard, or using any unique markings or labels on the fans.
By accurately identifying your fan models, you are now ready to proceed to the next step of adjusting the fan speeds in the fan control software based on your requirements and preferences.
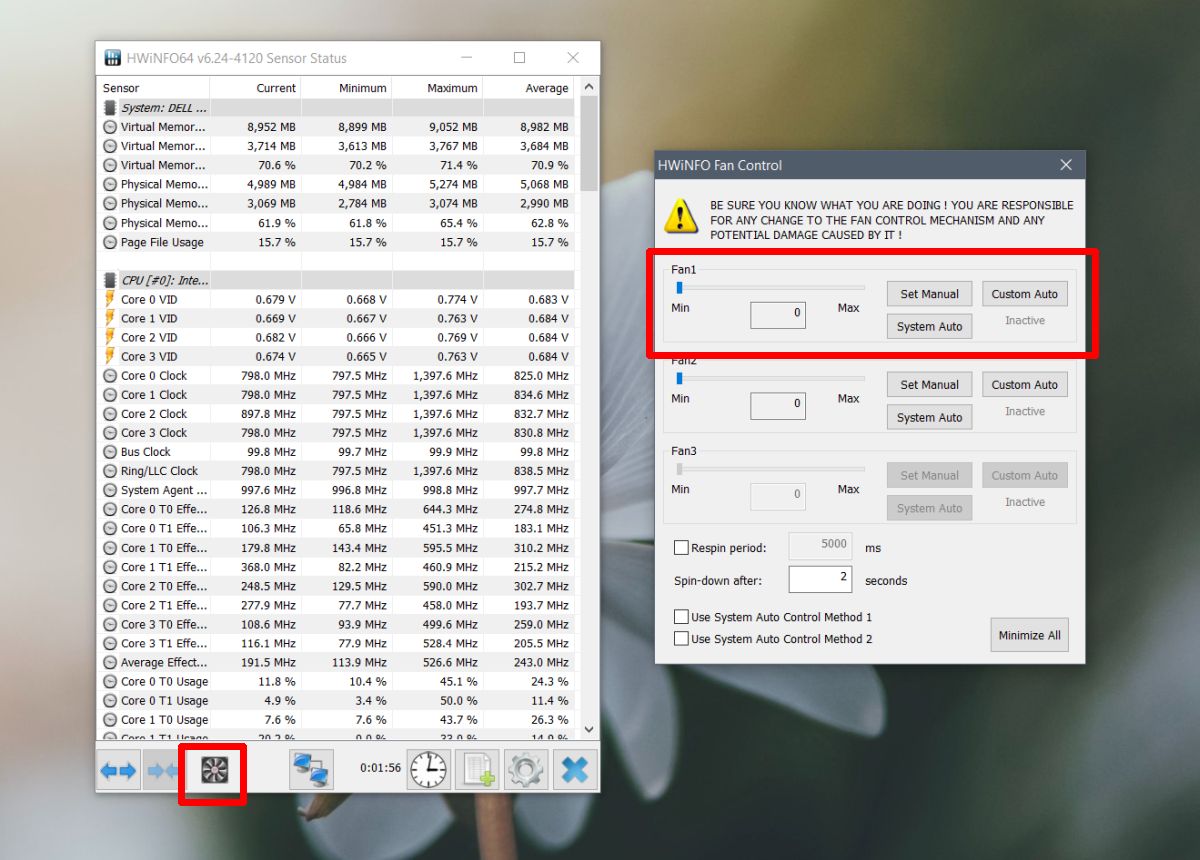
Step 3: Adjusting Fan Speeds
After identifying your fan models, the next step in setting a custom fan curve is to adjust the fan speeds. This can be done using the fan control software installed on your computer.
Here’s how you can adjust the fan speeds:
- Launch the Fan Control Software: Open the fan control software you installed in step 1. Depending on the software you chose, it may have its own dedicated interface or integrate with other system monitoring software.
- Locate Fan Speed Controls: In the fan control software, navigate to the section or page that controls the fan speeds. This is typically labeled as “Fan Speed Control,” “Fan Management,” or something similar.
- Select the Fan: Choose the fan you want to adjust the speed for from the list of detected fans. If you have multiple fans of the same model, make sure to select the correct one based on its unique identifier or location.
- Adjust Fan Speed: Once you have selected the fan, you will typically have several options to adjust its speed. These options may include setting a specific speed in RPM, a percentage of the fan’s maximum speed, or choosing from predefined speed profiles.
- Apply the Changes: After making the necessary adjustments, apply the changes to the fan speed. Some software may require you to click on a “Apply” or “Save” button, while others may apply the changes automatically.
- Repeat for Other Fans: Repeat steps 3 to 5 for each fan in your system, adjusting their speeds individually based on your preferences and requirements.
As you adjust the fan speeds, take note of the changes you make for each fan. This information will be useful when setting the custom fan curve in the next step.
Keep in mind that the fan control software allows you to fine-tune the fan speeds, so experiment with different settings to find the optimal balance between cooling performance and noise levels. It’s recommended to monitor the temperatures of your system components while adjusting the fan speeds to ensure they remain within safe limits.
Once you have adjusted the fan speeds to your satisfaction, you are now ready to move on to the next step of setting the custom fan curve.
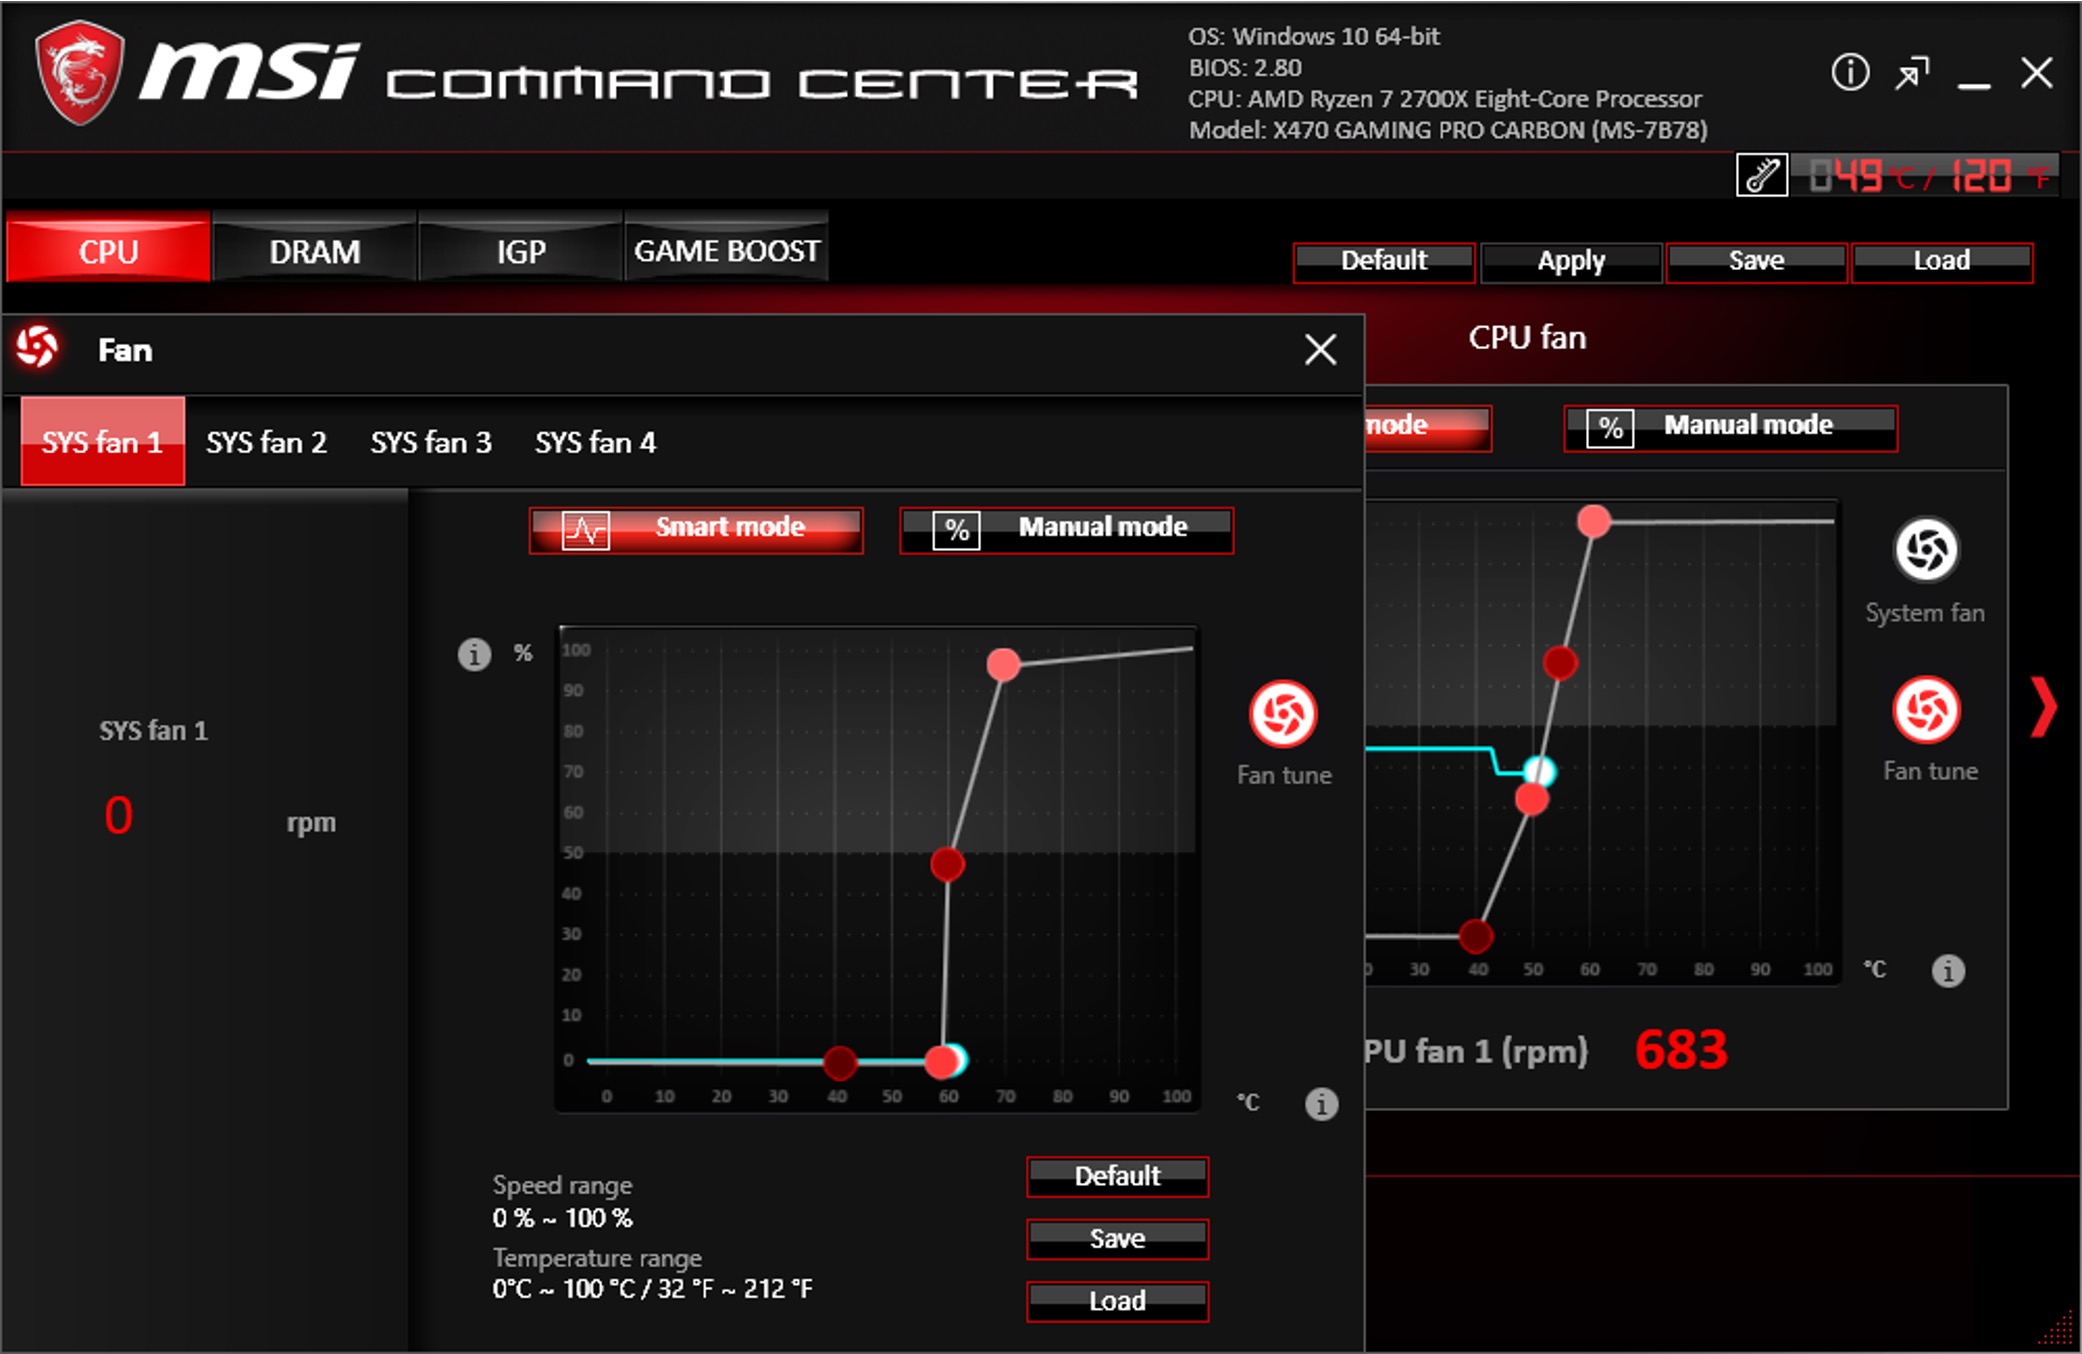
Step 4: Setting the Fan Curve
Now that you have adjusted the fan speeds for your case fans, it’s time to set the custom fan curve. The fan curve determines how the fan speeds will change in relation to the temperature of your computer components.
Here’s how you can set the fan curve:
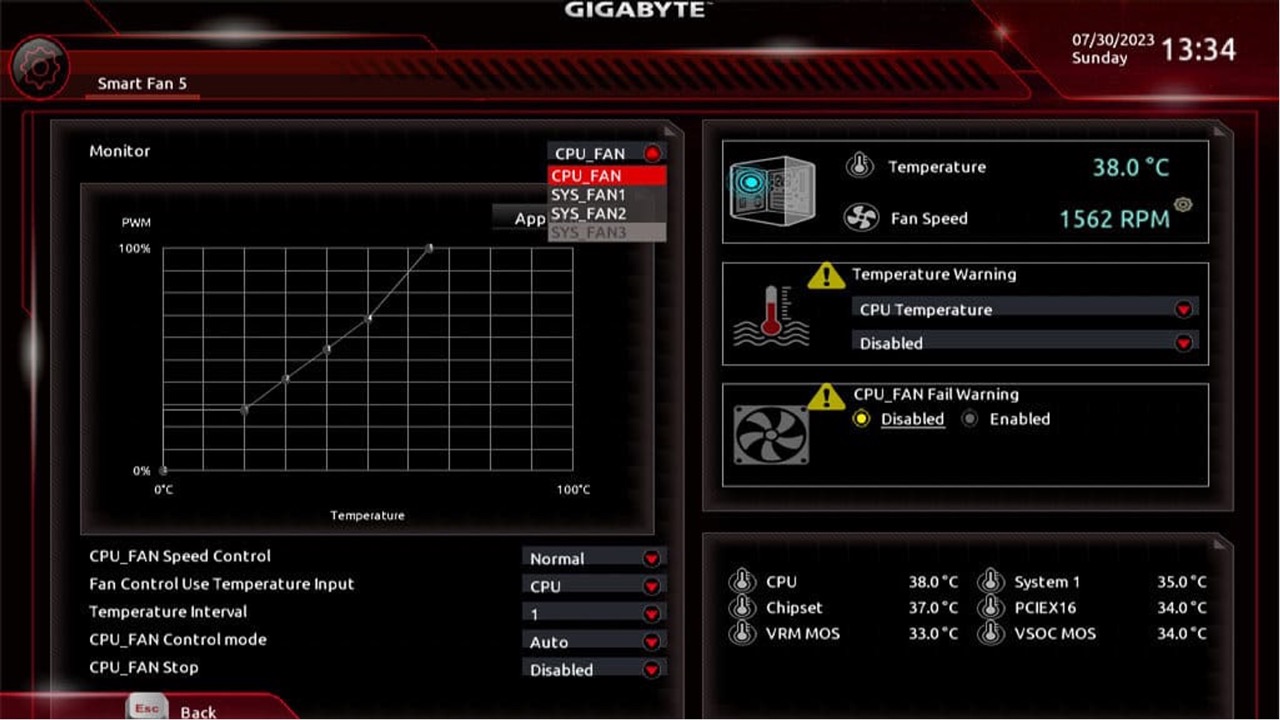
- Select Fan Curve Settings: In the fan control software, navigate to the section or page that allows you to set the fan curve. This is typically labeled as “Fan Curve,” “Curve Editor,” or something similar.
- Choose Temperature Scale: Select the temperature scale you prefer for setting the fan curve. The options may include Celsius (°C) or Fahrenheit (°F).
- Add Control Points: Add control points on the graph to define the relationship between temperature and fan speed. These points represent specific temperature and fan speed values.
- Adjust Control Points: Drag the control points on the graph to adjust the fan speeds for specific temperature thresholds. As the temperature increases, the fan speeds should also increase to provide more cooling. Conversely, as the temperature decreases, the fan speeds can be lowered to minimize noise.
- Preview the Fan Curve: Many fan control software programs provide a preview of how the fan speeds will change based on your control point adjustments. Take advantage of this feature to visualize the behavior of the fan curve.
- Fine-Tune the Curve: Make any necessary adjustments to the control points to further refine the fan curve. Pay attention to temperature thresholds where you want more aggressive cooling, as well as temperature ranges where you prefer quieter operation.
- Save the Fan Curve Profile: Once you are satisfied with the fan curve settings, save the profile. Some software may provide the option to name the profile for future reference and quick access.
Keep in mind that every computer system is unique, and the optimal fan curve will depend on factors such as the components used, case airflow, and personal preferences. It may take some trial and error to find the ideal settings for your system.
Remember to monitor the temperatures of your computer components while testing the fan curve to ensure they remain within safe operating limits. Additionally, listen for any unusual noises that may indicate issues with the fans, such as rattling or excessive vibrations.
By setting a custom fan curve, you can ensure efficient cooling, noise reduction, and better management of your computer’s temperature. Now that you have set the fan curve, you are ready to move on to the final step of testing and fine-tuning the fan speeds.
Step 5: Testing and Fine-tuning Your Fan Speeds
After setting the custom fan curve for your case fans, it’s essential to test and fine-tune the fan speeds to ensure optimal cooling performance and noise levels. This step allows you to make any necessary adjustments and further optimize your cooling system.
Here’s how you can test and fine-tune your fan speeds:
- Monitor System Temperatures: Use the fan control software or other monitoring tools to keep an eye on the temperatures of your computer components. Monitor temperatures during both idle and high-load scenarios to assess the effectiveness of the fan curve.
- Test Fan Response: Perform tasks that put your system under stress, such as running demanding applications or playing graphics-intensive games. Observe how the fans respond to the changing temperatures and how well they keep the components cool.
- Listen for Noise: Pay attention to the noise levels produced by the fans during different usage scenarios. If you notice excessive noise or fan rattling, it may indicate that the fan speeds need further adjustment or that there is an issue with the fans themselves.
- Adjust Control Points: Based on your observations, make any necessary adjustments to the control points of the fan curve. Raising a control point will increase the fan speed at a given temperature, while lowering a control point will decrease the fan speed.
- Repeat Testing: After making adjustments, continue monitoring system temperatures and testing the fan response. Iterate this process until you achieve the desired cooling performance and noise levels.
- Document Settings: Once you are satisfied with the fan speeds, consider documenting the final settings and fan curve profile. This documentation will be helpful if you need to reconfigure the fan curve in the future or share your settings with others.
Testing and fine-tuning your fan speeds are crucial steps to ensure that your cooling system operates optimally for your specific setup. By monitoring temperatures and listening for noise, you can make informed adjustments to strike the right balance between cooling performance and noise levels.
Remember that different usage scenarios may require different fan responses, so it’s essential to test under a variety of conditions to cover all possible scenarios in which your system may operate.
With your fan speeds tested and fine-tuned, you can enjoy a well-cooled and quieter computer system that matches your requirements and preferences.
Conclusion
Setting a custom fan curve for your case fans can greatly improve the cooling performance and noise levels of your computer system. By adjusting the fan speeds based on temperature thresholds, you can achieve efficient cooling while minimizing unnecessary noise.
In this guide, we walked you through the steps involved in setting a custom fan curve. Starting with the installation of fan control software and identifying your fan models, we then covered adjusting fan speeds, setting the fan curve, and testing and fine-tuning the fan speeds to optimize your cooling system.
By setting a custom fan curve, you can optimize cooling performance, extend the lifespan of your fans, reduce noise output, and improve energy efficiency. It also allows you to personalize your system’s cooling based on your specific needs and preferences.
Throughout the process, it’s important to monitor the temperatures of your computer components and listen for any unusual noises that may indicate issues with the fans. This will help you make informed adjustments and ensure that your system remains within safe operating limits.
Remember that every computer system is unique, so finding the optimal fan settings may require some trial and error. Be patient and willing to fine-tune the fan curve to achieve the ideal balance between cooling performance and noise levels for your specific setup.
We hope that this guide has provided you with a comprehensive understanding of how to set a custom fan curve for your case fans. By following these steps and taking control of your fan speeds, you can create an efficient and quiet cooling system that enhances your overall computing experience.
So, go ahead, dive in, and start customizing your fan curve to unleash the full potential of your cooling system!