Introduction
Welcome to the world of PC cooling where case fans play a vital role in maintaining optimal temperatures for your computer’s components. Whether you are a seasoned PC enthusiast or just venturing into the world of custom builds, understanding case fan curves can make a significant difference in cooling efficiency and noise levels. In this guide, we will explore the concept of case fan curves and how to set them effectively.
When it comes to cooling your PC, the default fan settings may not always provide the most efficient performance. That’s where case fan curves come in. A fan curve is a graphical representation of how your case fans adjust their speed based on the temperature of your components. By setting a custom fan curve, you can ensure that your components remain cool under heavy workloads while keeping noise levels to a minimum.
Setting a case fan curve allows you to have greater control over the cooling performance of your PC. You can fine-tune the fan speeds to match the specific cooling requirements of your system. For instance, you may want the fans to run at lower speeds when the system is idle or performing light tasks and ramp up their speeds during intense gaming or resource-intensive tasks. By customizing the fan curve, you can strike the perfect balance between performance and noise.
In this guide, we will take you through the step-by-step process of setting a case fan curve. We will cover everything from assessing your cooling needs to accessing your BIOS or fan controller, defining temperature thresholds, and adjusting fan speeds accordingly. You will also learn how to test and fine-tune the fan curve to ensure optimal cooling performance.
So, if you are ready to take your PC cooling to the next level, let’s dive into the world of case fan curves and learn how to set them effectively.
Understanding Case Fan Curves
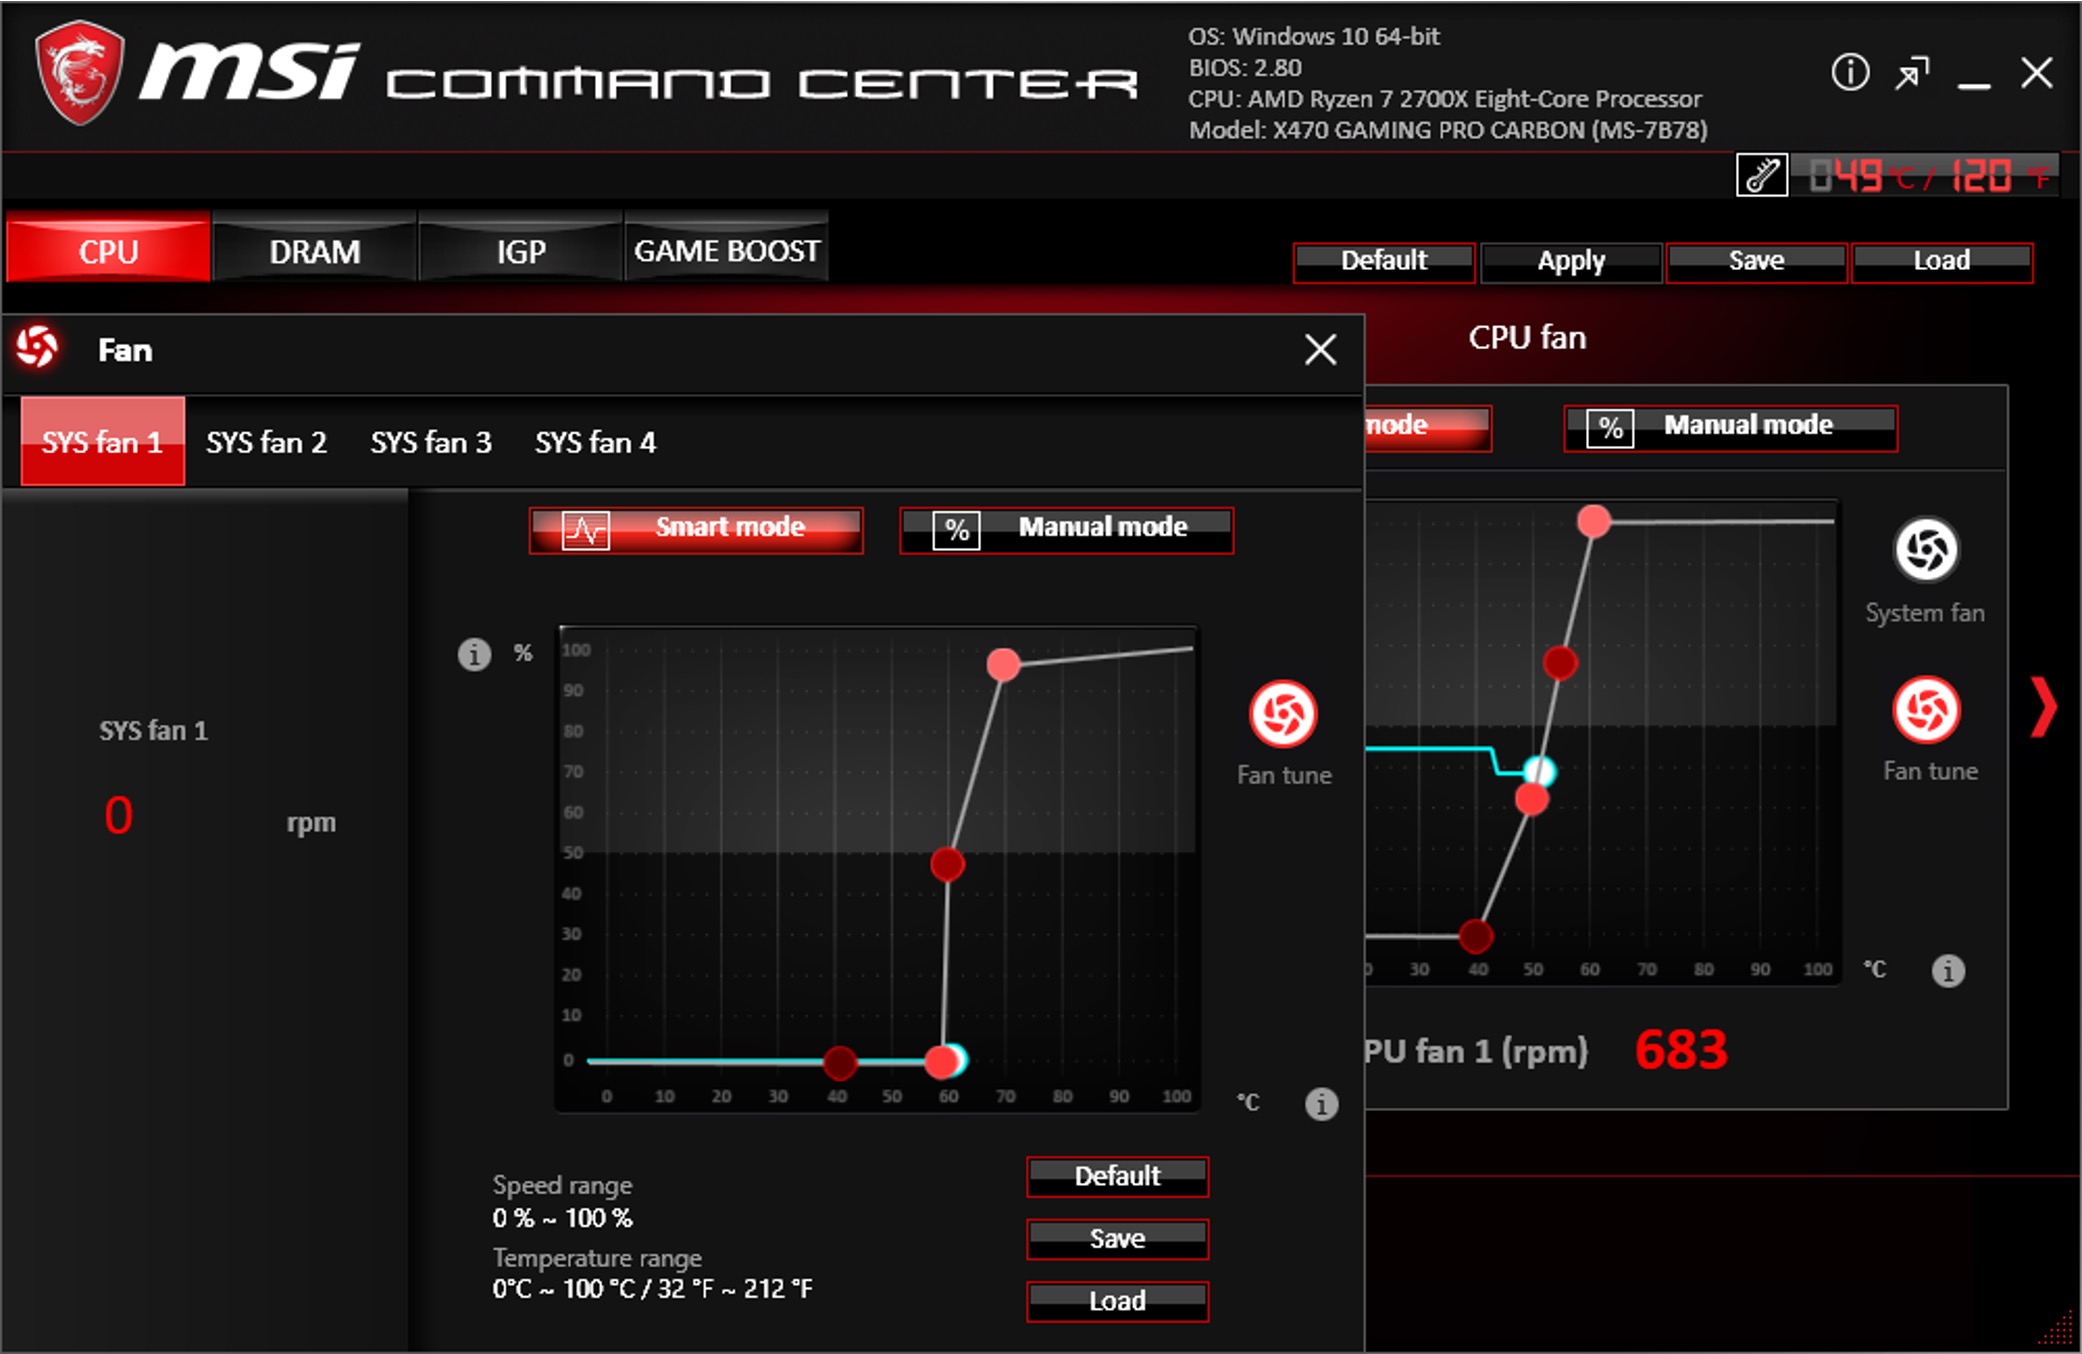
Before we dive into setting a case fan curve, let’s first understand what it is and how it works. A fan curve is essentially a graph that represents the relationship between the temperature of your components and the speed of your case fans. It allows you to define how your fans should respond to changes in temperature, ensuring optimal cooling performance.
The x-axis of the fan curve represents the temperature of your components, while the y-axis represents the speed of your case fans. The curve itself is divided into segments, each corresponding to a specific temperature range. By setting the fan curve, you can control the fan speed at different temperature thresholds.
Case fan curves can be customized using either your computer’s BIOS or specialized fan controller software. These tools allow you to adjust the fan speed percentages or RPM (rotations per minute) values for each specific temperature range. By modifying these settings, you can tailor the cooling performance of your system to your specific needs.
Typically, fan curves follow a gradual increase in fan speed as the temperature rises. This gradual increase helps maintain a balance between cooling performance and noise levels. For example, at lower temperatures, the fans may run at a slower speed to keep noise levels down. As the temperature increases, the fans gradually ramp up their speed to provide sufficient cooling.
It’s important to note that case fan curves are specific to each individual fan. If you have multiple case fans in your system, you may need to set a separate fan curve for each fan to optimize performance.
Understanding case fan curves allows you to take control of your PC’s cooling system. By customizing the fan curve to match your specific cooling needs, you can ensure that your components stay at optimal temperatures, keeping your system running smoothly and extending its lifespan.
In the next section, we will discuss the reasons why setting a case fan curve is essential for your PC cooling system and the benefits it brings. So, let’s move on to the next step in our guide.
Why Set a Case Fan Curve
Setting a case fan curve offers several benefits and is crucial for maintaining the optimal temperature and performance of your PC. Here are a few reasons why you should consider customizing your fan curve:
- Improved Cooling Efficiency: The default fan settings may not always provide the most efficient cooling performance for your specific system. By setting a custom fan curve, you can ensure that the fans respond appropriately to temperature changes, allowing for better cooling efficiency. This can prevent overheating and increase the longevity of your components.
- Noise Reduction: One common issue with stock fan settings is that they tend to prioritize noise reduction over cooling performance. This can result in your fans running at unnecessarily high speeds, causing a loud and annoying noise. By creating a custom fan curve, you can strike a balance between cooling performance and noise levels, ensuring a quieter and more pleasant computing experience.
- Customization for Specific Workloads: Different tasks and applications put varying levels of strain on your PC’s components. By setting a case fan curve, you can tailor the cooling performance to match specific workloads. For example, during idle or light tasks, you can set the fan speeds lower to conserve energy and reduce noise. Conversely, during intensive tasks like gaming or video rendering, you can increase the fan speeds to provide maximum cooling.
- Optimal Component Lifespan: Overheating can significantly reduce the lifespan of your computer components. By setting a case fan curve, you can prevent excessive heat build-up and extend the lifespan of your CPU, GPU, and other critical parts. This investment in cooling optimization can save you money in the long run by reducing the chances of component failures and the need for costly repairs or replacements.
- Flexibility for System Upgrades: Customizing the fan curve provides flexibility when upgrading your PC. As you add more powerful components or make changes in your system configuration, the cooling requirements may change. With a custom fan curve in place, you can easily adjust and optimize the cooling performance to accommodate the new upgrades without compromising on temperature control or noise levels.
In summary, setting a case fan curve offers improved cooling efficiency, reduced noise levels, customization for specific workloads, optimal component lifespan, and flexibility for system upgrades. Now that you understand the benefits, let’s move on to the step-by-step process of setting a case fan curve.
Step 1: Assess Your Cooling Needs
Before setting a case fan curve, it’s important to assess your cooling needs and understand the specific requirements of your system. This will help you determine the optimal fan speeds for different temperature ranges. Here are a few factors to consider when assessing your cooling needs:
- Components: Take a look at the components in your system, such as the CPU, GPU, and hard drives. Different components generate varying levels of heat, and some may require more cooling than others. Identify the components that tend to run hot or have higher cooling requirements.
- Case Airflow: Evaluate the airflow in your computer case. Consider where your case fans are currently placed and how the air flows through the case. Look for any areas with restricted airflow or places where heat tends to accumulate. This will help you determine if you need additional case fans or if any adjustments to fan placement are necessary.
- Workload and Usage: Consider how you primarily use your computer. If you engage in resource-intensive tasks like gaming, video editing, or 3D rendering, your system may require more aggressive cooling. On the other hand, if you mainly use your computer for web browsing and light productivity, you can opt for quieter and more energy-efficient fan settings.
- Room Temperature: Take into account the ambient temperature of the room where your computer is located. If your room tends to get hot, you may need more cooling power from your fans to compensate for the elevated ambient temperature.
- Personal Preferences: Consider your personal preference for noise levels. Some users are more sensitive to fan noise and prefer a quieter system, while others prioritize performance and are willing to tolerate higher fan speeds and noise levels. It’s important to find a balance that suits your needs.
Taking these factors into consideration will help you determine the appropriate fan speeds for your case fan curve. Remember, the goal is to strike a balance between cooling efficiency and noise levels, tailored to your specific cooling needs.
Once you have assessed your cooling needs, you can proceed to the next step, which is accessing your computer’s BIOS or fan controller to begin setting the fan curve. We will discuss this in detail in the following section.
Step 2: Access Your BIOS or Fan Controller
Accessing your computer’s BIOS (Basic Input/Output System) or fan controller software is essential to customize your case fan curve. This step allows you to modify the fan speed settings and create a personalized curve that suits your cooling needs. Here’s how you can access your BIOS or fan controller:
BIOS:
- Restart your computer and enter the BIOS by pressing the designated key during boot. The key to access the BIOS can vary depending on your computer manufacturer, but common keys include Del, F2, F10, or ESC. Refer to your computer’s manual or the manufacturer’s website for specific instructions.
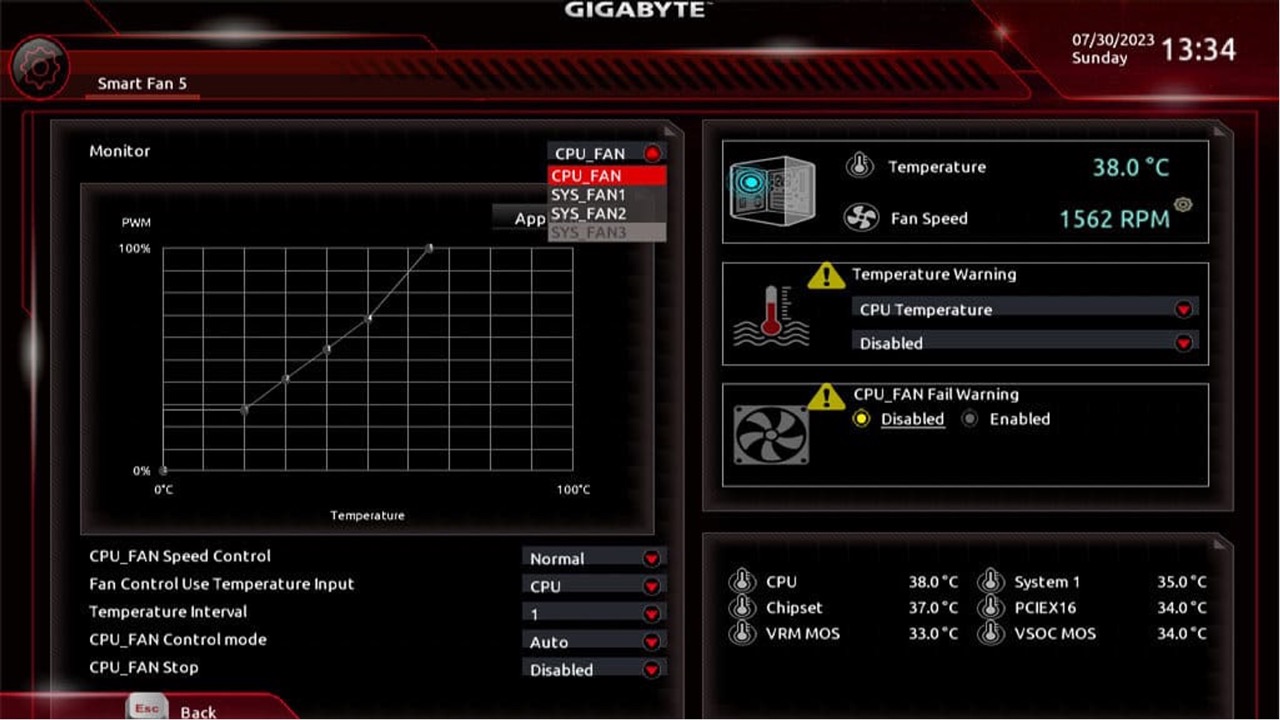
- Navigate to the “Hardware Monitor” or “Fan Control” section within the BIOS. The exact name of the section may differ depending on your motherboard manufacturer.
- Locate the fan speed settings for each fan header on your motherboard. Depending on your motherboard model, you may have separate settings for each fan header or a global fan speed control option.
- Adjust the fan speed settings for each temperature range according to your cooling needs. You may have the option to enter fan speeds as percentages or RPM values. Increase the fan speed gradually as the temperature rises to create a smooth and efficient fan curve.
- Save and exit the BIOS settings. Your custom fan curve will now be active.
Fan Controller Software:
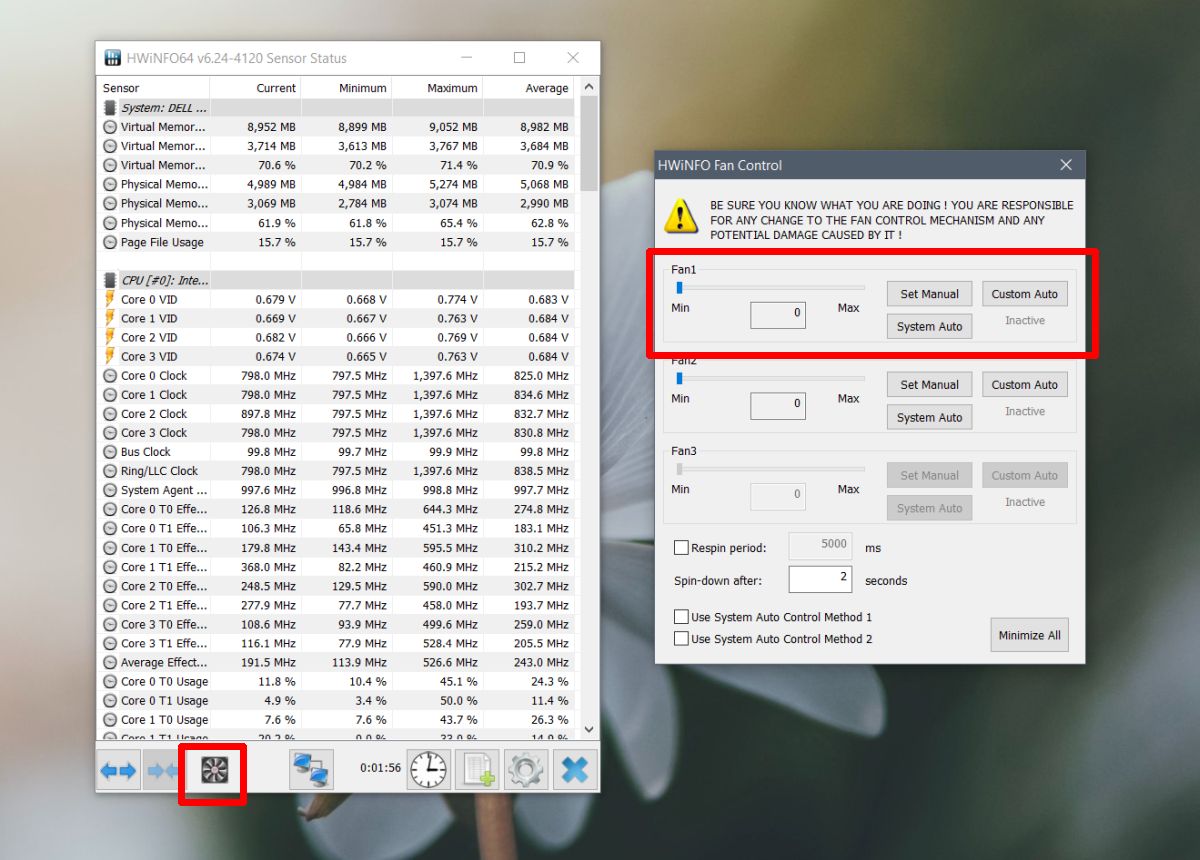
- If your motherboard does not have advanced fan control options in the BIOS, you can use third-party software to control your case fan curve. Some popular fan control software options include SpeedFan, MSI Afterburner, CAM, and Argus Monitor. Download and install the software that is compatible with your system.
- Launch the fan controller software and navigate to the fan control settings. The location and options may vary depending on the software you are using.
- Adjust the fan speed settings for each temperature range based on your cooling needs. Most software provides an easy-to-use interface where you can adjust fan speeds by dragging sliders or entering values.
- Once you have set the desired fan speeds, save the settings within the software. The fan controller software will now handle the fan speed control based on the configured curve.
By accessing your computer’s BIOS or using fan controller software, you gain control over the fan speed settings and can create a customized fan curve that reflects your specific cooling requirements. In the next step, we will discuss how to set the initial fan speeds for your case fans, so let’s proceed to the next section.
Step 3: Set the Initial Fan Speeds
After accessing your computer’s BIOS or fan controller, the next step is to set the initial fan speeds for your case fans. These initial speeds will determine the baseline for the fan curve and ensure that the fans are running at an appropriate speed when the system is idle or under light workload. Here’s how you can set the initial fan speeds:
- Refer to the fan control settings in your BIOS or fan controller software, as discussed in the previous step.
- Identify the temperature range or temperature threshold that corresponds to idle or light workload for your system.
- Set the fan speed for this temperature range to a lower percentage or RPM value. This will ensure that the fans are running at a quieter speed when your system is not under heavy usage.
- Save the settings in your BIOS or fan controller software to apply the initial fan speeds.
The purpose of setting the initial fan speeds is to establish a baseline for your case fans. This baseline ensures that the fans are running at an appropriate speed when your system is not under heavy load, minimizing noise levels and conserving energy.
It’s important to find the right balance when setting the initial fan speeds. While you want the fans to run at a lower speed during idle or light tasks, make sure they provide sufficient airflow to prevent any heat accumulation. Monitoring the temperature of your components using monitoring software such as HWiNFO or Open Hardware Monitor can help you ensure that the initial fan speeds are maintaining adequate cooling even during low workload situations.
With the initial fan speeds set, we can proceed to the next step, which involves defining the temperature thresholds for your fan curve. This will determine when the fans should ramp up their speeds to provide effective cooling. Let’s move on to the next section.
Step 4: Define the Temperature Thresholds
Defining the temperature thresholds is a crucial step in setting a case fan curve. These thresholds determine when your case fans will start increasing their speed to provide effective cooling. By properly defining these thresholds, you can ensure that your components stay within safe temperature ranges. Here’s how you can define the temperature thresholds for your fan curve:
- Refer to the fan control settings in your BIOS or fan controller software.
- Identify the temperature ranges that correspond to different levels of workload or heat generation in your system.
- For each temperature range, set the desired fan speed as a percentage or RPM value that reflects the cooling performance you want to achieve. Gradually increase the fan speed as the temperature rises to provide more effective cooling.
- Consider the cooling needs of your specific components and adjust the fan speeds accordingly. Some components, such as the CPU or GPU, may require more aggressive cooling than others.
- Ensure that the fan speeds are appropriate for the corresponding temperature ranges to prevent overheating and maintain optimal component temperatures.
- Save the settings in your BIOS or fan controller software to apply the defined temperature thresholds.
Remember, the goal is to strike a balance between cooling performance and noise levels. While you want the fans to provide effective cooling, it’s also important to consider the noise generated by higher fan speeds. Continuously monitor the temperatures of your components in real-time during different workloads to ensure that the defined temperature thresholds are maintaining safe operating temperatures.
By defining the temperature thresholds for your case fan curve, you are ensuring that your system stays within the desired temperature ranges and that the fans respond appropriately to keep components cool. Now that you have defined the thresholds, let’s move on to the next step, which involves adjusting fan speeds according to temperature.
Step 5: Adjust Fan Speeds According to Temperature
With the temperature thresholds defined, the next step is to adjust the fan speeds according to the temperature of your components. This step ensures that your case fans respond dynamically to changes in temperature, providing efficient cooling when needed. Here’s how you can adjust the fan speeds according to temperature:
- Refer to the fan control settings in your BIOS or fan controller software.
- Monitor the temperatures of your components in real-time using monitoring software or BIOS features.
- As the temperature of a specific component approaches or exceeds the defined temperature threshold, increase the fan speed for that temperature range.
- Gradually increase the fan speed as the temperature continues to rise to maintain optimal cooling performance.
- Monitor the temperatures and fan speeds over time to ensure that the fans are providing sufficient cooling and keeping the temperatures within the desired range.
- Make adjustments to the fan speeds as necessary to achieve the desired cooling efficiency and noise levels.
- Save the settings in your BIOS or fan controller software to apply the adjusted fan speeds based on temperature.
It’s important to note that the fan speeds should be adjusted incrementally rather than in large steps. This gradual increase helps maintain a balance between cooling performance and noise levels. However, be cautious not to set the fan speeds too high, as excessively high speeds may create excessive noise without significantly improving cooling efficiency.
Regularly monitor the temperatures of your components and the corresponding fan speeds to ensure that the adjusted fan speeds are effectively cooling your system. Additionally, consider stress-testing your system under heavy workloads and monitoring the temperatures to ensure that the fan speeds are sufficient to keep temperatures within safe limits.
With proper adjustment of fan speeds according to temperature, you can ensure that your components remain cool and protected even during intense workloads. Now that you have adjusted the fan speeds, let’s move on to the final step, which involves testing and fine-tuning the fan curve for optimal performance.
Step 6: Test and Fine-Tune the Fan Curve
Once you have set the fan speeds according to temperature, it’s crucial to test and fine-tune the fan curve to ensure optimal cooling performance. Testing and fine-tuning allow you to make adjustments and improvements based on real-world usage scenarios. Follow these steps to test and fine-tune your fan curve:
- Run your computer under various workloads, such as gaming, video rendering, or other resource-intensive tasks, to generate heat and stress your components.
- Monitor the temperatures of your components in real-time using monitoring software or BIOS features while running these workloads.
- Observe how the fan speeds respond to changes in temperature. Ensure that the fans are increasing their speed adequately to maintain optimal cooling performance.
- Listen for any excessive fan noise or unusual sounds that may indicate the fans are running at unnecessarily high speeds.
- Make note of any areas where the temperatures are higher than expected or where the fans may need to increase their speed sooner.
- Based on your observations, fine-tune the fan curve by making adjustments to the fan speeds at specific temperature ranges.
- Consider adjusting the fan speeds gradually to strike the right balance between cooling performance and noise levels.
- Repeat the testing process after each adjustment to evaluate the impact on cooling performance and noise levels.
- Continue fine-tuning the fan curve until you achieve optimal cooling performance with minimal noise.
- Save the final settings in your BIOS or fan controller software for the customized and fine-tuned fan curve.
Testing and fine-tuning the fan curve is an iterative process that requires patience and observation. It allows you to optimize cooling efficiency while ensuring a quieter and more enjoyable computing experience.
Remember to regularly monitor your temperatures and fan speeds, especially after significant changes in your system configuration or during different seasons when room temperatures may vary. Fine-tuning your fan curve ensures that your cooling performance remains optimal regardless of external factors.
Congratulations! You have successfully set and fine-tuned a custom case fan curve for your PC. Enjoy the improved cooling performance and reduced noise levels that come with the personalized fan curve.
Conclusion
Setting a case fan curve is a crucial step in optimizing the cooling performance of your PC while keeping noise levels at a minimum. By customizing the fan speeds according to temperature thresholds, you can ensure that your components stay cool and extend their lifespan.
Throughout this guide, we have explored the step-by-step process of setting a case fan curve, starting with assessing your cooling needs and accessing your BIOS or fan controller. We discussed the importance of defining temperature thresholds and adjusting fan speeds accordingly. Additionally, we highlighted the significance of testing and fine-tuning the fan curve to achieve optimal cooling performance.
By taking the time to personalize your fan curve, you can strike the right balance between cooling efficiency and noise levels, tailored to your specific cooling needs. The improved cooling efficiency not only helps maintain safe operating temperatures for your components but also extends their lifespan, ensuring the longevity of your PC.
Remember, the fan curve may need adjustments over time, especially with changes in system configuration, ambient room temperature, or workload requirements. Regular monitoring of temperatures and fan speeds is essential to maintain optimal cooling performance.
So, dive into your computer’s BIOS or fan controller software, follow the steps outlined in this guide, and set your custom case fan curve. Enjoy a cooler and quieter computing experience!