Introduction
Welcome to the world of MSI Afterburner, the ultimate tool for controlling case fan speed. In today’s article, we will explore how you can utilize MSI Afterburner to optimize the cooling performance of your computer system. Whether you are a tech-savvy enthusiast or a casual user, understanding how to control case fan speed can greatly impact the overall temperature and stability of your system.
MSI Afterburner is a powerful graphics card overclocking utility that not only allows you to push your GPU to its limits but also provides advanced control over your case fans. With its user-friendly interface and extensive customization options, this software provides an easy and effective way to fine-tune fan speeds for optimal cooling.
Why is it important to control case fan speed, you may ask? Well, a well-maintained temperature inside your computer system is crucial for its performance and longevity. Overheating components can lead to reduced performance, system crashes, and even permanent damage. By controlling fan speed, you can ensure that your components stay cool under heavy loads and maintain a stable operating temperature.
In this step-by-step guide, we will walk you through the process of controlling case fan speed using MSI Afterburner. From downloading and installing the software to customizing fan profiles and applying fan curve settings, we will cover it all. So, let’s dive in and unlock the power of MSI Afterburner to unleash the full potential of your cooling system.
What is MSI Afterburner?
MSI Afterburner is a powerful overclocking utility primarily designed for MSI graphics cards, but it is also compatible with a wide range of other GPU brands. Developed by MSI, a leading manufacturer of high-performance gaming hardware, Afterburner offers users a comprehensive set of tools to tweak and optimize their graphics cards for maximum performance.
With its intuitive interface and extensive features, MSI Afterburner has become a popular choice among gamers, overclockers, and system enthusiasts. This versatile software not only allows you to overclock your graphics card to squeeze out extra performance but also provides advanced control over various settings, including fan speeds.
One of the key features of MSI Afterburner is its ability to monitor crucial metrics such as GPU temperature, usage, and clock speeds in real-time. This invaluable information helps users keep track of their system’s performance and make informed decisions when it comes to overclocking or adjusting fan speeds.
While MSI Afterburner is best known for its overclocking capabilities, it also provides users with extensive fan control options. This allows you to manually adjust the speed of your case fans based on your specific needs. By customizing fan profiles, you can optimize cooling efficiency, minimize noise levels, and ensure that your system stays within safe operating temperatures.
The software supports both automatic and manual fan control modes. In automatic mode, Afterburner adjusts fan speeds based on temperature thresholds set by the user. This ensures that the fans ramp up when the system gets hot and slows down when it’s cooler. Alternatively, you can switch to manual mode and set a fixed fan speed of your choice, bypassing the temperature-based control altogether.
With its comprehensive set of features, MSI Afterburner is not limited to graphics card tweaking and fan control. It also offers additional tools such as on-screen display for monitoring system performance in-game, benchmarking utilities, and hardware monitoring graphs. The software is compatible with a wide range of GPUs, making it a versatile tool for any computer system.
In the next sections, we will explore how to download, install, and utilize the fan control features of MSI Afterburner to unleash the full potential of your cooling system.
Why Control Case Fan Speed?
Controlling case fan speed is crucial for maintaining optimal temperature levels and ensuring the longevity of your computer system. Here are some key reasons why you should consider taking control of your case fan speed:
1. Cooling Performance: The primary function of case fans is to circulate air and dissipate heat generated by various components in your system, including the CPU, GPU, and power supply. By controlling fan speed, you can fine-tune the airflow to effectively cool these components. This helps to prevent overheating, which can lead to hardware malfunctions and reduced performance.
2. Noise Reduction: While cooling is important, excessive fan speed can result in high noise levels, which can be annoying and distracting. By adjusting the fan speed to an optimal level, you can strike a balance between cooling performance and noise reduction. This is particularly crucial for users who value a quiet computing environment, such as content creators or individuals who use their computer in a noise-sensitive environment.
3. Energy Efficiency: Case fans play a vital role in maintaining energy efficiency. By regulating fan speed based on system requirements, you can optimize power consumption. Running fans at unnecessarily high speeds not only generates more noise but also draws more power, leading to increased energy consumption. By adjusting fan speeds to match the cooling demands of your system, you can reduce power consumption and lower your energy bills.
4. System Stability: Heat is the enemy of system stability. When components operate at higher temperatures, they tend to become less stable and more prone to errors and crashes. By controlling case fan speed, you can prevent excessive heat buildup and maintain a stable operating temperature for your system. This is particularly important for users who engage in resource-intensive tasks such as gaming, video editing, or 3D rendering.
5. Longevity of Components: Overheating can significantly reduce the lifespan of computer components. Exposing your hardware to prolonged high temperatures can lead to thermal degradation, causing premature failure of sensitive components such as CPUs and GPUs. By controlling fan speed and ensuring efficient cooling, you can extend the lifespan of your components and protect your investment in your computer system.
Overall, controlling case fan speed is essential for optimizing cooling performance, reducing noise levels, improving energy efficiency, maintaining system stability, and prolonging the lifespan of your computer components. By utilizing the fan control features of MSI Afterburner, you can achieve a perfect balance between cooling performance, noise reduction, and energy efficiency, ensuring your system operates at its best for years to come.
Step 1: Download and Install MSI Afterburner
The first step in controlling case fan speed with MSI Afterburner is to download and install the software. Follow these simple steps:
1.1 Go to the MSI Afterburner website: Open your web browser and navigate to the official MSI Afterburner website. You can find it by searching for “MSI Afterburner” or by visiting the MSI official website and accessing the “Downloads” section.
1.2 Locate the download section: Once you are on the website, look for the download section where you can find the latest version of MSI Afterburner. Ensure that you are downloading the correct version for your operating system (Windows, macOS, or Linux).
1.3 Download the software: Click on the download link to initiate the download process. The file size may vary, but it is generally a small-sized executable file that can be downloaded quickly.
1.4 Run the installer: Once the download is complete, locate the downloaded file on your computer and double-click to run the installer. You may be prompted to confirm permissions or make changes to your system, so follow the on-screen instructions accordingly.
1.5 Agree to the terms and conditions: Read through the terms and conditions of MSI Afterburner and click on the “Agree” or “Accept” button to proceed with the installation.
1.6 Choose the installation options: By default, MSI Afterburner installs all the necessary components for controlling fan speed and overclocking. Leave the default options selected unless you have specific requirements or want to customize the installation further.
1.7 Install the software: Click on the “Install” or “Next” button to begin the installation process. The installation may take a few minutes, depending on your system’s speed.
1.8 Complete the installation: Once the installation is complete, you may be prompted to launch MSI Afterburner immediately or choose to launch it later. It is recommended to launch it right away to proceed with configuring the fan control settings.
Congratulations! You have successfully downloaded and installed MSI Afterburner on your system. In the next step, we will explore the software’s interface and familiarize ourselves with its features.
Step 2: Launch MSI Afterburner and Familiarize Yourself with the Interface
Once you have installed MSI Afterburner, it’s time to launch the software and get acquainted with its user-friendly interface. Follow these steps to get started:
2.1 Locate the MSI Afterburner icon: Look for the MSI Afterburner icon on your desktop or in your list of installed programs. It is usually represented by a flame symbol or the MSI logo.
2.2 Launch the application: Double-click on the MSI Afterburner icon to launch the program. It may take a few moments to initialize.
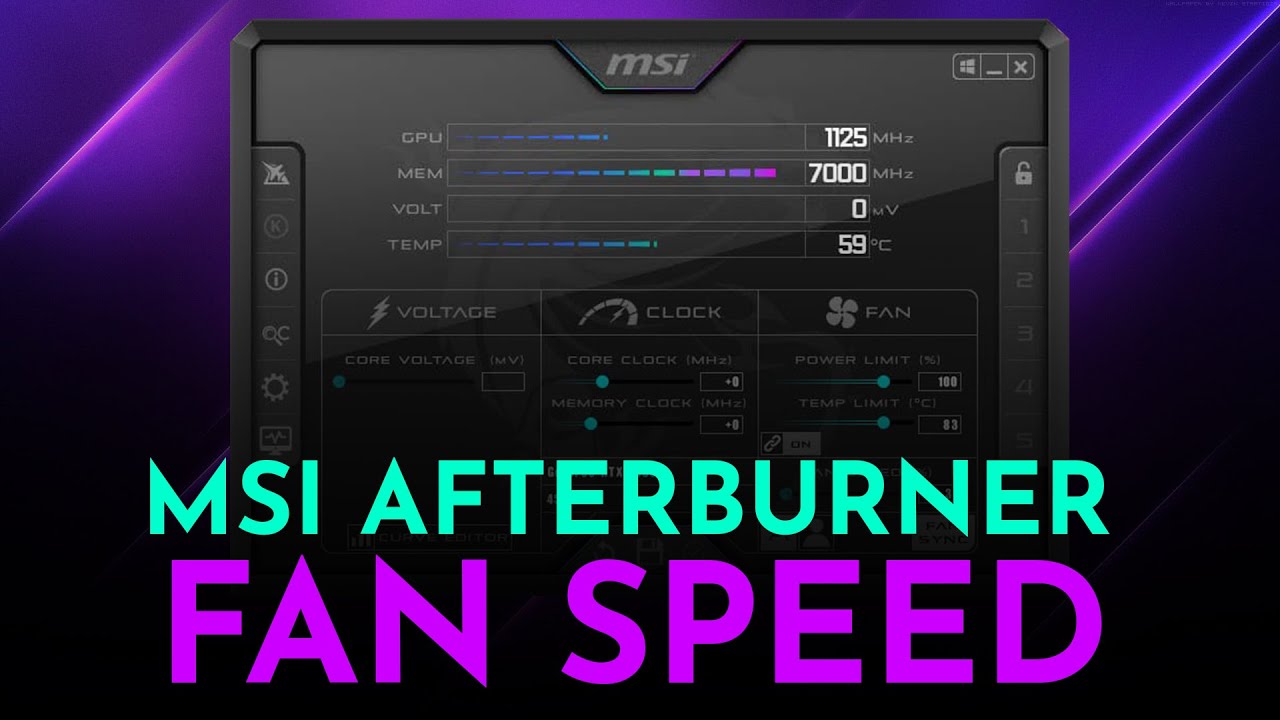
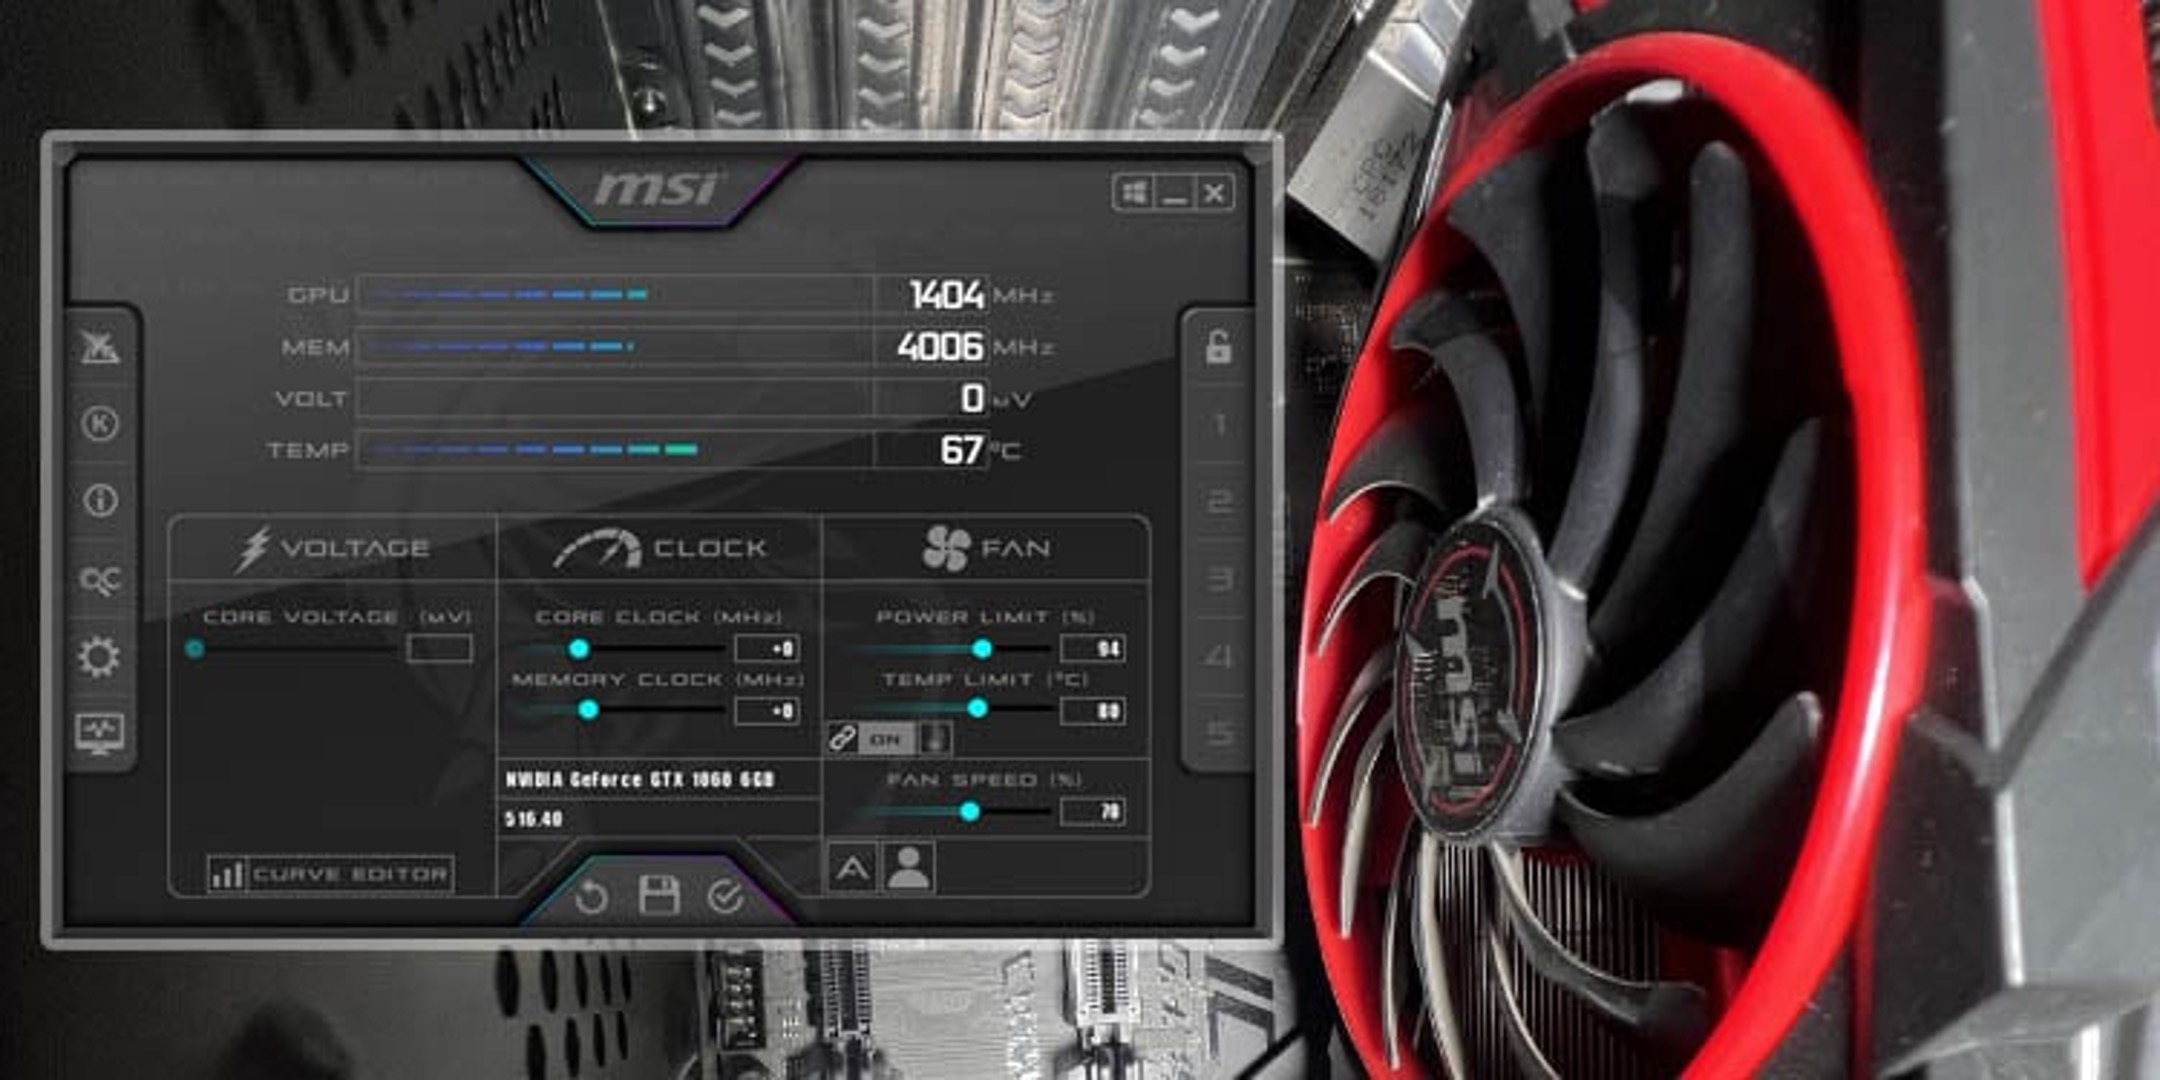
2.3 Familiarize yourself with the main interface: The main window of MSI Afterburner will appear, featuring a graphical interface with various options and settings. Take a moment to explore the different sections and understand their functions.
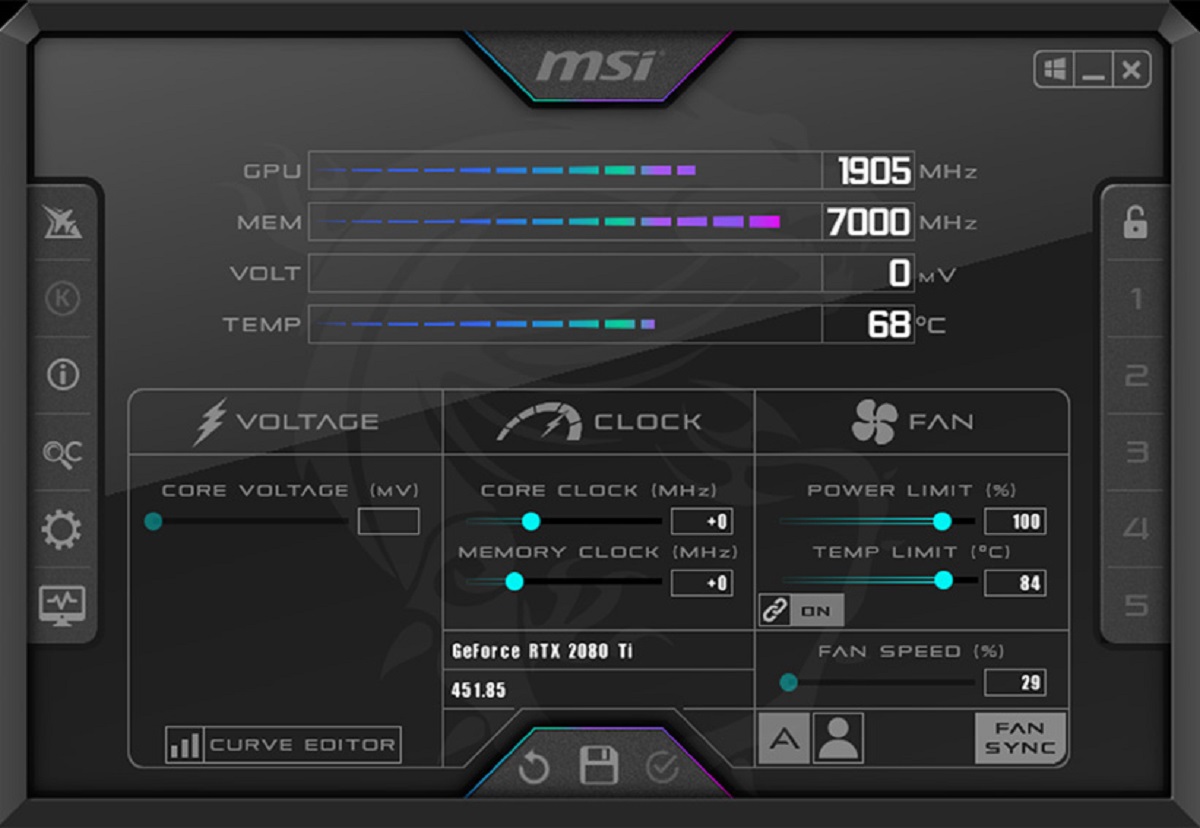
2.4 Check the hardware monitoring panel: One of the key features of MSI Afterburner is its real-time monitoring panel. Located on the left side of the interface, it displays essential information about your system’s hardware, including GPU temperature, clock speeds, fan speed, and more. This panel is useful for monitoring the effect of fan adjustments on system temperatures.
2.5 Adjust the interface to your liking: MSI Afterburner offers customization options for the interface, allowing you to change the skin, color scheme, and layout. To access these options, go to the “Settings” or “Preferences” section of the software. Customize the interface based on your preferences to make it more visually appealing and user-friendly.
2.6 Enable on-screen display: Another useful feature of MSI Afterburner is the on-screen display (OSD) that provides real-time performance information while you are in a game or application. To enable the OSD, go to the “Settings” section and navigate to the “Monitoring” tab. From there, you can customize which metrics are displayed on-screen and their appearance. This feature is handy for monitoring system performance without the need to switch between windows.
2.7 Adjust preferences and settings: Spend some time exploring the various settings and preferences available in MSI Afterburner. This includes options for automatic fan control, custom fan profiles, overclocking settings, and more. Familiarize yourself with these options to gain full control over your fan speed and optimize the performance of your system.
You have now launched MSI Afterburner and familiarized yourself with its interface. In the next step, we will delve into how to access the fan control settings and begin customizing your fan profiles. Stay tuned!
Step 3: Accessing Fan Control Settings
Now that you are familiar with the interface of MSI Afterburner, let’s move on to accessing the fan control settings. Follow these steps to access and configure fan control in MSI Afterburner:
3.1 Open the settings: To access the fan control settings, click on the gear or settings icon in the main interface. It is usually located at the top right corner of the window.
3.2 Navigate to the fan control section: Within the settings menu, you will find a tab or section specifically dedicated to fan control. Click on this tab to access the fan control settings.
3.3 Choose fan control mode: In the fan control settings, you will find different options for controlling fan speed. MSI Afterburner offers two main modes: automatic and manual. By default, the automatic mode is enabled, allowing the software to regulate fan speeds based on temperature thresholds. If you prefer to have more control, you can switch to manual mode.
3.4 Set temperature thresholds: In automatic mode, you can adjust the temperature thresholds that trigger changes in fan speed. Higher temperatures will make the fans spin faster to maintain cooler temperatures. Adjust these thresholds based on your desired cooling performance and noise levels.
3.5 Enable user-defined fan control: Manual mode allows you to set a fixed fan speed or create custom fan profiles. Enabling user-defined fan control gives you full control over fan speeds, independent of temperature. This can be beneficial if you want to set a constant fan speed for a noise-optimized configuration.
3.6 Save your settings: After configuring the fan control settings, don’t forget to save your changes. Look for a “Save” or “Apply” button within the fan control settings menu. This ensures that your settings take effect and are applied whenever you launch MSI Afterburner.
3.7 Monitor fan speed: After configuring the fan control settings, you can monitor the actual fan speed in the hardware monitoring panel of MSI Afterburner. Ensure that the fan speed adjusts as intended based on temperature changes. This will help you confirm that your fan control settings are working correctly.
By following these steps, you have now accessed the fan control settings in MSI Afterburner and configured them according to your preferences. In the next step, we will explore how to create custom fan profiles to further optimize your cooling system. Stay tuned!
Step 4: Customizing Fan Profiles
Customizing fan profiles is an essential step in optimizing your cooling system with MSI Afterburner. By creating personalized fan profiles, you can tailor the fan speed curve to match your specific cooling needs. Follow these steps to customize your fan profiles:
4.1 Enable user-defined fan control: Before you can customize fan profiles, ensure that you have enabled user-defined fan control. This mode gives you complete control over the fan speeds, allowing you to create custom profiles.
4.2 Access the fan curve editor: In the fan control settings of MSI Afterburner, locate the fan curve editor. This editor allows you to define the relationship between temperature and fan speed by adjusting points on the graph.
4.3 Define fan speed points: With the fan curve editor, you can set different points on the graph where the fan speed should be at a specific level. By default, the graph may have a gentle slope, indicating that the fan speeds increase gradually as the temperature rises. You can add, remove, or adjust these points according to your preferences.
4.4 Adjust fan curve: To customize the fan curve, simply click and drag the points on the graph to modify the fan speed at different temperature levels. Increase the fan speed for higher temperatures to provide more cooling, or decrease it for lower temperatures to reduce noise. Aim for a balance between cooling performance and noise levels that suits your needs.
4.5 Test and fine-tune: After customizing the fan curve, it’s crucial to test and fine-tune the settings. Run resource-intensive tasks or applications that typically put a heavy load on your system. Monitor the temperature and observe how the fans respond based on your customized profile. Make adjustments to the fan curve as necessary to achieve the desired cooling performance.
4.6 Save your fan profile: Once you are satisfied with your customized fan profile, be sure to save it to ensure your settings are preserved. Look for a “Save” or “Apply” button within the fan control settings to save your fan profile configuration.
4.7 Load fan profile on startup: To ensure that your customized fan profile is loaded every time you start your computer, enable the option to load the profile on startup. This way, you don’t have to manually load the profile each time you boot your system.
By customizing your fan profiles in MSI Afterburner, you can optimize the cooling performance of your system to suit your specific needs. This level of control allows you to strike a balance between temperature management and noise reduction, resulting in a well-cooled and quiet computing experience.
In the next step, we will explore how to apply fan curve settings and make real-time adjustments using MSI Afterburner. Stay tuned!
Step 5: Applying Fan Curve Settings
After customizing your fan profiles in MSI Afterburner, it’s time to apply those settings to your system. Follow these steps to apply and activate your fan curve settings:
5.1 Access the fan control settings: Open MSI Afterburner and navigate to the fan control settings. Ensure that you have user-defined fan control enabled and have customized your fan curve to your liking.
5.2 Save your fan profile: Before applying your fan curve settings, make sure to save your customized fan profile. This ensures that your settings are preserved and can be reloaded later if needed.
5.3 Apply fan curve settings: Look for a “Apply” or “OK” button within the fan control settings. Click on it to apply your customized fan curve settings to your system. Depending on your system configuration, the changes may take effect immediately or require a system restart.
5.4 Monitor fan speeds: Once you have applied your fan curve settings, monitor the actual fan speeds using the hardware monitoring panel in MSI Afterburner. Verify that the fan speeds adjust according to your customized curve as your system heats up or cools down.
5.5 Fine-tune and make adjustments: It’s recommended to fine-tune your fan curve settings and make any necessary adjustments based on the real-time monitoring and performance of your system. Use resource-intensive tasks or applications to stress your components and ensure your customized curve provides adequate cooling under heavy loads.
5.6 Save and load settings on startup: Once you are satisfied with your fan curve settings, save them and enable the option to load the settings on startup. This ensures that your customized fan curve is applied every time you boot your system, eliminating the need to manually adjust the settings each time.
By applying your customized fan curve settings, you have optimized the cooling performance of your system and achieved a balance between temperature management and noise reduction. Your computer will now operate with improved cooling efficiency and reduced fan noise.
In the next step, we will explore how to test and adjust fan speed in real-time using MSI Afterburner. Stay tuned!
Step 6: Testing and Adjusting Fan Speed
After applying your customized fan curve settings in MSI Afterburner, it’s important to test and fine-tune the fan speed to ensure optimal cooling performance. Follow these steps to test and adjust your fan speed in real-time:
6.1 Run resource-intensive tasks: To stress your system and generate heat, run resource-intensive tasks or applications that push your components to their limits. This could include running demanding games, performing heavy rendering or video editing tasks, or running stress test software.
6.2 Monitor temperature and fan speed: Keep an eye on the temperature of your components using the hardware monitoring panel of MSI Afterburner. Simultaneously, monitor the fan speeds to see how they respond to increased temperatures.
6.3 Observe fan behavior: Pay close attention to how the fan speeds adjust in real-time as the temperature rises during your resource-intensive tasks. Ensure that the fan speeds increase gradually and adequately to keep the components cool. If the temperatures rise too quickly or the fan speeds don’t seem sufficient to maintain desired cooling, adjustments may be needed.
6.4 Fine-tune the fan curve: If you find that the fan speeds are not providing adequate cooling or are too loud for your liking, you can fine-tune the fan curve settings in MSI Afterburner. Use the fan curve editor to make adjustments to the points on the graph, increasing or decreasing fan speeds at specific temperature thresholds as needed.
6.5 Test again and repeat adjustments: After making adjustments to your fan curve, test your system again under resource-intensive tasks to observe how the new settings affect temperature and fan speed. Repeat the process of fine-tuning and testing until you achieve a balance between cooling performance and noise levels that meets your preferences.
6.6 Save your revised fan curve: Once you are satisfied with your adjustments, remember to save your revised fan curve settings in MSI Afterburner. This ensures that your customized settings are preserved and can be easily loaded in the future.
6.7 Enjoy optimal cooling performance: With your fan speeds properly adjusted, you can now enjoy optimized cooling performance for your system. Your components will stay cooler under heavy loads, ensuring stability and longevity, while minimizing fan noise for a more pleasant computing experience.
By testing and adjusting the fan speed in real-time using MSI Afterburner, you can fine-tune your cooling system to meet your specific needs. This step ensures that your components are adequately cooled and that the fan noise is kept at a level that suits your preferences.
Congratulations! You have successfully completed all the steps to control case fan speed with MSI Afterburner. Your system is now equipped with optimized cooling performance, providing you with a more stable, efficient, and quieter computing experience.
Conclusion
Controlling case fan speed is a crucial aspect of optimizing the cooling performance of your computer system. With the help of MSI Afterburner, a powerful overclocking utility, you can easily adjust fan speeds to achieve optimal cooling efficiency. Throughout this guide, we have explored the step-by-step process of controlling case fan speed using MSI Afterburner, from downloading and installing the software to customizing fan profiles and fine-tuning fan curve settings.
We learned that MSI Afterburner is not only a reliable tool for overclocking your graphics card but also provides advanced fan control options. By accessing the fan control settings, we can choose between automatic and manual fan control modes, enabling us to regulate fan speeds based on temperature thresholds or specific preferences.
Furthermore, we explored the process of customizing fan profiles, allowing us to create a personalized fan curve that matches our desired cooling performance and noise levels. By testing and adjusting fan speed in real-time, we can fine-tune the settings to achieve the optimum balance between temperature management and noise reduction.
Controlling case fan speed with MSI Afterburner provides several benefits, including improved cooling performance, reduced noise levels, enhanced energy efficiency, system stability, and the longevity of components. By keeping our system’s temperatures in check, we can ensure better performance and protect our hardware investment.
Remember to save and load your settings on startup to ensure that your customized fan profiles are applied automatically each time you boot your computer. Regularly monitor your fan speeds and temperatures to ensure that they are functioning as intended and make necessary adjustments whenever required.
Now that you are equipped with the knowledge of controlling case fan speed with MSI Afterburner, go ahead and optimize the cooling performance of your computer system. Enjoy a quieter and more efficient computing experience with improved system stability.
Thank you for following along with this guide, and may your computing journey be cool and smooth!