Introduction
When working with Google Sheets, it’s essential to have a good grasp of how to customize the appearance of your spreadsheet. One common customization is adjusting the column width to ensure that your data is properly displayed and easy to read. By adjusting the column width, you can prevent text from being cut off or columns from appearing too narrow.
In this article, we will explore various methods for setting column width in Google Sheets. Whether you’re a beginner or an experienced user, these methods will help you customize your spreadsheets to suit your specific needs.
It’s worth noting that the process for adjusting column width in Google Sheets is intuitive and straightforward. With just a few clicks, you can resize columns to accommodate the content within them. In addition to manual adjustment, Google Sheets also offers several automated options for fitting your data or setting specific column widths.
By learning these techniques, you’ll be equipped to handle any spreadsheet and ensure that your data is presented in a clean and organized manner. So, let’s dive in and explore the various methods for setting column width in Google Sheets!
Method 1: Adjusting Column Width Manually
The most basic and straightforward way to adjust column width in Google Sheets is by doing it manually. To manually adjust the column width, follow these steps:
- Select the column or columns that you want to adjust. You can do this by clicking on the header of the column or by holding down the Ctrl key (or Cmd key on a Mac) and clicking on multiple column headers.
- Hover your cursor over the right edge of the selected column header until you see a double-headed arrow cursor.
- Click and drag the column boundary to the left or right to increase or decrease the column width, respectively.
- Release the mouse button when you’re satisfied with the new width.
By adjusting the column width manually, you have full control over how wide or narrow each column should be. This method allows you to tailor the width to accommodate the specific content within each column.
Keep in mind that when adjusting column width manually, you can also resize multiple columns simultaneously. To do this, simply select the desired columns and drag the column boundary as before.
One advantage of adjusting column width manually is that you can have different column widths throughout your spreadsheet. This flexibility allows you to highlight important data by widening the corresponding columns or conserve space by making less important columns narrower.
Whether you’re working on a small or large spreadsheet, adjusting column width manually can be a quick and effective way to ensure your data is displayed legibly. Now that you’re familiar with the first method, let’s explore another method for setting column width in Google Sheets.
Method 2: Using the “Fit to Data” Option
If you want Google Sheets to automatically adjust the column width based on the content within each column, you can utilize the “Fit to Data” option. This option ensures that all the data in the column remains visible without any text being cut off.
To use the “Fit to Data” option, follow these steps:
- Select the column or columns for which you want to adjust the width. You can do this by clicking on the column header or by holding down the Ctrl key (or Cmd key on a Mac) and clicking on multiple column headers.
- Go to the Format menu at the top of the Google Sheets interface.
- Hover over the Column option in the dropdown menu, and then select Resize selected columns.
- In the pop-up window, check the box next to “Fit to data”.
- Click Resize.
Google Sheets will automatically adjust the column width to fit the content within each column. If you have varying lengths of data within the selected columns, Google Sheets will adjust the width accordingly so that none of the content is cut off.
This method can be particularly useful when you have a large dataset or frequently changing data. It saves you the time and effort of manually adjusting column widths and ensures that your data is always visible and legible.
It’s important to note that using the “Fit to Data” option may result in columns being wider than necessary if some cells contain excessively long content. If you prefer more compact column widths, you may need to consider other options or manually adjust the width as needed.
Now that you’re familiar with the second method, let’s move on to explore another technique for setting column width in Google Sheets.
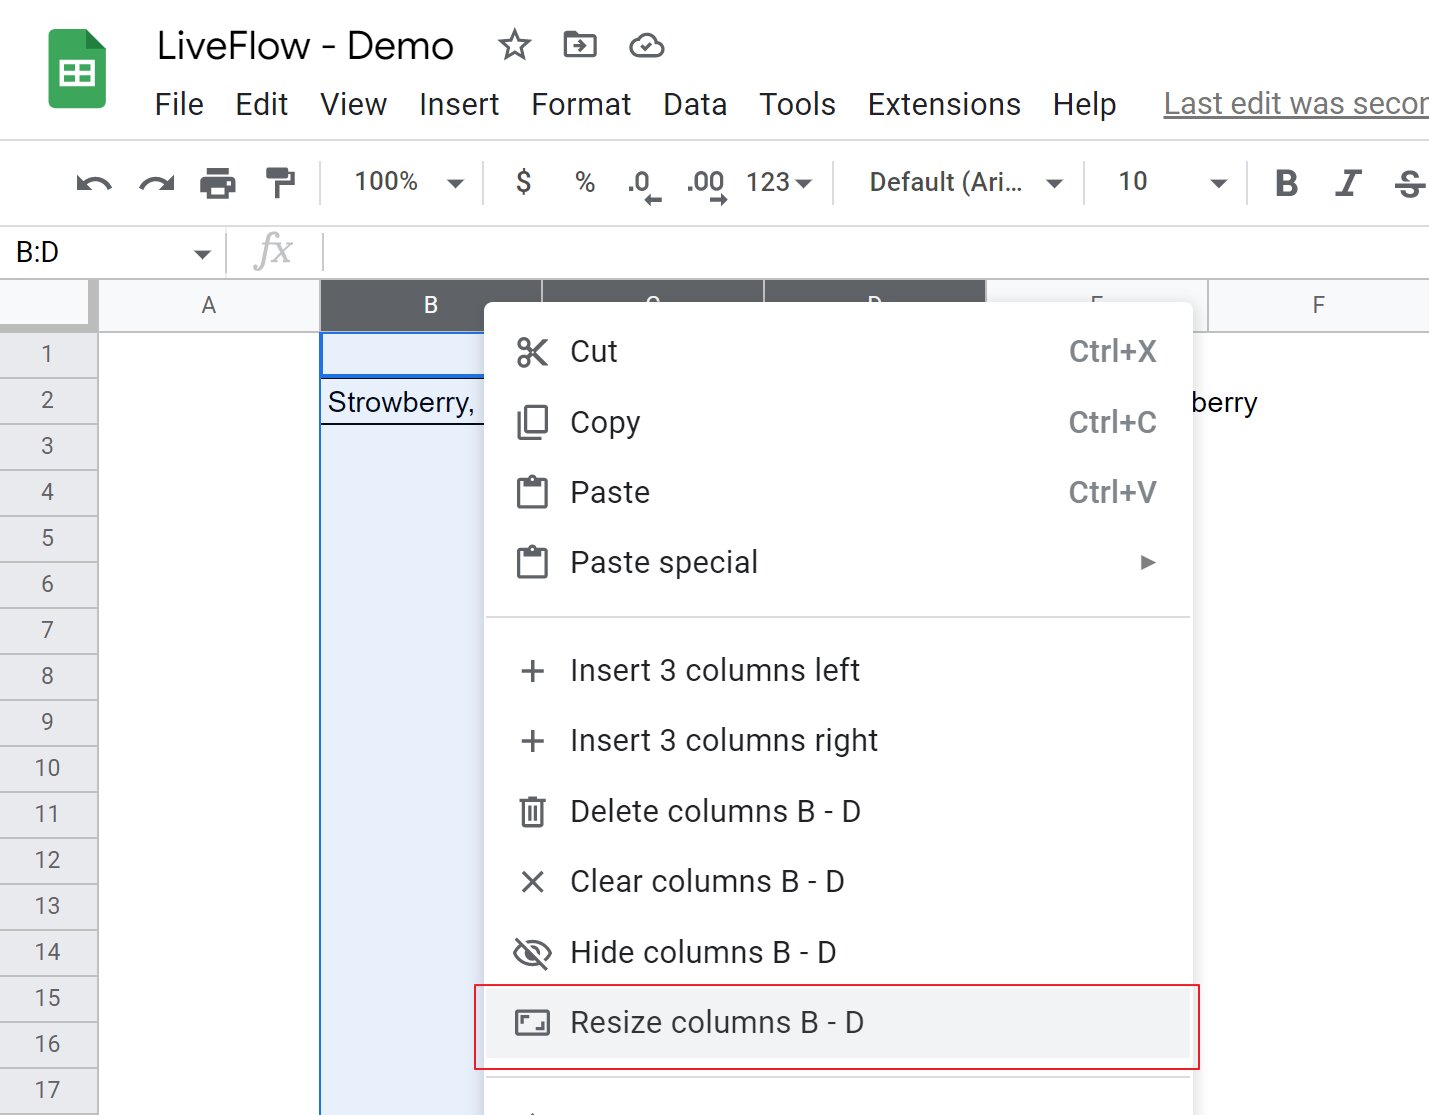
Method 3: Using the “Resize Columns” Option
Another efficient way to adjust column width in Google Sheets is by using the “Resize Columns” option. This allows you to set specific column widths for one or more columns with ease.
To use the “Resize Columns” option, follow these steps:
- Select the column or columns that you want to adjust. You can do this by clicking on the column header or by holding down the Ctrl key (or Cmd key on a Mac) and clicking on multiple column headers.
- Right-click on the selected column headers to open the context menu. Alternatively, you can click on the Format menu at the top of the Google Sheets interface and choose “Column” followed by “Resize selected columns”.
- In the context menu, hover over the “Column width” option, and then choose “Resize columns…”.
- In the pop-up window, you can enter the desired width value for the selected columns, measured in pixels. Alternatively, you can select from the predefined width options.
- Click “Apply” to set the chosen width for the selected columns.
The “Resize columns” option allows you to manually specify the exact width for each column, giving you precise control over the layout of your spreadsheet. This can be especially useful when you want to maintain consistency or alignment across columns or to accommodate specific content requirements.
By setting specific column widths, you can ensure that your data is displayed consistently and uniformly throughout the spreadsheet. This method is particularly helpful when working on projects that demand a structured and organized presentation.
Remember that while setting specific column widths can be beneficial, it’s important to consider the content within each column. Be mindful of the optimal width needed to display the information clearly and avoid excessively wide columns that can waste valuable horizontal space.
Now that you understand the third method, let’s explore another technique for setting column width in Google Sheets.
Method 4: Using the Mouse Drag
If you prefer a more hands-on approach to adjust column width in Google Sheets, you can utilize the mouse drag method. This allows you to quickly and intuitively resize columns by simply dragging the column boundary.
To use the mouse drag method, follow these steps:
- Select the column header of the column that you want to adjust.
- Hover your cursor over the right edge of the selected column header until you see a double-headed arrow cursor.
- Click and hold the left mouse button.
- Drag the column boundary to the left or right to increase or decrease the column width, respectively.
- Release the mouse button when you’re satisfied with the new width.
This method allows you to directly interact with the column width, making it convenient and precise. The real-time adjustment provides instant feedback, allowing you to find the optimal width for your column based on the content within it.
Furthermore, the mouse drag method is flexible because you can adjust multiple columns simultaneously. To do this, simply select the desired columns and follow the same steps to resize them together.
One benefit of this method is its simplicity and the ease with which you can customize the column width. It requires no additional steps or configurations, making it perfect for quick adjustments during data entry or analysis.
However, it’s important to exercise caution when using the mouse drag method, especially when resizing multiple columns. In some cases, unintentional adjustments may occur, resulting in misaligned or inconsistent column widths. Always double-check your changes to ensure they meet your formatting requirements.
Now that you’ve learned the fourth method, let’s move on to explore another technique for setting column width in Google Sheets.
Method 5: Using the Column Width Box
If you prefer precise control over the column width and know the exact measurement you want, you can use the Column Width box in Google Sheets. This method allows you to enter a specific value for the column width instead of manually dragging or resizing the column boundaries.
To use the Column Width box, follow these steps:
- Select the column or columns that you want to adjust. You can do this by clicking on the column header or by holding down the Ctrl key (or Cmd key on a Mac) and clicking on multiple column headers.
- Right-click on the selected column headers to open the context menu. Alternatively, you can click on the Format menu at the top of the Google Sheets interface and choose “Column” followed by “Resize selected columns”.
- In the context menu, hover over the “Column width” option, and then choose “Column width…”.
- In the pop-up window, enter the desired width value for the selected columns, measured in pixels.
- Click “OK” to apply the specified width to the selected columns.
The Column Width box allows you to set the exact width for your columns with precision, ensuring consistency and alignment across your spreadsheet. This method is especially useful when you need to maintain a specific layout or adhere to certain formatting guidelines.
By entering the desired value, you can quickly adjust the columns to specific measurements without the need for manual dragging or resizing. This can be a time-saving solution, particularly when you’re working with large datasets or complex spreadsheets.
It’s important to note that using the Column Width box does not take into account the content within the columns. Be mindful of the width you enter and ensure it is sufficient to display the data legibly without cutting off any information.
Now that you’re familiar with the fifth method, let’s move on to explore another technique for setting column width in Google Sheets.
Method 6: Using the “Set Column Width” Option
In Google Sheets, there is an option called “Set Column Width” that allows you to adjust the column width based on predefined measurements. This method provides a quick and convenient way to resize columns to common width options.
To use the “Set Column Width” option, follow these steps:
- Select the column or columns that you want to adjust. You can do this by clicking on the column header or by holding down the Ctrl key (or Cmd key on a Mac) and clicking on multiple column headers.
- Right-click on the selected column headers to open the context menu. Alternatively, you can click on the Format menu at the top of the Google Sheets interface and choose “Column” followed by “Resize selected columns”.
- In the context menu, hover over the “Column width” option, and then choose “Set column width…”.
- In the pop-up window, select one of the predefined width options provided, such as “Default” or “Fit to data”.
- Click “OK” to apply the selected width to the selected columns.
The “Set Column Width” option enables you to quickly adjust the column width to common measurements based on your specific needs. This method is particularly useful when you want a consistent and harmonized layout throughout your spreadsheet.
By choosing a predefined width option, such as “Default” or “Fit to data”, you can ensure that the column width is standardized across the selected columns. This can be beneficial for maintaining readability, uniformity, and a professional appearance in your spreadsheet.
However, it’s important to keep in mind that using predefined width options may not be suitable for all situations, as the measurements might not align perfectly with your specific content. Consider the content within each column and determine if the predefined widths adequately display your data.
Now that you understand the sixth method, let’s move on to explore another technique for setting column width in Google Sheets.
Method 7: Using the “Auto Fit” Option
Google Sheets offers an “Auto Fit” option that automatically adjusts the column width based on the content within each column. This feature ensures that your data is displayed optimally without any text being cut off.
To use the “Auto Fit” option, follow these steps:
- Select the column or columns that you want to adjust. You can do this by clicking on the column header or by holding down the Ctrl key (or Cmd key on a Mac) and clicking on multiple column headers.
- Right-click on the selected column headers to open the context menu. Alternatively, you can click on the Format menu at the top of the Google Sheets interface and choose “Column” followed by “Resize selected columns”.
- In the context menu, hover over the “Column width” option, and then choose “Auto Fit column width”.
Google Sheets will automatically adjust the column width to fit the content within each column, ensuring that none of the text is cut off. This method is particularly useful when you have varying lengths of data or when you frequently update your spreadsheet.
The “Auto Fit” option saves you the time and effort of manually adjusting column widths, especially when dealing with large datasets or complex spreadsheets. It guarantees that your data is consistently and clearly displayed, regardless of any changes or updates you may make.
Keep in mind that while the “Auto Fit” option is convenient, it may sometimes result in wider columns than necessary if there is long content in certain cells. If you prefer a more compact layout, you may need to consider other methods or manually adjust the column widths as needed.
Now that you’re familiar with the seventh method, you have a variety of techniques to choose from when setting column width in Google Sheets. Each method offers its own advantages, allowing you to customize your spreadsheet according to your specific requirements.
Conclusion
Customizing the column width in Google Sheets is an essential skill for creating visually appealing and organized spreadsheets. In this article, we explored seven different methods for setting column width, each offering its own advantages and flexibility.
By adjusting the column width manually, using the “Fit to Data” option, resizing columns, using the mouse drag method, utilizing the Column Width box, or choosing the “Auto Fit” option, you can easily tailor your spreadsheet’s appearance to suit your needs.
Whether you prefer precise control, automation, or a combination of both, Google Sheets provides a range of options to help you fine-tune the column width to display your data accurately and legibly.
It’s important to consider the content within each column and strike a balance between readability and efficient use of space. Experiment with different methods to find the one that works best for your specific spreadsheet requirements.
Remember, the ideal column width is one that allows your data to be displayed clearly without cutting off any information and without wasting unnecessary space.
Now that you have learned these seven methods, you can confidently adjust the column width in Google Sheets and create well-organized and visually appealing spreadsheets.
So go ahead and customize your spreadsheet to perfection by setting the column width that best suits your data and your visual preferences!