Introduction
Resetting a Windows 10 computer can be a helpful solution when you’re facing issues like system crashes, slow performance, or persistent errors. It allows you to restore your PC to its factory settings, erasing all installed programs, settings, and files. In essence, it gives your computer a clean slate, which can help resolve many software-related problems.
Before proceeding with a reset, it’s important to understand that this process will delete all of your personal files, applications, and settings. Therefore, it is crucial to back up your data to an external storage device or cloud service to prevent permanent loss. Once you’ve taken this precaution, you can confidently proceed with the reset process, which can be done easily by following a few steps.
In this guide, we’ll walk you through the process of resetting your Windows 10 computer. Whether you want to keep your personal files or remove everything on your PC, we’ll cover all the necessary steps. So, grab a cup of coffee and let’s get started!
Step 1: Back up your data
Before proceeding with a reset on your Windows 10 computer, it is crucial to back up all your important data. This will ensure that none of your files or documents are lost during the reset process. Here are a few methods to help you backup your data:
- External Hard Drive: Connect an external hard drive to your computer and simply copy and paste your important files to the external drive. This method is ideal for larger files and can be easily accessed later.
- Cloud Storage: Utilize popular cloud storage services such as Google Drive, Dropbox, or OneDrive to store your files online. This option allows you to access your data from anywhere and offers automatic syncing for added convenience.
- USB Flash Drive: If you only have a few files to back up, you can use a USB flash drive. Simply copy your important files to the flash drive, and ensure it is safely stored.
Remember to include all relevant files such as documents, photos, videos, and any other data you consider essential. Take your time during this step to ensure that you have backed up everything you need.
By backing up your data, you can have peace of mind knowing that even if something goes wrong during the reset process, your files will be safe and easily accessible. Once you’ve completed the backup, you’re ready to proceed to the next step of resetting your Windows 10 computer.
Step 2: Open the Start menu
The Start menu is your gateway to accessing various settings and features on your Windows 10 computer. To begin the reset process, you need to open the Start menu. Here’s how you can do it:
- Click on the Windows icon located in the bottom-left corner of the screen. This will open the Start menu.
- If you prefer using keyboard shortcuts, you can press the Windows key on your keyboard or press the Ctrl + Esc keys simultaneously.
Once the Start menu is open, you will see a list of frequently used apps and a search bar. This menu provides quick access to programs, settings, and various system features.
Opening the Start menu is the first step towards resetting your Windows 10 computer. By accessing the Start menu, you can navigate to the necessary settings required to initiate the reset process. Let’s move on to the next step to continue with the reset process.
Step 3: Select “Settings”
In order to perform a reset on your Windows 10 computer, you’ll need to access the “Settings” menu. By accessing the “Settings,” you can customize various aspects of your computer, including the reset options. Here’s how you can do it:
- Once you have the Start menu open, locate and click on the gear-shaped icon. This icon represents the “Settings” menu and is usually located above the power icon.
- If you prefer using keyboard shortcuts, you can press the Windows key + I keys simultaneously to directly open the “Settings” menu.
Upon clicking or pressing the shortcut, the “Settings” app will launch, providing you with access to a wide range of configuration options.
The “Settings” menu is an essential part of the reset process as it contains the necessary options to reset your Windows 10 computer. This menu allows you to customize various settings, such as display, privacy, updates, and more. Let’s proceed to the next step to continue the reset process.
Step 4: Click on “Update & Security”
After accessing the “Settings” menu, the next step in resetting your Windows 10 computer is to navigate to the “Update & Security” section. This section contains important options related to system updates, recovery, and resetting. Here’s how you can find it:
- Within the “Settings” app, locate and click on the “Update & Security” option. It is usually represented by an icon of a two-way arrow in a circular shape.
- If you prefer using keyboard shortcuts, you can press the Tab key on your keyboard to navigate through the options within the “Settings” app. Once you reach “Update & Security,” press Enter to select it.
Clicking on “Update & Security” will open up a new window with settings related to your computer’s updates, recovery options, and more. This section is essential for performing a reset as it allows you to access the necessary tools to initiate the process.
Make sure to locate and select the “Update & Security” option correctly in order to proceed with the reset. Let’s move on to the next step to continue the reset process.
Step 5: Choose “Recovery”
Once you’ve opened the “Update & Security” section in the “Settings” app, the next step in resetting your Windows 10 computer is to locate and select the “Recovery” option. This section provides you with various recovery options, including the ability to reset your computer. Here’s how you can find it:
- Within the “Update & Security” window, navigate to the left-hand side menu and click on the “Recovery” option. It is usually represented by an icon of a left-pointing arrow in a circular shape.
- If you prefer using keyboard shortcuts, you can press the Tab key on your keyboard to navigate through the options within the “Update & Security” window. Once you reach “Recovery,” press Enter to select it.
Clicking on “Recovery” will display a range of recovery options on the right-hand side of the screen, including the ability to reset your computer to its factory settings.
Choosing the “Recovery” option is an important step as it provides you with access to the reset functionality. This allows you to restore your Windows 10 computer to its original state, helping to resolve various software-related issues.
Now that you have successfully selected “Recovery,” let’s proceed to the next step to continue with the reset process.
Step 6: Select “Reset this PC”
After navigating to the “Recovery” section, the next step in resetting your Windows 10 computer is to select the “Reset this PC” option. This option allows you to initiate the reset process and restore your computer to its factory settings. Here’s how you can do it:
- Within the “Recovery” section, look for the “Reset this PC” option. It is usually located under the “Reset your PC” heading.
- Click on the “Get Started” button below the “Reset this PC” option.
By selecting “Reset this PC,” you are choosing to erase all personal files and settings on your computer, reverting it back to its original state. It is essential to understand that this process cannot be undone, and all your data will be permanently removed.
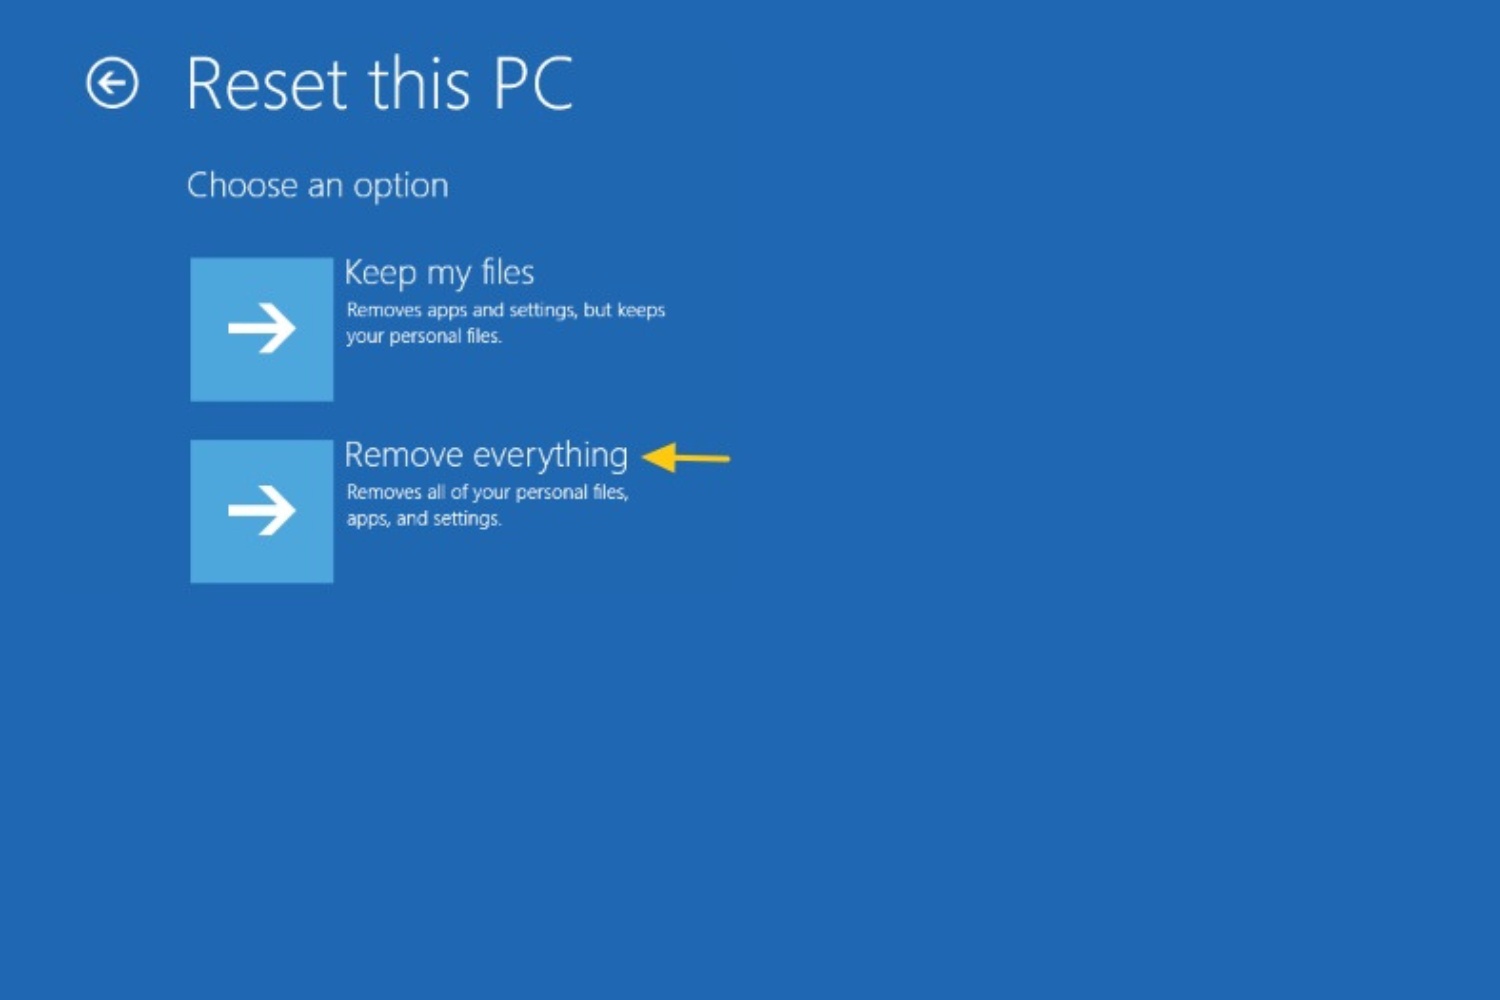
Before proceeding, you will be prompted to choose between two reset options: “Keep my files” or “Remove everything.” The former retains your personal files while removing apps and settings, while the latter removes everything, including personal files. Select the option that best suits your needs.
Once you have selected the desired reset option, the reset process will begin. It may take some time, so be patient and avoid interrupting the process.
By selecting “Reset this PC,” you are taking a significant step towards resolving software-related issues on your Windows 10 computer. Let’s move on to the next step to complete the reset process.
Step 7: Choose between “Keep my files” or “Remove everything”
Once you have selected “Reset this PC,” you will be prompted to choose between two options: “Keep my files” or “Remove everything.” This step allows you to decide the extent to which you want your Windows 10 computer to be reset. Here is a breakdown of each option:
- Keep my files: This option allows you to reset your computer while keeping all your personal files intact. It removes installed apps and settings but retains your documents, pictures, videos, and other personal data. This is a suitable choice if you want a fresh start without losing your important files.
- Remove everything: This option performs a complete reset, removing all personal files, installed apps, and settings from your computer. It essentially restores your PC to its factory settings. Choosing this option is recommended if you want to wipe everything clean and start from scratch.
Consider your needs and the reasons for resetting your computer when making this choice. If you have valuable files that you want to preserve, opting for “Keep my files” is the best choice. On the other hand, if you want a completely clean slate, choosing “Remove everything” is the way to go.
Once you have decided which option suits your requirements, click on it to proceed. Be aware that after making this selection, the reset process will begin, and it may take some time depending on the size of your files and the performance of your computer.
By choosing between “Keep my files” and “Remove everything,” you are tailoring the reset process to meet your specific needs. Let’s move on to the next step to complete the reset process.
Step 8: Follow the on-screen instructions
After selecting either “Keep my files” or “Remove everything,” you will need to follow the on-screen instructions to complete the reset process. These instructions will guide you through the remaining steps to ensure a successful reset of your Windows 10 computer. Here’s what you need to do:
- Read and understand the information presented on the screen. This may include important details about the reset process and the impact it will have on your computer.
- Confirm your selection by clicking on the “Reset” or “Next” button, depending on the instructions provided.
- Wait for the reset process to initiate. Your computer may restart several times during this process, so it’s important to be patient and avoid interrupting the reset.
- Follow any additional instructions that are presented on the screen. These instructions may include confirming your language and keyboard preferences or signing in to your Microsoft account if required.
- Once the reset process is complete, your computer will be restored to its factory settings or the selected reset option. You can then proceed to set up your Windows 10 computer as if it were new.
It’s essential to carefully follow the on-screen instructions provided. These instructions are designed to ensure a smooth and successful reset process for your Windows 10 computer.
After completing the on-screen instructions, you will be greeted with a fresh installation of Windows 10, ready for you to set it up according to your preferences. Take this opportunity to install any necessary updates, reinstall your apps, and restore your personal files from the backup you created earlier.
By following the on-screen instructions, you can finalize the reset process and enjoy a clean and optimized Windows 10 computer.
Conclusion
Resetting your Windows 10 computer can be a useful solution when facing software-related issues or simply wanting to start fresh. By following the step-by-step process outlined in this guide, you can easily initiate a reset and restore your computer to its factory settings.
Remember to back up your important data before starting the reset process to ensure that none of your files are lost. Utilize external storage devices, cloud storage services, or USB flash drives to securely store your data.
Starting with opening the Start menu and navigating to the “Settings” menu, you can access the “Update & Security” section to initiate the reset process. By choosing the “Recovery” option and selecting “Reset this PC,” you can decide whether to keep your files or remove everything. Following the on-screen instructions, you can successfully complete the reset process.
After the reset, take the time to reinstall necessary applications, update your computer, and restore your personal files from the backup. This will ensure that your Windows 10 computer is set up according to your preferences and ready for use.
By following these steps, you can effectively reset your Windows 10 computer and enjoy a fresh start. Whether you’re resolving software issues or simply looking to optimize your computer’s performance, a reset can provide the solution you need.
Remember, a reset is a powerful tool, and it should be used with caution. Make sure to back up your important data and carefully follow the instructions to avoid any unintended consequences. With a clean slate, you can now enjoy a refreshed and optimized Windows 10 experience.