Introduction
An external hard drive is a popular and convenient storage solution for individuals and businesses alike. It provides additional space to keep your files, documents, photos, videos, and more. However, you might find yourself needing to rename an external hard drive for various reasons, such as better organization, clearer identification, or personal preference.
Renaming an external hard drive is a simple process that can be accomplished in just a few steps. Whether you are using a Windows or Mac computer, the procedure remains relatively similar. In this article, we will guide you through the steps to rename an external hard drive.
By giving your external hard drive a new name, you can easily distinguish it from other storage devices. This can be particularly useful if you have multiple external hard drives connected to your computer or if you frequently switch between different drives. Additionally, a descriptive name can make it easier to locate and access the specific files you need.
It’s important to note that renaming an external hard drive does not affect the data stored on the drive. The renaming process only changes the display name of the drive, not its contents. So you can rename your hard drive without worrying about losing any files or data.
Now, let’s dive into the step-by-step process of renaming an external hard drive on your computer, whether you are using Windows or Mac operating systems.
Step 1: Connect the external hard drive
The first step in renaming an external hard drive is to ensure that it is properly connected to your computer. Take the USB cable that came with your external hard drive and plug one end into the drive itself and the other end into an available USB port on your computer. Make sure the connection is secure and check that the drive is powered on, if applicable.
Once the external hard drive is connected, your computer should recognize it as a new storage device. Depending on your operating system, you may receive a notification or see the drive listed in the file explorer or finder.
If you’re using a Windows computer, you can usually find the external hard drive listed under “This PC” or “My Computer.” On a Mac, you can find it in the “Devices” section of the Finder sidebar.
If you have trouble connecting the external hard drive or if it is not detected by your computer, try the following troubleshooting steps:
- Check the USB cable for any obvious defects or damage. If necessary, try using a different USB cable.
- Test the USB port by connecting another device to see if it is recognized. This will help determine if the issue is with the port or the external hard drive itself.
- If possible, try connecting the external hard drive to another computer to see if it is recognized. This will help determine if the issue is with the drive or your computer.
- Verify that the external hard drive is powered on. Some drives require an external power source, so make sure it is connected and functioning.
Once you have successfully connected the external hard drive to your computer and ensured it is functioning correctly, you are ready to proceed to the next step: opening the file explorer or finder.
Step 2: Open File Explorer or Finder
After connecting your external hard drive, the next step is to open the file explorer on a Windows computer or the Finder on a Mac. This allows you to access the files and folders stored on your computer as well as the connected external devices.
If you are using a Windows computer, you can open File Explorer by clicking the folder icon on your taskbar or by pressing the Windows key + E on your keyboard. This will launch the File Explorer window, which displays a variety of locations, including your internal storage drives, external devices, and network locations.
On a Mac computer, you can open Finder by clicking the smiley face icon located on the left side of your Dock, or by pressing Command + Space to open Spotlight search and typing “Finder.” Alternatively, you can click on the Finder icon located in your Dock.
Opening the file explorer or finder allows you to navigate through your computer’s file system and access the connected external devices. It is an essential step before you can proceed with renaming your external hard drive.
Once you have opened the file explorer or finder, you should see a list of locations on the left-hand side of the window. Look for the external hard drive that you connected in the previous step. The drive may be listed under the “Devices” or “External Devices” section, and it is often named based on the manufacturer or model of the drive.
Locating the external hard drive is essential before you can proceed to the next step of renaming it. Once you have identified the drive, you are ready to move on to step 3 and begin the renaming process.
Step 3: Locate the external hard drive
Now that you have opened the file explorer or finder, it’s time to locate the external hard drive that you want to rename. This step is crucial because it allows you to identify the correct drive and ensure that you make changes to the desired device.
In the file explorer or finder window, you will typically find a list of locations and devices on the left-hand side. Look for the section that includes external drives or devices. The external hard drive you connected in the previous step should be listed here.
The name of the external hard drive might vary depending on the manufacturer or model. It may appear as a combination of letters, numbers, and sometimes special characters. Take a moment to locate and select the correct drive that you wish to rename. It’s important to double-check and make sure you are selecting the right device, especially if you have multiple external hard drives connected to your computer.
If you are having trouble locating the external hard drive, there are a few things you can try:
- Refresh the file explorer or finder window by pressing F5 on a Windows computer or Command + R on a Mac.
- Look for a specific icon that represents external storage devices, such as an icon with a hard drive symbol.
- If you have multiple external drives connected, pay attention to the drive size, as it can help you identify the correct one.
Once you have successfully located the external hard drive in the file explorer or finder, you are ready to proceed to the next step: renaming the drive.
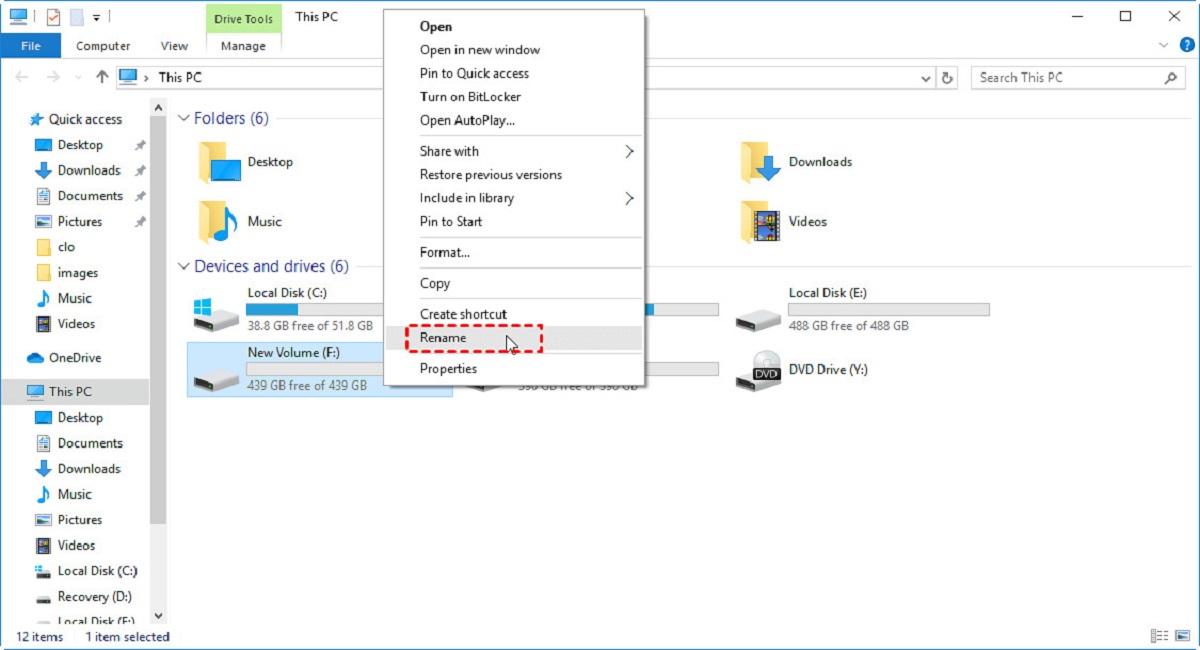
Step 4: Right-click on the external hard drive’s name
After locating the external hard drive in the file explorer or finder, it’s time to rename it. To rename the drive, you will need to right-click on its name. Right-clicking on the name will open a context menu with various options, including the option to rename the drive.
On a Windows computer, simply position your mouse pointer over the name of the external hard drive. Right-clicking will open a dropdown menu with different actions you can perform on the drive.
If you are using a Mac computer, you can accomplish the same action by pressing the Control key on your keyboard and then clicking on the name of the external hard drive. This will open a contextual menu with several options.
Once you have right-clicked or Control-clicked (on Mac) on the name of the external hard drive, a menu will appear on the screen. This menu provides various options for interacting with the drive.
Within this menu, you will find an option that allows you to rename the external hard drive. On both Windows and Mac computers, this option is usually labeled “Rename” or something similar.
Left-click or single-click on the “Rename” option within the context menu to proceed to the next step and rename the external hard drive.
If you accidentally right-clicked on the wrong drive or changed your mind about renaming the specific drive, you can simply click outside the context menu to close it and start again by right-clicking on the correct drive name.
Now that you have successfully accessed the context menu and selected the option to rename the external hard drive, you are ready to move on to the next step: entering the new name for the drive.
Step 5: Select “Rename”
After right-clicking on the name of the external hard drive in the context menu, you will see a list of options. Look for the option labeled “Rename” and select it by left-clicking or single-clicking on it.
This action will initiate the renaming process for the external hard drive. By selecting “Rename,” you are indicating to the computer that you want to change the current name of the drive to something new and different.
It’s important to note that the specific wording of the “Rename” option may vary slightly depending on your operating system or file explorer/finder version. For example, instead of “Rename,” you might see “Rename Drive,” “Rename Device,” or another related wording. Regardless of the exact phrasing, the function remains the same.
Once you have selected the “Rename” option, the drive’s name will become editable, allowing you to enter a new name of your choice.
If you accidentally selected the wrong option in the context menu or changed your mind about renaming the drive, you can simply click outside the context menu to close it and start again by right-clicking on the correct drive name.
Now that you have successfully selected the “Rename” option, you are ready to proceed to the next step: entering the new name for the external hard drive.
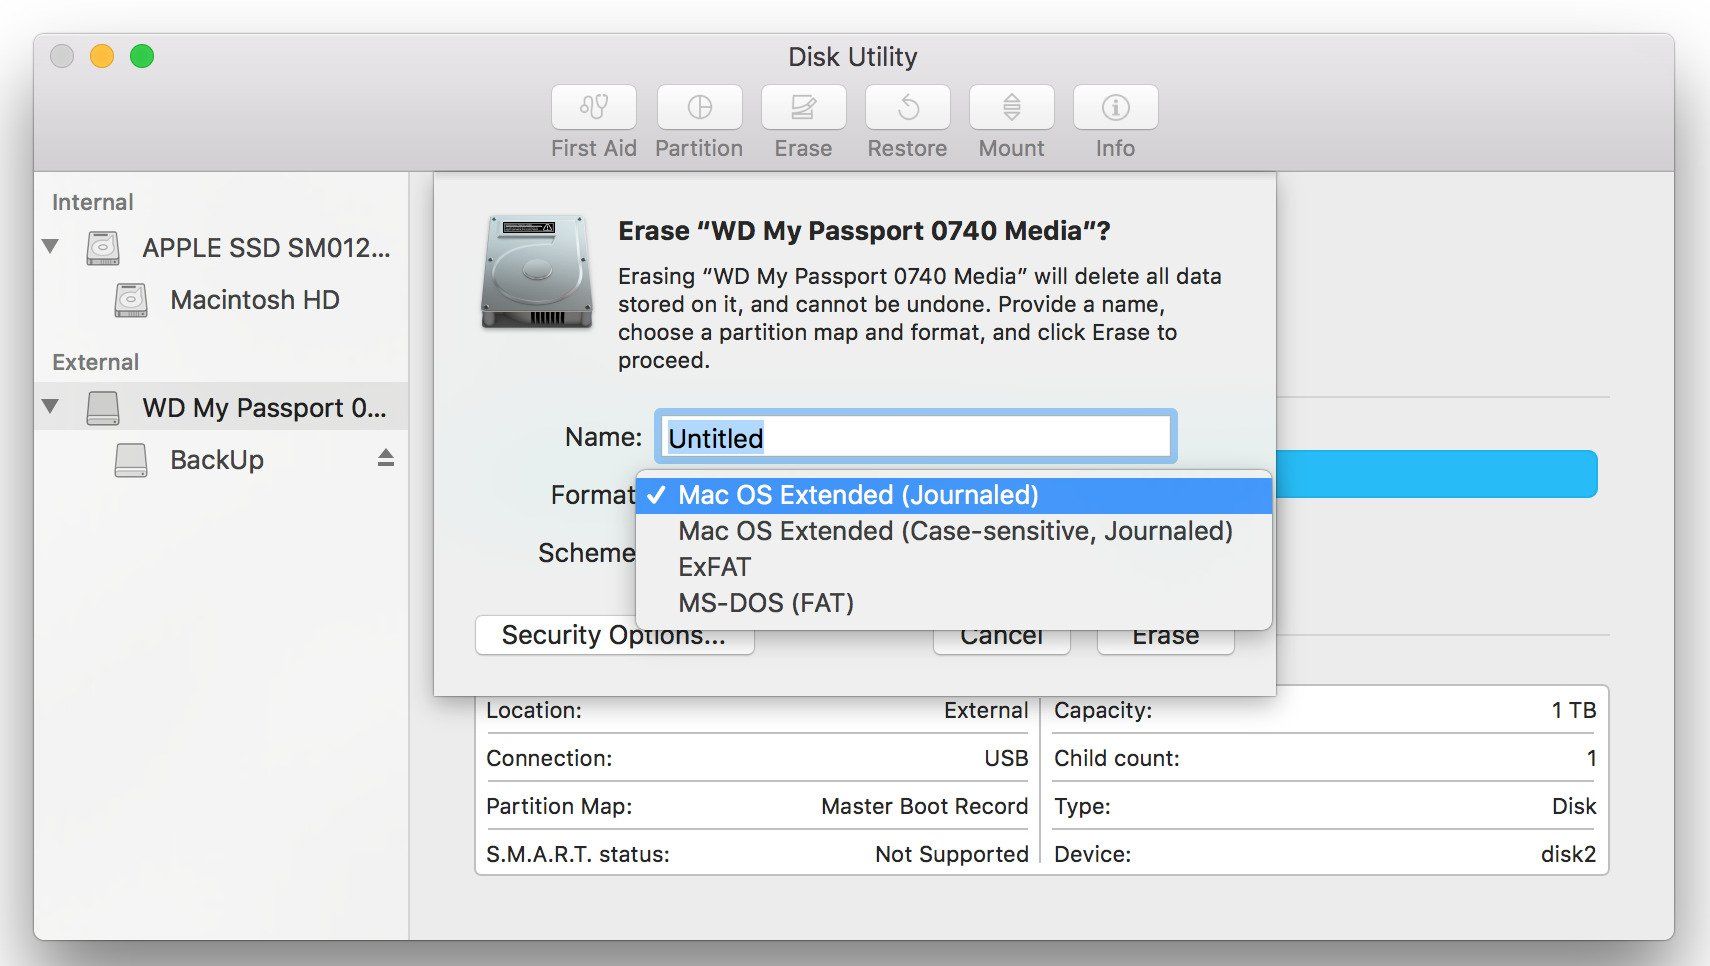
Step 6: Enter the new name for the external hard drive
After selecting the “Rename” option, the name of the external hard drive becomes editable. This means you can now enter the new name for the drive.
Click on the current name of the external hard drive, which should be highlighted or surrounded by a text box or cursor. Once you have clicked on the name, you can start typing the new name you want to assign to the drive.
When choosing a new name for the drive, keep in mind that it should be descriptive and easily identifiable. Consider using a name that reflects the contents or purpose of the drive, such as “Photos Backup,” “Important Documents,” or “Media Library.”
While there are no strict rules for naming an external hard drive, it’s best to avoid using special characters, symbols, or excessive punctuation. Stick to alphanumeric characters and spaces to ensure compatibility with different operating systems.
Additionally, try to keep the new name concise and meaningful, especially if you have multiple external hard drives connected to your computer. This will make it easier to distinguish between them and find the specific drive you need.
As you type the new name, you will see the changes reflected in real-time, allowing you to preview how the drive will appear with the new name.
Take your time to enter the new name accurately and review it before moving on to the next step. Once you are satisfied with the new name for the external hard drive, you are ready to proceed to the subsequent step: saving the changes.
Step 7: Press Enter or click outside the name field to save the changes
After entering the new name for the external hard drive, it’s time to save the changes you made. To do this, you have a couple of options depending on your operating system and file explorer/finder.
The most common way to save the new name is by pressing the Enter key on your keyboard. Once you have finished typing the new name, simply press Enter, and the changes will be saved automatically.
If you prefer not to use the keyboard, you can also save the changes by clicking outside the name field or anywhere else on the screen. This action will indicate to the computer that you have finished editing and want to apply the new name to the external hard drive.
Upon pressing Enter or clicking outside the name field, you will see the new name replace the old one for the external hard drive in the file explorer or finder window. The drive will now be referred to by the new name you have chosen.
It’s important to note that once you save the changes, the new name will be permanent unless you decide to rename the drive again in the future. Therefore, make sure you are satisfied with the new name before proceeding.
Now that you have successfully saved the changes, you can move on to the next step: confirming the new name of the external hard drive.
Step 8: Confirm the new name of the external hard drive
After saving the changes, it’s important to confirm that the new name you assigned to the external hard drive is displayed correctly. This step helps ensure that the renaming process was successful and that the drive is now properly identified with its updated name.
To confirm the new name, navigate to the file explorer or finder window where you initially located the external hard drive. Look for the drive in the list of locations or devices, and you should see its updated name displayed.
Take a moment to review the new name and ensure it accurately reflects the changes you made. Check for any typographical errors or misspellings and ensure that the name is descriptive and identifiable.
If the new name is displayed as intended, congratulations! You have successfully renamed the external hard drive. The drive will now be recognized by the computer and other applications using its new name.
However, if you notice any issues with the new name or if it is not displayed correctly, you can repeat the earlier steps to rename the drive and make the necessary adjustments.
Remember, the renaming process only affects the display name of the external hard drive and does not alter its contents or functionality.
After confirming the new name and ensuring its accuracy, you are ready to proceed to the final step: safely ejecting the external hard drive.
Step 9: Safely eject the external hard drive
Once you have successfully renamed the external hard drive, it’s important to follow the proper procedure for safely ejecting it from your computer. This ensures that any pending read or write operations are completed, reducing the risk of data corruption or loss.
To safely eject the external hard drive, locate the drive in the file explorer or finder window. Right-click on the drive’s name and select the “Eject” or “Safely Remove” option.
On a Windows computer, you can usually find the eject option by right-clicking on the external hard drive’s name in the file explorer and selecting “Eject.” This action notifies the operating system that you are ready to disconnect the drive.
On a Mac computer, you can typically find the eject option by right-clicking on the external hard drive’s name in the finder and selecting “Eject.” This prompts the system to finish any ongoing processes with the drive before allowing you to safely remove it.
After selecting the eject option, you might see a notification or progress bar indicating that it is safe to remove the external hard drive. Once the notification disappears or the progress bar completes, you can physically disconnect the drive from your computer.
Before removing the drive, ensure that any file transfer or data backup operations are complete. It’s also a good practice to wait a few seconds after ejecting before physically disconnecting the drive to ensure the system has fully finalized any pending operations.
Once you have safely ejected the external hard drive, you can unplug the USB cable from your computer and disconnect the drive from its power source, if applicable.
By following the proper procedure to safely eject the external hard drive, you minimize the risk of data loss or damage. This step ensures that any cached data is written to the drive and prevents potential file system corruption.
Congratulations! You have successfully renamed and safely ejected your external hard drive. You can now enjoy using the renamed drive, knowing that it is properly identified and ready for your storage needs.
Conclusion
Renaming an external hard drive is a straightforward process that allows you to customize the name of the drive to better suit your needs. Whether you want to organize multiple drives or make it easier to identify specific files or backups, renaming an external hard drive can be a helpful step.
In this article, we walked through the step-by-step process of renaming an external hard drive on both Windows and Mac computers. We covered the initial steps of connecting the drive and opening the file explorer or finder. We then discussed locating the external hard drive and right-clicking on its name to access the renaming option.
After selecting “Rename,” we entered a new name for the external hard drive, ensuring it was descriptive and easily identifiable. We then saved the changes by either pressing Enter or clicking outside the name field. It was crucial to confirm that the new name was displayed correctly in the file explorer or finder.
Finally, we emphasized the importance of safely ejecting the external hard drive to minimize the risk of data corruption. Following the proper procedure for safe removal ensures that any pending operations are completed before physically disconnecting the drive.
By following these steps, you can confidently rename your external hard drives, manage your data more efficiently, and personalize your storage experience.
Remember, the process of renaming an external hard drive is reversible, allowing you to change the name again in the future if needed. It’s essential to choose a name that best suits your preferences and organization system.
Now that you have acquired the knowledge of renaming external hard drives, you can confidently customize your drive names to enhance your storage organization and navigation.
So go ahead, connect your external hard drive, follow the steps outlined in this article, and give your drive a personalized and meaningful name!