Introduction
Welcome to this guide on how to remove the CPU cooler on a Mac G5! The CPU cooler is an essential component that helps to regulate and dissipate the heat generated by the central processing unit (CPU) in your Mac G5. Over time, dust and debris can accumulate on the cooler, hindering its performance and causing your system to overheat. Additionally, you may need to remove the CPU cooler to upgrade or replace it with a more efficient model.
In this step-by-step article, we will walk you through the process of safely removing the CPU cooler from your Mac G5. From powering off the device to reconnecting the fan connector, we will cover all the necessary steps to ensure a successful removal. We will also provide some optional instructions on how to clean the CPU and apply thermal paste, which can help optimize the cooling efficiency of your system.
To perform this task, you will need a few basic tools, such as a screwdriver and an anti-static wrist strap to prevent any damage from static electricity. It is important to follow the steps closely and exercise caution while handling the components of your Mac G5. So, let’s dive in and learn how to remove the CPU cooler on your Mac G5!
Tools Needed
Before you begin the process of removing the CPU cooler on your Mac G5, make sure you have the following tools ready:
- Screwdriver (size may vary depending on your Mac G5 model)
- Anti-static wrist strap
- Clean cloth or lint-free cloth
- Isopropyl alcohol (optional, for cleaning the CPU and applying thermal paste)
- Thermal paste (optional, for reapplying on the CPU)
The screwdriver will be used to open the side panel of your Mac G5 and remove the mounting clips that secure the CPU cooler. Make sure it fits the screws on your particular model to avoid damaging them. The anti-static wrist strap is essential to protect your internal components from static electricity while handling them.
A clean cloth or lint-free cloth will come in handy for wiping away any dust or debris that may have accumulated on the CPU or cooler. If you choose to clean the CPU and reapply thermal paste, isopropyl alcohol can be used to clean the surfaces. Finally, thermal paste is used to ensure adequate heat transfer between the CPU and cooler for optimal cooling performance.
Having these tools prepared before starting the CPU cooler removal process will help ensure a smooth and efficient procedure. Remember to work in a clean and static-free environment to avoid any damage to your Mac G5 or its internal components.
Step 1: Power Off and Unplug the Mac G5
The first step in removing the CPU cooler on your Mac G5 is to power off the system and unplug it from the electrical outlet. This ensures your safety during the process and prevents any accidental damage or electrical shocks.
Start by shutting down your Mac G5 using the normal shutdown procedure. Save any ongoing work and close all applications before proceeding. Once the system has shut down completely, locate the power button on your Mac G5 and press and hold it for a few seconds until you see the power indicator light turn off.
After the Mac G5 is powered off, it is important to unplug the power cord from the electrical outlet. This will completely disconnect the system from the power source, ensuring that there is no residual electrical current running through the components. This step is necessary to prevent any potential harm to you or the Mac G5 during the CPU cooler removal process.
Before moving on to the next step, take a moment to ground yourself by touching a metal object. This helps discharge any static electricity that may have built up in your body, further protecting the sensitive internal components of the Mac G5.
Now that your Mac G5 is powered off and unplugged, you can proceed to the next step of removing the side panel of the computer case to gain access to the CPU cooler.
Step 2: Remove the Side Panel
With the Mac G5 powered off and unplugged, it’s time to remove the side panel of the computer case to gain access to the internal components, including the CPU cooler. Follow these steps:
- Locate the screws or latches securing the side panel of your Mac G5. The number and placement of these may vary depending on the model.
- Using the appropriate screwdriver, carefully remove the screws or release the latches, allowing the side panel to slide or swing open.
- Set aside the screws or latches in a safe place to avoid misplacing them.
- Gently slide or lift off the side panel, exposing the internal components of your Mac G5.
Take care not to apply excessive force when removing the side panel, as this could damage the case or delicate internal components. If you encounter any resistance, double-check for any additional screws or latches that may need to be removed.
Once the side panel is removed, you will have a clear view of the internal components, including the CPU cooler. At this point, it is important to avoid touching any of the components directly, especially the CPU itself, to prevent damage from static electricity or accidental mishandling.
With the side panel successfully removed, you are now ready to proceed with locating the CPU cooler in the next step.
Step 3: Locate the CPU Cooler
Once you have removed the side panel of your Mac G5, it’s time to locate the CPU cooler. Follow these instructions:
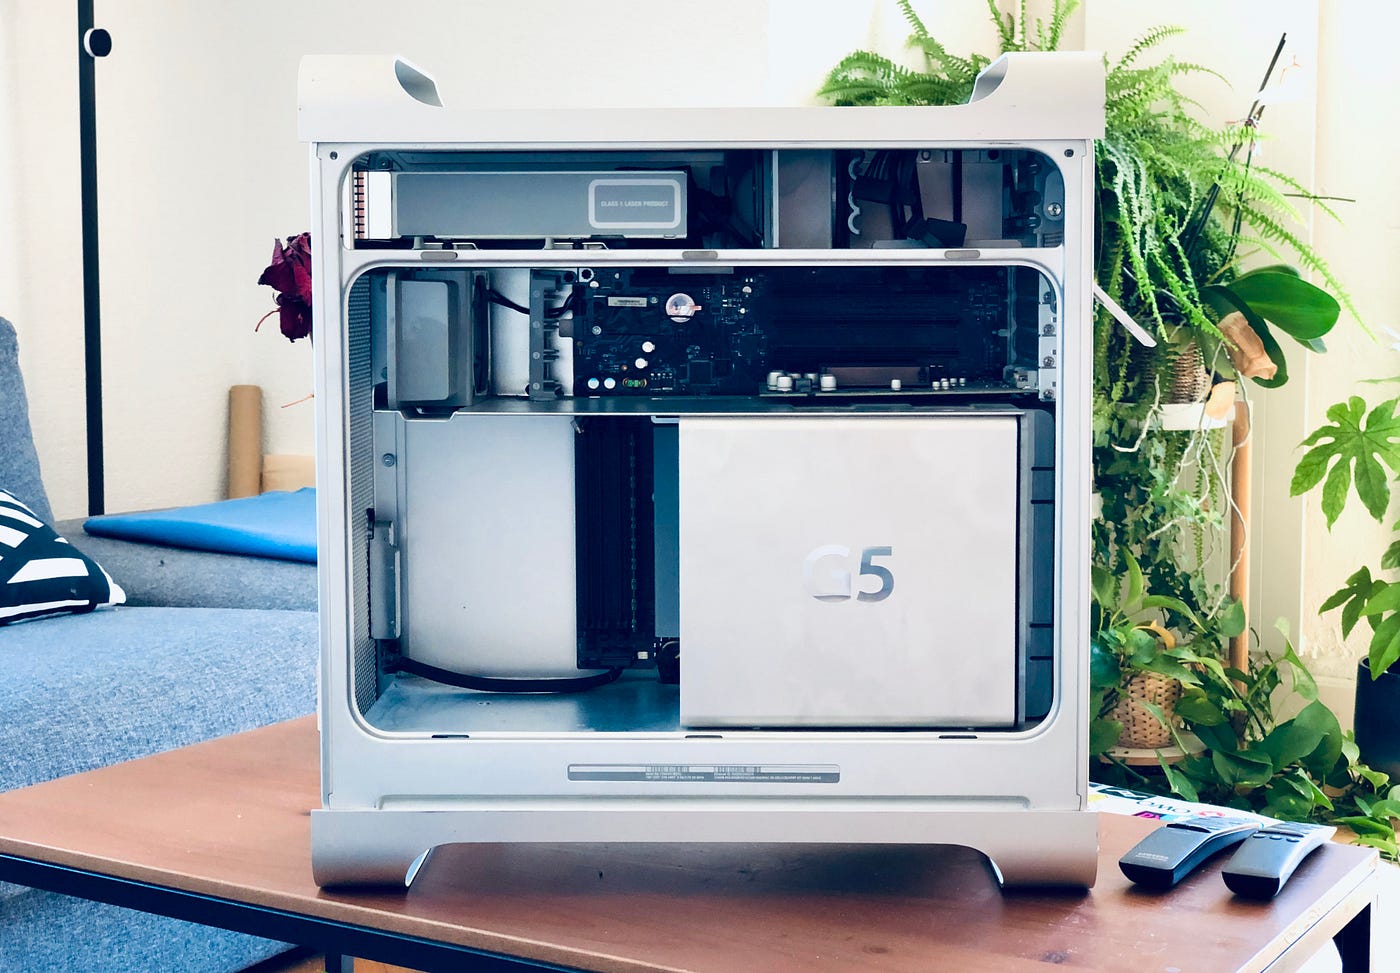
- Take a moment to familiarize yourself with the internal layout of your Mac G5. Look for the large metallic heat sink with a fan attached to it. This assembly is the CPU cooler.
- Note the position of the CPU cooler in relation to other components. It is generally located near the center of the motherboard and is connected to the CPU itself.
- Take a mental note of how the CPU cooler is secured to the motherboard. This will help you in the next steps when you need to disconnect and remove it.
It is important to exercise caution when working around the CPU cooler. Avoid applying pressure or touching the delicate fins of the heat sink, as they can be easily bent or damaged. Also, take care not to accidentally disconnect or damage any nearby cables or connectors.
By locating the CPU cooler, you have successfully identified the component that needs to be removed in order to clean, upgrade, or replace it. In the next step, we will guide you through the process of disconnecting the fan connector from the CPU cooler.
Step 4: Disconnect the Fan Connector
Before you can remove the CPU cooler from your Mac G5, you will need to disconnect the fan connector that powers the cooling fan. Follow these steps:
- Locate the fan connector on the CPU cooler. It is typically a small, rectangular plastic connector with wires attached.
- Gently grasp the fan connector and carefully disconnect it from the motherboard. You may need to gently push down on a small lever or squeeze the sides of the connector to release it.
- Take note of how the fan connector is positioned before disconnecting it. This will help you ensure the correct orientation when reconnecting it later.
When disconnecting the fan connector, it is important to handle it delicately to avoid damaging the wires or connector pins. Apply gentle, even pressure and avoid pulling on the wires directly.
Once the fan connector is successfully disconnected, set it aside in a safe place where it won’t get tangled or damaged. This step ensures that power is no longer being supplied to the CPU cooler fan, allowing you to safely proceed with the removal process.
With the fan connector disconnected, you are now ready to move on to the next step: removing the mounting clips that secure the CPU cooler in place.
Step 5: Remove the Cooler Mounting Clips
With the fan connector disconnected, the next step in removing the CPU cooler on your Mac G5 is to remove the mounting clips that secure it in place. Follow these instructions:
- Inspect the CPU cooler and locate the mounting clips that hold it onto the motherboard. These clips are typically located on opposite sides of the cooler.
- Using a screwdriver or your fingers, carefully release each mounting clip by gently pushing it downwards or outwards, depending on the design.
- Slowly lift the CPU cooler away from the motherboard, keeping a firm grip on it as you remove the clips.
- Once the mounting clips have been released, set them aside in a safe place. Be sure to keep track of them to avoid misplacing or losing them.
It is essential to exercise caution when removing the mounting clips to prevent any damage to the motherboard or other components. Take your time and be gentle to ensure a smooth removal process.
When lifting the CPU cooler away from the motherboard, be mindful of any thermal paste that may be present on the surface. Avoid smearing or spreading the thermal paste, as it can interfere with the heat transfer properties of the cooler.
With the cooler mounting clips removed, you have successfully detached the CPU cooler from your Mac G5. In the next step, we will guide you through the careful removal of the CPU cooler itself.
Step 6: Carefully Remove the CPU Cooler
Now that the mounting clips have been removed, you are ready to carefully remove the CPU cooler from your Mac G5. Follow these steps:
- Hold the CPU cooler with both hands, ensuring a firm grip and steady control.
- Slowly and gently lift the cooler away from the motherboard, ensuring that you do not apply too much force or twist it in any way.
- As you lift the cooler, you may feel a slight resistance due to the thermal paste that may be holding it in place.
- If necessary, use a slight twisting motion to help break the thermal paste seal between the cooler and the CPU.
- Continue lifting until the CPU cooler is completely free from the motherboard.
While removing the CPU cooler, it is crucial to handle it with care to prevent any damage to the internal components or the cooler itself. Avoid applying excessive force or making sudden movements that could cause the cooler to detach abruptly.
Take note of the position and orientation of the CPU cooler as you remove it. This will be helpful when it comes time to reinstall it or replace it with a new unit.
Once the CPU cooler is successfully removed, place it in a safe and clean location. Take care not to set it down on any surfaces that may be prone to static electricity or dust accumulation.
With the CPU cooler removed, you have completed an essential step in maintaining or upgrading your Mac G5. In the next step, we will provide instructions on cleaning the CPU and applying thermal paste for improved cooling performance.
Step 7: Clean the CPU and Apply Thermal Paste (optional)
At this stage, you have the option to clean the CPU and apply new thermal paste for optimal cooling performance. While this step is not mandatory, it can help improve heat transfer and ensure efficient operation of your Mac G5. Follow these instructions:
- Using a clean cloth or lint-free cloth, gently wipe away any dust or debris from the surface of the CPU. Take care not to apply too much pressure or scratch the CPU.
- If you choose to clean the CPU more thoroughly, you can dampen the cloth with a small amount of isopropyl alcohol. Ensure the alcohol has evaporated before proceeding to the next step.
- Inspect the CPU cooler for any dust or residue. Use the cloth to clean the cooler as well, taking care to remove any buildup that may hinder its performance.
- If you wish to reapply thermal paste, remove any residual paste from the CPU and cooler using the cloth and isopropyl alcohol (if needed).
- Apply a small, pea-sized drop of thermal paste to the center of the CPU. Do not spread the paste; the pressure from reattaching the cooler will distribute it evenly.
When cleaning the CPU and applying thermal paste, it is crucial to work in a clean and dust-free environment. The presence of dust particles or other contaminants can impact the effectiveness of the thermal paste and cause cooling issues.
Remember that thermal paste helps fill in microscopic gaps between the CPU and cooler, promoting efficient heat transfer. Applying too much or too little thermal paste can hinder its effectiveness, so be sure to use the right amount.
If you choose not to clean the CPU or apply thermal paste, you can skip this step and proceed to the next section.
With the CPU cleaned and, if desired, new thermal paste applied, you are ready to move on to the next step of reinstalling the CPU cooler.
Step 8: Reinstalling the CPU Cooler
After cleaning the CPU and, if applicable, applying new thermal paste, it’s time to reinstall the CPU cooler. Follow these steps to ensure a secure and proper installation:
- Position the CPU cooler over the CPU socket on the motherboard, aligning it with the mounting holes.
- Gently lower the CPU cooler onto the CPU, taking care to align the screw holes on the cooler with the corresponding holes on the motherboard.
- Once the CPU cooler is aligned, apply gentle pressure evenly to ensure a proper and secure fit. Do not apply excessive force.
- If required, reattach the mounting clips to the motherboard, securing the CPU cooler in place. Ensure that the clips are fully engaged and properly tightened.
When reinstalling the CPU cooler, it is crucial to align it correctly with the CPU socket to ensure proper contact and heat dissipation. Misalignment can cause uneven cooling and potentially damage the CPU.
Exercise caution when applying pressure to avoid damaging the CPU or motherboard. Apply gentle, even pressure until the CPU cooler is securely in place.
Take note of any specific instructions or requirements for your Mac G5 model regarding the mounting clips or any additional securing mechanisms. Follow these instructions to ensure a proper installation.
Once the CPU cooler is reinstalled, you are ready to move on to the next step of securing the mounting clips in place to ensure the cooler remains firmly attached.
Step 9: Secure the Mounting Clips in Place
Now that you have reinstalled the CPU cooler on your Mac G5, the next step is to secure the mounting clips in place to ensure the cooler remains firmly attached. Follow these instructions:
- Double-check that the CPU cooler is positioned correctly and aligned with the mounting holes on the motherboard.
- Gently press on each mounting clip, ensuring that it securely latches onto the corresponding slot or hook on the motherboard.
- Verify that both mounting clips are fully engaged and properly tightened. They should feel secure and provide sufficient pressure to keep the CPU cooler in place.
- Give the CPU cooler a slight wiggle to confirm that it is firmly attached. If there is any movement or looseness, double-check the mounting clips or consult the manufacturer’s instructions for your specific model.
It is crucial to ensure that the mounting clips are properly secured to prevent any movement or detachment of the CPU cooler. A loose cooler can lead to inadequate cooling performance or potential damage to the CPU and other components.
If your Mac G5 model uses a different type of securing mechanism for the CPU cooler, make sure to follow the specific instructions provided by the manufacturer to ensure a secure attachment.
With the mounting clips secured, you can proceed to the next step of reconnecting the fan connector to power the CPU cooler.
Step 10: Reconnect the Fan Connector
Now that the CPU cooler is securely in place, the next step is to reconnect the fan connector to ensure proper power supply to the cooling fan. Follow these steps:
- Locate the fan connector on the CPU cooler.
- Orient the fan connector in the correct position, ensuring that it matches the corresponding connector on the motherboard.
- Gently insert the fan connector into the motherboard’s connector, making sure it is securely seated.
- Confirm that the fan connector is properly and fully connected by giving it a gentle tug. It should remain firmly in place without coming loose.
While reconnecting the fan connector, be careful not to force it or insert it in the wrong orientation, as this could damage the pins or connectors.
Double-check that the fan connector is aligned correctly before pushing it into the motherboard connector. You may need to refer to the motherboard’s manual or the markings on the connectors to ensure proper alignment.
Once the fan connector is securely reconnected, you can proceed to the final step of reattaching the side panel of your Mac G5.
Step 11: Reattach the Side Panel
With the CPU cooler connected and secured, the final step is to reattach the side panel of your Mac G5. Follow these instructions:
- Position the side panel in alignment with the computer case.
- Slide or swing the side panel into place, ensuring that it fits snugly and securely.
- Line up the screw holes or latches on the side panel with those on the computer case.
- Using a screwdriver, reinsert and tighten the screws or engage the latches to secure the side panel.
When reattaching the side panel, make sure it is aligned properly with the computer case. Avoid using excessive force, as this could damage the panel or the case.
If your Mac G5 uses screws to secure the side panel, tighten them appropriately, but be careful not to overtighten, as this could strip the screw threads or damage the case.
If your Mac G5 has latches, ensure they are securely engaged to hold the side panel firmly in place.
Once the side panel is reattached, give it a gentle push or wiggle to verify that it is properly secured. It should not move or come loose.
With the side panel reattached, you have completed the process of removing and reinstalling the CPU cooler on your Mac G5. You can now reconnect the power cord, power on your Mac G5, and enjoy efficient cooling performance!
Conclusion
Congratulations! You have successfully learned how to remove and reinstall the CPU cooler on your Mac G5. By following these steps, you can ensure optimal cooling performance for your system, whether you are cleaning the cooler, upgrading it, or applying new thermal paste.
Throughout the process, it is important to work carefully and exercise caution to protect both the internal components of your Mac G5 and yourself. Remember to power off and unplug your system before starting, and take necessary precautions to prevent any damage from static electricity.
In this guide, we covered the tools you will need, the steps to power off and unplug the Mac G5, removing the side panel, locating the CPU cooler, disconnecting the fan connector, removing the cooler mounting clips, carefully removing the CPU cooler, cleaning the CPU and applying thermal paste (optional), reinstalling the CPU cooler, securing the mounting clips in place, reconnecting the fan connector, and reattaching the side panel.
The process of removing and reinstalling the CPU cooler may seem daunting at first, but with the right tools and careful execution, you can accomplish this task successfully. By keeping your Mac G5’s CPU cooler clean and properly installed, you can maintain optimal temperature levels and prevent overheating, ensuring the smooth operation of your system.
Remember to consult your specific Mac G5 model’s documentation or manufacturer’s instructions for any model-specific guidelines or precautions. Additionally, if you are not comfortable performing these tasks yourself, it is advisable to seek assistance from a professional technician who can help you safely remove and reinstall the CPU cooler.
Now that you have completed the process, you can enjoy improved cooling performance and potentially prolong the lifespan of your Mac G5. Whether you are a tech enthusiast or a regular user, knowing how to remove and reinstall the CPU cooler can be a valuable skill to have, allowing you to maintain and optimize your computer’s performance.


