Introduction
When it comes to securing your online accounts, one of the most effective methods is using two-factor authentication (2FA). Google Authenticator is a popular 2FA application that adds an extra layer of security to your Gmail, social media, and other online accounts. It generates time-based codes that you enter along with your username and password, providing an additional level of verification.
However, what happens if you lose your phone that has Google Authenticator installed? Losing your phone can be a harrowing experience, but there’s no need to panic. In this article, we will explore the various methods you can use to recover Google Authenticator from a lost phone.
Before we dive into the recovery methods, let’s take a quick look at how Google Authenticator works. The application uses the Time-based One-Time Password (TOTP) algorithm to generate unique codes every few seconds. These codes are synchronized with the server of the service you are trying to log into, creating a dynamic and time-sensitive login process.
Now, let’s move on to the steps you can take to recover Google Authenticator from a lost phone.
How does Google Authenticator work?
Google Authenticator provides an extra layer of security by implementing a two-factor authentication (2FA) system. It works based on the Time-based One-Time Password (TOTP) algorithm, which generates unique codes that expire after a set period of time.
When you enable Google Authenticator for an online account, such as Gmail or a social media platform, the service and the app establish a synchronized connection. This connection is done by scanning a QR code or manually entering a secret key provided by the service.
Once the connection is established, Google Authenticator begins generating time-sensitive codes. The app uses the current time and the secret key to generate a unique code that you need to enter along with your username and password when logging into the service.
The beauty of Google Authenticator lies in its simplicity and effectiveness. The generated codes constantly change, typically every 30 seconds, making them difficult for potential hackers to predict or replicate. This time-sensitive approach adds an extra layer of security to your online accounts.
In addition to generating codes, Google Authenticator also supports push notifications on some services. Instead of manually entering a code, you can simply approve or deny the login attempt through a push notification on your device. This makes the login process even more convenient and secure.
It is worth mentioning that Google Authenticator does not rely on an internet connection to generate codes. The app stores the secret key locally on your device, eliminating the need for continuous internet access. This ensures that even if you are in an area with no connectivity, you can still access your accounts securely.
Now that we have covered the basics of how Google Authenticator works, let’s explore the steps you can take to recover it if you lose your phone.
Steps to recover Google Authenticator from a lost phone
Losing your phone can be a stressful experience, especially if you have Google Authenticator installed. However, there are several methods you can use to recover Google Authenticator from a lost phone. Let’s explore these methods below:
Method 1: Using a backup phone
If you have a backup phone, you can easily transfer Google Authenticator to that device. Simply install the app on your backup phone and follow the setup process. During the setup, select the option to “Transfer accounts” and follow the prompts to transfer your accounts from the lost device to the backup phone. This method requires you to have access to the backup phone and the ability to install apps.
Method 2: Contacting the service provider
If you have lost both your phone and your backup device, contacting the service provider is your best course of action. Reach out to the customer support or account recovery department of the service for which you are using Google Authenticator. Explain your situation and provide any necessary information they may require to verify your identity. The service provider will guide you through the recovery process, which may involve providing alternative verification methods or disabling Google Authenticator temporarily.
Method 3: Recovering with a recovery code
When you initially set up Google Authenticator, you should have received a recovery code. This code acts as a backup in case you lose access to your device. If you have the recovery code stored in a safe place, you can use it to regain access to your accounts. During the setup process on a new device, select the option to “Restore accounts” and enter the recovery code when prompted. This method requires you to have the recovery code readily available.
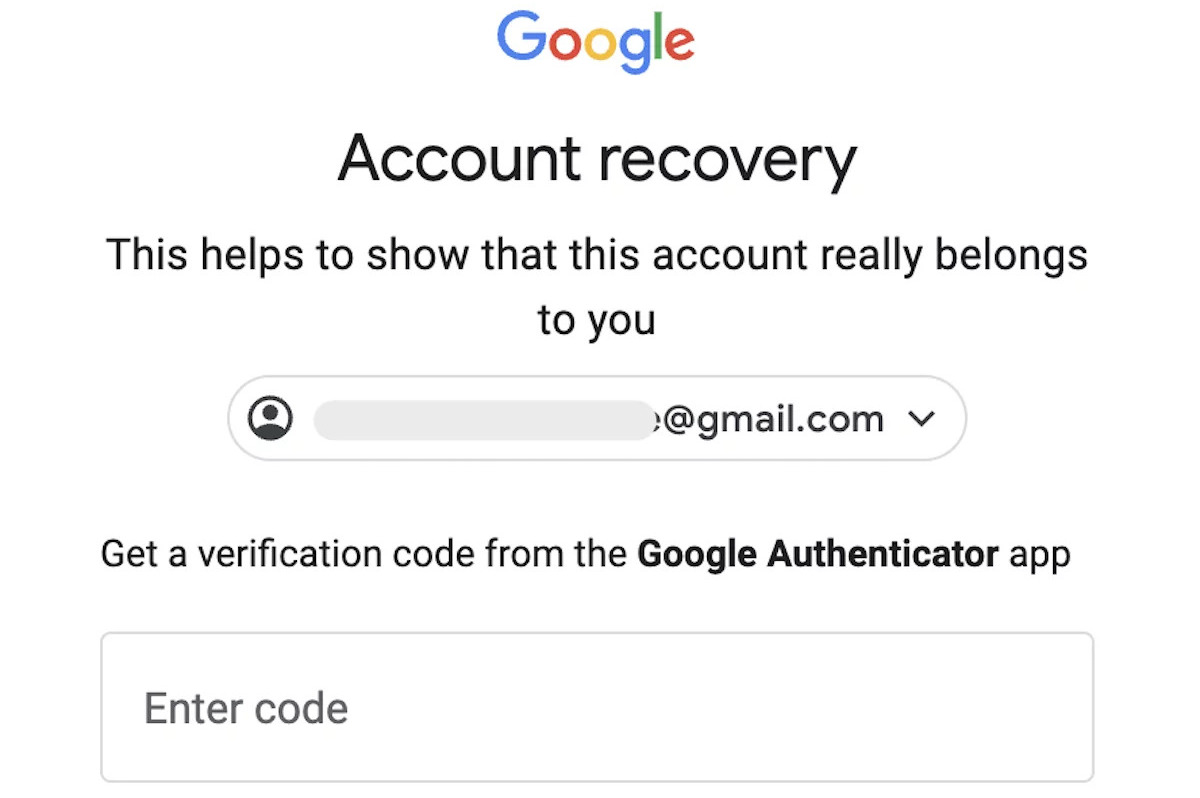
Method 4: Recovering through Google Account
If you have a Google Account connected to your Google Authenticator app, you can use your account to recover the app. Visit the Google Account recovery page and follow the provided instructions to regain access to your Google Authenticator app. This method requires you to have a Google Account associated with the app.
Now that you are familiar with the steps to recover Google Authenticator from a lost phone, let’s discuss the advantages and disadvantages of using this authentication method.
Method 1: Using a backup phone
If you have a backup phone, recovering Google Authenticator becomes a straightforward process. By transferring the app to your backup device, you can regain access to your accounts without any hassle. Here’s a step-by-step guide on how to use a backup phone to recover Google Authenticator:
- Ensure that your backup phone is connected to a stable internet connection.
- Open the app store on your backup phone (e.g., Google Play Store for Android or App Store for iOS).
- Search for “Google Authenticator” and install the app.
- Once the app is installed, open it and click on the plus (+) icon to add an account.
- Choose the “Scan a barcode” option and scan the QR code displayed on the service you wish to set up Google Authenticator for.
- If the QR code cannot be scanned, you can manually enter the provided secret key.
- Once the setup is complete, the app on your backup phone will generate time-based codes, allowing you to log in to your accounts.
It’s important to note that using a backup phone requires you to have access to the device and the ability to install apps. If you don’t have a backup phone or if you’ve lost it along with your primary device, don’t worry. There are alternative methods available to recover Google Authenticator, which we will discuss in the following sections.
Now that you’re familiar with using a backup phone as a recovery method, let’s move on to the next method: contacting the service provider.
Method 2: Contacting the service provider
If you have lost both your phone and your backup device, contacting the service provider is the next course of action to recover Google Authenticator. The service provider can assist you in regaining access to your accounts. Here’s what you need to do:
- Initiate contact with the customer support or account recovery department of the service you are using Google Authenticator for. Look for contact information on their website or app.
- Explain your situation and provide any necessary information they may require to verify your identity. This can include your account details, previous login information, or any other relevant information associated with your account.
- Be prepared to answer security questions or provide additional verification steps to demonstrate that you are the legitimate owner of the account.
- The service provider will guide you through the recovery process, which may include disabling Google Authenticator temporarily or enabling alternative verification methods.
- Follow the instructions provided by the service provider to recover your account access.
It’s important to remain patient and cooperative during the account recovery process, as it may involve several back-and-forth communications with the service provider. They have protocols in place to ensure the security of your account and may require additional time to verify your identity.
Remember, each service provider may have different procedures and requirements for account recovery, so it’s essential to follow their specific instructions. Keep any communication records, such as email threads or support ticket numbers, for future reference.
Now that you’re familiar with contacting the service provider as a recovery method, let’s move on to the next method: recovering Google Authenticator with a recovery code.
Method 3: Recovering with a recovery code
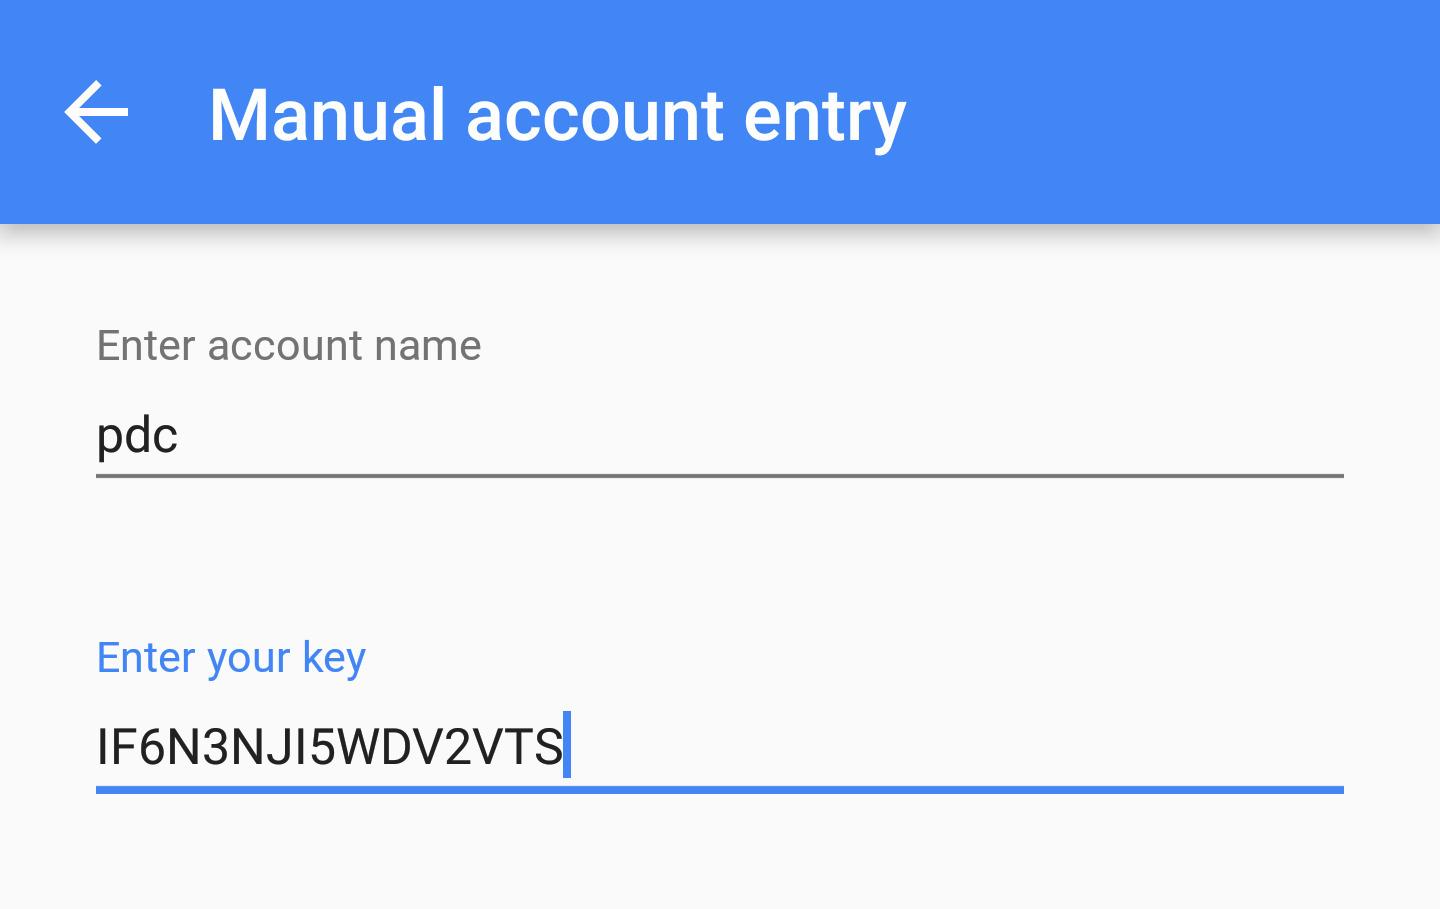
If you’ve set up Google Authenticator properly when enabling two-factor authentication, you should have received a recovery code. The recovery code serves as a backup in case you lose access to your phone. Follow these steps to recover Google Authenticator using a recovery code:
- Locate your recovery code. It is typically provided to you during the initial setup process or sent to your email address.
- On your new device or backup phone, install the Google Authenticator app.
- Open the app and click on the plus (+) icon to add an account.
- Choose the “Enter a provided key” option.
- Enter the recovery code you previously obtained.
- Complete the setup process by following the on-screen instructions.
- Your Google Authenticator app should now be synced with your online accounts, and you can start using it to generate login codes.
It’s important to note that the recovery code acts as a one-time backup. Once used, it becomes invalid, so it’s crucial to keep it in a safe and secure place. If you cannot find your recovery code, check any email or documentation you received during the initial setup process. If you still cannot locate it, consider reaching out to the service provider for further assistance.
Using a recovery code ensures that you can regain access to your accounts even if you lose your primary device. It is a reliable method to recover Google Authenticator and maintain the security of your online accounts.
Now that you’re familiar with recovering with a recovery code, let’s move on to the next method: recovering through your Google Account.
Method 4: Recovering through Google Account
If you have a Google Account connected to your Google Authenticator app, you can use your account to recover the app. Follow these steps to recover Google Authenticator through your Google Account:
- Visit the Google Account recovery page using a web browser on your computer or another device.
- Enter your Google Account email address associated with the Google Authenticator app.
- If you have forgotten your password, click on the “Forgot password?” link and follow the instructions to reset it.
- Follow the on-screen instructions to verify your identity. This may involve answering security questions, entering a verification code sent to your recovery email or phone number, or providing any other necessary information.
- Once you have successfully recovered your Google Account, you can proceed to set up Google Authenticator again on your new device or backup phone.
- Install the Google Authenticator app on your new device or backup phone.
- Open the app and go through the setup process, scanning the QR codes or entering the secret keys provided by the services you wish to enable Google Authenticator for.
- Complete the setup process and start using Google Authenticator to generate login codes for your online accounts.
Recovering through your Google Account provides an additional layer of convenience, especially if you have multiple accounts linked to Google Authenticator. It allows you to regain access to the app without the need for recovery codes or contacting individual service providers.
Remember to keep your Google Account secure by enabling strong passwords, two-factor authentication, and regularly reviewing your account activity. By doing so, you can ensure the integrity and security of your Google Authenticator app and the associated online accounts.
Now that you’re familiar with the recovery method through your Google Account, let’s move on to discussing the advantages and disadvantages of using Google Authenticator.
Advantages and disadvantages of using Google Authenticator
Google Authenticator offers several advantages that make it a popular choice for enhancing the security of online accounts. However, like any authentication method, it also has certain drawbacks. Let’s explore the advantages and disadvantages of using Google Authenticator:
Advantages:
- Increased security: Google Authenticator adds an extra layer of security to your online accounts by generating time-based codes that are difficult for hackers to predict or replicate.
- Offline functionality: The app does not rely on an internet connection to generate codes, making it accessible even in areas with poor connectivity.
- Easy setup: Setting up Google Authenticator is simple and user-friendly, with prompts that guide you through the process of adding your accounts.
- Compatibility: Google Authenticator is compatible with a wide range of services, including popular platforms like Gmail, Facebook, Twitter, and Dropbox.
- No reliance on phone number: Unlike some 2FA methods that use SMS codes, Google Authenticator does not require you to have a functioning phone number, reducing the risk of SIM card hijacking or phone number spoofing attacks.
Disadvantages:
- Device dependency: Google Authenticator is tied to your device, meaning that if you lose or change your device without proper backup measures, you may be locked out of your accounts.
- Limited account recovery: If you lose access to your device and do not have backup options in place, recovering Google Authenticator can be challenging, requiring additional steps like contacting the service provider or Google Account recovery.
- No cross-platform syncing: The codes generated by Google Authenticator are specific to each device, which means you cannot sync your accounts across multiple devices without manually setting them up on each device individually.
- No cloud backup: Google Authenticator does not offer a built-in cloud backup option, so if you lose or break your device without a backup, you may permanently lose access to your accounts unless you have alternative recovery measures in place.
- Code expiration: The time-based codes generated by Google Authenticator have a limited lifespan, usually around 30 seconds. This can sometimes lead to inconvenience when logging in, especially if you are near the end of a code’s validity.
Understanding the advantages and disadvantages of using Google Authenticator can help you make an informed decision when considering it as a two-factor authentication method for securing your online accounts.
Now that we’ve discussed the pros and cons of Google Authenticator, let’s move on to exploring best practices for securing your Google Authenticator and online accounts.
Best practices for securing your Google Authenticator
To ensure the utmost security when using Google Authenticator, it is important to follow some best practices. By implementing these practices, you can enhance the protection of your accounts and maintain the integrity of your Google Authenticator app. Here are some recommendations:
1. Enable Two-Factor Authentication (2FA) on your Google Account:
Extending the security beyond the app itself, enable 2FA on your Google Account. This adds an extra layer of authentication when accessing your Google Account, providing an additional barrier against unauthorized access.
2. Keep your devices secure:
Ensure the devices you use for Google Authenticator are protected with strong passwords, PIN codes, or biometric authentication. Additionally, keep your devices up to date with the latest security patches and avoid jailbreaking or rooting them, as it can weaken the device’s security.
3. Backup your Google Authenticator codes:
Regularly backup the codes or secret keys associated with your Google Authenticator app. This can be done by securely storing the recovery codes provided during the initial setup or using backup features provided by some services. Keeping a backup will enable you to restore your codes if you lose or change your device.
4. Use a secure and reliable device:
Utilize a trusted and reputable device when using Google Authenticator. Avoid using public or unsecured devices to minimize the risk of compromising your codes and account information.
5. Review and revoke unnecessary access:
Periodically review the apps and services connected to your Google Account via Google Authenticator. Remove any unnecessary or unused access permissions to minimize potential security risks.
6. Regularly update and secure your recovery options:
Ensure that your recovery email address and phone number associated with your Google Account are up to date and secure. In case you need to recover your account, having accurate and secure recovery options can help facilitate the process.
7. Use additional security measures:
Consider using additional security measures, such as a password manager, to securely store your login credentials. Using a strong and unique password for each account can further bolster your overall security.
By following these best practices, you can enhance the security of your Google Authenticator app and protect your online accounts from unauthorized access.
Now that we’ve covered the best practices for securing your Google Authenticator, let’s conclude the article.
Conclusion
Securing your online accounts is of paramount importance in today’s digital world, and Google Authenticator provides a reliable and effective way to implement two-factor authentication (2FA). It adds an extra layer of security by generating time-based codes that are difficult for hackers to replicate. While losing access to your Google Authenticator app can be a worrisome situation, there are various methods for recovery.
We discussed several methods for recovering Google Authenticator from a lost phone, including using a backup phone, contacting the service provider, recovering with a recovery code, and recovering through your Google Account. Each method has its own advantages and considerations depending on your specific circumstances.
Google Authenticator offers several advantages, such as increased security, offline functionality, and compatibility with a wide range of services. However, it’s important to keep in mind the device dependency, limited account recovery options, and the need to securely manage recovery codes.
To ensure maximum security, it is recommended to follow best practices for securing your Google Authenticator, including enabling 2FA on your Google Account, keeping your devices secure, backing up your codes, and reviewing and revoking unnecessary access.
In conclusion, Google Authenticator provides a robust and convenient solution for implementing two-factor authentication. By understanding the methods for recovery and implementing best practices for security, you can confidently use Google Authenticator to enhance the protection of your online accounts and maintain the integrity of your digital identity.