Introduction
Welcome to the world of SSDs! If you’ve recently purchased a new SSD for your Windows 10 system, you might be wondering how to partition it effectively. Partitioning your SSD allows you to organize and manage your data more efficiently, leading to improved performance and easier file management.
In this article, we will guide you through the process of partitioning a new SSD in Windows 10. We will cover everything from preparing for partitioning, checking SSD compatibility, and backing up your data, to actually partitioning the SSD using Windows’ built-in Disk Management tool.
Partitioning your SSD is a crucial step, as it allows you to divide the storage space into separate sections called partitions. Each partition behaves as its own independent entity, enabling you to store different types of data, install multiple operating systems, or create a dedicated space for system files and programs.
Before we delve into the details of the partitioning process, it is important to emphasize the significance of preparing your system for this task. Partitioning involves modifying disk structures, and it is always recommended to back up your data before proceeding to avoid any potential data loss. Additionally, ensuring compatibility of your SSD with your Windows 10 system is crucial to ensure a smooth partitioning process.
So, without further ado, let’s begin our journey to partitioning a new SSD in Windows 10. By the end of this article, you’ll have the knowledge and confidence to effectively manage the storage space on your SSD.
Preparing for Partitioning
Before diving into the partitioning process, there are a few crucial steps you need to take to ensure a smooth and successful experience. These steps include checking SSD compatibility, backing up your data, and creating a bootable USB.
The first step is to verify the compatibility of your SSD with your Windows 10 system. SSDs are generally compatible with modern operating systems, but it’s always a good idea to double-check. Consult the manufacturer’s documentation or website for specific information about compatibility with Windows 10.
Once you’ve confirmed SSD compatibility, the next step is to back up your data. Partitioning involves modifying disk structures, and there is always a risk of data loss. Creating a backup ensures that your valuable files and documents are safe in case anything goes wrong during the partitioning process.
There are several options for backing up your data. You can use external hard drives, cloud storage services, or even create a disk image. Choose the method that suits your needs and preferences, and make sure to include all the necessary files and folders.
In addition to backing up your data, it’s also essential to create a bootable USB drive. This will allow you to access advanced troubleshooting options and utilities in case any issues arise during the partitioning process.
To create a bootable USB, you’ll need a blank USB drive and a Windows 10 ISO file. You can download the ISO file from the official Microsoft website or use a third-party tool to create it. Once you have the ISO file, use a tool like Rufus to create the bootable USB drive.
With your SSD compatibility checked, your data backed up, and a bootable USB created, you are now ready to proceed with partitioning your new SSD. In the next section, we will guide you through the necessary steps using Windows’ built-in Disk Management tool.
Checking SSD Compatibility
Before you begin partitioning your new SSD in Windows 10, it is essential to ensure that your SSD is compatible with your system. While SSDs are generally compatible with modern operating systems, performing a compatibility check can help you avoid any potential issues or complications during the partitioning process.
To check the compatibility of your SSD, you can start by consulting the manufacturer’s documentation or visiting their website. Look for information specifically related to your SSD model and its compatibility with Windows 10. The manufacturer may provide notes or compatibility lists that detail the supported operating systems for your SSD.
If you’re unable to find the information you need from the manufacturer, you can also look for user forums, online communities, or tech support websites where others might have shared their experiences with your particular SSD model. These resources can offer valuable insights and feedback from users who have already tested the compatibility of the SSD with Windows 10.
Another helpful resource is Microsoft’s official website, where you can find a list of compatible hardware for Windows 10. Check if your SSD model is listed as a compatible device for Windows 10. If it is, you can proceed with confidence knowing that your SSD is officially supported by the operating system.
Additionally, it’s a good idea to ensure that your Windows 10 system is up to date with the latest updates and drivers. This can help ensure optimal compatibility between your SSD and the operating system. Check for updates through the Windows Update settings and install any available updates for your system.
By performing a thorough compatibility check for your SSD and ensuring that your Windows 10 system is up to date, you can proceed with peace of mind, knowing that your SSD is compatible and ready for partitioning. With compatibility confirmed, you can now move on to the next crucial step, backing up your data.
Backing Up Data
Before you embark on the partitioning process for your new SSD in Windows 10, it is crucial to back up your data. Partitioning involves modifying disk structures, and there is always a risk of data loss. By creating a backup of your important files and documents, you can protect yourself from potential mishaps and ensure that your data remains safe throughout the partitioning process.
There are several methods you can use to back up your data, depending on your preferences and available resources. One option is to use an external hard drive or SSD to create a clone or copy of your entire system. This method provides a complete backup, including the operating system, applications, and files.
Another option is to utilize cloud storage services such as Google Drive, Dropbox, or Microsoft OneDrive. These services offer convenient and secure storage for your files, allowing you to access them from anywhere and ensuring that they are safely backed up in case of any unforeseen issues during partitioning.
If you prefer a more manual approach, you can selectively back up your important documents, photos, videos, and other files to an external storage device or cloud storage. This method allows you to choose specific files and folders to back up, saving time and storage space.
In addition to backing up your personal data, it is important to note that you might need to reinstall certain applications after partitioning your SSD. Make a note of the applications you currently have installed on your system to ensure that you can easily reinstall them later.
Regardless of the method you choose, it is essential to verify that your backup is complete and accessible. Double-check that all of your important files and folders are included in the backup and that you can restore them if needed. This step will give you peace of mind and confidence as you move forward with the partitioning process.
Remember, creating a backup of your data is an essential precautionary measure before partitioning your new SSD in Windows 10. By taking the time to safeguard your valuable files and documents, you can minimize the risk of data loss and ensure a smooth transition to your newly partitioned SSD.
Creating a Bootable USB
Creating a bootable USB drive is an important step when preparing to partition your new SSD in Windows 10. This will enable you to access advanced troubleshooting options and utilities in case any issues arise during the partitioning process.
To create a bootable USB drive, you will need a blank USB drive with sufficient storage capacity and a Windows 10 ISO file. You can obtain the Windows 10 ISO file from the official Microsoft website or use a reliable third-party source.
Once you have the ISO file, you can use a variety of tools to create your bootable USB drive. One popular tool is Rufus, a free and intuitive software that simplifies the process.
Here’s a step-by-step guide to create a bootable USB using Rufus:
- Insert your USB drive into your computer.
- Launch Rufus and select your USB drive from the “Device” dropdown menu.
- Choose the Windows 10 ISO file by clicking the “Select” button next to the “Boot selection” section.
- Ensure that the partition scheme is set to “MBR” (Master Boot Record) if your system uses legacy BIOS, or “GPT” (GUID Partition Table) for UEFI-based systems.
- Leave the other settings at their default values, unless you have specific requirements.
- Click the “Start” button to begin the process. Rufus will format the USB drive and copy the Windows 10 ISO file to create a bootable USB.
Once the process is complete, you will have a bootable USB drive ready for use. Before proceeding with the partitioning of your new SSD, make sure to keep the bootable USB drive in a safe and easily accessible place.
By creating a bootable USB drive, you have an additional layer of security and flexibility during the partitioning process. It allows you to access advanced troubleshooting options and utilities if needed, ensuring a smooth partitioning experience with your new SSD.
Partitioning the SSD
Now that you are prepared with a compatible SSD, have backed up your data, and created a bootable USB drive, it’s time to dive into the partitioning process for your new SSD in Windows 10. Windows provides a built-in tool called Disk Management that allows you to partition your SSD easily.
Follow these steps to partition your SSD:
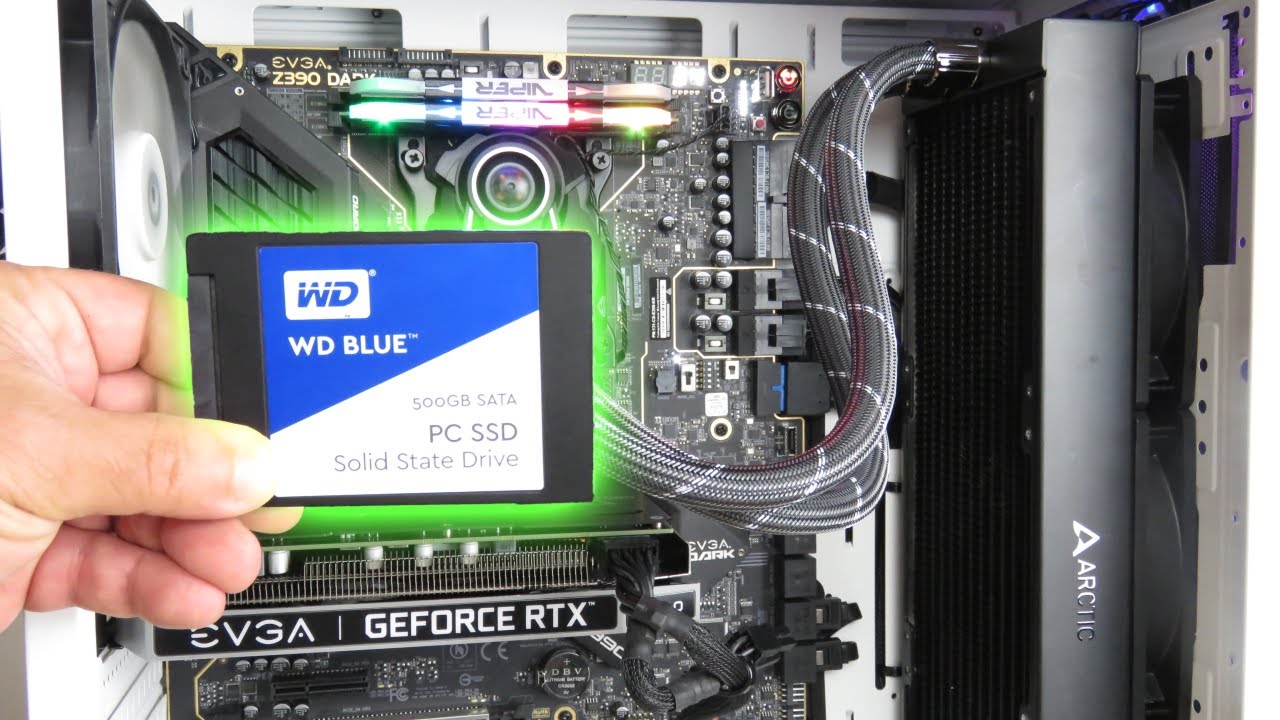
- Connect your new SSD to your computer. Ensure that it is recognized and accessible.
- Open the Windows Start menu and search for “Disk Management”. Click on the “Create and format hard disk partitions” option from the search results.
- In the Disk Management window, locate your SSD. It should be labeled with its total storage capacity.
- Right-click on the SSD and select “Shrink Volume”. This will adjust the existing partition size to create unallocated space that can be used for new partitions.
- In the Shrink dialog, enter the amount of space you want to shrink from the existing partition. This will determine the size of the new partition. Keep in mind that the space is measured in megabytes (MB).
- Click the “Shrink” button to start the shrinking process. Once completed, you will see unallocated space on your SSD.
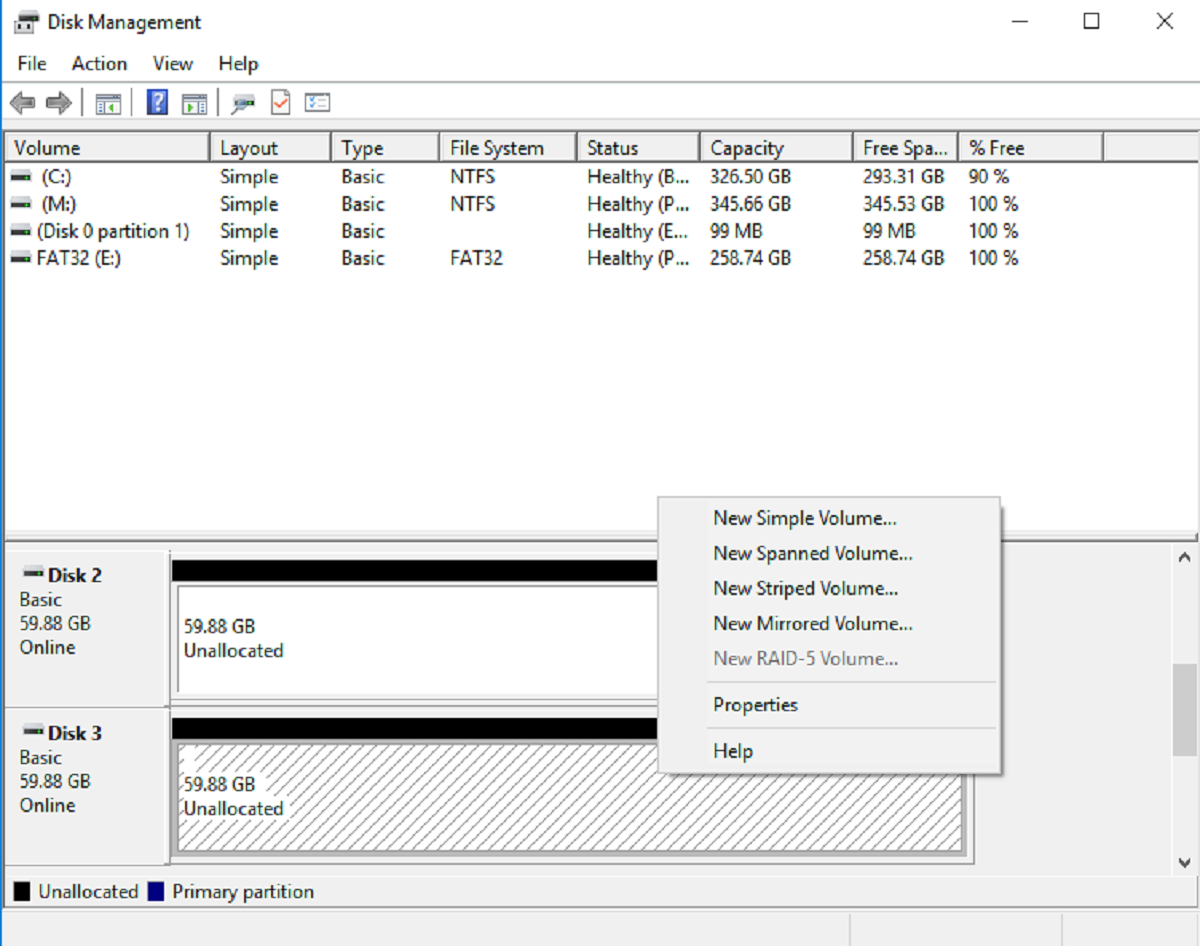
- Right-click on the unallocated space and select “New Simple Volume”. This will launch the New Simple Volume Wizard.
- Follow the prompts in the wizard to specify the size, drive letter, and file system for the new partition. You can choose a drive letter that is not already in use and select the file system as NTFS for optimal compatibility.
- After completing the wizard, the new partition will be created and assigned a drive letter. You can now access and use the partition.
Repeat the above steps if you want to create additional partitions on your SSD. Each partition will have its own allocated space and can be formatted and managed independently.
It is important to note that partitioning your SSD will result in the loss of any data on the drive. Therefore, it is crucial to back up your data before proceeding and ensure that you are partitioning the correct drive.
With the partitioning process complete, you now have a newly partitioned SSD ready to be utilized for your specific needs. The partitions are independent entities, allowing you to organize and store your data more efficiently on your Windows 10 system.
Accessing Disk Management
To begin the partitioning process for your new SSD in Windows 10, you will need to access the Disk Management tool. Disk Management is a built-in utility that allows you to manage and modify disk partitions on your computer.
Follow these steps to access Disk Management:
- Open the Windows Start menu and search for “Disk Management”. Click on the “Create and format hard disk partitions” option from the search results. This will open the Disk Management window.
- In the Disk Management window, you will see a list of all the storage devices connected to your computer, including your new SSD. Each device will be labeled with its total storage capacity.
- Locate your new SSD in the list. It should be displayed with its corresponding drive letter and capacity.
- To view the existing partitions on your SSD, right-click on the SSD and select “Properties”. This will display detailed information about the drive, including the current partition layout and available free space.
Alternatively, you can access Disk Management directly by following this method:
- Press the Windows key + R to open the Run dialog box.
- Type “diskmgmt.msc” into the Run dialog and press Enter. This will open the Disk Management tool directly.
Once you have accessed Disk Management, you can proceed with the partitioning process for your new SSD by following the steps outlined in the previous section.
It’s important to note that you may need administrative privileges to access and make changes in Disk Management. If prompted, provide the necessary permissions to continue.
By accessing Disk Management, you have gained access to a powerful tool that allows you to manage and modify disk partitions on your Windows 10 system. With Disk Management, you can create, delete, resize, and format partitions, all from one convenient interface.
Now that you know how to access Disk Management, you’re one step closer to effectively partitioning your new SSD and taking full control of your storage space in Windows 10.
Shrink the Volume
Before creating new partitions on your new SSD in Windows 10, you need to shrink the existing volume to free up unallocated space. This can be done using the Disk Management tool, allowing you to allocate space for new partitions without affecting the existing data.
Follow these steps to shrink the volume:
- Access the Disk Management tool as described in the previous section.
- In the Disk Management window, locate your SSD with the existing volume you want to shrink. It will be labeled with its drive letter and total storage capacity.
- Right-click on the volume and select “Shrink Volume”. The system will analyze the drive and calculate the maximum amount of space available to shrink.
- In the Shrink dialog box, you will see the total size of the volume and the amount of space that can be shrunk in megabytes (MB).
- By default, the dialog box will show the maximum amount of space available to shrink. However, you can enter a smaller value if desired.
- Review the values and ensure that the space you are shrinking is appropriate for your needs. Keep in mind that this space will become unallocated and can be used for creating new partitions.
- Click the “Shrink” button to start the shrinking process. Windows will adjust the size of the existing volume and create unallocated space.
- After the process is completed, you will see the unallocated space on your SSD. This space is now available for creating new partitions.
It is important to note that the shrinking process may take some time, depending on the size of the volume and the available free space. Be patient and avoid interrupting the process to ensure a successful operation.
By shrinking the existing volume, you have created unallocated space on your SSD that can be used to create new partitions. This will allow you to better organize and manage your data, improving overall performance and storage efficiency.
With the volume shrunk and unallocated space available, you can now proceed to the next steps of creating new partitions using the Disk Management tool.
Create New Partition
After shrinking the volume and generating unallocated space on your new SSD in Windows 10, you can proceed to create new partitions to utilize the available space effectively. The Disk Management tool provides an easy and straightforward method for creating new partitions.
Follow these steps to create a new partition:
- Access the Disk Management tool as described earlier.
- Locate the unallocated space on your SSD. It will be labeled as “Unallocated” and displayed next to your SSD’s drive letter and total storage capacity.
- Right-click on the unallocated space and select “New Simple Volume”. This will launch the New Simple Volume Wizard.
- In the wizard, click the “Next” button to begin the process.
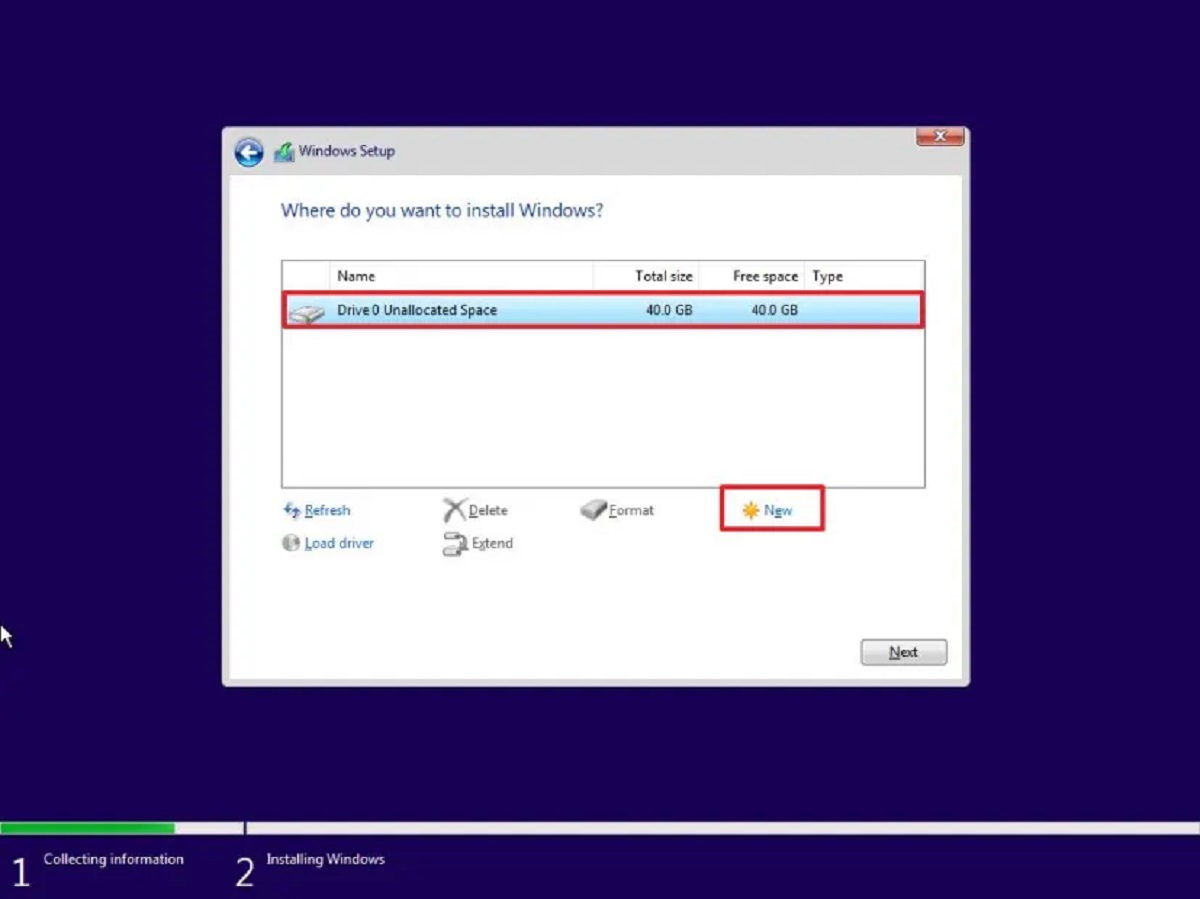
- Specify the size for the new partition. The wizard will show the maximum and default size based on the available unallocated space. You can enter a custom size if desired.
- Assign a drive letter to the partition. Choose a letter that is not currently in use by any other drive on your system.
- Select the file system for the new partition. The default and recommended file system for Windows 10 is NTFS, which provides optimal compatibility and features.
- Enter a volume label for the new partition. This label will be displayed as the name of the partition in Windows Explorer.
- Check the “Perform a quick format” box if desired. This option allows for faster partition formatting but skips the process of scanning the partition for bad sectors.
- Click the “Next” button and review the summary of the new partition settings.
- Click the “Finish” button to create the new partition. The Disk Management tool will format the partition and assign the specified settings.
Once the process is complete, the new partition will be visible in the Disk Management tool, along with its assigned drive letter and file system. You can now start using the new partition to store and organize your data.
Repeat the above steps if you want to create additional partitions using the remaining unallocated space on your SSD.
Creating new partitions allows you to divide your SSD’s storage space into separate sections, enabling more efficient organization and management of your files and data. With the newly created partition, you can now proceed to format it and begin utilizing it according to your requirements.
Assign a Drive Letter
After creating a new partition on your SSD in Windows 10, the next step is to assign a drive letter to the newly created partition. A drive letter is a unique identifier that allows you to access and manage the partition easily through Windows File Explorer or any other file management tool.
Follow these steps to assign a drive letter to the partition:
- Launch the Disk Management tool by following the steps outlined earlier.
- In the Disk Management window, locate the newly created partition. It will be labeled as “New Volume” or “Unallocated”.
- Right-click on the partition and select “Change Drive Letter and Paths” from the context menu.
- In the “Change Drive Letter and Paths” dialog box, click the “Add” or “Change” button.
- In the next dialog box, select the “Assign the following drive letter” option if it is not already selected.
- From the dropdown menu, choose an available drive letter to assign to the partition. Make sure to select a letter that is not currently in use.
- Click the “OK” button to save the changes and assign the drive letter to the partition.
Once you have assigned a drive letter, the partition will be accessible through Windows File Explorer, and you can start using it to store and organize your files and data.
It’s worth noting that you can also change the drive letter of a partition at any time if needed. Simply access the “Change Drive Letter and Paths” dialog box again, select the partition, and choose a new drive letter from the dropdown menu.
Assigning a drive letter to your newly created partition allows for easy identification and access. You can now navigate to the partition using its assigned letter, copy or move files to and from it, and perform various operations on the partition through Windows File Explorer.
With the drive letter assigned, the partition is ready for use, and you can proceed to format it to ensure optimal performance and compatibility.
Formatting the Partition
After creating a new partition on your SSD in Windows 10 and assigning a drive letter to it, the next step is to format the partition. Formatting prepares the partition to store data by establishing a file system and organizing the storage space to ensure optimal performance.
Follow these steps to format the partition:
- Ensure that you have access to the Disk Management tool. If not, refer to the previous sections for instructions on accessing Disk Management.
- In the Disk Management window, locate the newly created partition that you want to format. It should be labeled with the assigned drive letter.
- Right-click on the partition and select “Format” from the context menu.
- In the Format dialog box, you can provide a volume label for the partition. The volume label is an optional name that you can assign to the partition for easy identification.
- Choose the desired file system for the partition. The recommended file system for Windows 10 is NTFS, which provides advanced features and compatibility.
- Ensure that the “Quick Format” option is selected. This option speeds up the formatting process by skipping the scanning for bad sectors, assuming that the disk is new and free from errors.
- Click the “OK” button to begin the formatting process. Windows will erase any existing data on the partition and create the new file system.
- Wait for the formatting process to complete. The duration will depend on the size of the partition and the speed of your SSD.
- Once the formatting is finished, you will receive a notification confirming the successful completion.
After formatting, the partition is ready to be used for storing data. You can now transfer files, install applications, and perform any other file operations on the newly formatted partition.
It’s important to note that formatting erases any existing data on the partition. Therefore, make sure to have a backup of any important files before proceeding with the formatting process.
By formatting the partition, you ensure that the file system is optimized for storing data, enhancing performance, and providing compatibility with Windows 10. With the partition now formatted, you can begin utilizing it for your specific needs and enjoy efficient data storage on your SSD.
Verifying the Partition
After creating and formatting a new partition on your SSD in Windows 10, it is important to verify that the partition has been successfully created and is functioning as intended. Verifying the partition ensures that it is accessible, properly labeled, and ready for use.
Follow these steps to verify the partition:
- Access the Disk Management tool by following the methods mentioned earlier.
- In the Disk Management window, locate the newly created partition. It should now be labeled with the assigned drive letter and the volume label, if you had provided one during the formatting process.
- Right-click on the partition and select “Properties” from the context menu to open the Properties dialog box.
- In the Properties dialog box, navigate through the different tabs to review the details of the partition. This includes information such as the file system used, the total capacity, and the amount of free space available.
- Verify that the partition displays the correct label and assigned drive letter. If you had set a volume label during formatting, ensure that it appears correctly.
- Click the “OK” button to close the Properties dialog box.
- Open Windows File Explorer, and navigate to the newly created partition by selecting it from the left sidebar under the “This PC” section.
- Confirm that you can access the partition and that you can perform basic file operations such as creating folders, copying files, and deleting files.
- As an additional verification step, you can transfer a small test file to the partition and then retrieve or modify it to ensure that changes are saved successfully.
Verifying the partition ensures that it has been created correctly and is functioning as expected. It allows you to confirm that the partition is accessible, properly labeled, and ready to be used for your data storage needs.
If you encounter any issues during the verification process, double-check your steps to ensure that you have followed the instructions correctly. If problems persist, you may need to troubleshoot further or seek expert assistance.
By verifying the partition, you can have peace of mind knowing that your new partition on the SSD is ready to store and organize your data efficiently in Windows 10.
Conclusion
Congratulations! You have successfully partitioned your new SSD in Windows 10. By following the steps outlined in this guide, you have transformed your SSD into a more organized and efficient storage solution. Partitioning allows you to divide the storage space into separate sections, giving you the freedom to store different types of data and optimize your system’s performance.
Remember, before starting the partitioning process, it is essential to check the compatibility of your SSD with Windows 10 and to back up your data to ensure its safety. Creating a bootable USB drive adds an extra layer of security, granting you access to troubleshooting options in case any issues arise.
Through Disk Management, you were able to shrink the volume, create new partitions, assign drive letters, and successfully format them. Verifying the partition ensured that everything was set up correctly and functional.
Now that your SSD is partitioned, you can start taking advantage of the benefits. Utilize the partitions to organize your files, separate operating systems, or create dedicated spaces for system files and programs. Remember to maintain regular backups of your important data to prevent any potential loss.
Partitioning your new SSD in Windows 10 has made it easier for you to manage your data, improve performance, and maintain an efficient file system. Enjoy the enhanced storage capabilities that your newly partitioned SSD provides!