Why Use Terminal on Chromebook
The Terminal on Chromebook may seem intimidating at first, but it can be a powerful tool for both beginners and advanced users. Here are a few reasons why you might want to use the Terminal on your Chromebook:
- Customization: The Terminal allows you to personalize your Chromebook experience by modifying system settings, installing custom themes, and tweaking various aspects of the operating system.
- Advanced Tasks: With the Terminal, you can perform advanced tasks such as script automation, network diagnostics, software development, and system administration. It provides a wide range of tools and utilities that can help you achieve these tasks efficiently.
- Access to Linux: By enabling Linux (Beta) on your Chromebook, you can unlock the full potential of the Terminal. Linux compatibility brings an ecosystem of powerful command-line tools, software packages, and development environments to your Chromebook.
- Educational Purposes: If you’re a student or a tech enthusiast, learning how to use the Terminal can enhance your understanding of operating systems, command-line interfaces, and programming concepts. It opens up a whole new world of possibilities for experimentation and learning.
The Terminal provides a gateway to a vast array of features and capabilities that go beyond what the Chrome OS interface offers. It empowers users to take control of their Chromebook and explore the limitless potential that lies beneath the surface.
Enabling Developer Mode
In order to access and use the Terminal on your Chromebook, you first need to enable Developer Mode. Follow these steps to enable Developer Mode on your Chromebook:
- Backup Your Data: Before proceeding, ensure that you have backed up all important files and data on your Chromebook, as enabling Developer Mode will wipe all local data.
- Turn Off Your Chromebook: Completely power off your Chromebook by holding down the power button or selecting “Shut down” from the menu.
- Enter Recovery Mode: Once your Chromebook is turned off, press and hold the Esc and Refresh keys simultaneously, then press the Power button to turn it back on. Release all three keys once you see the recovery screen.
- Enable Developer Mode: On the recovery screen, press Ctrl + D to bring up the “OS verification is off” message. Press Enter to confirm and enable Developer Mode. Your Chromebook will then reboot and prompt you to follow the setup process again.
- Wait for Developer Mode to Enable: Your Chromebook will go through a process of enabling Developer Mode, which may take several minutes. During this process, your Chromebook will display a warning screen indicating that Developer Mode has been enabled.
- Set Up Your Chromebook: Once Developer Mode has been enabled, you will need to go through the initial setup process again. Follow the on-screen instructions to configure your Chromebook.
After completing these steps, you will have successfully enabled Developer Mode on your Chromebook. This will unlock additional features and functionalities, including the ability to use the Terminal.
It’s worth mentioning that enabling Developer Mode may void your warranty and expose your device to potential security risks. Therefore, it’s important to exercise caution and consider the implications before proceeding with this process.
Installing and Running Linux (Beta)
To fully unlock the capabilities of the Terminal on your Chromebook, you can install and run Linux (Beta), which brings the power and flexibility of a Linux operating system to your device. Here’s how you can do it:
- Enable Linux (Beta): Open the Settings on your Chromebook and navigate to the “Linux (Beta)” section. Click on the “Turn On” button to enable Linux (Beta) support on your device. Follow the on-screen prompts to set up the Linux container.
- Install Linux: Once Linux (Beta) is enabled, click on the “Install” button to download and install the necessary files. This may take some time, depending on your internet speed and system specifications.
- Launch Linux: After the installation is complete, you can open the Terminal by clicking on the “Linux (Beta)” app in your app launcher. This will launch a Linux virtual machine on your Chromebook.
- Set Up Linux: The first time you launch Linux, you will be prompted to set up your Linux username and password. Follow the instructions to create your Linux user account.
- Update Linux: Once you have set up your Linux user account, it’s important to update the Linux distribution by running the following command in the Terminal:
sudo apt update && sudo apt upgrade. This will ensure that you have the latest security updates and software packages.
With Linux (Beta) installed and running on your Chromebook, you can now leverage the full power of the Terminal and access a wide range of Linux tools, utilities, and software packages. This opens up endless possibilities for developers, system administrators, and Linux enthusiasts.
It’s worth noting that Linux (Beta) is still in development and may have some limitations or compatibility issues with certain hardware and software. However, Google continues to improve and refine the Linux support on Chromebooks with regular updates.
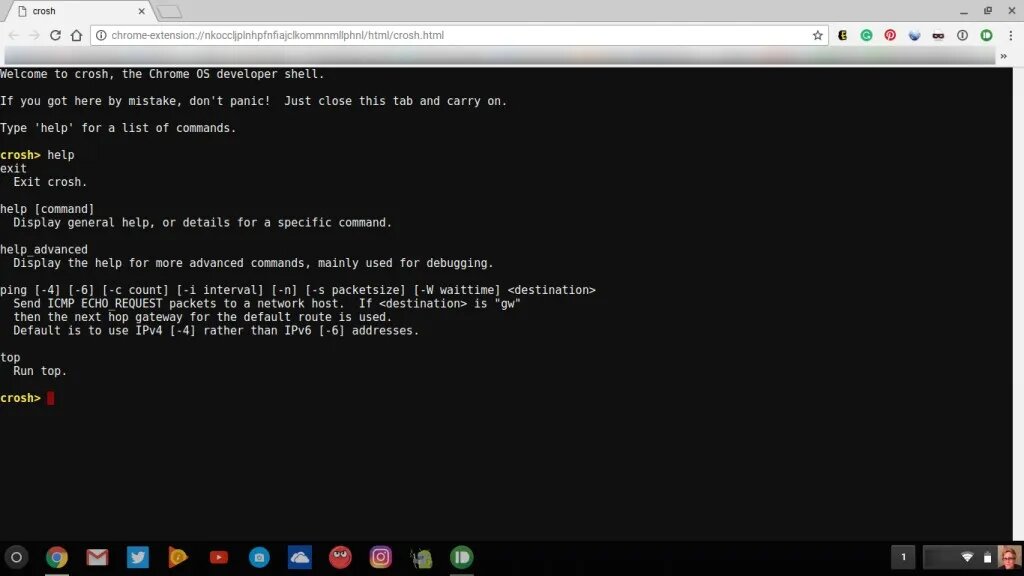
Opening Terminal on Chromebook
Once you have enabled Developer Mode and installed Linux (Beta) on your Chromebook, you can easily open the Terminal and start utilizing its powerful command-line interface. Here’s how:
- Launch the Terminal: Open the app launcher on your Chromebook by clicking on the circular icon in the bottom-left corner of the screen. Type “Terminal” in the search bar and select the Terminal app from the search results.
- Terminal Interface: Once the Terminal opens, you will see a command-line interface where you can type commands and interact with the system. The Terminal will open in the Linux container you set up earlier when enabling Linux (Beta).
- Customize Your Terminal: You can customize the appearance and behavior of the Terminal by accessing the settings menu. Right-click anywhere in the Terminal window and select “Preferences.” Here, you can change the font, color scheme, cursor style, and more.
- Basic Navigation: Familiarize yourself with basic navigation commands to move around the file system in the Terminal. For example, you can use the
cdcommand to change directories and thelscommand to list the contents of a directory. - Execute Commands: Use the Terminal to execute a wide range of commands and perform various tasks. From simple file operations and system configuration to more advanced programming and development tasks, the Terminal is a versatile tool that allows you to control your Chromebook.
Opening the Terminal on your Chromebook gives you direct access to the underlying Linux system. It empowers you to execute commands, install software, troubleshoot issues, and accomplish tasks that may not be possible through the regular Chrome OS interface alone.
Remember to exercise caution when using the Terminal, as executing incorrect commands or modifying system files without proper knowledge can lead to unintended consequences. It’s always a good practice to research commands and seek guidance if you are unsure about a specific action in the Terminal.
Basic Terminal Commands
Using the Terminal on your Chromebook opens up a world of possibilities for executing commands and performing various tasks. Here are some basic Terminal commands that can help you navigate and interact with the system:
- cd: Change the current directory. For example,
cd Documentswill navigate to the “Documents” directory. - ls: List the contents of the current directory.
ls -lprovides a detailed view, whilels -ashows hidden files as well. - pwd: Display the present working directory, which shows the path to the current directory.
- mkdir: Create a new directory. For example,
mkdir Projectswill create a directory named “Projects”. - touch: Create a new empty file. For example,
touch script.shwill create a shell script file named “script.sh”. - cp: Copy files and directories. For example,
cp file.txt /path/to/destinationwill copy “file.txt” to the specified destination. - mv: Move or rename files and directories. For example,
mv file.txt newname.txtwill rename “file.txt” to “newname.txt”. - rm: Remove files and directories. Use with caution, as this command permanently deletes files. For example,
rm file.txtwill delete “file.txt”. - cat: Output the contents of a file. For example,
cat file.txtwill display the content of “file.txt” in the Terminal. - grep: Search for a specific pattern or word in a file. For example,
grep "keyword" file.txtwill search for “keyword” in the file and display matching lines.
These are just a few examples of basic Terminal commands. Exploring and practicing using these commands will improve your familiarity and confidence in using the Terminal on your Chromebook.
Remember to consult the manual pages or online resources for more detailed information about each command. You can access the manual pages by typing man [command] in the Terminal.
Advanced Terminal Commands
Once you have mastered the basic Terminal commands, you can move on to more advanced commands that offer increased functionality and efficiency. Here are some examples of advanced Terminal commands to explore on your Chromebook:
- find: Search for files or directories based on various criteria. For example,
find /path/to/search -name "*.txt"will find all files with a “.txt” extension in the specified path. - grep: Use more advanced options with the grep command to search for specific patterns with greater precision. Experiment with options like case-insensitive searches (-i), displaying line numbers (-n), and searching recursively in directories (-r).
- sudo: Execute a command with elevated privileges. This command is used when you need administrative rights to perform certain operations. Use it with caution, as it grants you access to system-level actions.
- chmod: Change file permissions. This command allows you to modify the read, write, and execute permissions of files and directories. The chmod command often uses symbolic notation or octal values to specify permissions.
- tar: Create compressed archive files or extract files from an existing archive. The tar command is commonly used to package and compress multiple files into a single archive for storage or distribution.
- ssh: Securely connect to remote systems using the Secure Shell protocol. The ssh command allows you to access and manage remote machines using command-line interfaces, facilitating remote administration and file transfers.
- rsync: Synchronize files and directories between different locations. The rsync command efficiently transfers only the differences between source and destination, making it an excellent choice for backups and file synchronization.
- top/htop: Monitor system resource usage in real-time. The top and htop commands display a dynamic overview of CPU usage, memory usage, running processes, and other system information.
These are just a few examples of advanced Terminal commands that offer powerful capabilities. As you become more comfortable with the Terminal, exploring and experimenting with advanced commands will expand your proficiency and enable you to accomplish more complex tasks.
Remember to consult the manual pages or online resources for detailed information about each command, including their various options and usage scenarios.
Tips and Troubleshooting
While using the Terminal on your Chromebook, you may encounter certain challenges or have questions about optimizing your experience. Here are some tips and troubleshooting suggestions to help you navigate any roadblocks:
- Backup Your Data: Before making any major system changes or experimenting with advanced commands, always back up your important data to prevent any potential loss.
- Update Your System: Regularly update your Chromebook’s operating system, Linux (Beta), and installed software packages to ensure you have the latest security patches and bug fixes.
- Use Tab Completion: Take advantage of the tab completion feature by pressing the Tab key while typing commands. It saves time by automatically completing file or directory names and helps avoid typographical errors.
- Search Online Resources: If you encounter an error or need help with a specific command, search online forums, documentation, or community resources for solutions and guidance. Often, someone else has encountered a similar issue and found a solution.
- Read the Manual Pages: Use the
mancommand followed by the command name to access the manual pages and learn more about specific commands, their options, and proper usage. - Experiment in a Safe Environment: If you’re unsure about a command or its potential impact, test it in a controlled environment first. Create a separate directory or use a virtual machine to minimize the risk of unintended consequences.
- Practice Regularly: Familiarity with the Terminal comes with practice. Spend time exploring and experimenting with different commands to build your confidence and proficiency in using the command-line interface.
- Join Online Communities: Engage with online communities, forums, or social media groups dedicated to Chromebooks, Linux, or Terminal usage. These communities can provide valuable insights, tips, and troubleshooting assistance.
Remember, the Terminal is a powerful tool, but it also carries certain risks. Always exercise caution when executing commands, especially those with potential system-wide effects or that modify critical files.
Finally, don’t hesitate to seek professional help or consult official documentation if you encounter complex issues or require specialized assistance. Chromebook support forums and official documentation can provide valuable insights specific to your device and operating system.
Conclusion
The Terminal on your Chromebook is a gateway to a world of possibilities, allowing you to customize your experience, perform advanced tasks, and unlock the power of Linux. By enabling Developer Mode and installing Linux (Beta), you gain access to a command-line interface that empowers you to take control of your Chromebook’s capabilities.
From basic commands for navigation, file manipulation, and system management to more advanced commands for searching, scripting, and networking, the Terminal provides a versatile platform for executing tasks efficiently. It opens up opportunities for customization, learning, and development, making it a valuable tool for both beginners and experienced users.
As you delve into the world of the Terminal, remember to exercise caution, back up your data, and stay informed about any potential risks or limitations. Regularly update your system, consult documentation and online resources, and engage with a supportive community to enhance your understanding and troubleshoot any challenges you encounter.
Whether you’re a developer, a student, or a tech enthusiast, embracing the Terminal on your Chromebook can enhance your productivity, expand your skillset, and unlock new possibilities. So, take the plunge, embrace the power of the Terminal, and embark on an exciting journey of exploration and growth on your Chromebook.