Introduction
Welcome to our guide on how to move a game from a hard drive to an SSD! As gaming technology progresses, it’s becoming more common for gamers to seek faster and more efficient ways to store and access their games. This is where Solid State Drives (SSDs) come into play. With their high transfer speeds and rapid data access, SSDs have become a popular choice for gamers looking to optimize their gaming experience.
By moving a game from a traditional hard drive to an SSD, you can significantly reduce loading times, improve overall performance, and enhance your gaming experience. Imagine seamlessly navigating through immersive virtual worlds without frustrating lags or delays. With the right knowledge and steps, you can easily transfer your favorite games to an SSD and reap the benefits of faster loading times and smoother gameplay.
During this guide, we will walk you through the step-by-step process of moving a game from a hard drive to an SSD. Whether you’re a casual gamer looking to improve your experience or a hardcore enthusiast seeking maximum performance, this guide is designed to help you achieve your goal.
Before we dive into the details, it’s important to note that SSDs come in various storage capacities. Ensure that your SSD has enough space to accommodate the game you want to transfer. Additionally, make sure you have a backup of your game files before proceeding with the transfer. Now, let’s get started on this exciting journey of optimizing your gaming setup!
Benefits of Moving a Game from a Hard Drive to SSD
Moving a game from a hard drive to an SSD offers several significant benefits that can enhance your gaming experience. Here are some of the key advantages:
- Improved Loading Times: One of the most significant advantages of using an SSD for gaming is the remarkable reduction in loading times. Traditional hard drives have mechanical components that can slow down data access, resulting in longer loading screens. SSDs, on the other hand, have no moving parts, allowing for lightning-fast data retrieval. This means you can launch your favorite games and load new levels or areas in a matter of seconds, providing a more seamless and immersive gaming experience.
- Enhanced Performance: SSDs offer faster read and write speeds compared to traditional hard drives. This improved performance not only reduces loading times but also contributes to smoother gameplay. In open-world games or games with large environments, an SSD can eliminate stutters and lag that may occur when the game fetches data from the storage device. This ensures a more responsive and fluid gaming experience, allowing you to fully enjoy graphically demanding games without performance hiccups.
- Reduced Input Lag: When you’re engrossed in a fast-paced multiplayer game, every millisecond counts. By transferring your game to an SSD, you can minimize input lag, ensuring quick and accurate response times. SSDs have faster data transfer rates, allowing your game to access vital information and respond to your commands more rapidly. Whether you’re competing against other players online or engaged in intense combat, reduced input lag can give you a competitive edge.
- Quieter and Cooler Gaming Experience: Traditional hard drives generate noise and heat due to their moving parts. SSDs, however, operate silently as they have no mechanical components. This leads to a quieter gaming environment where you can focus on the immersive audio and gameplay experience. Additionally, SSDs produce less heat, keeping your gaming setup cooler. This is especially beneficial for those who have compact gaming systems with limited airflow.
- Efficient File Management: SSDs offer faster file indexing and searching capabilities. This means that scans for game updates, patches, and mods can be performed more quickly. Organizing and managing your game files becomes easier and more efficient, enabling you to spend less time searching through directories and more time enjoying your favorite games.
Moving a game from a hard drive to an SSD provides tangible benefits that can enhance your overall gaming experience. From improved loading times and performance to reduced input lag and a quieter gaming environment, the advantages of using an SSD are hard to overlook. Now that you’re aware of how it can optimize your gaming setup, let’s move on to the step-by-step guide on transferring your game to an SSD.
Step-by-Step Guide: How to Move a Game from Hard Drive to SSD
If you’re ready to optimize your gaming experience by moving a game from a hard drive to an SSD, follow these step-by-step instructions:
- Determine which game to transfer: Start by deciding which game you want to move to your SSD. It’s recommended to choose a game that requires frequent loading or has long loading times, as these will benefit the most from the faster transfer speeds of an SSD.
- Check the available storage space on your SSD: Ensure that your SSD has enough storage space to accommodate the game you want to transfer. You can check the available space by opening File Explorer (Windows) or Finder (Mac) and viewing the properties of your SSD.
- Backup your game files: Before proceeding with the transfer, it’s essential to create a backup of your game files. This will protect your progress and settings in case anything goes wrong during the transfer process. Copy the game folder to an external hard drive or another location on your computer.
- Uninstall the game from your hard drive: Open the game’s installation folder on your hard drive and locate the uninstallation file. Run the uninstaller and follow the prompts to remove the game from your hard drive. Alternatively, you can uninstall the game through the Control Panel (Windows) or Applications (Mac).
- Install the game on your SSD: If you haven’t already done so, install the game on your SSD. Insert the game installation disc or download the game from the appropriate digital distribution platform. During the installation process, ensure that you select the destination folder as your SSD.
- Transfer the game files to the SSD: Navigate to the backup folder you created earlier and copy the game files. Paste them into the appropriate folder on your SSD. This step may take some time, depending on the size of the game and the transfer speed of your SSD.
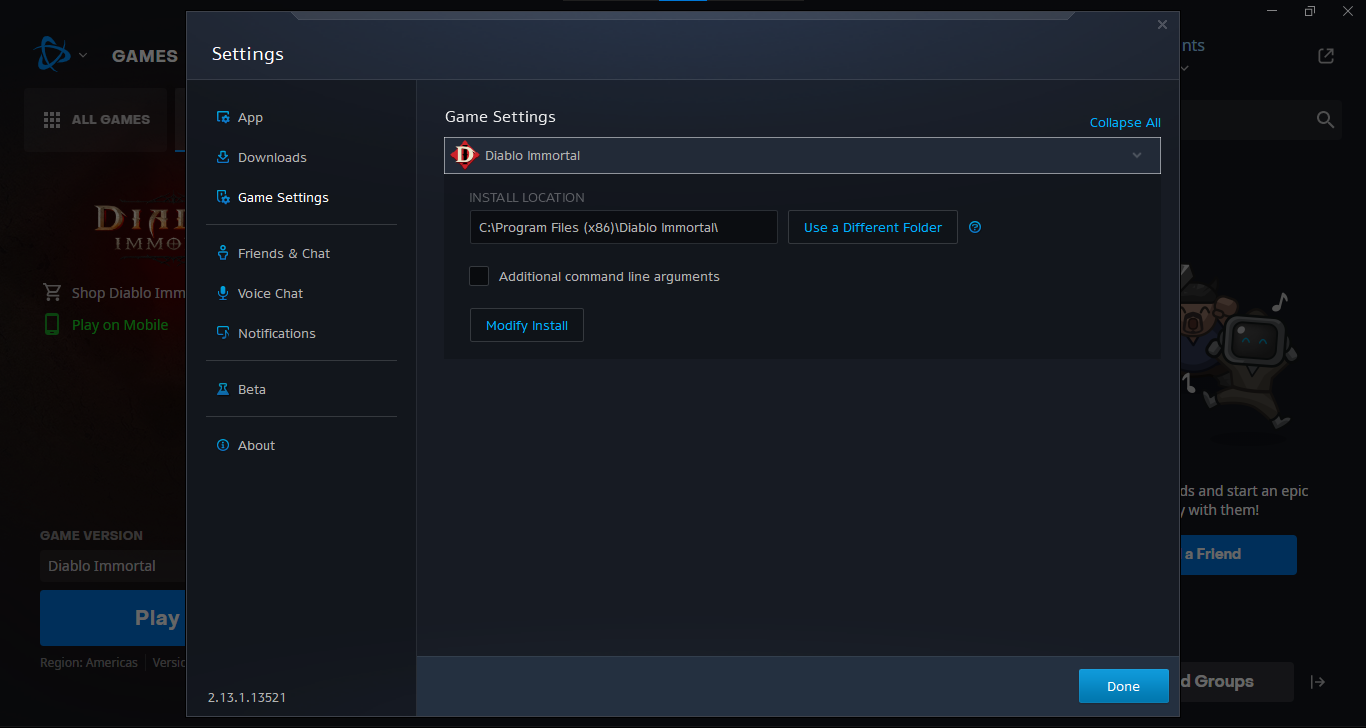
- Update the game’s installation path: Open the game launcher or settings and update the installation path to the new location on your SSD. This ensures that the game knows where to find the necessary files for launching and gameplay.
- Test the game on your SSD: Launch the game from your SSD and ensure that it runs smoothly without any issues. Play through different levels or areas to verify that the transfer was successful and that the game performs better on the SSD.
By following these step-by-step instructions, you can seamlessly move a game from your hard drive to an SSD, taking full advantage of the faster loading times, improved performance, and other benefits offered by SSDs. Now, you’re ready to enjoy an optimized gaming experience like never before!
Determine which game to transfer
When it comes to moving a game from a hard drive to an SSD, the first step is to decide which game you want to transfer. While you may be tempted to move all of your games to the SSD, it’s important to consider the available storage space on your SSD.
Start by identifying a game that will benefit the most from the faster loading times and improved performance offered by an SSD. Consider games that have long loading screens or frequent level transitions. These types of games tend to benefit the most from the faster transfer speeds of an SSD.
Additionally, take into account the size of the game. Some games can take up a significant amount of storage space, so ensure that your SSD can accommodate the game you want to transfer. You can check the available storage space on your SSD by opening File Explorer (Windows) or Finder (Mac) and viewing the properties of your SSD. Make sure you have enough free space to accommodate your chosen game.
If you’re having trouble deciding which game to transfer, consider analyzing your gaming habits. Which games do you play the most frequently? Which games have the longest loading times? By prioritizing the games that you play the most or those that have the biggest impact on your gaming experience, you can ensure that you derive the most benefit from the transfer process.
It’s worth noting that you’re not limited to transferring a single game. If you have enough storage space on your SSD, you can transfer multiple games to reap the benefits of faster loading times and improved performance across all of them.
Once you’ve determined the game or games you want to transfer, you’re ready to move on to the next step of the process: checking the available storage space on your SSD.
Check the available storage space on your SSD
Before transferring a game from a hard drive to an SSD, it’s crucial to ensure that your SSD has enough available storage space to accommodate the game. Checking the available storage space on your SSD is a simple process that will help you determine whether or not you have sufficient capacity for the transfer.
To check the available storage space on your SSD, follow these steps:
- Open File Explorer (Windows) or Finder (Mac) on your computer.
- Navigate to the location where your SSD is listed.
- Right-click on the SSD and select “Properties” (Windows) or press Command + I (Mac) to view the properties of your SSD.
- Within the properties window, you will see the total capacity of your SSD as well as the amount of free space available.
Take note of the free space on your SSD. Ensure that you have enough available storage to accommodate the game you want to transfer. Keep in mind that some games can be large in size, especially with high-quality graphics and expansive worlds.
If you find that your SSD doesn’t have enough available space, you have a few options. Firstly, you can consider transferring a smaller game or freeing up space on your SSD by deleting unnecessary files or uninstalling unused applications. Another option is to upgrade to a larger capacity SSD, allowing you to transfer and store more games.
It’s important to have enough free space on your SSD to ensure optimal performance. If your SSD is near its storage capacity, it can impact its overall speed and potentially cause issues during the transfer process. Aim to have at least 20% of your SSD’s capacity as free space for optimal performance.
Once you have confirmed that you have enough available storage space on your SSD, you’re ready to move on to the next step: backing up your game files before the transfer.
Backup your game files
Before proceeding with the transfer of a game from a hard drive to an SSD, it’s crucial to create a backup of your game files. This ensures that your progress, settings, and any additional data associated with the game are protected in case anything goes wrong during the transfer process.
Follow these steps to backup your game files:
- Locate the game folder on your hard drive. The game folder is usually located in the “Program Files” or “Program Files (x86)” directory.
- Copy the entire game folder and paste it into a separate location, such as an external hard drive or a different folder on your computer. To copy the folder, right-click on it and select “Copy”. Then, navigate to the desired backup location and right-click and select “Paste”.
The time it takes to complete the backup process will depend on the size of the game and the speed of your hard drive. Larger games may take longer to copy.
By creating a backup of your game files, you can have peace of mind knowing that your progress, settings, and any customizations you’ve made will be preserved. In the event that something unexpected happens during the transfer process, you can easily restore your game to its previous state using the backup.
Please note that the backup will only encompass the game files and any associated data stored within the game folder. If your game has additional files or saves data located outside of the game folder, it’s recommended to back those up as well to ensure a complete backup of your game.
Once you have successfully created a backup of your game files, you’re ready to move on to the next step: uninstalling the game from your hard drive.
Uninstall the game from your hard drive
After creating a backup of your game files, the next step in transferring a game from a hard drive to an SSD is uninstalling the game from your hard drive. This process ensures that all the necessary files are removed from the hard drive, making way for a clean installation on the SSD.
To uninstall the game from your hard drive, follow these steps:
- Open the game’s installation folder on your hard drive. You can typically find this folder in the “Program Files” or “Program Files (x86)” directory.
- Look for an uninstallation file within the game folder. The file is often named “uninstall.exe” or “uninstall.msi”.
- Double-click on the uninstallation file to initiate the uninstallation process.
- Follow the prompts provided by the uninstaller to uninstall the game from your hard drive. The exact steps may vary depending on the game and its uninstallation process.
If you are unable to locate an uninstallation file within the game folder, you can also uninstall the game through the Control Panel (Windows) or the Applications folder (Mac). Here’s how:
- On Windows, go to the Control Panel and click on “Programs” or “Programs and Features”. Find the game in the list of installed programs, select it, and click “Uninstall”.
- On Mac, open the Applications folder, find the game icon, and drag it to the Trash. Then, right-click on the Trash and select “Empty Trash” to completely remove the game from your system.
It’s important to ensure that the game is completely uninstalled from your hard drive. Leaving any remnants of the game behind may lead to conflicts or issues when reinstalling it on the SSD.
Once you have successfully uninstalled the game from your hard drive, you’re ready to move to the next step: installing the game on your SSD.
Install the game on your SSD
With the game successfully uninstalled from your hard drive, the next step in transferring a game from a hard drive to an SSD is installing the game on your SSD. This will ensure that the game is properly installed in the new location, ready for optimal performance and faster loading times.
To install the game on your SSD, follow these steps:
- Insert the game installation disc into your computer’s disc drive, or if you downloaded the game from a digital distribution platform, locate the game installer file on your computer.
- Run the game installer by double-clicking on the installation file.
- Follow the prompts provided by the installer to proceed with the game installation. Make sure to carefully review and select the appropriate options, such as the installation location.
- When prompted to choose the installation location, browse for and select the folder on your SSD where you want to install the game. It’s crucial to select the correct destination folder on your SSD to ensure that the game is installed in the desired location.
- Continue through the installation process, following any additional prompts or instructions provided by the installer.
- Once the installation is complete, ensure that the game is installed correctly by verifying the installation directory on your SSD.
It’s important to note that during the installation process, you must choose the correct folder on your SSD to install the game. This ensures that the game files are placed in the appropriate location for optimal performance. Take care to select the SSD as the destination drive and choose a folder that makes sense for organization and ease of access.
If you already have the game installer on your computer and it allows you to choose the installation location, make sure to browse for and select the folder on your SSD where you want to install the game.
Once the game is successfully installed on your SSD, you’re ready to move to the next step: transferring the game files to the SSD.
Transfer the game files to the SSD
After installing the game on your SSD, the next step in transferring a game from a hard drive to an SSD is to transfer the actual game files from your backup to the SSD. This step ensures that all the necessary game data is in the correct location on your SSD for smooth gameplay and improved performance.
Follow these steps to transfer the game files to the SSD:
- Navigate to the folder where you created a backup of your game files.
- Copy the entire game folder by right-clicking on it and selecting “Copy”.
- Navigate to the installation directory of the game on your SSD.
- Paste the copied game folder into the appropriate location on your SSD by right-clicking and selecting “Paste”.
- Depending on the size of the game folder and the speed of your SSD, the transfer process may take some time to complete. Be patient and allow the files to copy over completely.
Make sure to copy the entire game folder rather than individual files. This ensures that all necessary game files, including assets, saves, and configuration files, are transferred to the correct location on your SSD.
Keep in mind that larger games may take longer to transfer, so it’s important to have sufficient time and patience during this step. The transfer speed will also depend on the read and write speeds of your SSD.
Once the transfer is complete, you will have successfully moved the game files to your SSD. The game is now ready to be played from your SSD, offering faster loading times and improved performance compared to the previous installation on your hard drive.
Next, proceed to the next step: updating the game’s installation path to reflect the new location on your SSD.
Update the game’s installation path
After transferring the game files to your SSD, it’s essential to update the game’s installation path to reflect the new location on your SSD. This step ensures that the game’s launcher or executable knows where to find the necessary files for launching and gameplay.
To update the game’s installation path, follow these steps:
- Launch the game’s launcher or executable file.
- Look for any settings or options related to the game’s installation or file paths. This can typically be found in the game’s settings menu or launcher options.
- Locate the field or option that specifies the installation path of the game.
- Edit the installation path by selecting the new location on your SSD where the game is now installed.
- Save the changes and exit the settings or options menu.
It’s important to select the correct installation path on your SSD to ensure that the game can locate and access the required files. Be careful not to accidentally select the old installation path on your hard drive.
If you’re unsure about how to update the installation path, consult the game’s documentation or online support resources. Additionally, you can reach out to the game’s developer or community for assistance.
Once you have successfully updated the game’s installation path, the game is now fully configured to run from your SSD. You’re almost ready to start playing your favorite game with faster load times and improved performance.
Now, proceed to the final step: testing the game on your SSD to ensure everything is working correctly.
Test the game on your SSD
After completing the transfer of the game to your SSD and updating the installation path, it’s crucial to test the game to ensure that everything is working correctly. Testing the game on your SSD allows you to verify that the transfer was successful and that the game is running smoothly, benefiting from the faster loading times and improved performance of the SSD.
Follow these steps to test the game on your SSD:
- Launch the game from your SSD using the game’s launcher or executable file.
- Pay attention to the loading times as the game initializes. With the game now running from your SSD, you should notice significantly faster loading times compared to the previous installation on your hard drive.
- Play through various levels or areas of the game to test its performance. Keep an eye out for any stutters, lags, or other performance issues that were present in the previous installation on the hard drive. With the faster transfer speeds and improved performance of the SSD, these issues should be reduced or eliminated.
- Observe the responsiveness and smoothness of the gameplay. With the game files stored on the SSD, you should experience improved overall performance, reduced input lag, and a more fluid gaming experience.
- Monitor the temperatures of your SSD during gameplay. SSDs generally run cooler than traditional hard drives. If you notice significantly lower temperatures on your SSD, this is a positive indicator of the efficient heat management of SSDs.
By thoroughly testing the game on your SSD, you can ensure that the transfer process was successful and that you’re now benefiting from the faster loading times and improved performance. Any issues or discrepancies that arise during testing can be addressed, and appropriate troubleshooting steps can be taken to rectify them.
If you encounter any issues or notice unexpected behavior during gameplay, check the game’s support resources or reach out to the game’s developer or community for assistance. They may be able to provide guidance or troubleshooting steps specific to your game.
Once you are satisfied with the performance and functionality of the game on your SSD, congratulations! You have successfully moved the game from your hard drive to an SSD, optimizing your gaming experience.
Feel free to repeat this process for other games you want to transfer to your SSD, maximizing the benefits of faster loading times and improved performance across your gaming library.
Conclusion
Moving a game from a hard drive to an SSD can greatly enhance your gaming experience, providing faster loading times, improved performance, reduced input lag, and a more efficient file management system. By following the step-by-step guide outlined in this article, you can successfully transfer a game to an SSD and reap the benefits it offers.
We began by discussing the benefits of moving a game to an SSD, including improved loading times, enhanced performance, reduced input lag, a quieter gaming experience, and efficient file management. These advantages make the process of transferring a game to an SSD well worth the effort.
Next, we provided a thorough step-by-step guide on how to move a game from a hard drive to an SSD. We walked you through determining which game to transfer, checking the available storage space on your SSD, backing up your game files, uninstalling the game from your hard drive, installing the game on your SSD, transferring the game files to the SSD, updating the game’s installation path, and finally, testing the game on your SSD to ensure everything is working optimally.
Throughout this guide, we emphasized the importance of careful preparation and following each step in the process to ensure a successful transfer. Additionally, we encouraged you to seek support or guidance from the game’s developer or community if any issues arise during the transfer or testing process.
By moving your games to an SSD, you can unlock a new level of performance and enjoyment in your gaming sessions. With faster loading times, improved responsiveness, and smoother gameplay, the benefits are undeniable. So, take the leap and transfer your favorite game to an SSD today to experience gaming at its best!


