Introduction
Mounting a monitor without VESA compatibility can be a challenge for many users. VESA (Video Electronics Standards Association) standards have become the industry norm for monitor mounting, allowing users to easily attach their monitors to various arms, brackets, and stands. However, not all monitors come with VESA mounting holes, leaving users searching for alternative solutions.
In this article, we will explore different options and techniques for mounting a monitor without VESA compatibility. Whether you’re a professional setting up a dual-monitor workstation, a gamer looking to optimize your gaming setup, or simply someone who wants a better viewing experience, this guide will help you find a suitable solution.
While VESA compatibility offers the most reliable and secure mounting option, there are other alternatives available that can help you achieve a similar result. These options are not only cost-effective but also provide flexibility and convenience.
In the following sections, we will discuss various non-VESA mounting options, including adhesive tape or Velcro, monitor arms with adjustable clamps, VESA adapter plates, and custom DIY mounting solutions. Each option will be explained in detail, outlining the steps required for implementation and highlighting the pros and cons.
By the end of this article, you will have a better understanding of the available alternatives to mount your monitor without VESA compatibility and be able to choose the most suitable method for your specific needs.
Understanding VESA Standards
Before exploring alternative mounting options, it’s important to understand what VESA standards are and why they are crucial for monitor mounting. VESA, or Video Electronics Standards Association, is an organization that sets standards for the design and manufacture of video-related products.
VESA standards include specifications for the placement and size of mounting holes on the back of displays, allowing them to be easily attached to VESA-compliant brackets, arms, and stands. These mounting holes are usually arranged in a square or rectangular pattern, commonly referred to as VESA mount pattern.
The most common VESA mount patterns are 75x75mm and 100x100mm, but larger displays may have larger VESA mount patterns like 200x200mm or 400x400mm. It’s essential to determine the specific VESA mount pattern of your monitor to ensure compatibility with mounting solutions.
By adhering to VESA standards, manufacturers ensure that their monitors can be easily mounted and provide a secure and stable connection to mounting accessories. This allows users to customize their workspace, whether it’s for ergonomic reasons or for creating a multi-monitor setup.
It’s worth noting that not all monitors come with VESA mounting holes. This is especially common in older models or budget-friendly displays that prioritize cost-saving measures over mounting compatibility. In such cases, users must explore alternative mounting options.
Alternative mounting options can provide practical solutions for those who want to mount their monitors without VESA compatibility. While these options may not be as secure or reliable as the VESA standards, they can still offer satisfactory results in certain situations.
In the next sections, we will discuss some popular non-VESA mounting options, including adhesive tape or Velcro, monitor arms with adjustable clamps, VESA adapter plates, and custom DIY mounting solutions. Each option will provide a workaround for mounting monitors without VESA compatibility, allowing users to optimize their workspace according to their needs and preferences.
Non-VESA Mounting Options
If your monitor doesn’t have VESA mounting holes, there are alternative solutions available to help you mount it securely. While these options may not be as straightforward as VESA mounting, they can still provide viable alternatives for achieving the desired setup. Let’s explore some of the popular non-VESA mounting options:
-
Adhesive Tape or Velcro: One of the simplest and most affordable solutions is to use adhesive tape or Velcro to attach your monitor to a mount or stand. Make sure to choose a strong adhesive tape or industrial-grade Velcro that can withstand the weight of your monitor. Clean the back of your monitor and the surface where you will be attaching the tape or Velcro for optimal adhesion. Attach one side to the back of your monitor and the other side to the desired mounting surface. Keep in mind that this option may not provide the same level of stability as VESA mounting, but it can work well for smaller and lighter monitors.
-
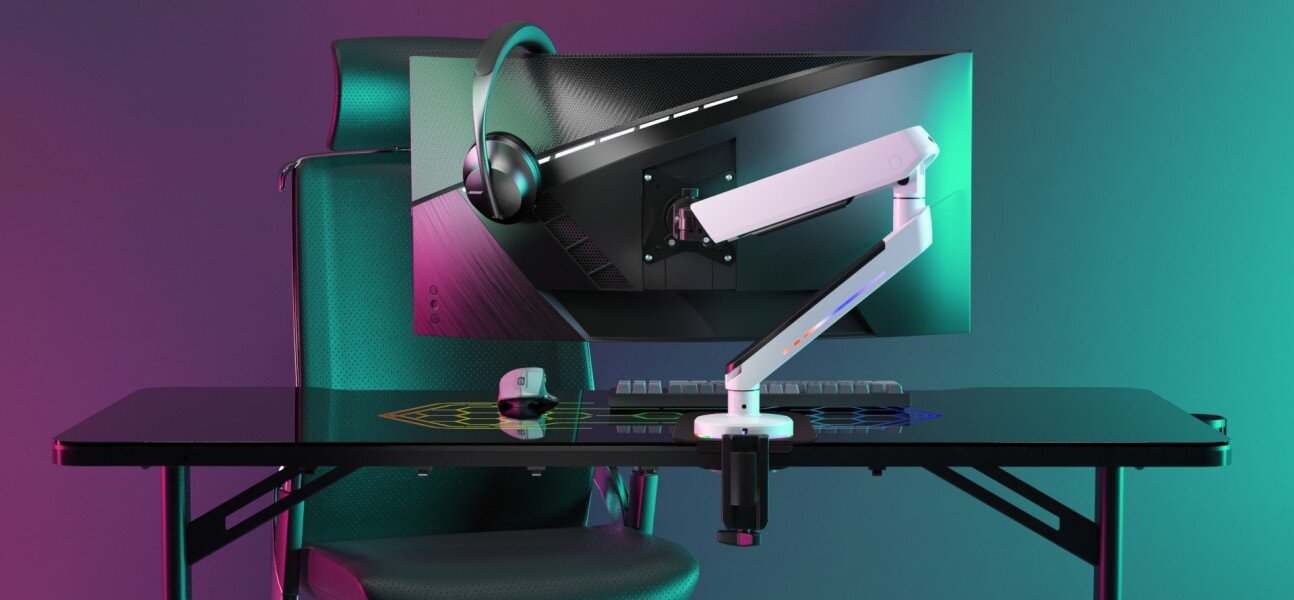
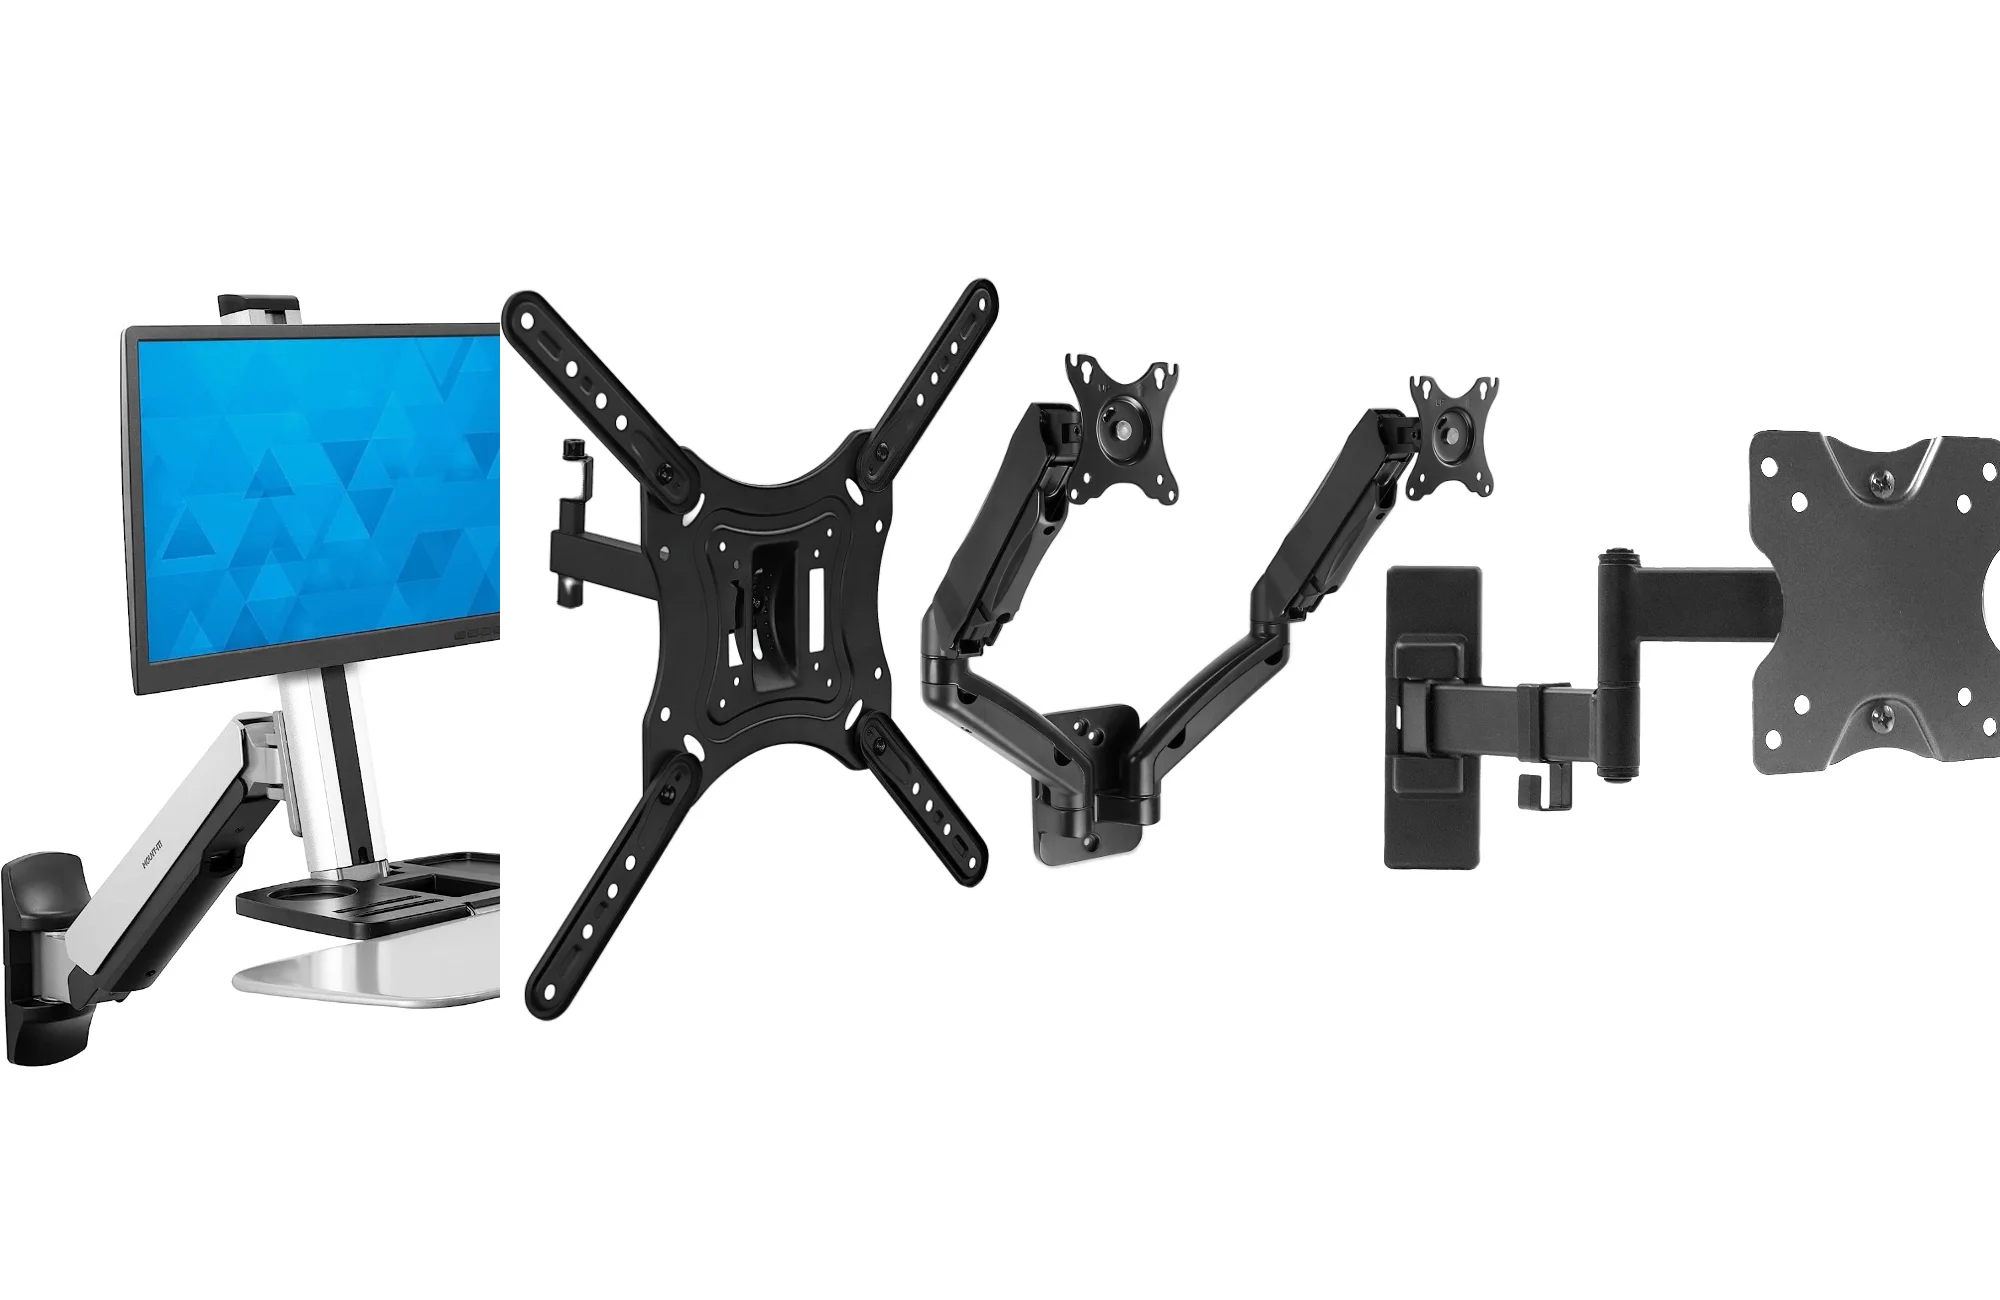
Monitor Arm with Adjustable Clamps: Another option is to use a monitor arm with adjustable clamps. These arms typically come with universal clamps that can securely hold monitors without VESA mounting holes. To use this option, adjust the clamps to fit the thickness of your monitor and attach them to the sides of your monitor. The arm can then be mounted on a desk or wall, providing flexibility in positioning and adjusting the height and angle of your monitor.
-
VESA Adapter Plates: VESA adapter plates are available in the market, specifically designed for mounting monitors without VESA compatibility. These plates come with holes that match the VESA mount pattern of standard brackets and arms. Simply attach the adapter plate to the back of your monitor using the provided hardware, and then attach the bracket or arm to the adapter plate. While this option may add some bulk to the back of your monitor, it provides a secure and stable mounting solution.
-
Custom DIY Mounting Solutions: For those who enjoy a hands-on approach, custom DIY mounting solutions can be a creative and cost-effective option. This could involve building a custom bracket or stand that suits your monitor’s size and weight. With some basic woodworking or metalworking skills, you can design and construct a mount that meets your specific requirements. Just make sure to take into consideration the weight distribution and stability of your makeshift mount.
When exploring these non-VESA mounting options, it’s important to consider factors such as the weight and size of your monitor, the type of surface you’re mounting it on, and the level of adjustability and stability required. Each option has its own benefits and limitations, so choose the one that best fits your needs and resources.
Adhesive Tape or Velcro
When it comes to mounting a monitor without VESA compatibility, adhesive tape or Velcro can provide a simple and cost-effective solution. This option is especially suitable for smaller and lighter monitors that don’t require extensive adjustability or have unique mounting requirements.
To use adhesive tape or Velcro, start by choosing a strong adhesive tape or industrial-grade Velcro that can securely hold the weight of your monitor. Clean the back of your monitor and the surface where you will be attaching the tape or Velcro to ensure optimal adhesion.
Attach one side of the tape or Velcro to the back of your monitor and the other side to the desired mounting surface. Make sure to align them properly, considering the position and angle at which you want your monitor to be mounted. Press firmly to ensure a strong bond.
It’s important to note that while adhesive tape or Velcro can provide a convenient mounting option, it may not offer the same level of stability and adjustability as VESA mounting. The adhesive may weaken over time, especially under heavy monitor weight or constant adjustments.
Additionally, ensure that the surface you’re attaching the tape or Velcro to is suitable for this mounting method. Smooth and clean surfaces tend to offer better adhesion than rough or uneven surfaces. Avoid mounting on surfaces that are susceptible to moisture or excessive heat, as these conditions can weaken the adhesive.
If you decide to opt for adhesive tape or Velcro, take into consideration the weight and size of your monitor. Lighter and smaller monitors are more suitable for this method since they put less strain on the adhesive or Velcro.
While not as secure as VESA mounting, adhesive tape or Velcro provides a quick and easy alternative for mounting monitors without VESA compatibility. It’s a cost-effective option that allows for flexibility in adjusting the position and angle of your monitor.
Before committing to this method, ensure that your monitor’s weight and the intended usage align with the limitations of adhesive tape or Velcro. Regularly check the adhesion to make sure it remains strong, and be prepared to reapply or replace the adhesive tape or Velcro if necessary.
Overall, adhesive tape or Velcro can be a practical choice for mounting a monitor without VESA compatibility, especially for lighter and smaller setups that require minimal adjustability.
Monitor Arm with Adjustable Clamps
A monitor arm with adjustable clamps is a versatile and reliable option for mounting a monitor without VESA compatibility. This option provides greater stability and adjustability compared to adhesive tape or Velcro, making it suitable for larger monitors or setups that require frequent adjustments.
Monitor arms with adjustable clamps typically come with universal clamps that can securely hold monitors without VESA mounting holes. To use this option, adjust the clamps to fit the thickness of your monitor and attach them to the sides of your monitor.
Once securely attached, the monitor arm can be mounted on a desk or wall, providing flexibility in positioning and adjusting the height and angle of your monitor. This allows you to find the optimal ergonomic position and make adjustments according to your preferences.
When selecting a monitor arm, make sure it has a weight capacity that is suitable for your monitor’s weight. You should also consider the size of your monitor and ensure that the arm’s length and range of motion can accommodate it.
Monitor arms with adjustable clamps offer several advantages over other non-VESA mounting options. They provide a stable and secure connection for your monitor, allowing you to free up desk space and adjust the position of your monitor as needed.
One drawback of monitor arms with adjustable clamps is that they may not be compatible with all monitor designs. Some monitors have decorative elements or curves on the back that may interfere with the clamps’ ability to securely hold the monitor. It’s essential to check the compatibility of your monitor and the monitor arm before making a purchase.
Overall, a monitor arm with adjustable clamps offers a versatile and convenient solution for mounting a monitor without VESA compatibility. It provides stability, adjustability, and ergonomic benefits that enhance your overall viewing experience.
Consider your specific needs, such as the weight and size of your monitor, the desired adjustability, and the mounting options available in your workspace. With a monitor arm with adjustable clamps, you can achieve a secure and customizable setup that promotes comfort and productivity.
VESA Adapter Plates
VESA adapter plates are specifically designed for mounting monitors without VESA compatibility. These plates provide a reliable and secure solution, allowing you to attach your monitor to standard VESA brackets, arms, and stands.
To use a VESA adapter plate, first, determine the VESA mount pattern of your monitor. You can find this information in the specifications or user manual of your monitor. Once you know the VESA mount pattern, choose a compatible VESA adapter plate that matches the pattern.
Attach the VESA adapter plate to the back of your monitor using the provided hardware. Make sure to align the mounting holes properly and tighten the screws securely. Once the VESA adapter plate is securely attached, you can then attach the bracket or arm to the adapter plate.
VESA adapter plates offer several advantages. They provide a stable and secure mounting solution that ensures the monitor remains in place and allows for easy adjustability. Additionally, they offer compatibility with a wide range of VESA adapters, giving you the flexibility to choose from various mounting options.
It’s important to note that using a VESA adapter plate may add some bulk to the back of your monitor. As a result, the overall thickness of your monitor may increase, which may affect the compatibility with certain monitor stands or installation in tight spaces. Consider the space available and ensure that the increased thickness doesn’t hinder the functionality or aesthetics of your setup.
Furthermore, when using a VESA adapter plate, make sure to adhere to the weight restrictions and guidelines provided by the manufacturer. Overloading the adapter plate with a monitor that exceeds its weight capacity can compromise the stability and safety of the setup.
Overall, VESA adapter plates provide a reliable solution for mounting monitors without VESA compatibility. They offer compatibility with standard VESA brackets, arms, and stands, ensuring a secure and adjustable setup. Take the necessary precautions and select a VESA adapter plate that matches the specifications of your monitor to achieve a stable and effective mounting solution.
Custom DIY Mounting Solutions
If you’re a hands-on person and enjoy the challenge of creating your own solutions, a custom DIY mounting solution can be a creative and cost-effective option for mounting a monitor without VESA compatibility. With some basic woodworking or metalworking skills, you can design and construct a mount that meets your specific requirements.
When opting for a custom DIY mounting solution, it’s important to consider a few key aspects:
-
Design: Plan your mount design based on the size, weight, and shape of your monitor. Consider the materials you have available and choose a design that provides adequate support and stability.
-
Materials and Tools: Determine the materials and tools needed for your DIY mount. Depending on your design, you may require wood, metal, screws, brackets, clamps, or other hardware. Ensure that your chosen materials are strong enough to support the weight of your monitor and are suitable for the desired mount.
-
Construction: Follow your design plan and carefully construct your mount. Make sure to measure and cut the materials accurately, and join them securely using appropriate techniques. Pay attention to weight distribution and stability, ensuring that the mount can support the monitor effectively.
-
Installation: Once your DIY mount is built, carefully install it in your desired location. Ensure that it is securely fastened to the wall, desk, or other surface, and test its stability before placing the monitor on it.
Custom DIY mounting solutions can offer a personalized touch to your setup, allowing you to create a mount that perfectly fits your needs. However, it’s important to note that DIY mounts may not provide the same level of adjustability or ease of use as commercially available options.
Additionally, it’s crucial to prioritize safety when constructing and installing a custom DIY mount. Make sure that your mount is stable and can support the weight of your monitor to prevent accidents or damage to your equipment.
Consider the specific requirements of your setup, such as the size and weight of your monitor, the desired adjustability, and the available space. With careful planning and execution, a custom DIY mounting solution can be a satisfying and effective way to mount a monitor without VESA compatibility.
Conclusion
Mounting a monitor without VESA compatibility may seem like a challenge, but with alternative solutions, you can achieve a secure and customized setup. Understanding VESA standards and the limitations of your monitor is essential in exploring non-VESA mounting options.
Adhesive tape or Velcro provides a simple and cost-effective solution, especially for smaller and lighter monitors. Monitor arms with adjustable clamps offer versatility and stability, making them a suitable choice for larger monitors or setups that require frequent adjustments.
VESA adapter plates provide a reliable solution by allowing you to attach your monitor to standard VESA brackets, arms, and stands. And for those who enjoy a hands-on approach, custom DIY mounting solutions offer a personalized touch, allowing you to create a mount that perfectly fits your needs.
When choosing a non-VESA mounting option, consider factors such as monitor size, weight, adjustability requirements, and the available space in your workspace. It’s important to ensure stability, safety, and compatibility with your monitor’s specifications to prevent accidents or damage.
While non-VESA mounting options can provide satisfactory results, it’s worth noting that they may not offer the same level of stability and reliability as VESA standards. VESA compatibility remains the gold standard for monitor mounting, providing the most secure and versatile mounting solutions.
Overall, by exploring alternative mounting options and selecting the most suitable method for your specific needs, you can effectively mount your monitor without VESA compatibility. Whether you choose adhesive tape or Velcro, a monitor arm with adjustable clamps, a VESA adapter plate, or a custom DIY mount, you can optimize your workspace and enhance your viewing experience.
Remember to carefully evaluate your options, follow the provided guidelines, and prioritize safety to create a stable and functional setup. With the right approach and creativity, you can overcome the lack of VESA compatibility and enjoy the benefits of a properly mounted monitor.