Introduction
YouTube has become one of the most popular platforms for watching videos online. With millions of users uploading and consuming content on a daily basis, it is crucial to ensure that your videos are accessible to a wide range of viewers. One important aspect of accessibility is providing subtitles for your YouTube videos.
Subtitles not only make your videos accessible to those with hearing impairments, but they also enhance the overall viewing experience for all viewers. They allow viewers to follow along with the dialogue, understand the content better, and enjoy videos in noisy environments or without sound.
While YouTube automatically generates subtitles for most videos, the font size of these subtitles might not always be ideal for everyone. Some viewers may find the default font size too small to read comfortably, especially on smaller screens or for those with visual impairments. Fortunately, YouTube provides a simple solution that allows you to adjust the size of the subtitles on your videos.
In this guide, we will walk you through the steps to make the subtitles bigger on YouTube. Whether you’re a content creator who wants to ensure that your audience can follow along easily, or a viewer who wants to customize their viewing experience, this tutorial will help you achieve that.
By increasing the subtitle size on YouTube, you can make the text more visible and readable for all viewers. So, without further ado, let’s dive into the process of making the subtitles bigger on your YouTube videos.
Understanding the Importance of Subtitles on YouTube
Subtitles play a crucial role in making YouTube videos accessible to a wider audience. They provide a text version of the audio content, allowing viewers who are deaf or hard of hearing to understand and enjoy the video. Additionally, subtitles are beneficial for viewers who speak a different language or have difficulty understanding accents, as they can read along and comprehend the content.
However, the benefits of subtitles extend beyond accessibility. They also enhance the overall viewing experience for all users. Subtitles help to improve comprehension, especially for complex or technical topics, by providing clarity in the dialogue. They make it easier for viewers to follow along with the video and fully grasp the information being presented.
Moreover, subtitles make YouTube videos more inclusive and accommodating to different situations and settings. Not everyone can watch videos in a quiet environment, and subtitles come in handy when background noise or distractions make it difficult to hear the audio clearly. By reading the subtitles, viewers can still understand and enjoy the content, regardless of the external circumstances.
Another advantage of subtitles is that they reinforce the message of the video. Visual learners or individuals who prefer reading can benefit from having the text on screen, as it provides another medium through which the information can be absorbed. This multi-sensory approach can improve knowledge retention and engagement with the video.
Furthermore, subtitles contribute to SEO (Search Engine Optimization) efforts. Search engines scan the text within videos to determine their relevance to users’ search queries. By adding subtitles, you increase the chances of your video being indexed and ranked higher in search engine results, ultimately attracting more viewers and potential subscribers.
In summary, subtitles are essential for promoting accessibility, improving comprehension, accommodating different viewing environments, appealing to diverse learning styles, and boosting SEO efforts. By understanding the importance of subtitles on YouTube, you can make an informed decision to enhance your videos and reach a broader audience.
Step 1: Sign in to Your YouTube Account
In order to make changes to your YouTube video subtitles, you will need to sign in to your YouTube account. If you don’t have an account yet, you can easily create one by visiting the YouTube website and clicking on the “Sign In” button at the top right corner of the page.
Once you are on the sign-in page, you can either use your existing Google account credentials or create a new account by clicking on the “Create Account” option. Follow the prompts to enter your email address, password, and any other required information.
After successfully signing in, you will have access to your YouTube account, where you can manage your videos, playlists, and other settings.
If you have multiple Google accounts, make sure you are signing in with the account that is associated with the YouTube channel where the video you want to edit the subtitles for is uploaded. If needed, you can switch between different accounts by clicking on your profile picture in the top right corner of the YouTube page, then selecting the account you want to use.
Remember to keep your YouTube account credentials secure and avoid sharing them with anyone. This will help protect your account and ensure that only authorized individuals have access to make changes to your videos.
Once you have successfully signed in to your YouTube account, you are ready to proceed to the next step and navigate to the YouTube Studio, where you can make the necessary adjustments to the subtitles of your videos.
Step 2: Navigate to “YouTube Studio”
To make changes to your YouTube video subtitles, you need to navigate to the YouTube Studio, which is the hub for managing your YouTube channel and its content. YouTube Studio provides a comprehensive set of tools and features to help you customize and optimize your videos.
To access YouTube Studio, start by signing in to your YouTube account. Once you are signed in, click on your profile picture in the top right corner of the YouTube page. In the dropdown menu that appears, select “YouTube Studio” from the list of options.
You will then be redirected to the YouTube Studio dashboard, where you can find an overview of your channel’s performance, video analytics, and various customization options.
YouTube Studio offers a user-friendly interface that simplifies the process of managing your videos and subtitles. The dashboard is organized into sections, with navigation tabs on the left side of the screen. These tabs include:
- Home: Provides an overview of your channel’s activity and performance.
- Videos: Allows you to manage and edit your uploaded videos.
- Playlists: Lets you create and organize playlists.
- Analytics: Provides insights and statistics about your video performance.
- Comments: Displays and allows you to moderate comments on your videos.
- Subtitles: Where you can access and edit the subtitles for your videos.
- Monetization: Provides options for monetizing your videos and managing ad revenue.
To proceed with editing your video subtitles, click on the “Subtitles” tab in the navigation menu. This will take you to the Subtitles management page, where you can make the necessary adjustments to the subtitles and closed captions of each of your videos.
Now that you have successfully navigated to YouTube Studio and accessed the Subtitles management page, you are ready to move on to the next step and access the settings for the subtitles and closed captions of your chosen video.
Step 3: Access the “Subtitle and CC” Settings
In order to make changes to the subtitles of your YouTube video, you will need to access the “Subtitle and CC” settings for that particular video. These settings allow you to customize the appearance and content of the subtitles, ensuring they meet your preferences and the needs of your viewers.
To access the “Subtitle and CC” settings, follow these steps:
- Start by clicking on the “Subtitles” tab in the navigation menu on the left side of the YouTube Studio dashboard. This will take you to the Subtitles management page.
- On the Subtitles management page, you will see a list of all your uploaded videos along with their respective subtitle status. Find the video for which you want to edit the subtitles and click on its title or thumbnail to open the video editor.
- Once you are in the video editor, look for the “Subtitles and CC” tab in the top navigation menu. Click on it to access the subtitle settings for that video.
- In the “Subtitles and CC” settings, you will find options to manage different aspects of the subtitles, such as the language, formatting, and style. You can also add new subtitles, edit existing ones, or delete subtitles if needed.
It’s important to note that YouTube provides automatic subtitle generation for many languages. If your video already has automatically generated subtitles, they will be displayed in the Subtitles and CC settings. You can make changes to these subtitles or choose to upload your own custom subtitle file.
By accessing the “Subtitle and CC” settings, you have taken an important step towards customizing the subtitles of your YouTube video. You can now proceed to the next step, where you will choose the specific video for which you want to make changes to the subtitles.
Step 4: Choose the Video You Want to Edit
Once you have accessed the “Subtitle and CC” settings in YouTube Studio, the next step is to choose the specific video for which you want to edit the subtitles. This allows you to make the necessary changes and adjustments to the subtitles of that particular video.
Follow these steps to choose the video you want to edit:
- On the “Subtitles and CC” settings page, you will see a list of all the videos in your YouTube channel that have subtitles or closed captions. This list provides an overview of the subtitles’ status for each video.
- Scroll through the list or use the search bar to find the video you want to edit. You can search by video title or copy and paste the video URL into the search bar.
- Click on the video title or thumbnail to select it and access the subtitle editing options for that particular video.
By selecting the desired video, you will be directed to the subtitle editor for that specific video. Here, you can add, modify, or delete subtitles as needed, ensuring that your viewers have the best possible experience when watching your content.
If the video you are looking for is not listed or does not have any subtitles assigned to it, you may need to generate subtitles from scratch or upload a custom subtitle file. YouTube offers tools to create subtitles manually or upload pre-existing subtitle files in various formats, such as .SRT or .VTT.
Remember to choose the correct video for editing, as changes made to the subtitles will only apply to the selected video. It is a good practice to double-check the video title and thumbnail to confirm that you have chosen the correct video before proceeding with any modifications to the subtitles.
Now that you have selected the video, you are ready to move on to the next step, where you will access the specific “Subtitle and CC” options for that video and make adjustments to the subtitle settings.
Step 5: Click on the “Subtitle and CC” Option
After choosing the specific video you want to edit in the YouTube Studio subtitle editor, the next step is to click on the “Subtitle and CC” option. This will allow you to access the settings and make adjustments to the subtitles of your chosen video.
Follow these steps to click on the “Subtitle and CC” option:
- Once you have selected the desired video in the subtitle editor, you will be directed to the subtitle management page for that video.
- Look for the “Subtitle and CC” tab at the top of the page. Click on it to access the specific options and settings for managing the subtitles and closed captions of your video.
Clicking on the “Subtitle and CC” option will open up a range of choices and customization settings for your video’s subtitles. These settings include language selection, subtitle style, formatting options, and the ability to make changes to the existing subtitles.
Within the “Subtitle and CC” settings, you can also choose to enable or disable subtitles for your video. If subtitles have not been added previously, you will have the option to add subtitles manually or upload a custom subtitle file.
Additionally, if you have received user contributions for subtitles, you can review and manage these contributions through the “Subtitle Contributions” section. This allows you to ensure the accuracy and quality of the subtitles provided by your audience.
By clicking on the “Subtitle and CC” option, you are taking a significant step towards customizing and optimizing the subtitles of your YouTube video. Now, you can proceed to the next step where you will select the language for your subtitles.
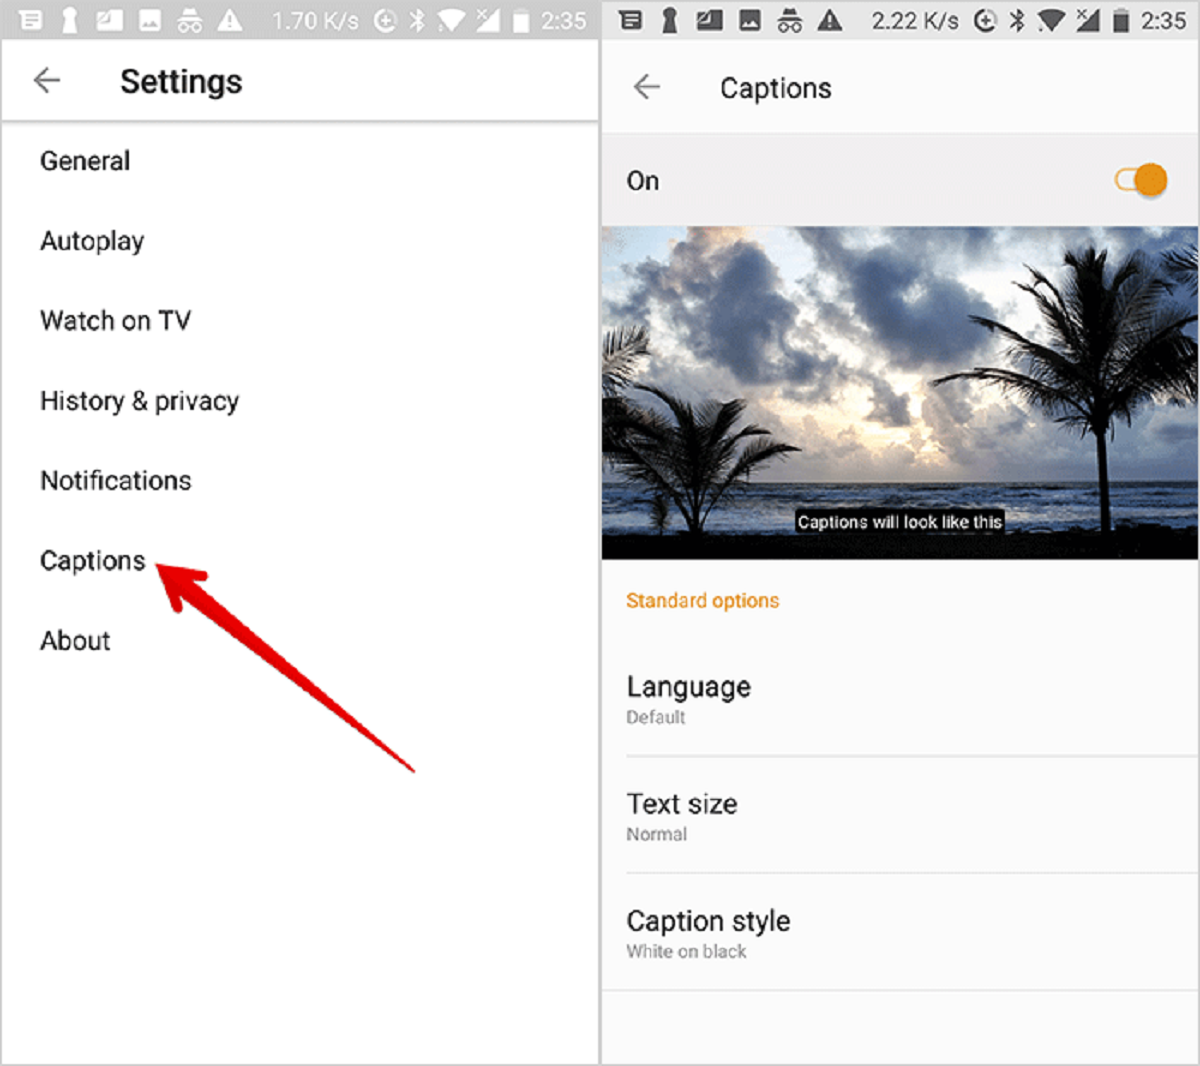
Step 6: Select the Language of the Subtitles
Once you have accessed the “Subtitle and CC” settings for your YouTube video, the next step is to select the language for your subtitles. This ensures that viewers can understand and follow along with the subtitles in their preferred language.
Follow these steps to select the language of the subtitles:
- In the “Subtitle and CC” settings page, look for the “Add Language” or “Language” option. This is where you can choose the language for your subtitles.
- Click on the dropdown menu to view the list of available languages. YouTube offers a wide range of languages to choose from, including popular languages like English, Spanish, French, German, and many more.
- Scroll through the list or use the search feature to quickly find the language you want to use for your subtitles.
- Once you have selected the desired language, click on it to set it as the default language for your subtitles. This will ensure that the subtitles are displayed in the chosen language when a viewer enables subtitles while watching your video.
If you want to add subtitles in multiple languages, you can repeat the above steps to select and add additional languages to your video. This allows you to cater to a wider audience and provide subtitles in multiple languages for better accessibility and reach.
Remember to prioritize the languages that are most relevant to your target audience. If you have a global audience, consider adding subtitles in multiple languages to make your content accessible to a diverse set of viewers.
By selecting the language of the subtitles, you are taking a crucial step towards making your YouTube video more inclusive and accessible to viewers who may not understand the video’s original language. Now, you can proceed to the next step where you will adjust the font size of the subtitles.
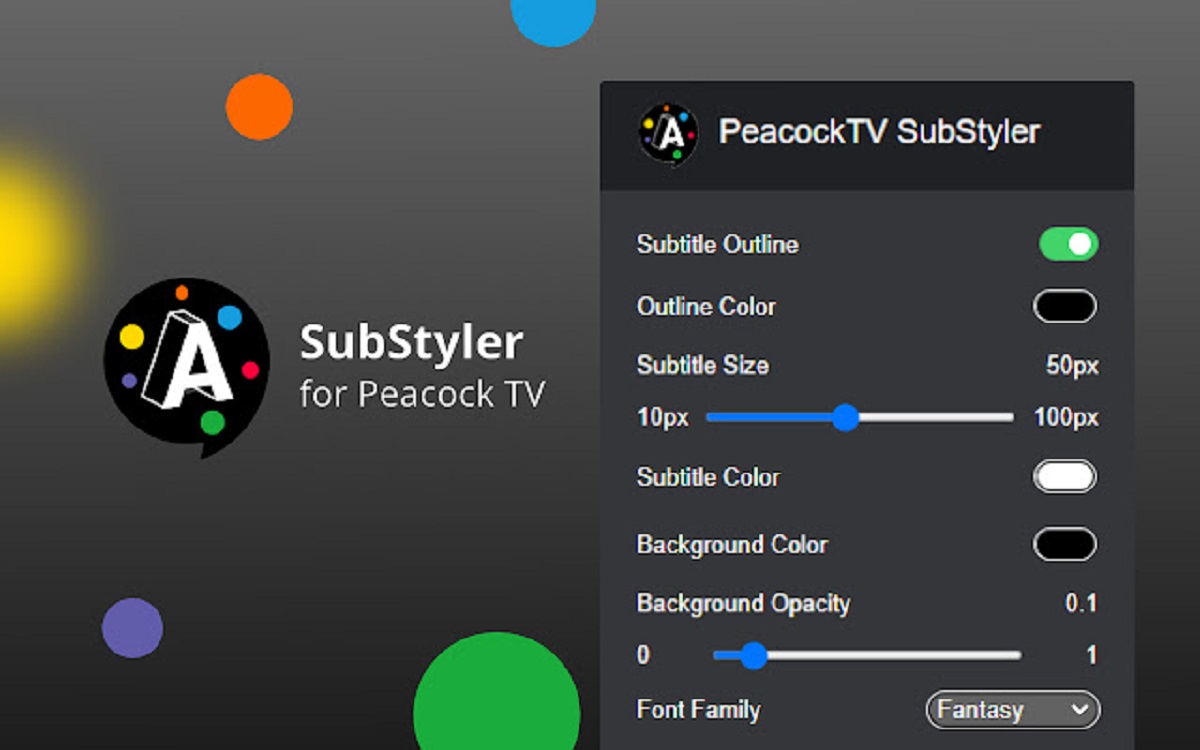
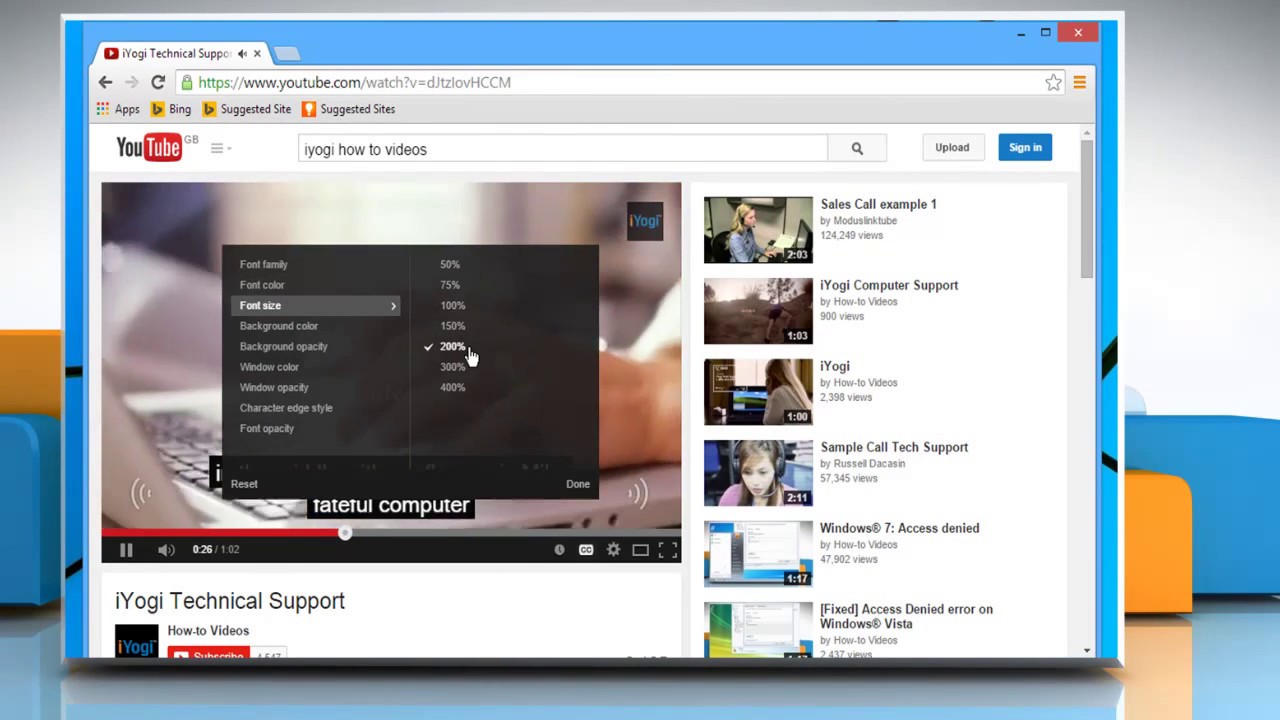
Step 7: Adjust the Font Size
Once you have selected the language for your subtitles, the next step is to adjust the font size to ensure optimal readability for your viewers. This allows you to customize the subtitles according to your preferences and make them more visible on different devices and screen sizes.
Follow these steps to adjust the font size of the subtitles:
- In the “Subtitle and CC” settings page for your YouTube video, look for the “Font Size” or “Text Size” option. This is where you can make changes to the font size of your subtitles.
- Click on the dropdown menu or the “+” and “-” buttons to increase or decrease the font size. YouTube provides a range of font size options to choose from, allowing you to find the size that works best for your video and audience.
- As you adjust the font size, you will see a preview of the subtitles with the new font size. This helps you visualize the changes and ensure that the subtitles are clear and legible for viewers.
It is important to find a font size that is large enough to be easily read by viewers, especially on smaller screens or for viewers with visual impairments. However, be mindful not to make the font size too large, as it may obstruct the video content or lead to excessive scrolling on the subtitle display.
Keep in mind that the font size adjustment only applies to the selected language and does not affect the font size of other languages or captions in the video. If you have multiple languages or captions, you may need to adjust the font size accordingly for each language.
By adjusting the font size, you are ensuring that your subtitles are easily readable and accessible to your viewers. Now, you can proceed to the next step where you will save your changes and confirm the font size of the subtitles.
Step 8: Save Your Changes
After adjusting the font size of the subtitles to your desired preferences, the next step is to save your changes. This ensures that the new font size is applied to the subtitles of your YouTube video and will be visible to your viewers.
Follow these steps to save your changes:
- Once you have adjusted the font size of the subtitles, look for the “Save” or “Apply” button. This button is usually located at the bottom or top right corner of the “Subtitle and CC” settings page.
- Click on the “Save” or “Apply” button to save your changes. This updates the font size of the subtitles and makes it effective for the selected language and video.
- After clicking on the save button, you will see a confirmation message indicating that your changes have been saved successfully. This assures you that the font size adjustment has been applied to the subtitles of your YouTube video.
It is important to review the subtitles after saving your changes to ensure that the font size is appropriate and enhances the readability of the text. You can preview the subtitles by playing the video in the YouTube player or by using the subtitle preview feature within the subtitle editor.
If you are not satisfied with the font size or notice any issues with the subtitles, you can always revisit the “Subtitle and CC” settings page and make further adjustments as needed. Remember, it’s crucial to provide subtitles that are clear and easy to read for your viewers.
By saving your changes, you have successfully adjusted the font size of the subtitles for your YouTube video. Now, you can proceed to the next step where you will preview and confirm the subtitle size before finalizing your changes.
Step 9: Preview and Confirm the Subtitle Size
After saving the changes to the font size of the subtitles in your YouTube video, it is important to preview and confirm the subtitle size to ensure that it is visually pleasing and meets your requirements. This step allows you to make any final adjustments if needed before finalizing your changes.
Follow these steps to preview and confirm the subtitle size:
- Return to the video playback page or the YouTube Studio subtitle editor for your chosen video.
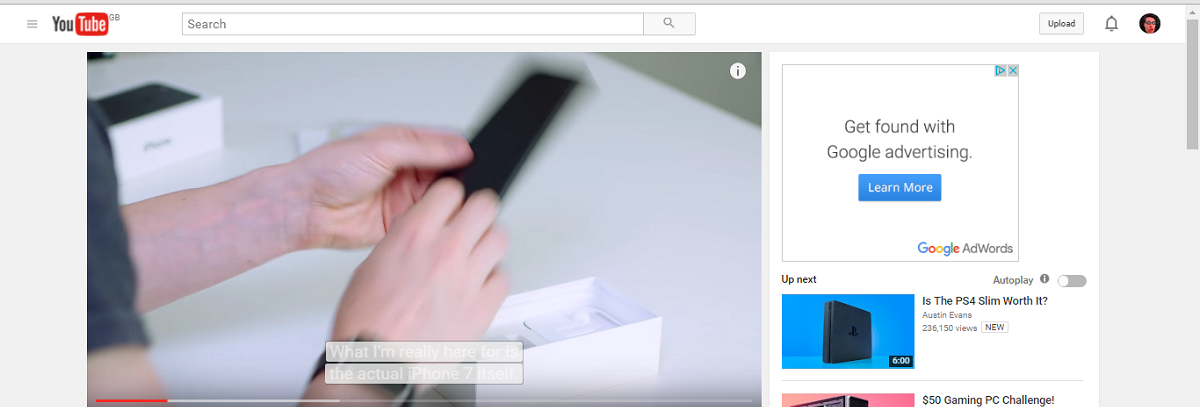
- Play the video and enable the subtitles by clicking on the “CC” button in the video player. This will display the subtitles with the adjusted font size.
- Observe the subtitle size while the video is playing. Pay attention to its visibility and readability, taking into consideration factors such as screen size, viewing distance, and viewer preferences.
- If necessary, navigate back to the “Subtitle and CC” settings page to make further adjustments to the font size until you are satisfied with the readability and aesthetics of the subtitles.
While previewing the subtitles, consider the overall visual experience of your video. Ensure that the font size is not too distracting or obscures important elements of the video content. Strive for a balance between legibility and unobtrusiveness.
If you are collaborating with others or have received feedback from viewers, you may want to seek their input on the subtitle size. Their perspectives can provide valuable insights to help you make an informed decision.
Once you are confident that the subtitle size is appropriate and meets your expectations, you can consider the changes confirmed and finalize the adjustments to the subtitle size for your YouTube video.
By previewing and confirming the subtitle size, you ensure that your viewers will have a well-presented and visually engaging experience while watching your videos with subtitles.
Congratulations! You have successfully gone through the process of making the subtitles bigger on your YouTube video. This enhances the accessibility and viewer experience, allowing a wider audience to engage with your content effectively.
Conclusion
Adding subtitles to your YouTube videos is not only a way to make them more accessible, but it also enhances the overall viewing experience for your audience. By following the steps outlined in this guide, you can easily make the subtitles bigger on your YouTube videos and ensure that they are visible and readable to a wide range of viewers.
We began by understanding the importance of subtitles on YouTube, highlighting how they improve accessibility for individuals with hearing impairments and enhance comprehension for all viewers. Subtitles also make videos more inclusive, accommodating different viewing environments and learning preferences.
Then, we walked through the step-by-step process to make the subtitles bigger on YouTube. We covered signing in to your YouTube account, navigating to YouTube Studio, accessing the “Subtitle and CC” settings, choosing the video for editing, clicking on the “Subtitle and CC” option, selecting the language of the subtitles, adjusting the font size, saving your changes, and previewing and confirming the subtitle size.
By making these adjustments, you ensure that the subtitles are visible and readable, regardless of the device or screen size your viewers are using. It’s crucial to find the right balance in the font size to maximize accessibility without obstructing the video content or overwhelming the visual experience.
Remember, though, that while these steps are simple, the impact they can have on your videos is significant. By making your subtitles bigger, you improve the accessibility, inclusivity, and overall viewing experience for your audience—allowing them to engage with your content more effectively.
Don’t hesitate to apply these techniques to your YouTube videos and cater to a wider audience. Whether you’re a content creator seeking to provide better accessibility or a viewer who wants to customize the subtitles, these steps will help you achieve your desired subtitles size on YouTube.
So go ahead and start making the subtitles bigger on your YouTube videos. Adapt and optimize your subtitles to ensure that they are clear and readable, providing an enhanced viewing experience for all your viewers. Happy subtitling!