Introduction
Having a professional and well-designed email signature can leave a lasting impression on your recipients, whether you’re communicating for business or personal purposes. An email signature not only provides essential contact information but also adds a touch of professionalism and personalization to your emails.
If you’re a Gmail user, you may be wondering how to create an email signature that stands out and aligns with your branding. Fortunately, Gmail offers a straightforward and intuitive way to customize and add an email signature to all your outgoing messages.
In this article, we will guide you through the step-by-step process of creating an email signature in Gmail. We’ll cover everything from accessing the settings to formatting the text and adding images or logos. By the end of this guide, you’ll have a polished and professional email signature that represents you or your business effectively.
So, whether you’re an entrepreneur, freelancer, or professional, let’s dive into the world of Gmail signatures and discover how to make your emails more memorable.
Step 1: Open Gmail Settings
The first step in creating your email signature in Gmail is to access the Gmail Settings. Here’s how:
- Open Gmail in your web browser and sign in to your account.
- Click on the gear icon in the top right corner of the screen. This will open the Gmail Settings menu.
- From the dropdown menu, select “See all settings”.
By following these simple steps, you’ll be able to navigate to the settings area where you can customize various aspects of your Gmail account, including your email signature.
It’s important to note that Gmail settings may vary slightly depending on the version or layout you’re using. However, you should be able to find the necessary options by following the general steps outlined above.
Now that you’ve successfully accessed the Gmail Settings, you’re ready to move on to the next step in creating your email signature.
Step 2: Access the “Signature” Section
Once you’re in the Gmail Settings menu, it’s time to locate the section where you can create and manage your email signature. Follow these steps:
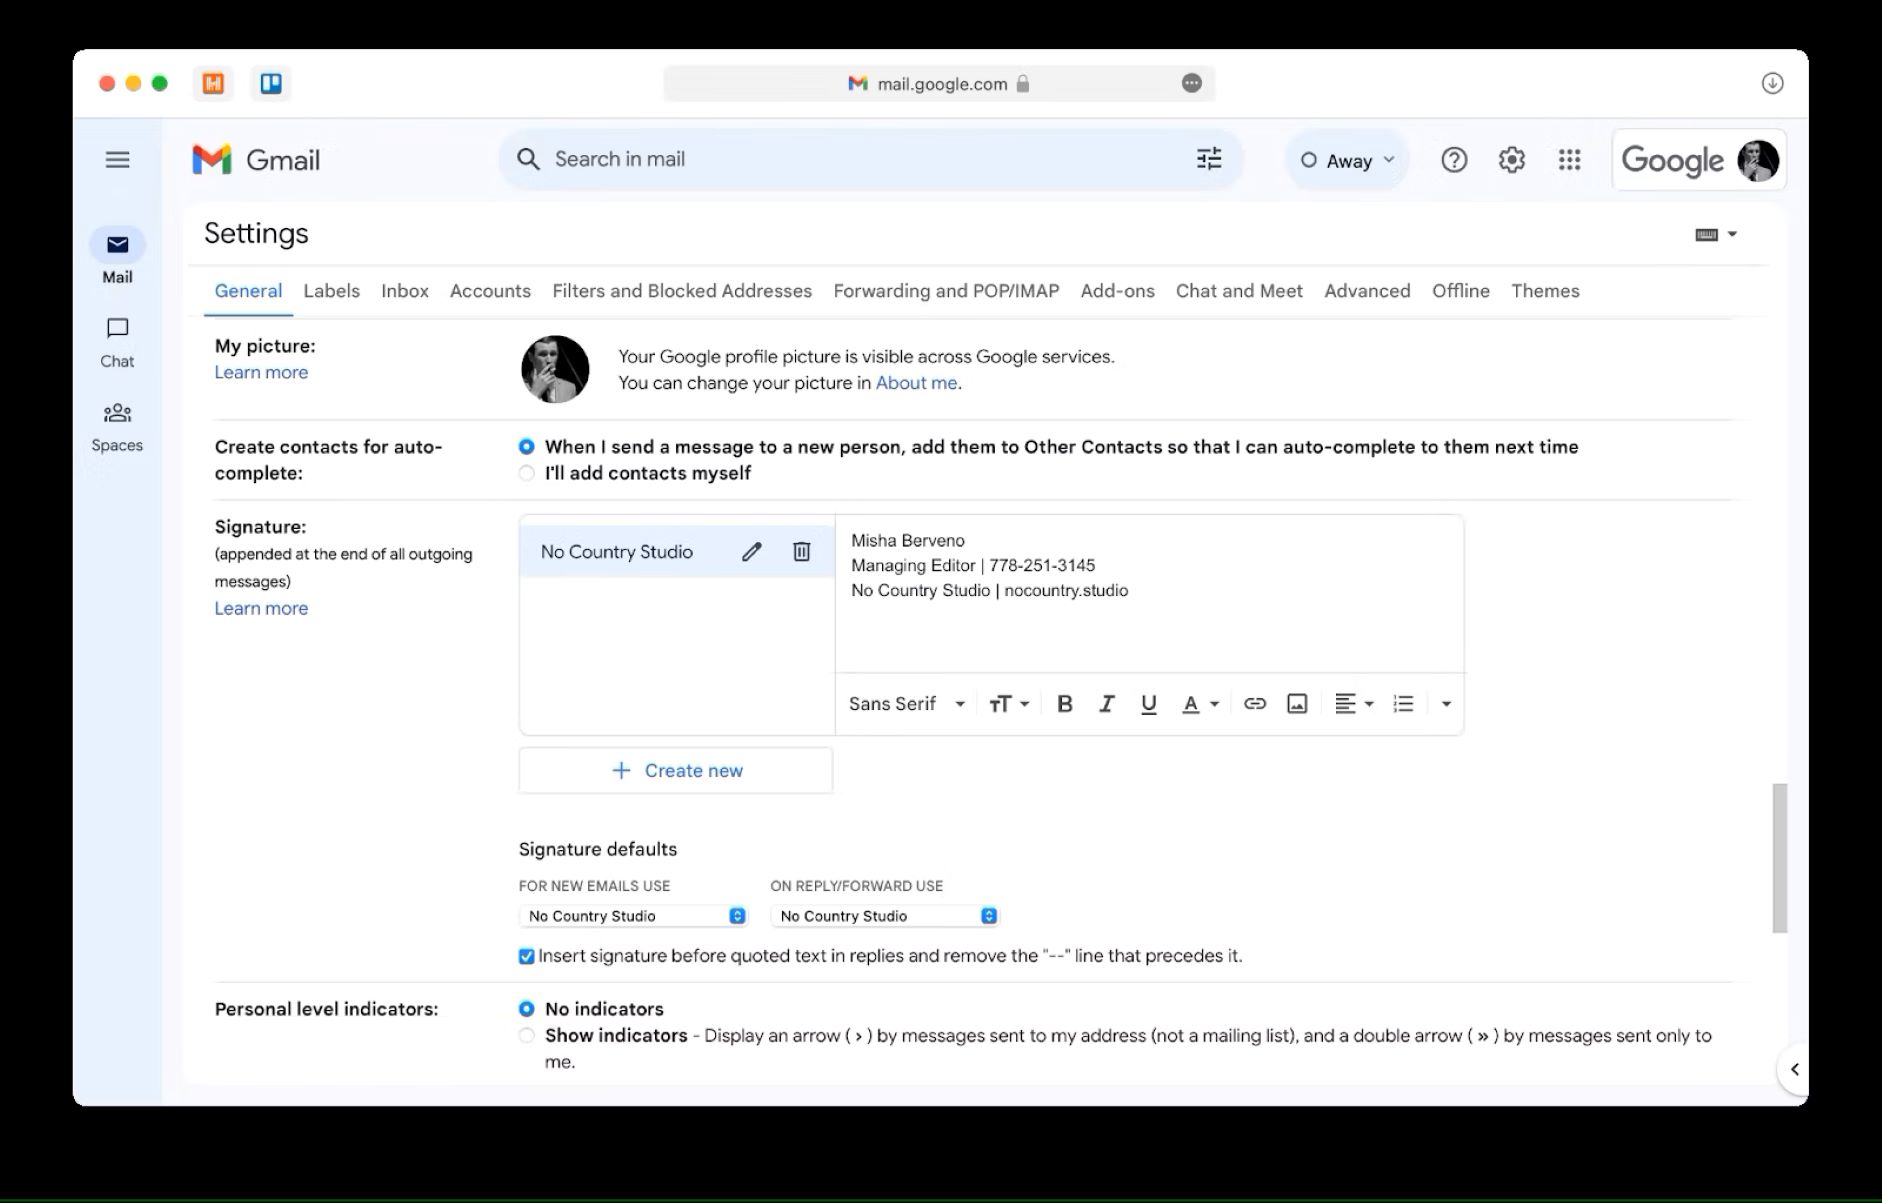
- In the Gmail Settings menu, scroll down until you find the “Signature” section. It is usually located towards the middle of the page.
- Here, you’ll find various options related to customizing your email signature.
The “Signature” section allows you to create different signatures for different email accounts if you have multiple email addresses connected to your Gmail account. You can have a unique signature for each email address, making it convenient and versatile.
By default, Gmail sets the signature option to “No signature”. It means that no signature will be added to your outgoing emails unless you manually create one. This gives you the flexibility to personalize your email signature according to your preferences and needs.
Now that you’ve accessed the “Signature” section, you’re ready to proceed to the next step and create your email signature in Gmail.
Step 3: Create a New Signature
With the “Signature” section in Gmail settings open, you can now begin creating your email signature. Here’s how:
- Under the “Signature” section, click on the radio button next to “Create new”. This will allow you to create a new email signature.
- Enter a name for your signature in the input field. This name will help you identify and manage your signatures if you have more than one.
Now that you’ve set up a new signature, it’s time to start customizing it to reflect your personal or professional brand.
Keep in mind that Gmail provides a basic text editor for creating your signature. You can add various formatting, links, and even images to make your signature visually appealing and informative.
Before moving on to customizing your email signature, make sure you have entered a name for your signature and have saved it. This ensures that you can easily access and edit your signature in the future.
Creating a new signature is an essential step in personalizing your emails and leaving a lasting impression on your recipients. Let’s now move on to the next step and begin customizing your email signature in Gmail.
Step 4: Customize Your Email Signature
Once you’ve created a new signature in Gmail, it’s time to customize it to reflect your personal or professional style. Here’s how you can make your email signature stand out:
- Start by adding your contact information, such as your name, job title, company name, phone number, and email address. This helps recipients easily identify and reach out to you.
- Consider adding a professional photo of yourself to create a more personal and engaging signature. It adds a touch of authenticity and helps build trust with the recipients.
- Choose a suitable font, font size, and color for your signature. Keep it legible and consistent with your branding.
- Add any relevant social media icons or links that you want to include in your email signature. This allows recipients to connect with you on various platforms.
- Think about including a brief, impactful quote or tagline that represents your personal or professional values. It can leave a lasting impression on the recipients.
- Consider adding a call-to-action (CTA) to your signature. This can be a link to your website, a recent blog post, or a promotion you’re running. It encourages recipients to engage further with your business.
- Preview your signature to ensure it looks visually appealing and professional on different devices and email clients.
Remember, the goal is to create an email signature that is not only informative but also visually appealing and consistent with your brand image. Take the time to experiment with different elements and find the perfect combination that suits your style.
Now that you’ve customized your email signature, let’s move on to the next step and learn how to add images or logos to your signature if desired.
Step 5: Add Images or Logos (Optional)
One way to enhance the visual appeal of your email signature in Gmail is by adding images or logos. Including your company logo or a personal photo can add a professional touch and make your signature more recognizable. Here’s how you can add images or logos to your email signature:
- Ensure that the image you want to include in your signature is saved on your computer or hosted on a reliable image hosting service.
- In the Gmail signature editor, place the cursor where you want to insert the image.
- Click on the image icon in the formatting toolbar. It looks like a picture frame.
- A pop-up window will appear. Choose whether you want to upload an image from your computer or insert an image URL if it’s hosted elsewhere.
- Select the image file or enter the image URL and click “Insert” or “OK”. The image will be added to your email signature.
- You can further customize the size, alignment, and spacing of the image by clicking on it and using the formatting options in the toolbar.
Remember to use high-quality and properly sized images to ensure they appear crisp and professional in your email signature. Avoid using images that are too large and may cause your emails to load slowly.
Adding an image or logo to your email signature is entirely optional, but it can make a significant impact on the overall appearance and branding of your emails. If you choose to include an image, make sure it aligns with your personal or company branding and enhances the professionalism of your signature.
Now that you’ve learned how to add images or logos to your email signature, let’s move on to the next step and explore how to format the text and add links.
Step 6: Format the Text and Add Links
Formatting the text in your email signature can help make it more visually appealing and easier to read. Additionally, adding clickable links can provide recipients with direct access to your website, social media profiles, or other relevant online resources. Let’s go through the process of formatting the text and adding links in your Gmail email signature:
- In the Gmail signature editor, select the text you want to format or add a link to.
- Use the formatting toolbar options to adjust the font, font size, color, and other attributes of the selected text. This allows you to match the style of your signature with your personal or company brand.
- To add a hyperlink, select the text you want to turn into a link and click on the link icon in the formatting toolbar. Enter the desired URL and click “Apply” or “OK”. This creates a clickable link in your email signature.
- You can also link an image in your signature by selecting the image and using the link icon to add the URL.
- Consider adding links to your professional social media profiles, such as LinkedIn or Twitter, to encourage recipients to connect with you on those platforms.
- Make sure to test the links in your signature to ensure they are working correctly.
Remember to keep the text formatting and links in your email signature consistent with your overall branding and professionalism. Choose fonts and colors that are easily legible and align with your personal or company style.
By formatting the text and adding relevant links, you can provide recipients with additional ways to engage with you and your online presence. It helps create a seamless and convenient experience for them to connect with your business or personal brand.
Now that you’ve customized the text and added links in your email signature, let’s move on to the next step and learn how to save and apply your signature to your outgoing emails.
Step 7: Save and Apply the Signature
After you have created and customized your email signature in Gmail, the next step is to save it and apply it to your outgoing emails. Follow these steps to save and apply your signature:
- Scroll down to the bottom of the Gmail Settings page, where you’ll find the “Save Changes” button. Click on it to save your signature.
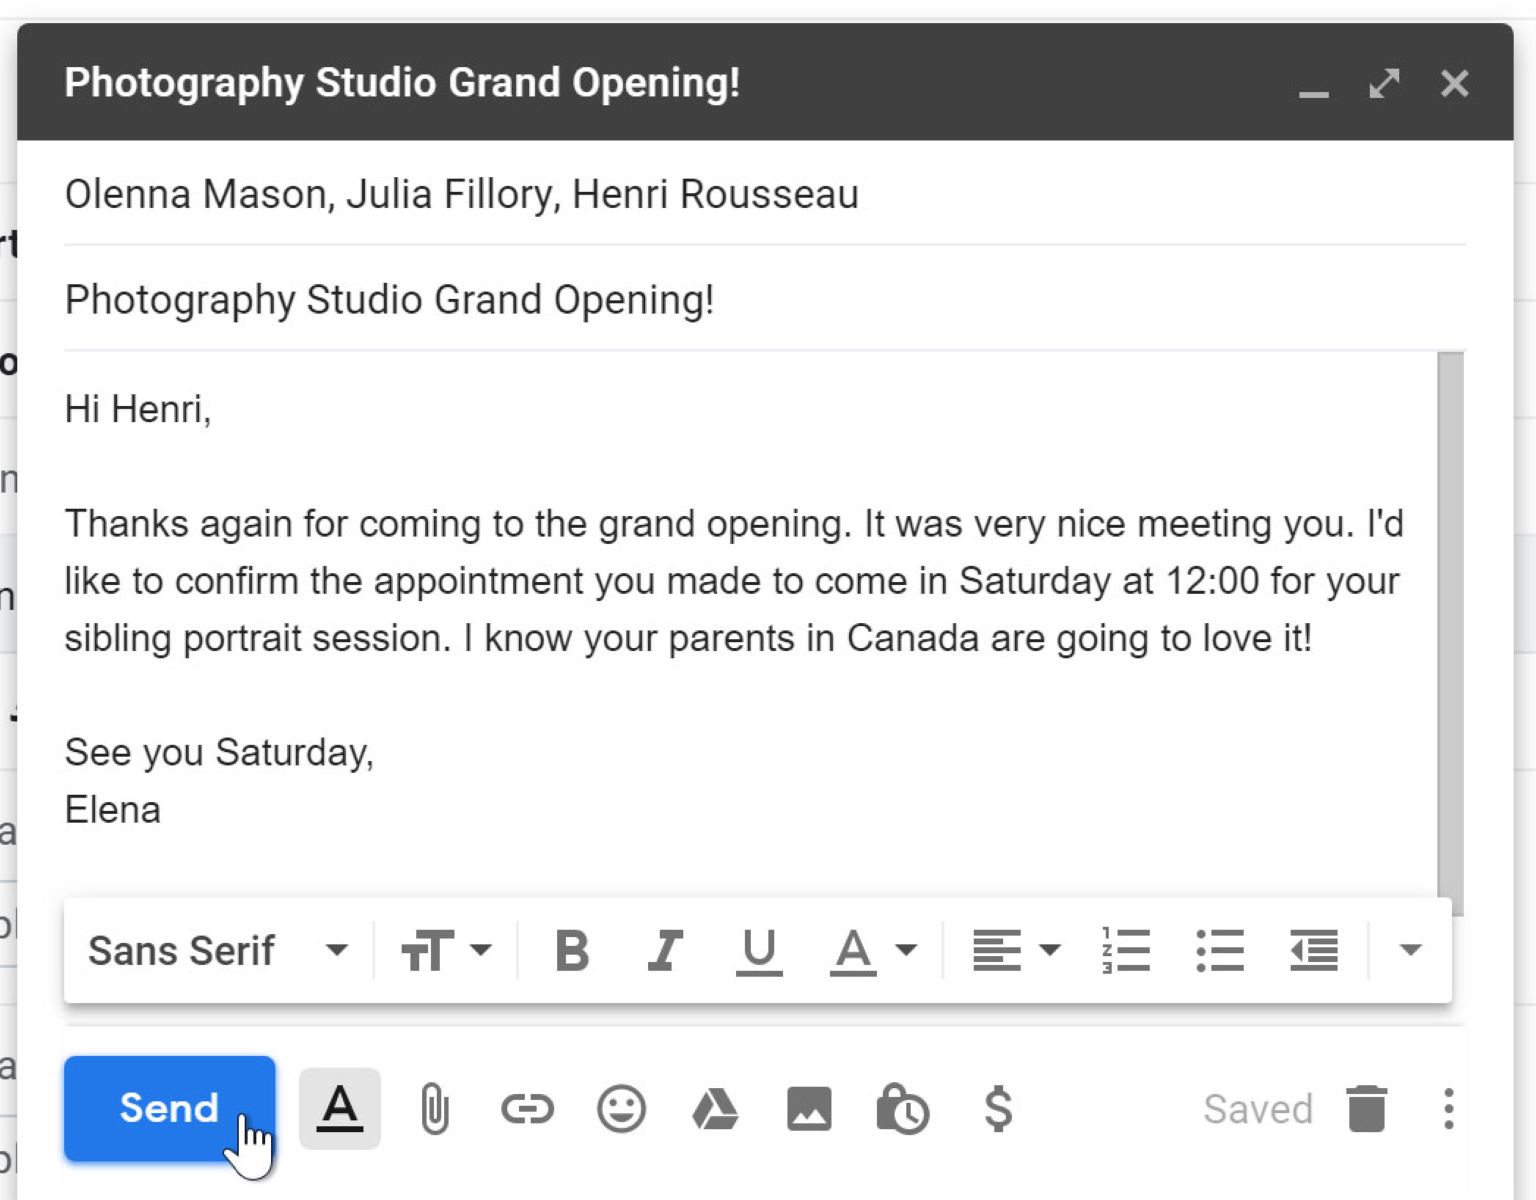
- Compose a new email or reply to an existing email to test your signature.
- At the bottom of the compose window, you’ll see the option to insert your email signature. By default, Gmail is set to “No signature”. To apply your newly created signature, click on the “Insert signature” option and choose the signature you want to use.
- Your signature will now be added to the email. You can make any final adjustments or additions if needed.
- Continue composing your email as usual, and your signature will appear automatically in every outgoing email.
By saving and applying your signature, you ensure that it will be automatically added to all your future emails, saving you time and ensuring consistent branding across your communications.
It’s worth noting that Gmail allows you to have multiple signatures for each of your connected email accounts. So, if you use different email addresses for different purposes, you can create separate signatures for each one.
Now that you’ve learned how to save and apply your signature, let’s move on to the final step and test your signature to ensure it appears correctly in your outgoing emails.
Step 8: Test Your Signature
Before you start sending emails with your newly created signature, it’s crucial to test it to ensure that it appears correctly and is visually appealing to your recipients. Follow these steps to test your signature:
- Compose a new email or reply to an existing email using your Gmail account.
- Ensure that the signature is automatically included at the bottom of the email.
- Check that all the text, formatting, and images in your signature are displayed correctly. Verify that the links are clickable and leading to the intended webpages.
- Send the test email to yourself or a trusted contact to confirm that the signature appears as expected in their inbox.
- Open the test email using different devices, email clients, and browsers to confirm that your signature is compatible and visually appealing across various platforms.
Testing your signature is essential in identifying any issues or inconsistencies that need to be addressed. It allows you to make any necessary revisions before sending your emails to ensure a professional and polished appearance.
If you notice any problems during the testing process, go back to the Gmail signature editor and make the necessary adjustments. Repeat the testing process until you are satisfied with the way your signature appears in your outgoing emails.
Now that you have thoroughly tested your signature and made any necessary tweaks, you can confidently use it in your everyday email communications.
Congratulations! You have successfully created, customized, and tested your Gmail email signature. Enjoy the convenience and professional touch it adds to your outgoing emails.
Conclusion
Creating a professional and visually appealing email signature in Gmail is a simple but impactful way to leave a lasting impression on your recipients. It not only provides essential contact information but also adds a touch of personalization and branding to your emails.
In this guide, we have walked through the step-by-step process of creating an email signature in Gmail. We started by accessing the Gmail settings, then moved on to creating a new signature and customizing it with fonts, colors, images, and links. We also discussed the importance of testing your signature to ensure it appears correctly across different devices and email clients.
Remember to keep your signature concise, legible, and consistent with your brand image. Consider adding relevant contact information, a professional photo, and links to your social media profiles or website to enhance engagement with your recipients.
By following the steps outlined in this guide, you can now confidently create a unique and attention-grabbing email signature in Gmail that reflects your personal or company branding.
So, go ahead and make that lasting impression with your well-designed email signature. Happy emailing!