Introduction
Welcome to the world of Chromebook jailbreaking! If you’re looking to unleash the full potential of your Chromebook and take it beyond its limitations, you’ve come to the right place. Jailbreaking allows you to install and run different operating systems, customize your device, and access a world of new possibilities.
Unlike other operating systems, Chromebook comes with some restrictions out of the box. However, with a little bit of technical know-how and the right tools, you can break free from these limitations and explore a whole new realm of functionality.
In this guide, we will walk you through the step-by-step process of jailbreaking your Chromebook. Before we begin, it’s important to note that jailbreaking your device may void your warranty and could potentially lead to errors or potential security risks. Therefore, proceed at your own discretion and responsibility.
Rest assured, we are here to provide you with clear instructions and guidance to ensure a smooth jailbreaking experience.
In the following sections, we will cover the tools you will need, the necessary preparations, and the step-by-step process to successfully jailbreak your Chromebook. So, without further ado, let’s get started on this exciting journey to unlock the full potential of your Chromebook!
Required Tools and Preparations
Before we dive into the jailbreaking process, there are a few essential tools and preparations you’ll need. Make sure you have the following items ready:
1. Chromebook
Of course, you’ll need a Chromebook to jailbreak! Ensure that your Chromebook is fully charged or connected to a power source throughout the jailbreaking process to avoid any disruptions.
2. USB Flash Drive
A USB flash drive will be required to create a recovery drive for your Chromebook. Make sure it has enough storage capacity to hold the necessary files.
3. External Keyboard and Mouse (Optional)
While not mandatory, using an external keyboard and mouse can make the jailbreaking process easier and more convenient, especially if you’re not comfortable with the Chromebook’s built-in keyboard and touchpad.
4. Internet Connection
Ensure that your Chromebook is connected to the internet throughout the jailbreaking process. This is crucial for downloading necessary files and updates.
5. Back Up Your Data
Before proceeding with the jailbreak, it’s vital to back up any important data on your Chromebook. While the likelihood of losing data during the process is low, it’s always better to be safe than sorry.
Once you have all the tools ready, it’s time to prepare your Chromebook for the jailbreaking process. Go through the following steps:
1. Check for Updates
Make sure your Chromebook is up to date by checking for any pending system updates. This will ensure that you have the latest version of Chrome OS installed.
2. Disable Developer Mode Warnings
In order to proceed with the jailbreaking process, you’ll need to disable the developer mode warnings on your Chromebook. This can be done in the Chrome OS settings.
3. Enable Developer Mode
Enabling developer mode is a crucial step in jailbreaking your Chromebook. It allows you to access and modify system files. However, keep in mind that enabling developer mode will erase all local data on your Chromebook, so make sure to back up your files before proceeding.
With these tools in hand and the necessary preparations made, you’re now ready to embark on your Chromebook jailbreaking adventure. In the next section, we will guide you through the step-by-step process of enabling developer mode and entering recovery mode.
Step 1: Enable Developer Mode
The first step in jailbreaking your Chromebook is to enable developer mode. Enabling developer mode gives you access to advanced features and allows you to modify the operating system. Please note that enabling developer mode will erase all local data on your Chromebook, so make sure to back up any important files before proceeding.
Follow these steps to enable developer mode:
- Ensure that your Chromebook is powered off.
- Press and hold the Esc key and the Refresh key simultaneously. The Refresh key typically has a circular arrow symbol on it.
- While pressing the Esc and Refresh keys, press the Power button to turn on your Chromebook.
- Release all three keys when you see a warning screen. This screen will display a message stating that Chrome OS is missing or damaged.
- Press Ctrl + D on your keyboard to bypass the warning screen and enter developer mode.
- You’ll see another screen prompting you to turn on OS verification. Press Enter to proceed.
- Wait for your Chromebook to reboot. This may take a few minutes.
Once your Chromebook has rebooted, you’ll see a screen displaying a red exclamation mark and a message stating that OS verification is off. This indicates that developer mode has been successfully enabled.
Congratulations! You’ve successfully enabled developer mode on your Chromebook. You’re one step closer to unlocking its full potential. In the next section, we’ll guide you through entering recovery mode to continue the jailbreaking process.
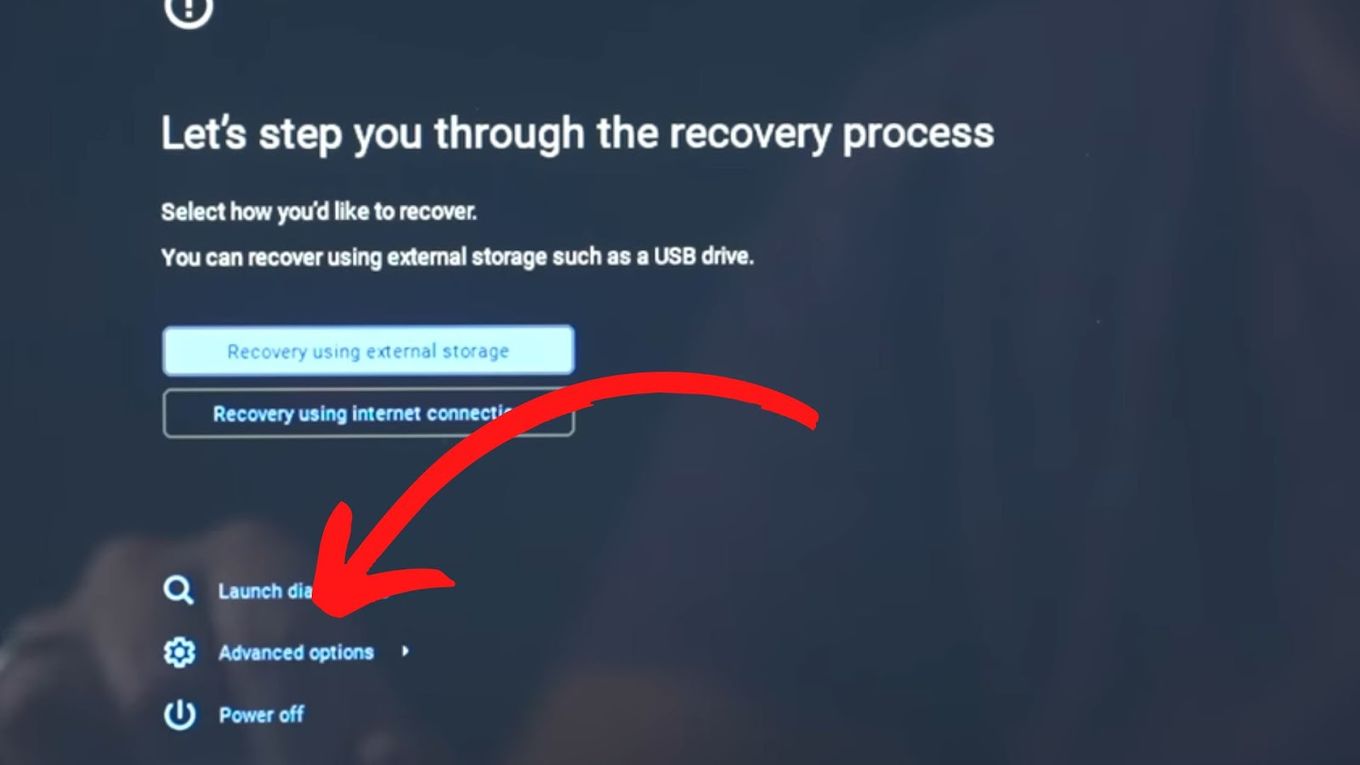
Step 2: Enter Recovery Mode
In order to continue the jailbreaking process, we need to enter recovery mode on your Chromebook. Recovery mode allows us to perform system updates, install custom firmware, and make necessary modifications to the device’s software.
Follow these steps to enter recovery mode:
- Ensure that your Chromebook is turned off.
- Press and hold the Esc key and the Refresh key simultaneously.
- While pressing the Esc and Refresh keys, press the Power button to turn on your Chromebook. Continue holding the Esc and Refresh keys until you see a screen with a message saying, “Chrome OS is missing or damaged.”
- Release the Esc and Refresh keys.
- Press Ctrl + D on your keyboard when prompted to enter recovery mode.
- Next, a yellow exclamation mark will appear on the screen with a message stating, “Chrome OS verification is turned off.” Press Ctrl + D again to proceed.
- Your Chromebook will now enter recovery mode, and you’ll see a screen displaying a message saying, “OS verification is off.”
Once you’ve successfully entered recovery mode, you can proceed to the next step of the jailbreaking process. In the upcoming sections, we’ll guide you through the installation of Linux and the customization of your Chromebook to unlock its full potential.
Step 3: Start CRouton
Now that you’ve enabled developer mode and entered recovery mode, it’s time to start CRouton. CRouton is a set of scripts that allows you to easily install Linux alongside Chrome OS on your Chromebook.
Follow these steps to start CRouton:
- While in recovery mode, press Ctrl + Alt + T on your keyboard. This will open the Chrome Terminal.
- At the terminal prompt, type
shelland press Enter to enter the Crosh shell. - Next, you’ll need to download the CRouton script. Enter the following command to download the script:
shell
curl -O https://goo.gl/fd3zc
- Once the script is downloaded, you can start the installation process. Enter the following command to start CRouton:
shell
sudo sh ~/Downloads/crouton -t core
The -t core flag specifies that you want to install the core system components. You can customize this flag later to include additional components or desktop environments.
- Wait for the installation process to complete. This may take a while depending on your internet speed and the components you selected.
- Once the installation is finished, you can start Linux by entering the following command:
shell
sudo startxfce4
This command will start the XFCE desktop environment, which is lightweight and easy to use.
Congratulations! You have successfully started CRouton and Linux on your Chromebook. In the next steps, we will install the Linux distribution of your choice and set up the Crouton Integration extension to seamlessly switch between Chrome OS and Linux.
Step 4: Install Linux Distro of Your Choice
Now that you have started CRouton and Linux on your Chromebook, it’s time to install the Linux distribution of your choice. CRouton supports several popular Linux distributions like Ubuntu, Debian, and Fedora. Installing a Linux distro will give you access to a wider range of software and customization options.
Follow these steps to install a Linux distro:
- Once you have started Linux using the
sudo startxfce4command, open the Terminal emulator. - In the terminal, enter the following command to bring up the CRouton options:
shell
sudo sh ~/Downloads/crouton -t list
This command will list all the available Linux distributions and their respective versions.
- Choose the Linux distribution you want to install by entering the following command:
shell
sudo sh ~/Downloads/crouton -r
Replace “
shell
sudo sh ~/Downloads/crouton -r ubuntu -t xfce
- The installation process will begin. Follow the on-screen prompts to complete the installation.
- Once the installation is finished, you can start the Linux distribution by entering the following command:
shell
sudo start
Replace “
shell
sudo startubuntu
That’s it! You have successfully installed a Linux distribution on your Chromebook. You now have access to a wide range of Linux software and customization options. In the next step, we will install the Crouton Integration extension to seamlessly switch between Chrome OS and Linux.
Step 5: Install Crouton Integration Extension
With your Linux distribution installed on your Chromebook, it’s time to enhance the integration between Chrome OS and Linux. To seamlessly switch between the two operating systems and enjoy a smoother user experience, we’ll install the Crouton Integration extension.
Follow these steps to install the Crouton Integration extension:
- Open the Chrome web browser on your Chromebook.
- Visit the Chrome Web Store by navigating to https://chrome.google.com/webstore.
- In the search bar, type “Crouton Integration” and press Enter.
- Look for the “Crouton Integration” extension and click on it to open the extension page.
- Click on the “Add to Chrome” button to install the extension.
- A confirmation dialog will appear asking for permission to add the extension. Click on “Add extension” to proceed with the installation.
- Wait for the extension to be downloaded and installed. Once the installation is complete, you will see a notification indicating that the Crouton Integration extension has been added to Chrome.
Now that you have installed the Crouton Integration extension, you will be able to switch seamlessly between Chrome OS and your installed Linux distribution. To switch to Linux, click on the Crouton Integration app icon in the Chrome OS shelf, select your Linux distribution, and follow the prompts to enter the Linux environment.
Remember to save your work and close any open applications in one operating system before switching to the other to avoid data loss.
Great job! You have successfully installed the Crouton Integration extension, allowing you to enjoy a cohesive experience between Chrome OS and Linux on your Chromebook. In the next step, we will update your Linux distribution to ensure that you have the latest software and security patches.
Step 6: Update the Linux Distro
Keeping your Linux distribution up to date is crucial for optimal performance, security, and access to the latest features and software. In this step, we will guide you through the process of updating your Linux distro on your Chromebook.
Follow these steps to update your Linux distro:
- Start your Linux distribution by entering the following command in the Terminal:
shell
sudo start
Replace “
shell
sudo startubuntu
- Once Linux has started, open the Terminal emulator from the applications menu.
- To update your Linux distribution, enter the following command:
shell
sudo apt update && sudo apt upgrade
This command will update the package lists and upgrade your installed packages to the latest versions.
- Follow the prompts and enter your password when prompted.
- Wait for the update and upgrade process to complete. This may take some time depending on the number of packages that need to be updated.
- Once the process is finished, you have successfully updated your Linux distribution.
It is recommended to periodically check for updates and run the update command to ensure that your Linux distribution remains up to date.
Well done! You have successfully updated your Linux distribution on your Chromebook. This ensures that you have the latest software and security patches for a smooth and secure experience. In the next step, we will proceed with the jailbreaking process by customizing your Chromebook to suit your preferences and needs.
Step 7: Jailbreak Your Chromebook
Now that you have enabled developer mode, installed Linux, and updated your Linux distribution, it’s time to take the final step and jailbreak your Chromebook. Jailbreaking allows you to unlock additional functionality, install custom firmware, and explore a whole new world of possibilities.
Follow these steps to jailbreak your Chromebook:
- Ensure that your Chromebook is currently running your Linux distribution. If not, start your Linux distribution using the command:
shell
sudo start
Replace “
- Open the Terminal emulator in your Linux environment.
- Enter the following commands:
shell
sudo su
flashrom –wp-disable –wp-range=0x0-0x100000
This command will disable the write protection on the Chromebook’s firmware, allowing for modification.
- After running the above commands, it’s time to flash the custom firmware. Enter the following command to install the firmware:
shell
cd ~
curl -L -O https://mrchromebox.tech/firmware-util.sh
- Once the firmware-util.sh script has been downloaded, execute the following command to start the flashing process:
shell
sudo bash firmware-util.sh
Follow the prompts and carefully read and accept the warning messages. The script will guide you through the process of flashing the custom firmware.
- After the flashing process is complete, reboot your Chromebook.
Congratulations! You have successfully jailbroken your Chromebook. You now have the freedom to customize and explore new possibilities with your device. Please note that jailbreaking your Chromebook may void your warranty and could potentially lead to errors or security risks. Proceed with caution and be responsible for any modifications you make.
In the next step, we’ll cover some customization options and tips to help you make the most out of your newly jailbroken Chromebook.
Step 8: Customize and Enjoy
Congratulations on successfully jailbreaking your Chromebook! Now that you have unlocked the full potential of your device, it’s time to customize it to your liking and enjoy the enhanced capabilities it now offers. Here are some customization options and tips to help you get started:
1. Desktop Environment
Experiment with different desktop environments to find one that suits your preferences. XFCE, GNOME, and KDE are popular choices. You can install multiple desktop environments and switch between them using the Crouton Integration extension.
2. Software Installation
Install your favorite Linux applications and software packages using package managers like APT or SNAP. Explore the vast Linux ecosystem and discover new tools, games, and productivity applications to enhance your Chromebook experience.
3. Appearance Customization
Customize the appearance of your Linux desktop and Chrome OS by changing themes, wallpapers, icons, and fonts. Personalize your device to reflect your style and make it feel truly yours.
4. Tweaking System Settings
Explore the system settings of your Linux distribution to fine-tune your Chromebook’s performance, power management, and other aspects. Adjusting settings can help optimize your device for your specific needs.
5. Virtualization and Containerization
Take advantage of virtualization and containerization technologies to run multiple operating systems or containers simultaneously. This allows you to have different environments for different tasks or isolate applications for enhanced security.
6. Developer Tools
As a developer, use your jailbroken Chromebook to its full potential by installing development tools and IDEs. Take advantage of the Linux environment to code, debug, and test your applications with ease.
Remember, with great power comes great responsibility. Be mindful of the modifications you make and the potential security risks. Regularly update your Linux distribution and Chrome OS to ensure a secure computing environment.
Enjoy the newfound freedom and possibilities that come with jailbreaking your Chromebook. Explore, create, and make your device truly unique. Have fun customizing, experimenting, and using your jailbroken Chromebook to its maximum potential!
Conclusion
Congratulations on completing the jailbreaking process for your Chromebook! By enabling developer mode, installing Linux, and customizing your device, you have unlocked a whole new world of possibilities and enhanced functionality.
Remember, jailbreaking your Chromebook may void your warranty and could potentially pose security risks. Proceed at your own discretion and take responsibility for any modifications you make to your device.
With your newly jailbroken Chromebook, you can now enjoy the freedom to install custom firmware, explore different operating systems, and customize your device to suit your preferences. Take advantage of the vast Linux ecosystem and discover new applications, tools, and features that can enhance your productivity, creativity, and enjoyment.
Remember to regularly update your Linux distribution and Chrome OS to ensure a secure computing environment, and always be cautious when installing third-party software or making system modifications.
We hope this guide has provided you with the necessary knowledge and steps to successfully jailbreak your Chromebook. Enjoy the limitless possibilities, embrace your newfound freedom, and make the most out of your jailbroken Chromebook!
Happy exploring and customization!