Introduction
Do you own a Chromebook and find yourself needing to unzip files? While Chromebooks are known for their simplicity and security, some users may be unsure about how to perform certain tasks, such as unzipping files. Fortunately, there are several methods available that allow you to easily unzip files on your Chromebook.
Unzipping files is a common need for many users, especially when downloading files from the internet or receiving compressed folders via email. A compressed folder, often referred to as a ZIP file, contains one or more files that have been compressed to reduce their size for easier storage and transfer. Once unzipped, the files are restored to their original size and can be accessed and used.
In this article, we will explore four methods to unzip files on a Chromebook. These methods include using the built-in ‘Files’ app, utilizing web apps from the Chrome Web Store, leveraging third-party apps from the Google Play Store, and utilizing online file decompressors. Whether you prefer native Chromebook apps or external tools, we have you covered.
Keep in mind that these methods are applicable to most Chromebook models running the Chrome OS. However, some older models or models with limited storage may have restrictions or less functionality in certain methods. With that said, let’s dive into the various ways to unzip files on your Chromebook.
Method 1: Using the ‘Files’ app
The ‘Files’ app is a built-in file manager on Chromebooks that allows you to navigate your device’s storage, manage files and folders, and perform basic file operations such as copy, paste, and delete. It also supports unzipping compressed files, making it a convenient option for Chromebook users.
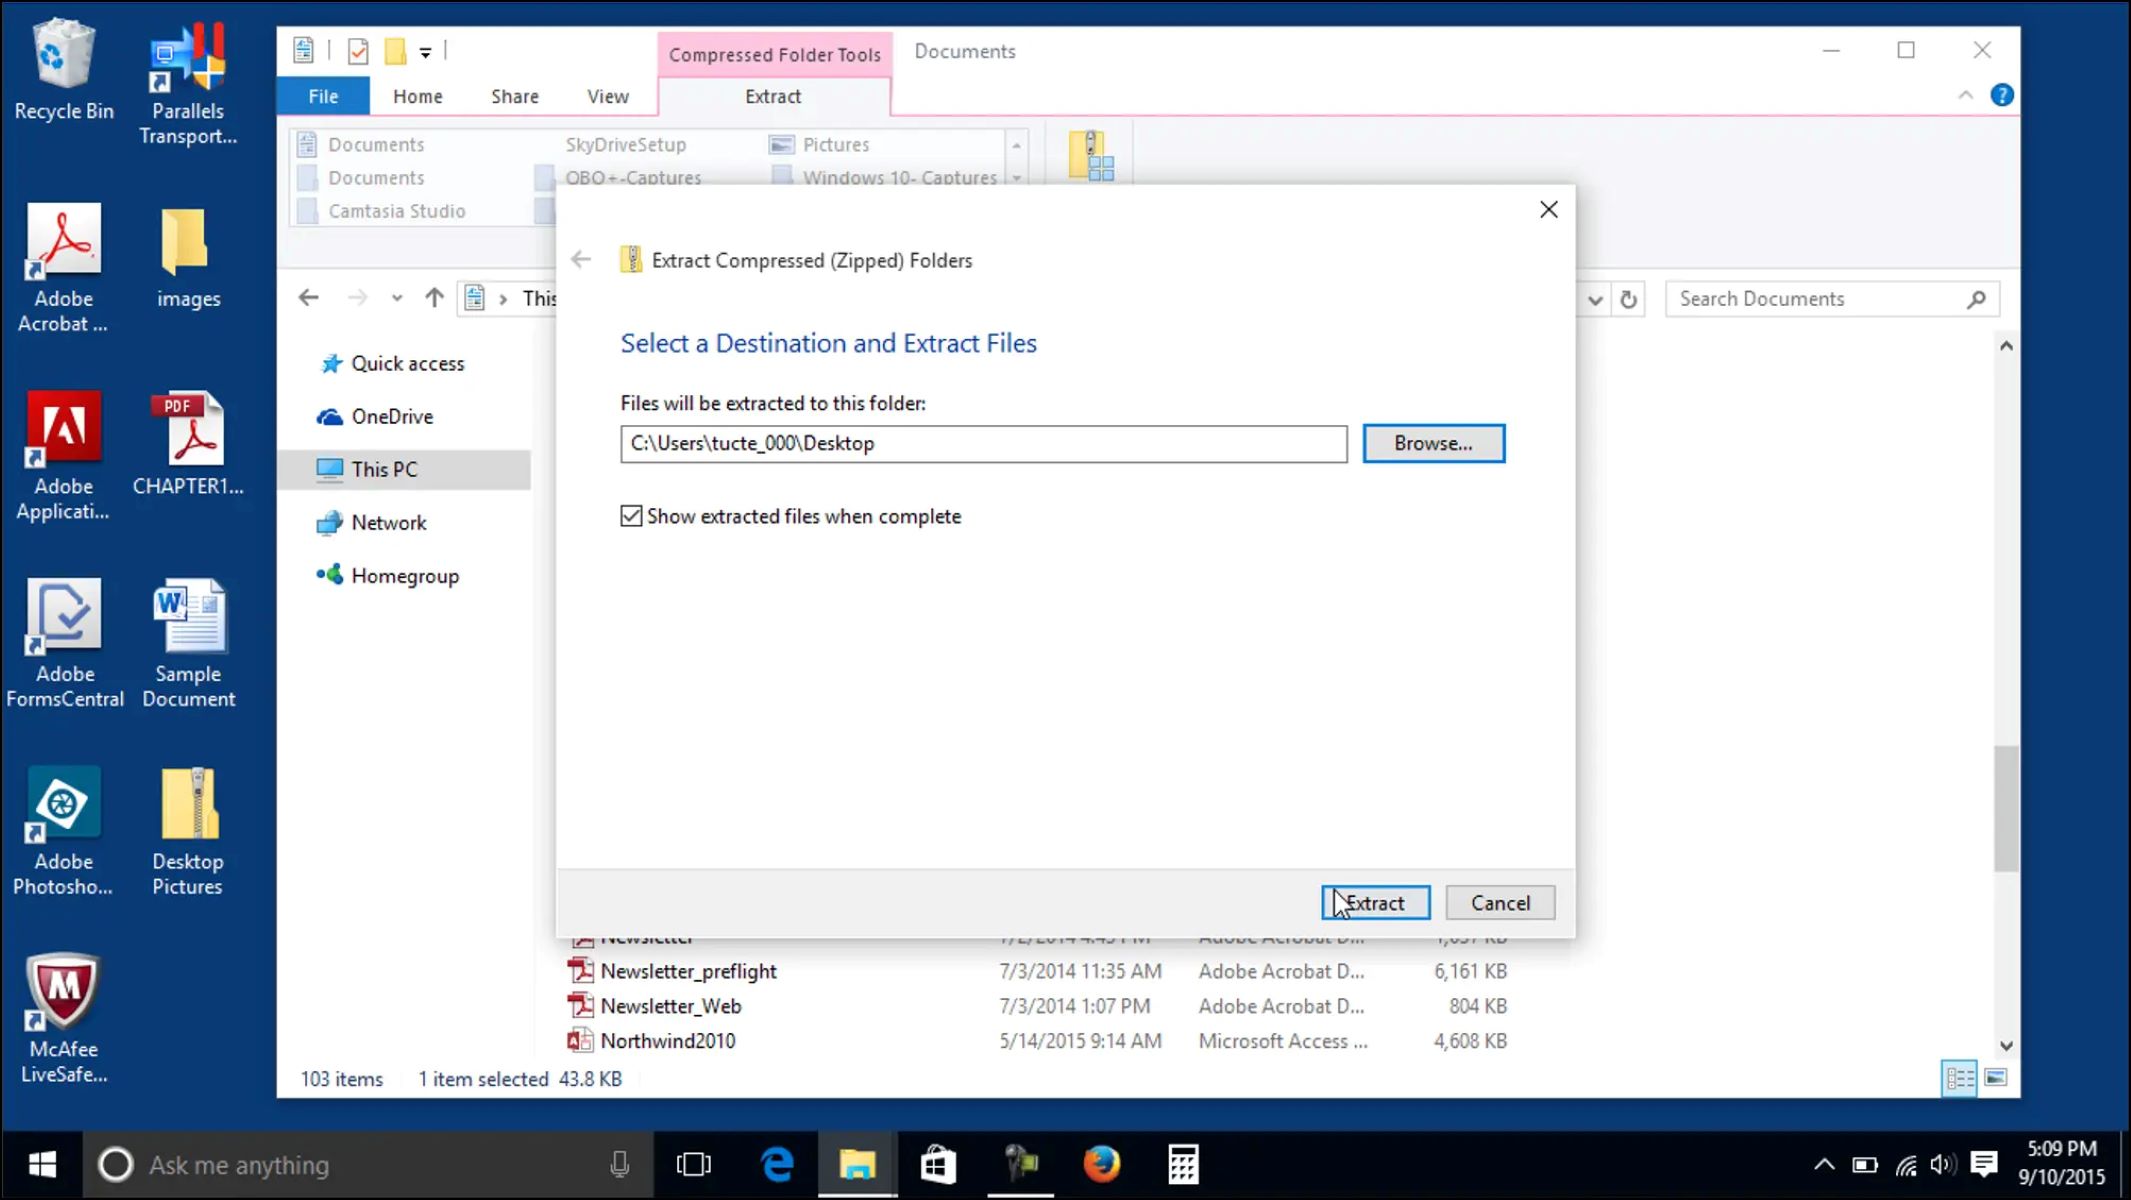
To unzip a file using the ‘Files’ app, follow these steps:
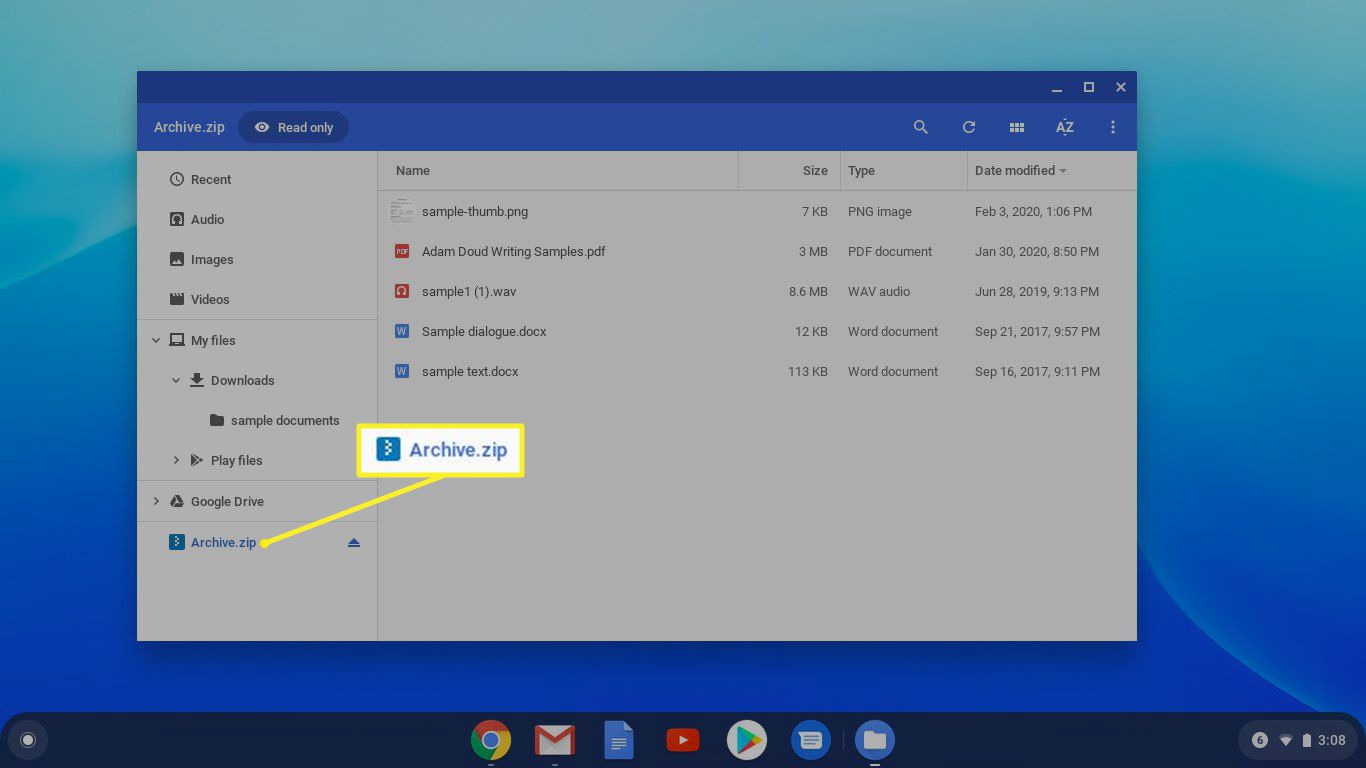
- Locate the ZIP file you want to unzip. You can find it in your downloads folder or any other directory where you have saved the file.
- Double-click on the ZIP file to open it with the ‘Files’ app. The file will appear in a new window.
- Click on the ‘Extract’ button located at the top of the window. The ‘Extract’ button looks like a folder icon with an arrow pointing outwards.
- Choose the destination folder where you want to extract the files. You can select an existing folder or create a new one by clicking on the ‘New Folder’ button.
- Click on the ‘Extract’ button to start the extraction process. The ‘Files’ app will create a new folder in the chosen destination and extract the files from the ZIP file into that folder.
Once the extraction is complete, you can access the unzipped files by navigating to the destination folder. From there, you can move, open, edit, or delete the files as needed.
The ‘Files’ app provides a straightforward and simple way to unzip files on your Chromebook without the need for additional apps or tools. It is a reliable option for most users, especially for basic file management tasks.
Now that you know how to use the ‘Files’ app to unzip files on your Chromebook, let’s explore another method using web apps from the Chrome Web Store.
Method 2: Using a web app from the Chrome Web Store
If you prefer using a dedicated web app for unzipping files on your Chromebook, you can explore options available in the Chrome Web Store. The Chrome Web Store hosts a wide range of web apps that offer various functionalities, including file compression and extraction.
Follow these steps to unzip files using a web app from the Chrome Web Store:
- Open the Chrome Web Store by clicking on the ‘Apps’ icon located in your Chromebook’s application launcher.
- In the search bar at the top left corner of the Chrome Web Store, type in keywords like ‘unzip’ or ‘file extractor’ to find relevant apps.
- Review the search results and select a web app that meets your requirements. Look for apps with favorable user ratings and reviews to ensure reliability.
- Click on the ‘Add to Chrome’ button to install the web app on your Chromebook. The app will be added to your app launcher for easy access.
- Once the app is installed, open it from your app launcher or by searching for its name in the application launcher.
- Select the ZIP file you want to unzip and follow the instructions provided by the web app to initiate the extraction process.
- Choose the destination folder where you want the extracted files to be saved.
- Click on the ‘Extract’ or ‘Unzip’ button to start the file extraction. Depending on the app you are using, the interface and options may vary.
After the extraction is complete, you can access the unzipped files in the chosen destination folder. Web apps from the Chrome Web Store offer a convenient alternative if you prefer using dedicated tools for file extraction.
Please note that the availability of web apps may vary, and some apps may require a subscription or offer additional features beyond basic file extraction. Make sure to read the app description and user reviews to choose an app that suits your needs.
Now that you have learned about unzipping files using a web app from the Chrome Web Store, let’s move on to another method using third-party apps from the Google Play Store.
Method 3: Using a third-party app from the Google Play Store
If you own a Chromebook that supports Android apps, you can take advantage of the wide range of apps available on the Google Play Store, including ones that specialize in file compression and extraction.
To unzip files using a third-party app from the Google Play Store, follow these steps:
- Open the Google Play Store app on your Chromebook.
- In the search bar at the top of the screen, type in keywords such as ‘unzip’ or ‘file extractor’ to find relevant apps.
- Review the search results and select an app that suits your preferences. Consider factors such as user ratings, reviews, and app features.
- Click on the ‘Install’ button to download and install the chosen app on your Chromebook.
- Once the app is installed, open it from your app launcher or by searching for its name.
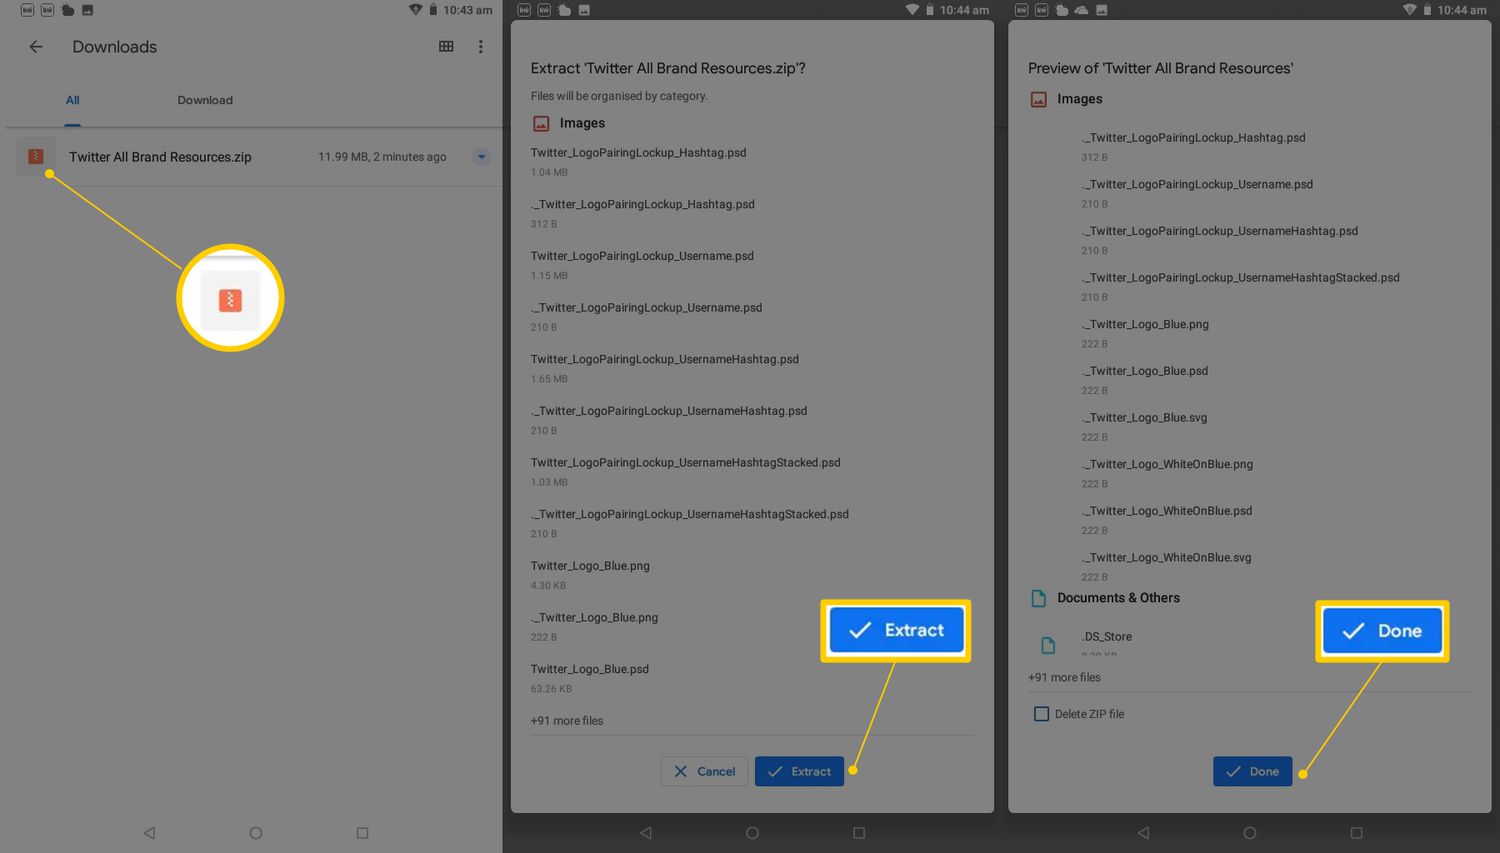
- Navigate to the location of the ZIP file you want to extract within the third-party app.
- Select the ZIP file and choose the destination folder where you want to extract the files.
- Follow the instructions provided by the app to initiate the extraction process.
- Click on the ‘Extract’ or ‘Unzip’ button to begin the file extraction. The app will extract the files and save them to the specified destination folder.
Once the extraction is complete, you can access the unzipped files in the chosen destination folder using the file manager app provided by the third-party app or the ‘Files’ app on your Chromebook.
Third-party apps from the Google Play Store offer additional flexibility and functionality for file extraction, making them a popular choice for users with specific needs or preferences. However, keep in mind that some apps may require in-app purchases or offer advanced features beyond basic file extraction.
Now that you know how to use a third-party app from the Google Play Store to unzip files on your Chromebook, let’s delve into another method using an online file decompressor.
Method 4: Using an online file decompressor
If you prefer to avoid installing additional apps on your Chromebook, you can utilize online file decompressors to unzip files directly from your browser. Online file decompressors are web-based tools that allow you to upload a ZIP file and extract its contents without the need for any software installation.
To unzip files using an online file decompressor, follow these steps:
- Open your preferred web browser on your Chromebook.
- Search for a reputable online file decompressor in a search engine. Some popular options include ‘Unzip Online’, ‘Extract.me’, and ‘Online Zip Converter’.
- Click on a trusted online file decompressor from the search results to access its website.
- Navigate to the extraction or decompression section of the website.
- Click on the ‘Choose File’ or ‘Browse’ button to upload the ZIP file from your Chromebook’s storage.
- Select the ZIP file you want to unzip and click on the ‘Open’ button to upload it to the online file decompressor.
- Wait for the decompression process to complete. The duration may vary depending on the size of the ZIP file and the speed of your internet connection.
- Once the extraction is finished, the online decompressor will provide a download link or directly display the extracted files on the website.
- Click on the download link or save the files to your Google Drive or other cloud storage options if available.
After downloading or saving the unzipped files, you can access them through your Chromebook’s file manager or the cloud storage platform you used.
Online file decompressors provide a convenient solution for quickly unzipping files without the need for installing additional software. However, keep in mind that the availability and features of online file decompressors may vary, and you should ensure that you choose a reputable and secure website.
With the knowledge of using online file decompressors to unzip files, we have explored various methods to perform this task on your Chromebook. Now, let’s summarize what we’ve learned.
Conclusion
Unzipping files on your Chromebook doesn’t have to be a daunting task. In this article, we explored four different methods to unzip files, depending on your preferences and needs.
Firstly, we discussed using the built-in ‘Files’ app on Chromebooks. This method is convenient and straightforward, allowing you to easily extract files with just a few clicks.
Next, we looked at using web apps from the Chrome Web Store. These dedicated apps provide a seamless experience for file extraction and offer additional features beyond basic unzipping.
If you have a Chromebook that supports Android apps, our third method involved using third-party apps from the Google Play Store. These apps provide flexibility and functionality for file extraction, catering to specific user preferences.
Lastly, we explored the option of using online file decompressors. This method allows you to unzip files directly from a web browser without the need for installing additional software on your Chromebook.
Ultimately, the method you choose depends on your personal preference and the specific requirements of the task at hand. Chromebooks offer flexibility and accessibility, accommodating various methods for unzipping files.
Remember to consider factors such as ease of use, available features, and the security of the method you choose. Additionally, ensure that you practice caution when downloading files from the internet and only use trusted sources.
With these methods at your disposal, you can confidently unzip files on your Chromebook and efficiently manage your digital content. Embrace the versatility of your Chromebook and enjoy the seamless experience of extracting files as needed.