Introduction
Changing the language on your Chromebook can greatly enhance your browsing experience, making it easier to navigate and understand. Whether you are learning a new language, prefer using Chromebook in your native language, or simply want a change of pace, adjusting the language settings is a simple and straightforward process.
In this guide, we will walk you through the step-by-step process of changing the language on your Chromebook. By following these instructions, you will be able to customize your device to display menus, notifications, and other system elements in your desired language.
Chromebooks are designed with user-friendliness in mind, and changing the language is no exception. With just a few clicks, you can switch between languages and explore the possibilities of a multilingual Chromebook experience.
Whether you want to add a new language to the list of available options, remove a language you no longer need, or rearrange the order of languages, this guide will provide you with all the necessary steps to accomplish your goals.
So, if you’re ready to embark on this language-changing journey, let’s get started with the first step: opening the settings menu!
Step 1: Open the Settings Menu
The first step to changing the language on your Chromebook is to access the settings menu. This is where you can make various adjustments to personalize your device.
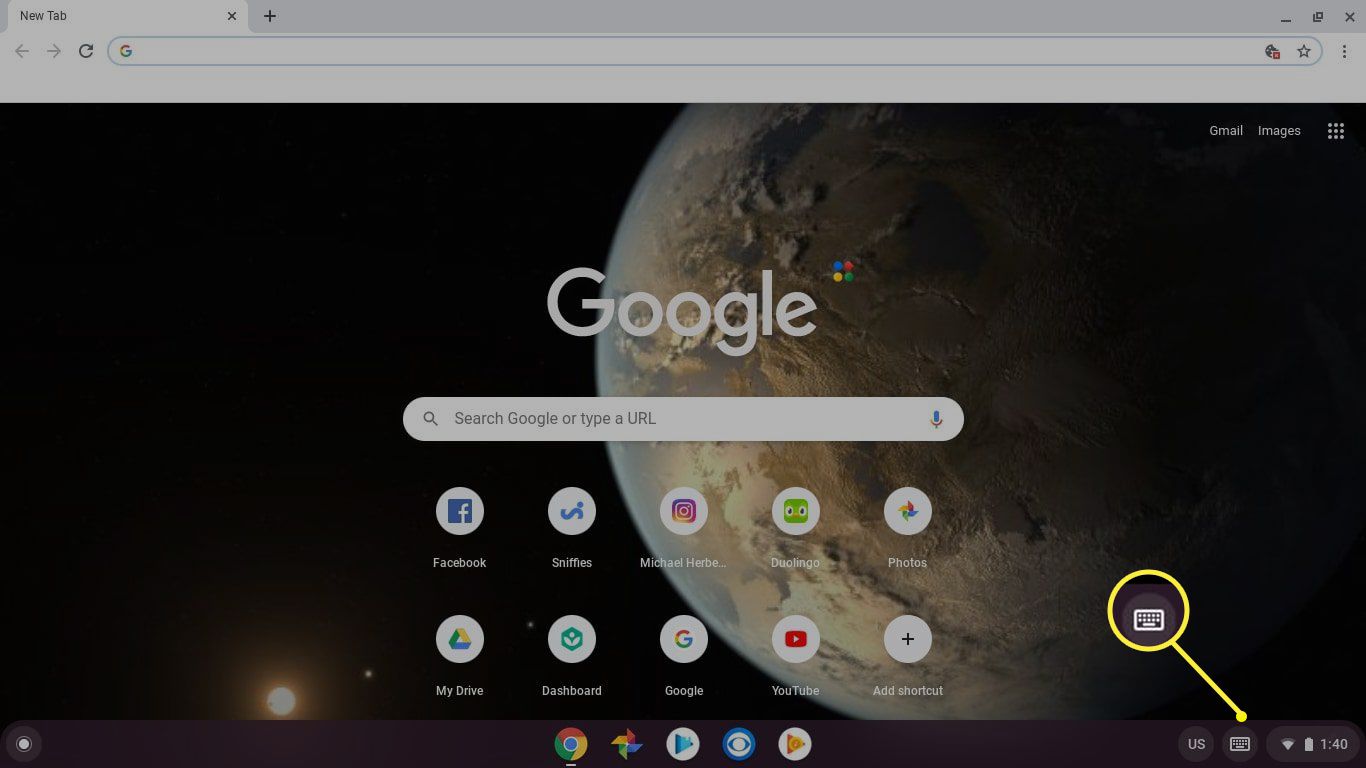
To open the settings menu, click on the clock icon located in the bottom-right corner of the screen. This will display a pop-up window with a few options. From the list, click on the gear-shaped icon labeled “Settings” to open the Chromebook settings.
Alternatively, you can also access the settings menu by clicking on the status area in the bottom-right corner of the screen. This will open a panel that displays various options, including Wi-Fi, battery, and settings. Click on the gear-shaped icon labeled “Settings” to proceed.
Once you have clicked on the “Settings” option, a new tab will open in your web browser, displaying the Chromebook settings. This tab is where you can customize a wide range of options, including the language settings.
Now that you have successfully opened the settings menu, you can move on to the next step: clicking on “Advanced.”
Step 2: Click on “Advanced”
After opening the Chromebook settings, the next step in changing the language is to access the “Advanced” section. This section contains additional settings and options that allow you to further customize your device.
To locate the “Advanced” section, scroll down the settings page until you see a category called “Advanced.” This category is typically located towards the bottom of the settings page, just before the “Reset settings” option.
Click on the category labeled “Advanced” to expand it and reveal the additional settings within.
By accessing the “Advanced” section, you gain access to a variety of advanced settings that can be adjusted according to your preferences. These settings allow you to delve deeper into the customization options available on your Chromebook.
Now that you have found and clicked on the “Advanced” section, you are ready to proceed to the next step: locating the “Languages” section.
Step 3: Locate the “Languages” section
Once you have accessed the “Advanced” section in the Chromebook settings, the next step is to locate the “Languages” section. This section is where you can manage the languages available on your device and make changes as needed.
Scroll down the settings page until you find the category labeled “Languages and input.” This category is typically located towards the middle of the “Advanced” section, just after the “Privacy and security” category.
Click on the “Languages and input” category to expand it and reveal the corresponding settings.
Within the “Languages and input” category, you will find the “Languages” section. This is the section where you can add new languages, remove existing ones, and customize the display language of your Chromebook.
The “Languages” section also provides additional options, such as spell check and input method settings that can be adjusted according to your preferences.
Now that you have successfully located the “Languages” section, you are ready to move on to the next step: clicking on “Language.”
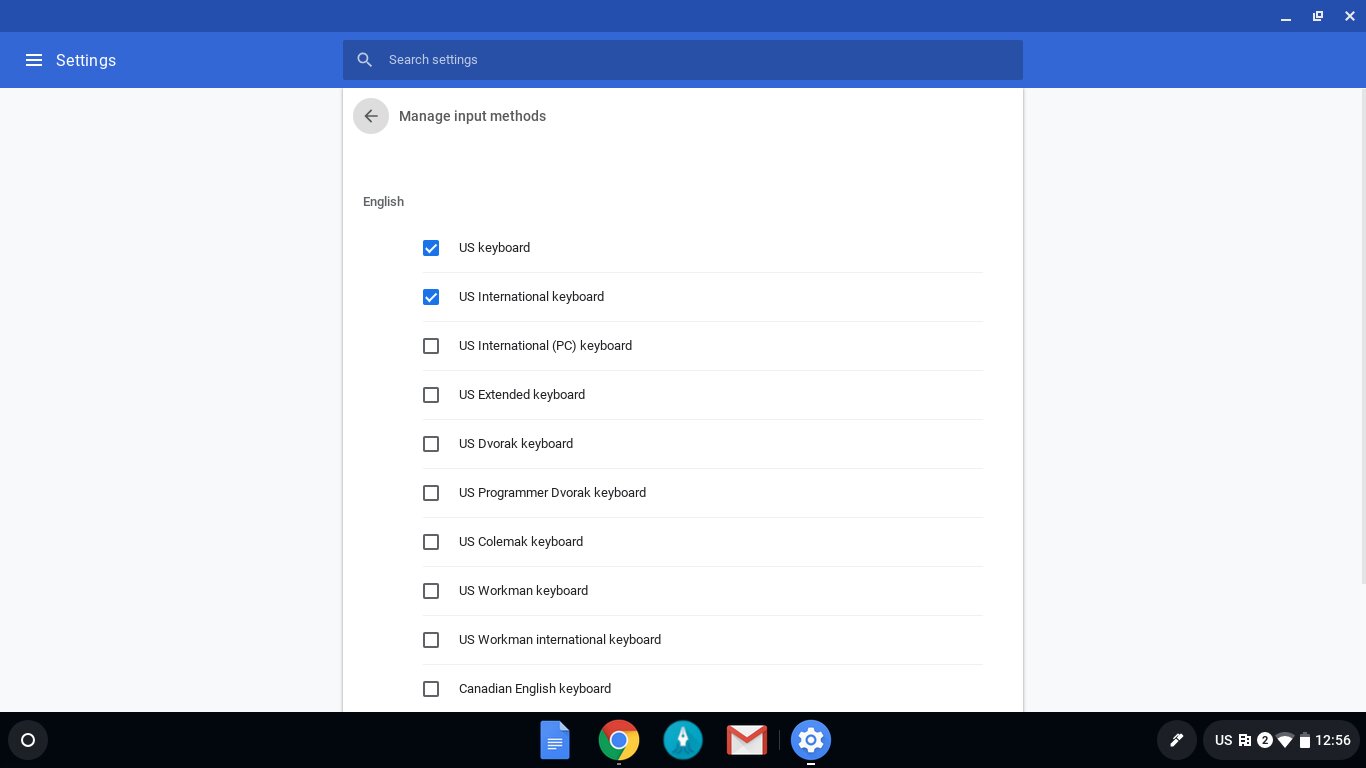
Step 4: Click on “Language”
Once you have found the “Languages” section within the Chromebook settings, the next step is to click on the “Language” option. This will allow you to make changes to the available languages on your device.
Within the “Languages” section, you will see a list of the languages currently installed on your Chromebook. This list includes both the display language and any additional input languages you may have added.
To make changes to the language settings, click on the “Language” option. This will open a new window with additional language-related settings that you can modify.
The language settings window allows you to manage various aspects of the languages on your Chromebook. Here, you can add new languages, remove existing ones, and rearrange the order in which the languages are displayed.
When you click on the “Language” option, you will see a list of available languages. To add a new language, click on the “Add languages” button and select the language you want to add from the list.
If you no longer need a specific language, you can remove it by clicking on the three-dot menu next to the language and selecting “Remove.”
In addition to adding and removing languages, you can also rearrange the order in which they are displayed. Simply click and hold on a language, then drag it up or down the list to change its position.
Now that you have clicked on the “Language” option and familiarized yourself with the language settings window, you are ready to proceed to the next step: adding a new language.
Step 5: Add a New Language
Adding a new language to your Chromebook is a great way to customize your device to suit your language preferences. Whether you want to explore a new language or need to communicate in a different language, this step will guide you through the process of adding a new language to your Chromebook.
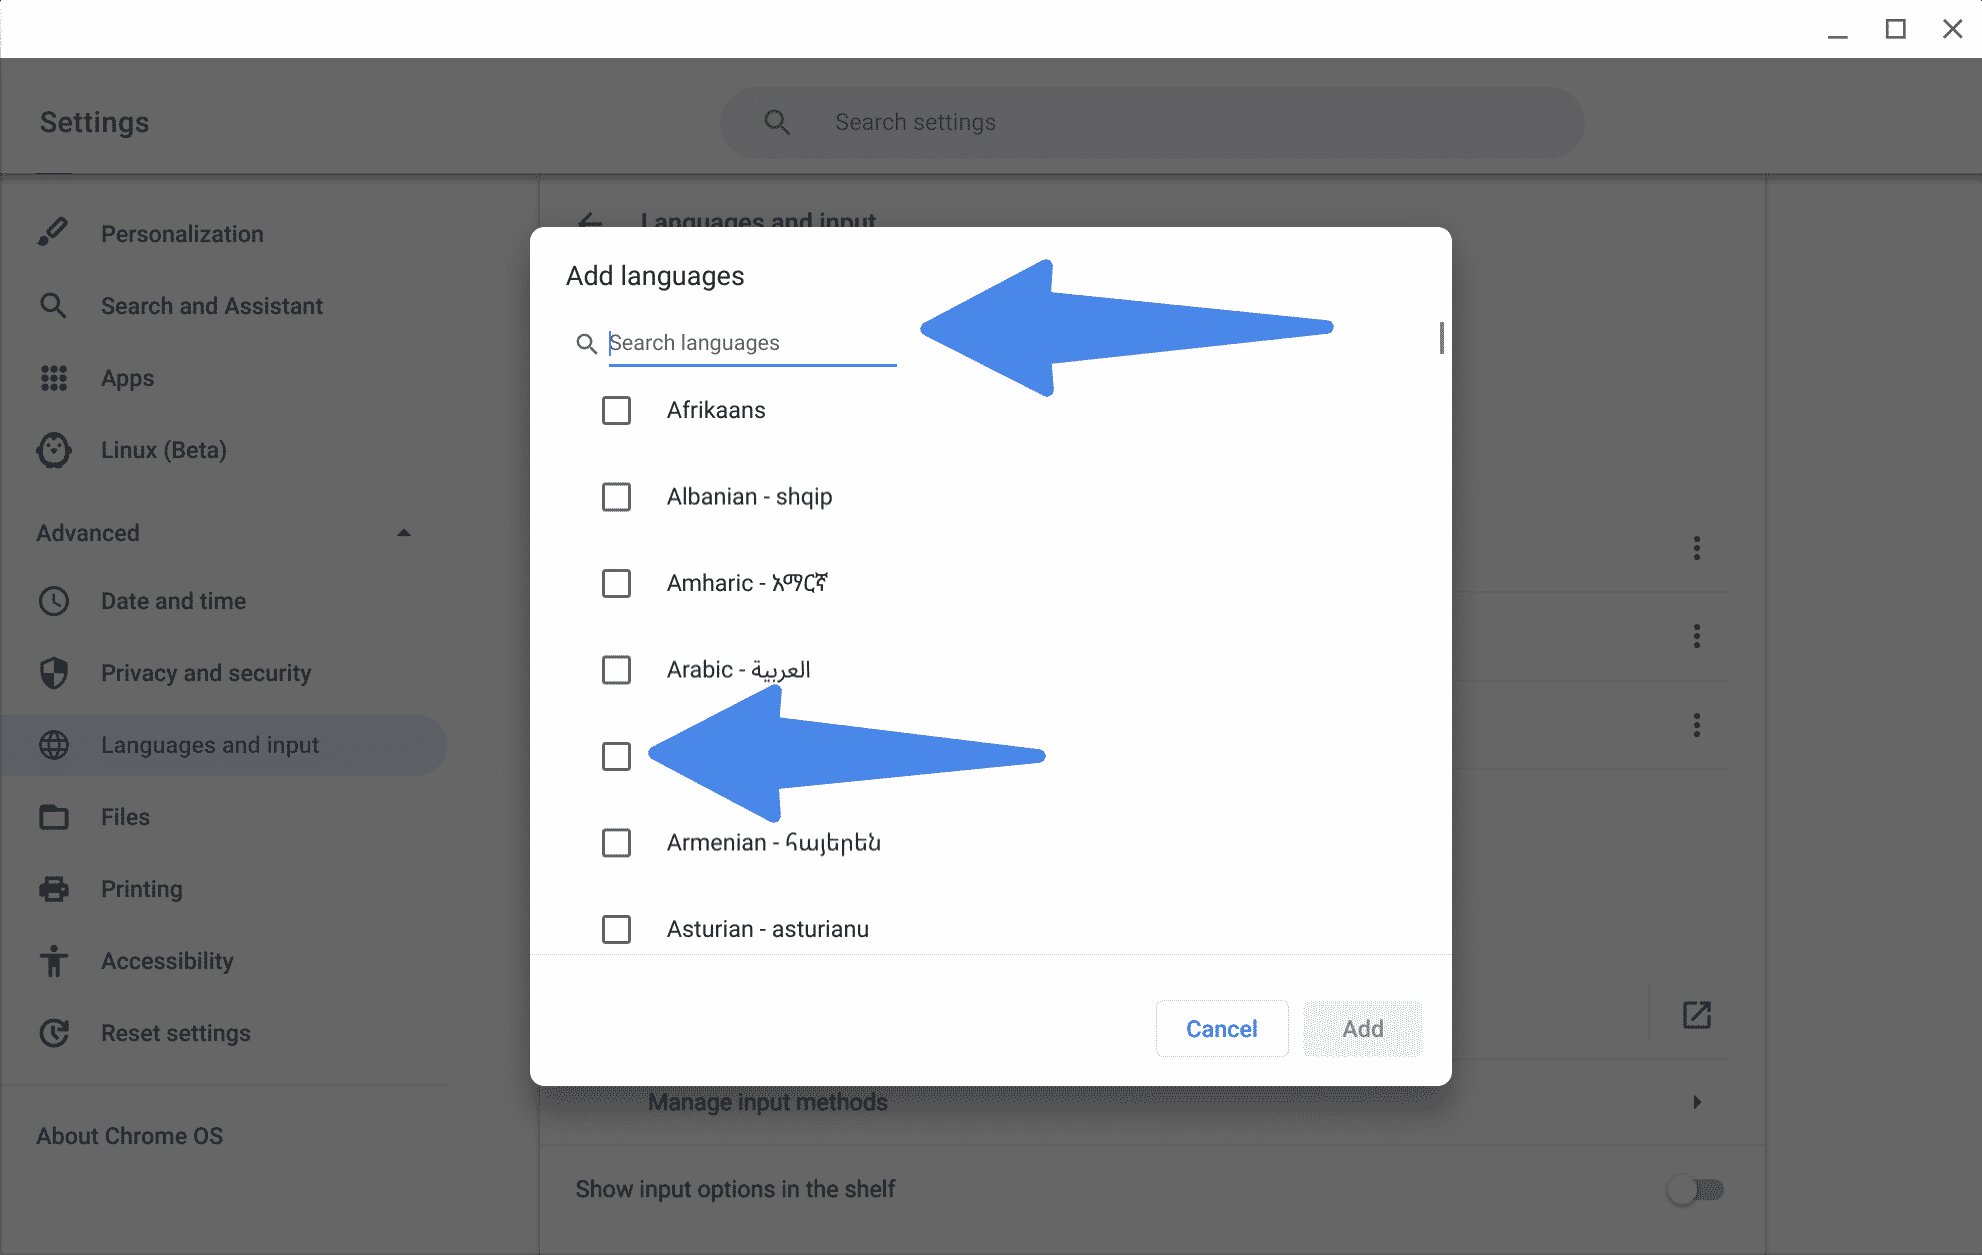
Once you have opened the language settings window by clicking on the “Language” option, you will see a list of available languages on your Chromebook. To add a new language, click on the “Add languages” button.
A new window will appear, presenting you with a list of languages to choose from. You can either scroll through the list or use the search bar to find a specific language quickly.
Once you have located the language you want to add, simply click on it, and it will be added to your list of installed languages. You can add multiple languages if desired.
After adding a new language, you can also choose to display it as the primary language by clicking on the three-dot menu next to it and selecting “Display Chrome OS in this language.”
It’s important to note that adding a new language may require additional files to be downloaded. These files will enable the display and input for the selected language on your Chromebook.
Now that you know how to add a new language to your Chromebook, feel free to explore different languages and enhance your browsing experience.
Step 6: Remove or Rearrange Languages
The ability to remove or rearrange languages on your Chromebook gives you the flexibility to customize the order in which languages are displayed and remove any languages you no longer need. In this step, we will guide you through the process of removing or rearranging languages on your Chromebook.
Once you have accessed the language settings window by clicking on the “Language” option, you will see a list of installed languages. To remove a language, click on the three-dot menu next to the language you want to remove. From the drop-down menu, select “Remove.”
A confirmation message will appear asking if you want to remove the language. Click on “Remove” to confirm the deletion. The language will be removed from your list of installed languages.
In addition to removing languages, you can also rearrange the order in which they are displayed. To rearrange a language, click and hold on it, then drag it up or down the list to your desired position.
By rearranging the order of languages, you can prioritize the languages you use most frequently. This can make it more convenient and efficient to switch between languages while using your Chromebook.
Remember to click on the “Done” button once you have made the necessary changes to save your modifications.
Now that you know how to remove or rearrange languages on your Chromebook, you have the freedom to customize the language settings according to your preferences and needs.
Step 7: Change the Display Language
Changing the display language on your Chromebook allows you to see system menus, notifications, and other elements in the language of your choice. Whether you want to use your native language or explore a new language, this step will guide you through the process of changing the display language on your Chromebook.
To change the display language, start by accessing the language settings window. Click on the “Language” option, as mentioned in the previous steps.
Within the language settings window, you will see a list of installed languages. Locate the language you want to set as the display language and click on the three-dot menu next to it. From the drop-down menu, select “Display Chrome OS in this language.”
After selecting the option, a confirmation message will appear, informing you that changing the display language will restart your Chromebook. Click on “Change language and restart” to proceed.
Your Chromebook will then reboot, and when it starts up again, you will see the display language changed to the language you selected.
It’s important to note that changing the display language does not affect the input language settings. You can still use different input languages even if the display language is set to something else.
If you want to revert to the previous display language, simply follow the same steps and select the desired language from the list.
Now that you know how to change the display language on your Chromebook, feel free to experiment with different languages to personalize your Chromebook experience.
Conclusion
Changing the language on your Chromebook is a simple and effective way to customize your device and enhance your browsing experience. By following the steps outlined in this guide, you can easily modify the language settings to match your preferences, whether you want to explore new languages, communicate in your native language, or simply personalize your device.
Throughout the process, we learned how to open the settings menu and navigate to the “Advanced” section. From there, we located the “Languages” section, where we could add, remove, and rearrange languages. We also explored how to change the display language, allowing us to see menus and system elements in the language of our choice.
With these steps, you have the knowledge and tools to customize your Chromebook to unleash its full potential in your preferred language. Whether you want to immerse yourself in a new language or make your Chromebook feel more familiar, the language settings offer flexibility and personalization options.
So go ahead and give it a try! Explore different languages, remove or rearrange languages to suit your needs, and change the display language to create a more personalized and enjoyable browsing experience.
Remember, language is a powerful tool, and by adapting your Chromebook to your preferred language, you can make your digital experience even more seamless and convenient.