Introduction
Fedora 23 Live Workstation is a powerful and user-friendly operating system that offers a range of features and tools for both beginners and advanced users. Whether you want to try out the latest Linux distribution, experiment with new software, or create a virtual testing environment, installing Fedora 23 on VirtualBox is a convenient and efficient solution.
In this guide, we will walk you through the step-by-step process of installing Fedora 23 Live Workstation on VirtualBox. We will cover everything from downloading the ISO file to configuring the virtual machine and installing the operating system. By the end of this tutorial, you will have a fully functional Fedora 23 system running on your VirtualBox.
Before we dive into the installation process, there are a few prerequisites you need to keep in mind. First, ensure that you have a working installation of VirtualBox on your computer. If you haven’t installed VirtualBox yet, don’t worry – we’ll cover it in detail in the next section. Additionally, you will need to download the Fedora 23 Live Workstation ISO file, which we will guide you through in the following steps. Lastly, make sure your computer meets the system requirements to run Fedora 23 Live Workstation.
Now that you have a brief overview of what to expect, let’s get started with the installation process of Fedora 23 Live Workstation on VirtualBox.
Prerequisites
Before you begin the installation process of Fedora 23 Live Workstation on VirtualBox, ensure that you have the following prerequisites in place:
- VirtualBox: If you haven’t installed VirtualBox yet, you will need to download and install the latest version of VirtualBox from the official website. VirtualBox is a cross-platform virtualization software that allows you to create and run virtual machines on your computer.
- Fedora 23 ISO: Download the Fedora 23 Live Workstation ISO file from the official Fedora website. The ISO file contains the installation image of the Fedora 23 operating system, which you will use to install on VirtualBox. Make sure you choose the appropriate architecture (32-bit or 64-bit) based on your computer’s hardware.
- System Requirements: Check if your computer meets the minimum system requirements to run Fedora 23 Live Workstation. The recommended system requirements include a 64-bit processor, 2GB of RAM, and at least 20GB of free disk space. It is also important to have a stable internet connection for downloading updates and software packages during the installation process.
Once you have ensured that you have the necessary prerequisites, you are ready to proceed with the installation of Fedora 23 Live Workstation on VirtualBox. In the upcoming sections, we will guide you through each step of the process, from setting up VirtualBox to configuring the virtual machine and installing Fedora 23. So let’s move on to the next section and get started with the installation process.
Step 1: Downloading Fedora 23 Live Workstation ISO
The first step in installing Fedora 23 Live Workstation on VirtualBox is to download the Fedora 23 Live Workstation ISO file. The ISO file contains the installation image of the Fedora 23 operating system.
To download the ISO file, follow these steps:
- Open your web browser and go to the official Fedora website. You can find the website by doing a quick search for “Fedora 23 download”.
- On the Fedora website, navigate to the downloads section and click on the link for Fedora 23.
- Choose the appropriate architecture for your computer (32-bit or 64-bit) and click on the corresponding download link.
- Wait for the ISO file to finish downloading. The file size may vary, so the download time will depend on your internet connection speed.
- Once the download is complete, you now have the Fedora 23 Live Workstation ISO file saved on your computer.
It’s a good practice to verify the integrity of the downloaded ISO file to ensure it hasn’t been corrupted during the download process. You can do this by checking the file’s checksum. The Fedora website provides instructions on how to verify the checksum for the downloaded ISO file, which involves comparing the calculated checksum with the one provided on the website.
Now that you have downloaded the Fedora 23 Live Workstation ISO file, you are ready to move on to the next step, which is installing VirtualBox. We will cover this step in detail in the upcoming section.
Step 2: Installing VirtualBox
Before you can install Fedora 23 Live Workstation on VirtualBox, you need to have VirtualBox installed on your computer. VirtualBox is a software that allows you to create and run multiple virtual machines on your system.
Follow the steps below to install VirtualBox:
- Open your web browser and navigate to the official VirtualBox website.
- On the VirtualBox website, go to the Downloads section and choose the version of VirtualBox that is compatible with your operating system. Click on the download link to initiate the download.
- Once the download is complete, locate the downloaded setup file on your computer and double-click on it to start the installation process.
- Follow the on-screen instructions to install VirtualBox. The installation wizard will guide you through the process, and you can choose the default settings unless you have specific preferences.
- Once the installation is complete, you can launch VirtualBox from the Start menu or desktop shortcut. VirtualBox should now be installed and ready for use.
After installing VirtualBox, it’s a good idea to check for any available updates. Open VirtualBox and go to the Help menu. From there, you can select “Check for Updates” to ensure you have the latest version of VirtualBox installed on your computer.
Now that you have VirtualBox installed and up to date, you are ready to move on to the next step, which is creating a new virtual machine. We will cover this step in detail in the upcoming section.
Step 3: Creating a New Virtual Machine
Once you have VirtualBox installed on your computer, the next step is to create a new virtual machine to install Fedora 23 Live Workstation. A virtual machine acts as a virtual computer within your physical computer, allowing you to run different operating systems simultaneously.
Follow these steps to create a new virtual machine:
- Open VirtualBox if it is not already running.
- Click on the “New” button in the toolbar or go to the “Machine” menu and select “New”. This will open the “Create Virtual Machine” wizard.
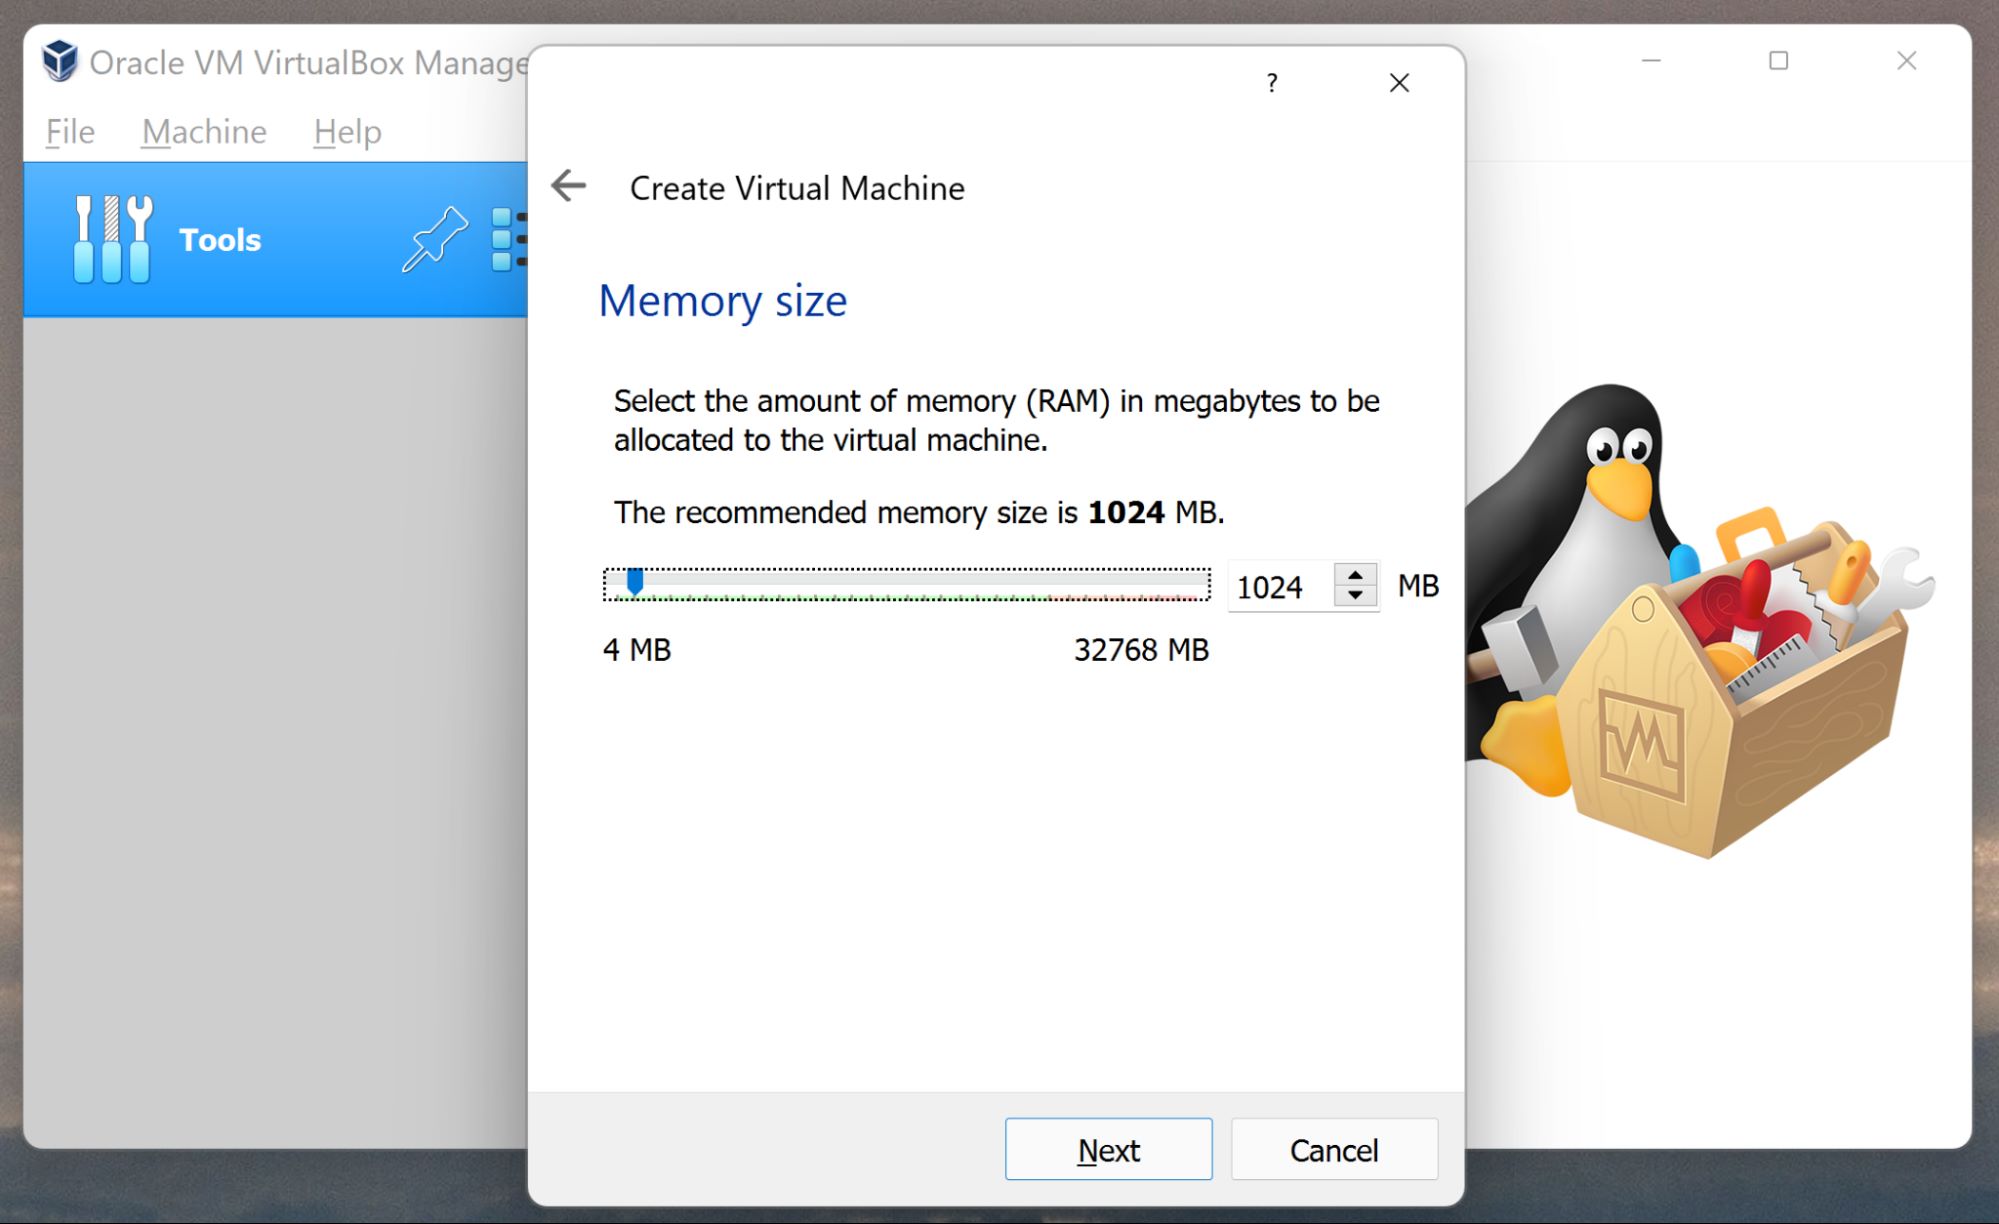
- In the wizard, enter a name for your virtual machine (e.g., “Fedora 23”) and choose the operating system type. Select “Linux” as the type and “Fedora (64-bit)” as the version.
- Click “Next” to proceed to the next step, where you will allocate memory (RAM) to the virtual machine. It is recommended to allocate at least 2GB of RAM for optimal performance.
- In the next step, choose the option to create a virtual hard disk and click “Create”. Select the default “VDI (VirtualBox Disk Image)” option and click “Next”.
- Choose the storage type for the virtual hard disk. The default “Dynamically allocated” option is recommended as it allows the virtual disk to dynamically grow in size as needed.
- Specify the size of the virtual hard disk. It is recommended to allocate at least 20GB of disk space to ensure sufficient space for the installation and future usage.
- Click “Create” to create the virtual machine. You will now see the newly created virtual machine listed in the VirtualBox main window.
Congratulations! You have successfully created a new virtual machine for Fedora 23 Live Workstation. In the next step, we will configure the virtual machine settings to prepare for the installation of Fedora 23. Continue reading to learn more.
Step 4: Configuring Virtual Machine Settings
After creating a new virtual machine for Fedora 23 Live Workstation, the next step is to configure the virtual machine settings to optimize its performance and ensure a smooth installation process. These settings include adjusting the system, display, and storage settings of the virtual machine.
Follow these steps to configure the virtual machine settings:
- Select the virtual machine you created in the previous step from the VirtualBox main window.
- Click on the “Settings” button in the toolbar or go to the “Machine” menu and select “Settings”. This will open the Virtual Machine Settings window.
- In the settings window, go to the “System” tab. Here, you can adjust the allocated memory (RAM) for the virtual machine. It is recommended to allocate at least 2GB of RAM.
- Next, go to the “Display” tab. Increase the video memory to improve the display performance. Allocating 128MB or more of video memory is recommended.
- Switch to the “Storage” tab. Click on the empty optical drive and then click on the disk icon next to “IDE Secondary Master”. Choose the “Choose Virtual Optical Disk File” option and navigate to the folder where you saved the Fedora 23 Live Workstation ISO file. Select the ISO file and click “Open” to mount it.
- Click “OK” to save the changes and close the Virtual Machine Settings window.
You have now configured the virtual machine settings for Fedora 23 Live Workstation. In the next step, we will proceed with mounting the Fedora 23 ISO file and preparing for the installation. Stay tuned!
Step 5: Mounting Fedora 23 ISO
With the virtual machine settings configured, the next step in installing Fedora 23 Live Workstation on VirtualBox is to mount the Fedora 23 ISO file. Mounting the ISO file will make it accessible to the virtual machine, allowing you to install the operating system.
Follow these steps to mount the Fedora 23 ISO file:
- Ensure that the virtual machine for Fedora 23 is selected in the VirtualBox main window.
- Click on the “Start” button in the toolbar or go to the “Machine” menu and select “Start”. This will launch the virtual machine.
- The virtual machine will start and display the Fedora 23 Live Workstation installation screen. Select your preferred language and click “Continue” to proceed.
- On the next screen, select “Install Fedora” and click “Continue”.
- In the installation summary screen, you will see various configuration options. Leave the default settings as they are or make any necessary changes according to your preferences.
- Next, click on the “Installation Destination” option to configure the installation disk. Choose the disk where you want to install Fedora 23 and click “Done”.
- Click on the “Begin Installation” button to start the installation process. Fedora 23 Live Workstation will be installed on the virtual machine.
- Wait for the installation to complete. This process may take some time depending on your computer’s hardware and the speed of your virtual machine.
Once the installation is finished, you can proceed to the next step and start configuring Fedora 23 Live Workstation according to your requirements. Stay tuned as we cover that in the upcoming section!
Step 6: Installing Fedora 23 Live Workstation
After successfully mounting the Fedora 23 ISO file, you can now proceed with the installation of Fedora 23 Live Workstation on the virtual machine. This step will guide you through the installation process and help you configure the initial settings.
Follow these steps to install Fedora 23 Live Workstation:
- Make sure the virtual machine for Fedora 23 is running.
- The installation process will automatically start after the virtual machine is booted. Select your preferred language and click “Continue”.
- On the next screen, you will be prompted to choose your keyboard layout. Select the appropriate option and click “Continue”.
- Next, you will see the installation summary screen. Review the configuration options and make any necessary changes according to your preferences.
- In the installation summary screen, you can also configure additional settings such as network configuration, user creation, and software packages to be installed. Make the desired changes and click “Begin Installation”.
- The installation process will now start. You can view the progress and wait for the installation to complete.
- Once the installation is finished, you will be prompted to restart the virtual machine. Click “Restart” to complete the installation process.
- After the virtual machine restarts, Fedora 23 Live Workstation will be ready on your virtual machine. Follow the on-screen instructions to set up your username, password, language preferences, and other initial configurations.
Congratulations! You have successfully installed Fedora 23 Live Workstation on your virtual machine. In the next step, we will guide you through the initial configuration of Fedora 23 Live Workstation. Stay tuned!
Step 7: Configuring Fedora 23 Live Workstation
After installing Fedora 23 Live Workstation on your virtual machine, the next step is to configure the operating system to suit your needs and preferences. This step will guide you through the initial configuration process of Fedora 23, including setting up user accounts, language preferences, and basic system settings.
Follow these steps to configure Fedora 23 Live Workstation:
- Start your virtual machine and log in with the username and password you set during the installation process.
- After logging in, Fedora 23 Live Workstation will load the default desktop environment. Take a moment to familiarize yourself with the interface.
- To add a user account, click on the “Activities” button in the top-left corner of the screen and search for “Users”. Click on the “Users” icon to open the Users settings. From here, you can add new users, set user privileges, and manage user accounts.
- Next, you may want to adjust the language preferences. Click on the “Activities” button again, search for “Settings”, and click on the “Settings” icon. In the settings menu, navigate to “Region & Language” to modify the language, date, and time settings to your desired configuration.
- Explore the “Appearance” settings to customize the look and feel of your desktop environment. You can change the wallpaper, theme, icons, and fonts according to your preferences.
- Check for system updates by opening the “Activities” menu again, searching for “Software”, and clicking on the “Software” icon. From here, click on the “Updates” tab to check for available updates and install them if necessary.
- Additionally, you can install additional software packages through the software center or by using the terminal. Explore the software repositories and install the applications you need for your tasks.
- Take the time to explore the various system settings and customization options to personalize your Fedora 23 Live Workstation experience based on your needs.
Once you have finished configuring Fedora 23 Live Workstation to your preferences, you are ready to use the operating system for your desired tasks. Enjoy exploring the features and capabilities of Fedora 23 Live Workstation on your VirtualBox virtual machine!
Step 8: Updating Fedora 23
After configuring Fedora 23 Live Workstation, it is crucial to keep the operating system up to date by regularly installing updates. Updating Fedora 23 ensures that your system remains secure, stable, and equipped with the latest features and bug fixes. This step will guide you through the process of updating Fedora 23 through the software update tools available in the operating system.
Follow these steps to update Fedora 23:
- Start your virtual machine and log in with your user account.
- Open the “Activities” menu by clicking on the “Activities” button in the top-left corner of the screen.
- In the search bar, type “Software” and click on the “Software” icon to open the software center.
- In the software center, click on the “Updates” tab to see if any updates are available for Fedora 23.
- If updates are available, click on the “Download” button to begin downloading the updates. The software center will display the progress of the download.
- After the download is complete, click on the “Install” button to install the updates. You may be prompted to enter your password to authorize the installation.
- The installation process will begin, and you can monitor the progress in the software center. Once the updates are installed, you will see a notification confirming the successful installation.
- After updating Fedora 23, it is recommended to restart your virtual machine to ensure that all updates take effect.
- To restart your virtual machine, go to the “Activities” menu, click on the power icon, and select “Restart”.
- Once your virtual machine restarts, Fedora 23 will boot up with all the updates applied.
Now that you have updated Fedora 23, your system is equipped with the latest improvements and security patches. Remember to regularly check for updates and perform the update process to keep your Fedora 23 installation up to date and running smoothly.
Step 9: Installing VirtualBox Guest Additions
VirtualBox Guest Additions is a set of software packages that enhance the functionality and performance of the virtual machine running Fedora 23 on VirtualBox. Installing VirtualBox Guest Additions provides features like seamless mouse integration, better video support, shared folders, and improved performance. This step will guide you through the process of installing VirtualBox Guest Additions on Fedora 23.
Follow these steps to install VirtualBox Guest Additions:
- Start your virtual machine and log in with your user account.
- In the VirtualBox menu, go to “Devices” and select “Insert Guest Additions CD Image”. This will mount the Guest Additions CD image inside the virtual machine.
- Open a terminal window in Fedora 23 by clicking on the “Activities” button, searching for “Terminal”, and clicking on the “Terminal” icon.
- In the terminal window, navigate to the mounted Guest Additions CD directory. Use the following command:
- Next, run the installation script by using the following command:
- The installation process will begin, and you may see various messages and prompts. Follow the instructions in the terminal to complete the installation.
- Once the installation is finished, restart your virtual machine to ensure that the changes take effect. You can restart the virtual machine by going to the “Activities” menu, clicking on the power icon, and selecting “Restart”.
- After the virtual machine restarts, VirtualBox Guest Additions will be installed and active. You can now enjoy enhanced functionality and performance in your Fedora 23 virtual machine.
$ cd /run/media/[username]/VBOXADDITIONS_[version]Note: Replace [username] with your actual username and [version] with the version number of VirtualBox Guest Additions.
$ sudo ./VBoxLinuxAdditions.runYou may be prompted to enter your password to authorize the installation.
Congratulations! You have successfully installed VirtualBox Guest Additions on your Fedora 23 virtual machine. Now, you can take advantage of the additional features and optimize your virtual machine experience.
Conclusion
Installing Fedora 23 Live Workstation on VirtualBox is a great way to explore the features of this powerful operating system without the need for dedicated hardware. Throughout this guide, we have covered each step, from downloading the Fedora 23 ISO file to installing VirtualBox, creating a virtual machine, configuring settings, and installing Fedora 23.
By following these steps, you have successfully set up Fedora 23 Live Workstation on your VirtualBox virtual machine. You have learned how to configure the virtual machine settings, mount the Fedora 23 ISO file, and perform the installation process. Additionally, we covered essential tasks such as configuring Fedora 23, updating the operating system, and installing VirtualBox Guest Additions to enhance the virtual machine’s functionality.
Now that Fedora 23 is up and running on your VirtualBox, feel free to explore and utilize its extensive features, software repositories, and customization options. The flexibility and ease of use provided by VirtualBox allow you to experiment, develop, and test software in a safe and controlled environment.
Remember to regularly check for system updates to keep your Fedora 23 installation secure and up to date. Additionally, make use of the software repositories to install additional applications and packages that cater to your specific needs.
We hope this guide has been helpful to you in installing Fedora 23 Live Workstation on VirtualBox. If you have any further questions or encounter any issues, it is always a good idea to refer to the official Fedora documentation or seek assistance from the Fedora community.
Happy virtualization and enjoy your Fedora 23 experience!