Introduction
Welcome to the world of nostalgia! With advancements in technology, it is now possible to recreate the computing experience of the past through virtualization. One such classic operating system that many users fondly remember is Windows 95. Setting up a Windows 95 virtual machine allows you to relive the charm of the 90s, explore vintage software, and even run old games and applications that are no longer compatible with modern systems.
In this guide, we will walk you through the process of setting up a Windows 95 virtual machine step by step. Whether you’re a technology enthusiast, a software developer testing legacy applications, or simply longing for a trip down memory lane, this tutorial will provide you with the knowledge and tools needed to create your very own virtual Windows 95 environment.
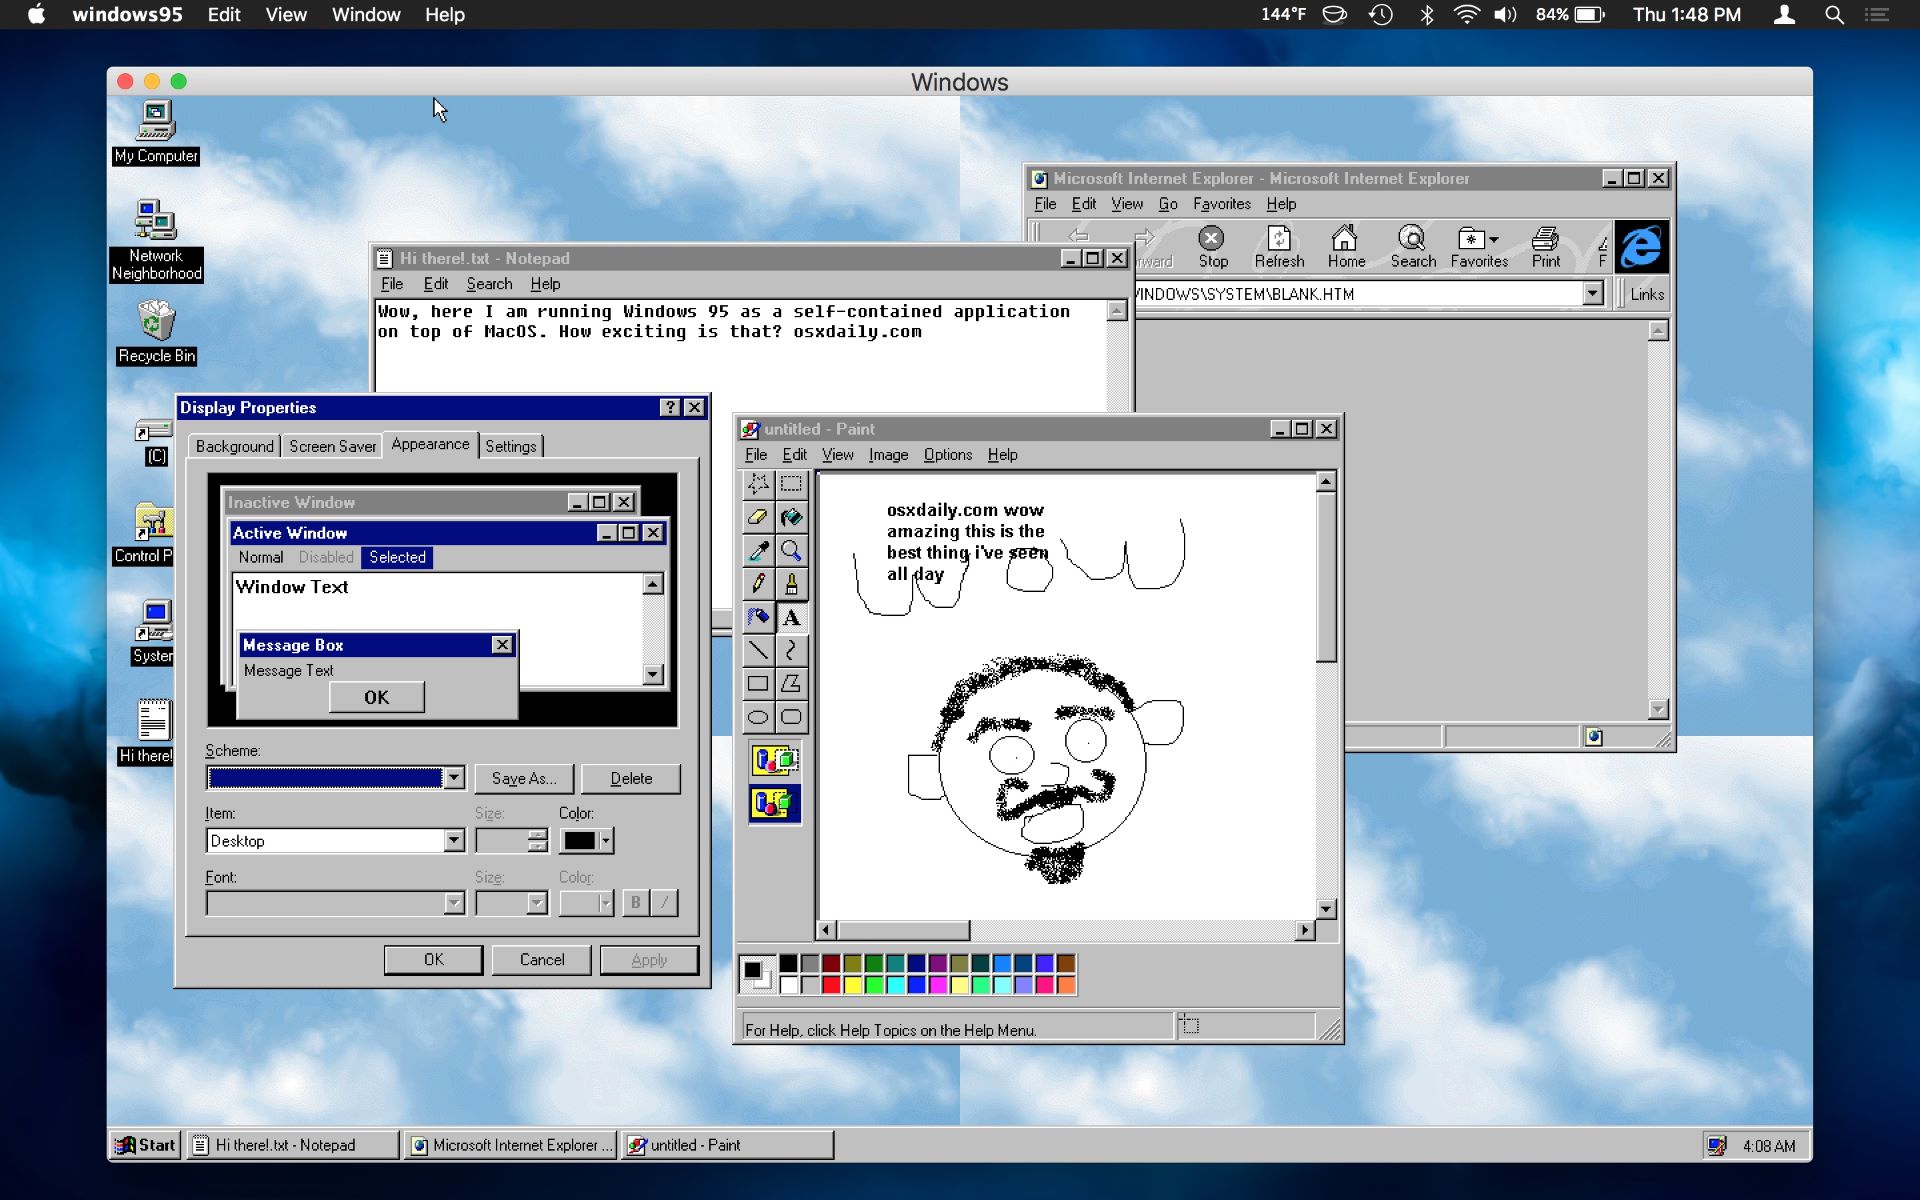
By setting up a Windows 95 virtual machine, you can experience the iconic Start menu, the simplicity of the graphical user interface (GUI), and the nostalgic sounds of the startup and shutdown sequences. Furthermore, you can explore the software and applications that defined the computing landscape of that era. From Microsoft Office 97 to classic games like Doom and Myst, the possibilities are endless.
However, it’s important to note that Windows 95 is an outdated operating system and may not be suitable for everyday use. It lacks many security features and compatibility with modern hardware and software. Therefore, it is highly recommended to use a virtual machine for the sole purpose of exploration and experimentation rather than relying on it as your main operating system.
Now that we have set the expectations and purpose for setting up a Windows 95 virtual machine, let’s dive into the details. In the next sections, we will cover the necessary prerequisites, the steps involved in creating the virtual machine, and the configurations needed to optimize the experience. So, grab your virtual time machine and let’s start the journey back to the 90s!
Benefits of Setting Up a Windows 95 Virtual Machine
Setting up a Windows 95 virtual machine offers a range of benefits and opportunities. Let’s explore some of the key advantages:
- Nostalgic Experience: One of the main reasons to set up a Windows 95 virtual machine is to experience the nostalgia of the past. Relive the retro computing era by interacting with the familiar user interface, iconic desktop backgrounds, and classic applications.
- Software Compatibility: Windows 95 was a popular operating system during its time, and many applications and games were designed specifically for it. By setting up a Windows 95 virtual machine, you can run vintage software or play old games that may not be compatible with modern operating systems.
- Testing Environment: If you are a software developer or IT professional, a Windows 95 virtual machine can serve as a valuable testing environment. It allows you to evaluate how your software or applications perform on an outdated platform, ensuring compatibility and identifying potential issues.
- Educational Purposes: For educational institutions or technology enthusiasts, a Windows 95 virtual machine provides a valuable resource for learning and teaching. It allows students to study the evolution of operating systems, explore the history of computing, and compare the features and functionalities of past and present platforms.
- Preserving Legacy Software: Many organizations still rely on legacy software that was designed for Windows 95. By creating a Windows 95 virtual machine, you can continue using these applications, ensuring seamless workflow and avoiding the need for costly upgrades or replacement.
- Recreating the Past: Setting up a Windows 95 virtual machine is like stepping into a time machine. It allows you to relive moments from the past, explore the websites, applications, and designs that were prevalent during that era. It’s a fascinating journey for those who want to reminisce and appreciate the evolution of technology.
By setting up a Windows 95 virtual machine, you can unlock a world of possibilities and take a trip down memory lane. Whether you want to explore the vintage software, play classic games, or test legacy applications, the benefits are abundant. Now, let’s move on to the prerequisites for creating your own Windows 95 virtual machine.
Prerequisites for Setting Up a Windows 95 Virtual Machine
Before diving into the process of setting up a Windows 95 virtual machine, there are a few prerequisites that you need to meet. These requirements ensure a smooth and successful virtual machine setup. Here are the essential prerequisites:
- Virtualization Software: To create a virtual machine, you need virtualization software installed on your computer. Two popular options are Oracle VM VirtualBox and VMWare Workstation. Both are free and provide robust features for virtualization.
- Windows 95 ISO File: You will need a Windows 95 ISO file to install the operating system on the virtual machine. The ISO file contains the complete setup of Windows 95. You can obtain the ISO file from various sources, such as online repositories or by converting your original Windows 95 installation CD.
- System Requirements: While the system requirements for running a Windows 95 virtual machine are relatively modest, it’s important to ensure that your computer can handle the virtualization process. Check the recommended system requirements of the virtualization software you choose to ensure compatibility.
- Ample Disk Space: Virtual machines require disk space to store the operating system, applications, and other files. Make sure you have enough free disk space on your computer to accommodate the virtual machine and any additional software or files you plan to install.
- Basic Computer Skills: While not a strict prerequisite, having basic computer skills will make the setup process much easier. Familiarity with virtualization software, installation processes, and general troubleshooting can help troubleshoot any issues that may arise during the setup.
Before proceeding with the installation process, it is crucial to have these prerequisites in place. Ensure you have chosen the appropriate virtualization software, obtained the Windows 95 ISO file, meet the system requirements, have ample disk space, and possess the necessary computer skills.
Once you have met these prerequisites, you are ready to embark on the journey of setting up your own Windows 95 virtual machine. In the next sections, we will guide you through each step of the process, from choosing the virtualization software to configuring the virtual machine settings. So, let’s get started!
Step 1: Choose a Virtual Machine Software
The first step in setting up a Windows 95 virtual machine is to choose the right virtualization software. There are several options available, but two popular choices are Oracle VM VirtualBox and VMWare Workstation.
Oracle VM VirtualBox: VirtualBox is a free and open-source virtualization software that provides a platform for running multiple operating systems simultaneously on a single computer. It supports Windows, macOS, Linux, and Solaris as host operating systems, making it a versatile choice for users across different platforms. VirtualBox offers a user-friendly interface, extensive configuration options, and a wide range of features, making it suitable for both beginners and advanced users.
VMWare Workstation: VMWare Workstation is a commercial virtualization software that offers advanced features and capabilities. It supports Windows and Linux as host operating systems and provides a robust platform for running virtual machines. VMWare Workstation offers enhanced performance, seamless integration with host operating systems, and advanced networking and storage options. Although VMWare Workstation is not free, it has a 30-day trial version available for evaluation.
When choosing a virtual machine software, factors such as your operating system, budget, and specific requirements should be considered. Both VirtualBox and VMWare Workstation have their own strengths and advantages, so choose the one that best fits your needs.
Once you have selected the virtualization software that suits your requirements, proceed to the next step: obtaining a Windows 95 ISO file to install the operating system on the virtual machine.
Step 2: Obtain a Windows 95 ISO File
To install Windows 95 on your virtual machine, you will need to obtain a Windows 95 ISO file. The ISO file contains the complete setup of the operating system and is required for the installation process. Here are a few ways to obtain a Windows 95 ISO file:
- Online Repositories: There are various online repositories where you can find Windows 95 ISO files available for download. These websites collect and provide legal copies of outdated operating systems. Ensure that you download the ISO file from a reputable and trustworthy source to avoid any security risks or copyright infringement. Some popular online sources include WinWorld and My Abandonware.
- Convert Original Installation CD: If you have an original Windows 95 installation CD, you can create an ISO file from it using CD/DVD burning software. Programs like ImgBurn, PowerISO, or Nero can be used to create an ISO image from the installation CD. This method ensures that you have an authentic and legal copy of the operating system.
- Retrieve from Old Computer: If you have an old computer with a functional Windows 95 installation, you can extract the ISO file from it. Connect the old computer’s hard drive to your current computer, use disk imaging software to create an image of the drive, and then extract the Windows 95 installation files from the image. This method allows you to preserve your original Windows 95 installation while obtaining the ISO file.
Remember that obtaining a Windows 95 ISO file from unofficial sources or through unauthorized means may violate copyright laws. It is essential to ensure that you have the legal right to use the ISO file for setting up the virtual machine.
Once you have obtained the Windows 95 ISO file, you are ready to proceed to the next step: creating a new virtual machine. In the upcoming sections, we will guide you through the process of creating a virtual machine using either Oracle VM VirtualBox or VMWare Workstation.
Step 3: Create a New Virtual Machine
Now that you have obtained a Windows 95 ISO file, it’s time to create a new virtual machine to install the operating system. In this step, we’ll guide you through the process of creating a new virtual machine using either Oracle VM VirtualBox or VMWare Workstation.
Using Oracle VM VirtualBox:
- Open Oracle VM VirtualBox and click on the “New” button in the toolbar to start the virtual machine creation wizard.
- Give your virtual machine a descriptive name and select “Windows 95” as the operating system type. Click “Next”.
- Allocate the desired amount of memory (RAM) for the virtual machine. It is recommended to allocate at least 256 MB for Windows 95. Click “Next”.
- Choose the option to create a new virtual hard disk and click “Next”. Select the virtual hard disk file type and storage location. Allocate sufficient disk space (around 2-5 GB) as per your requirements. Click “Create”.
- In the VirtualBox main window, select the newly created virtual machine and click on the “Settings” button.
- In the settings window, navigate to the “Storage” tab and click on the empty CD/DVD drive. On the right side, click on the CD icon and choose “Choose a disk file”. Browse and select the Windows 95 ISO file you obtained. Click “OK”.
Using VMWare Workstation:
- Open VMWare Workstation and click on “Create a New Virtual Machine” to start the virtual machine creation wizard.
- Choose “Custom (advanced)” and click “Next”.
- Select “I will install the operating system later” and click “Next”.
- Select “Microsoft Windows” as the guest operating system and choose “Windows 95” as the version. Click “Next”.
- Enter a name and location for the virtual machine. Choose the desired disk capacity and select “Store virtual disk as a single file”. Click “Next”.
- Customize any additional settings if necessary, and click “Finish” to create the virtual machine.
By following the steps specific to your chosen virtualization software, you have now created a new virtual machine ready to install Windows 95. In the upcoming sections, we will guide you through the installation process and further configuration of the virtual machine.
Step 4: Install Windows 95 on the Virtual Machine
With the virtual machine created, it’s time to install Windows 95 on it. In this step, we will guide you through the process of installing Windows 95 on the virtual machine using the ISO file you obtained.
Using Oracle VM VirtualBox:
- Ensure that the virtual machine is selected in the VirtualBox main window.
- Click on the “Start” button to launch the virtual machine.
- The virtual machine will boot from the Windows 95 ISO file.
- Follow the on-screen prompts to begin the Windows 95 installation process.
- Select the desired installation options, such as the installation directory and components.
- Continue following the installation wizard’s instructions to complete the installation process.
- After the installation is complete, the virtual machine will restart, and you will see the Windows 95 desktop.
Using VMWare Workstation:
- Ensure that the virtual machine is selected in the VMWare Workstation interface.
- Click on the “Power on this virtual machine” button to launch the virtual machine.
- The virtual machine will boot from the Windows 95 ISO file.
- Follow the on-screen prompts to begin the Windows 95 installation process.
- Select the desired installation options, such as the installation directory and components.
- Continue following the installation wizard’s instructions to complete the installation process.
- After the installation is complete, the virtual machine will restart, and you will see the Windows 95 desktop.
During the installation process, you may be prompted to enter a Windows 95 product key. You can find the product key on the Windows 95 installation CD or in the documentation that came with your original copy of Windows 95.
Congratulations! You have successfully installed Windows 95 on your virtual machine. In the next step, we will guide you through the configuration of the virtual machine settings to enhance the Windows 95 experience.
Step 5: Configure the Virtual Machine Settings
After successfully installing Windows 95 on the virtual machine, it’s time to configure the virtual machine settings to optimize the Windows 95 experience. In this step, we will guide you through the essential configurations for a smoother virtual machine operation.
1. Memory (RAM) Allocation: Assign an appropriate amount of memory (RAM) to the virtual machine to ensure optimal performance. For Windows 95, a minimum of 256 MB is recommended, but you can allocate more if your hardware allows.
2. CPU Settings: Adjust the number of virtual CPU cores and allocate processing power to the virtual machine. Assigning multiple virtual CPU cores can enhance performance, but be mindful not to allocate too many, which might affect the host system’s functioning.
3. Display Settings: Configure the display settings to match your preferences. You can adjust the screen resolution, color depth, and enable features like 3D acceleration if supported by your virtualization software.
4. Network Configuration: Set up the network connection for the virtual machine. Choose the bridged network mode to connect the virtual machine directly to the host network, allowing it to access the internet and other devices on the network. Alternatively, you can choose NAT or host-only networking, depending on your requirements.
5. Storage Settings: Customize the virtual machine’s storage settings, including the virtual hard disk size and location. You can also enable features like shared folders to easily transfer files between the host and the virtual machine.
6. Audio Configuration: Enable sound support in the virtual machine settings to experience the nostalgic Windows 95 sounds. Select the appropriate audio controller and adjust the audio settings as desired.
7. Input and Sharing: Configure the input devices and sharing options. Enable shared clipboard and drag-and-drop functionality to effortlessly exchange data between the host and the virtual machine.
8. Snapshot Management: Utilize the snapshot feature that allows you to capture and save the current state of the virtual machine. Snapshots are useful for restoring the virtual machine to a previous state if any issues occur during experimentation or software testing.
By configuring these essential virtual machine settings, you can ensure a smoother Windows 95 experience within the virtual environment. Adjust the settings according to your preferences and requirements to optimize performance and functionality.
In the next step, we will guide you through installing Guest Additions (VirtualBox) or Integration Tools (VMWare) to enhance the virtual machine’s functionality.
Step 6: Installing Guest Additions or Integration Tools
Installing Guest Additions or Integration Tools is an important step to enhance the functionality and performance of your Windows 95 virtual machine. These tools provide additional features and drivers that improve the integration between the virtual machine and the host system. In this step, we will guide you through installing Guest Additions (for Oracle VM VirtualBox) or Integration Tools (for VMWare Workstation).
Using Oracle VM VirtualBox:
- Start the virtual machine and wait for Windows 95 to fully load.
- From the VirtualBox menu bar, select “Devices” and then “Insert Guest Additions CD image”.
- Windows 95 will recognize the virtual CD and display a prompt to install Guest Additions. Click “OK” or “Yes” to proceed with the installation.
- Follow the on-screen instructions to complete the installation of Guest Additions.
- Once the installation is complete, restart the virtual machine for the changes to take effect.
Using VMWare Workstation:
- Start the virtual machine and wait for Windows 95 to fully load.
- From the VMWare Workstation menu, select “Player” or “Workstation” (depending on the version) and then “Manage” and “Install VMWare Tools”.
- An installation wizard will launch within the virtual machine.
- Follow the on-screen instructions to complete the installation of VMWare Tools.
- Once the installation is complete, restart the virtual machine for the changes to take effect.
Guest Additions (VirtualBox) or Integration Tools (VMWare) provide several benefits for your Windows 95 virtual machine. They enable features such as seamless mouse integration, shared folders for easy file transfer between the host and virtual machine, improved graphics performance, and clipboard sharing.
After installing Guest Additions or Integration Tools, your Windows 95 virtual machine will be more functional and integrated with your host system. In the next step, we will guide you through adjusting display and sound settings to fine-tune your Windows 95 experience.
Step 7: Adjust Display and Sound Settings
After installing Guest Additions (for Oracle VM VirtualBox) or Integration Tools (for VMWare Workstation), it’s time to adjust the display and sound settings for your Windows 95 virtual machine. These settings can greatly enhance your virtual machine experience. In this step, we will guide you through adjusting display and sound settings.
Display Settings:
- For Oracle VM VirtualBox:
- Start the virtual machine and wait for Windows 95 to fully load.
- From the VirtualBox menu bar, select “View” and then “Virtual Screen”. Adjust the screen resolution and color depth to your preference.
- You can also enable 3D acceleration from the VirtualBox settings for better graphics performance. From the VirtualBox main window, select the virtual machine and click on “Settings”. In the “Display” section, check the box for “Enable 3D acceleration”.
- For VMWare Workstation:
- Start the virtual machine and wait for Windows 95 to fully load.
- From the Workstation menu bar, select “View” and then “Adjust” to access the display settings. Adjust the screen resolution and color depth as desired.
- You can enable or disable hardware acceleration from the VMWare settings for graphics performance optimization. From the VMWare Workstation interface, select the virtual machine and click on “Settings”. In the “Display” section, toggle the “Accelerate 3D graphics” option.
Sound Settings:
- For Oracle VM VirtualBox:
- Start the virtual machine and wait for Windows 95 to fully load.
- From the VirtualBox menu bar, select “Devices” and then “Audio”. Choose the appropriate audio controller and adjust the audio settings based on your preference.
- Ensure that audio is enabled within the Windows 95 operating system. Double-click on the volume control icon in the system tray and check that the volume is not muted.
- For VMWare Workstation:
- Start the virtual machine and wait for Windows 95 to fully load.
- From the Workstation menu bar, select “Player” (or “Workstation”) and then “Removable Devices” and “Sound”. Choose the appropriate sound device from the list.
- Ensure that audio is enabled within the Windows 95 operating system. Double-click on the volume control icon in the system tray and verify that the volume is not muted.
Adjusting the display and sound settings can greatly enhance your Windows 95 virtual machine experience, making it more visually appealing and immersive. Customizing the settings based on your preferences ensures a comfortable and enjoyable nostalgic journey through the Windows 95 era.
In the next step, we will guide you through installing additional software and drivers to further enhance your Windows 95 virtual machine.
Step 8: Install Additional Software and Drivers
After setting up the display and sound settings for your Windows 95 virtual machine, you can further enhance its functionality by installing additional software and drivers. In this step, we will guide you through the process of installing software and drivers to optimize your Windows 95 virtual machine experience.
1. Software Installation:
- Install Antivirus Software: Protect your virtual machine from potential threats by installing antivirus software specifically designed for Windows 95. Although Windows 95 is an outdated operating system, it’s still important to have antivirus protection for security purposes.
- Install Productivity Software: Enhance your virtual machine’s functionality by installing productivity software. Popular options for Windows 95 include Microsoft Office 97, Corel WordPerfect, and Lotus SmartSuite. These applications can help you create documents, spreadsheets, presentations, and more.
- Install Vintage Games and Applications: Explore the nostalgic world of Windows 95 by installing vintage games and applications. From classic titles like Doom and Myst to popular software of that era, you can relive the excitement and memories of the past.
2. Driver Installation:
- Graphics Drivers: Install the appropriate graphics drivers for your virtual machine to improve visual quality and performance. Check the manufacturer’s website for Windows 95-compatible drivers for your virtual machine’s graphics card.
- Network Drivers: If you intend to connect to the internet from your Windows 95 virtual machine, install the necessary network drivers. These drivers allow your virtual machine to communicate with the host network and access the internet.
- Audio Drivers: Install audio drivers specific to your virtual machine’s audio controller. These drivers ensure optimal sound performance and compatibility with Windows 95.
- Other Peripherals: If you plan to use other peripherals within your virtual machine, such as printers or external storage devices, install the drivers required for seamless integration and functionality.
Installing additional software and drivers ensures that your Windows 95 virtual machine is fully equipped with the necessary tools and functionalities. It allows you to explore the many possibilities of the Windows 95 era and utilize the operating system to its fullest potential.
Congratulations! You have successfully completed the steps to set up your Windows 95 virtual machine. Take a moment to enjoy your retro computing experience, relish the nostalgia, and explore the classic applications and games that defined the computing landscape of a bygone era.
Conclusion
Setting up a Windows 95 virtual machine allows you to relive the nostalgia of the past and explore the iconic operating system that shaped the computing landscape of the 90s. Throughout this guide, we have walked you through the step-by-step process of creating a Windows 95 virtual machine, starting from choosing the virtualization software to installing additional software and drivers.
By setting up a Windows 95 virtual machine, you can enjoy various benefits, such as experiencing the familiar user interface, running vintage software, testing legacy applications, and even preserving and accessing old documents or games. However, it’s important to remember that Windows 95 is an outdated operating system and may not be suitable for everyday use due to its lack of security features and compatibility with modern applications.
Before embarking on this nostalgic journey, ensure that you have met the prerequisites, obtained a Windows 95 ISO file from a legitimate source, and chosen the appropriate virtualization software. Each step in the process, from creating the virtual machine to adjusting display and sound settings, was designed to help you optimize your Windows 95 virtual machine experience.
As you explore your virtual Windows 95 environment, don’t forget to install additional software and drivers, such as antivirus software for security, productivity tools for increased functionality, and vintage games and applications for a true blast from the past. Remember to find Windows 95-compatible drivers for your graphics, audio, and network devices to maximize performance and compatibility.
We hope that this guide has provided you with the knowledge and confidence to set up your own Windows 95 virtual machine. Enjoy your journey back to the 90s as you immerse yourself in the nostalgia and explore the software, games, and memories of a bygone era.


![7 Best AI Video Upscaling Software in 2024 [Free & Paid]](https://robots.net/wp-content/uploads/2023/12/Guy-in-headphones-editing-video-with-astronauts-for-space-blog-in-professional-program-300x169.jpeg)