Introduction
Welcome to this step-by-step guide on how to install a solid state drive (SSD) in a Cyberpower PC. Upgrading your computer’s storage by installing an SSD can greatly enhance its performance, speed, and overall efficiency. Whether you’re a gamer looking to reduce loading times or a professional seeking improved productivity, installing an SSD is an excellent choice.
Before you begin, it’s essential to understand what an SSD is and why it’s beneficial. Unlike traditional hard disk drives (HDDs) that use spinning platters and a mechanical arm to read/write data, SSDs utilize flash memory technology. This allows them to access and process data at much faster speeds, resulting in quicker boot times, faster file transfers, and reduced lag.
Upgrading to an SSD can breathe new life into your Cyberpower PC. From improved performance in demanding applications to reduced boot times for a seamless computing experience, the advantages are numerous. However, the installation process may seem daunting if you’re not familiar with computer hardware.
In this guide, we will walk you through each step of the installation process, ensuring a smooth and successful upgrade. Before we dive into the details, let’s go over the necessary tools and materials you’ll need for this project.
Step 1: Gather the necessary tools and materials
Before you start the installation process, it’s important to gather all the tools and materials you’ll need. Having everything ready beforehand will save you time and prevent potential delays during the installation.
Here’s a list of the essential tools and materials you’ll need:
- Small screwdriver set: You’ll need a small screwdriver to open the computer case and remove the existing hard drive (if applicable).
- Anti-static wrist strap: This is an optional but highly recommended item to discharge any static electricity from your body, preventing damage to sensitive computer components.
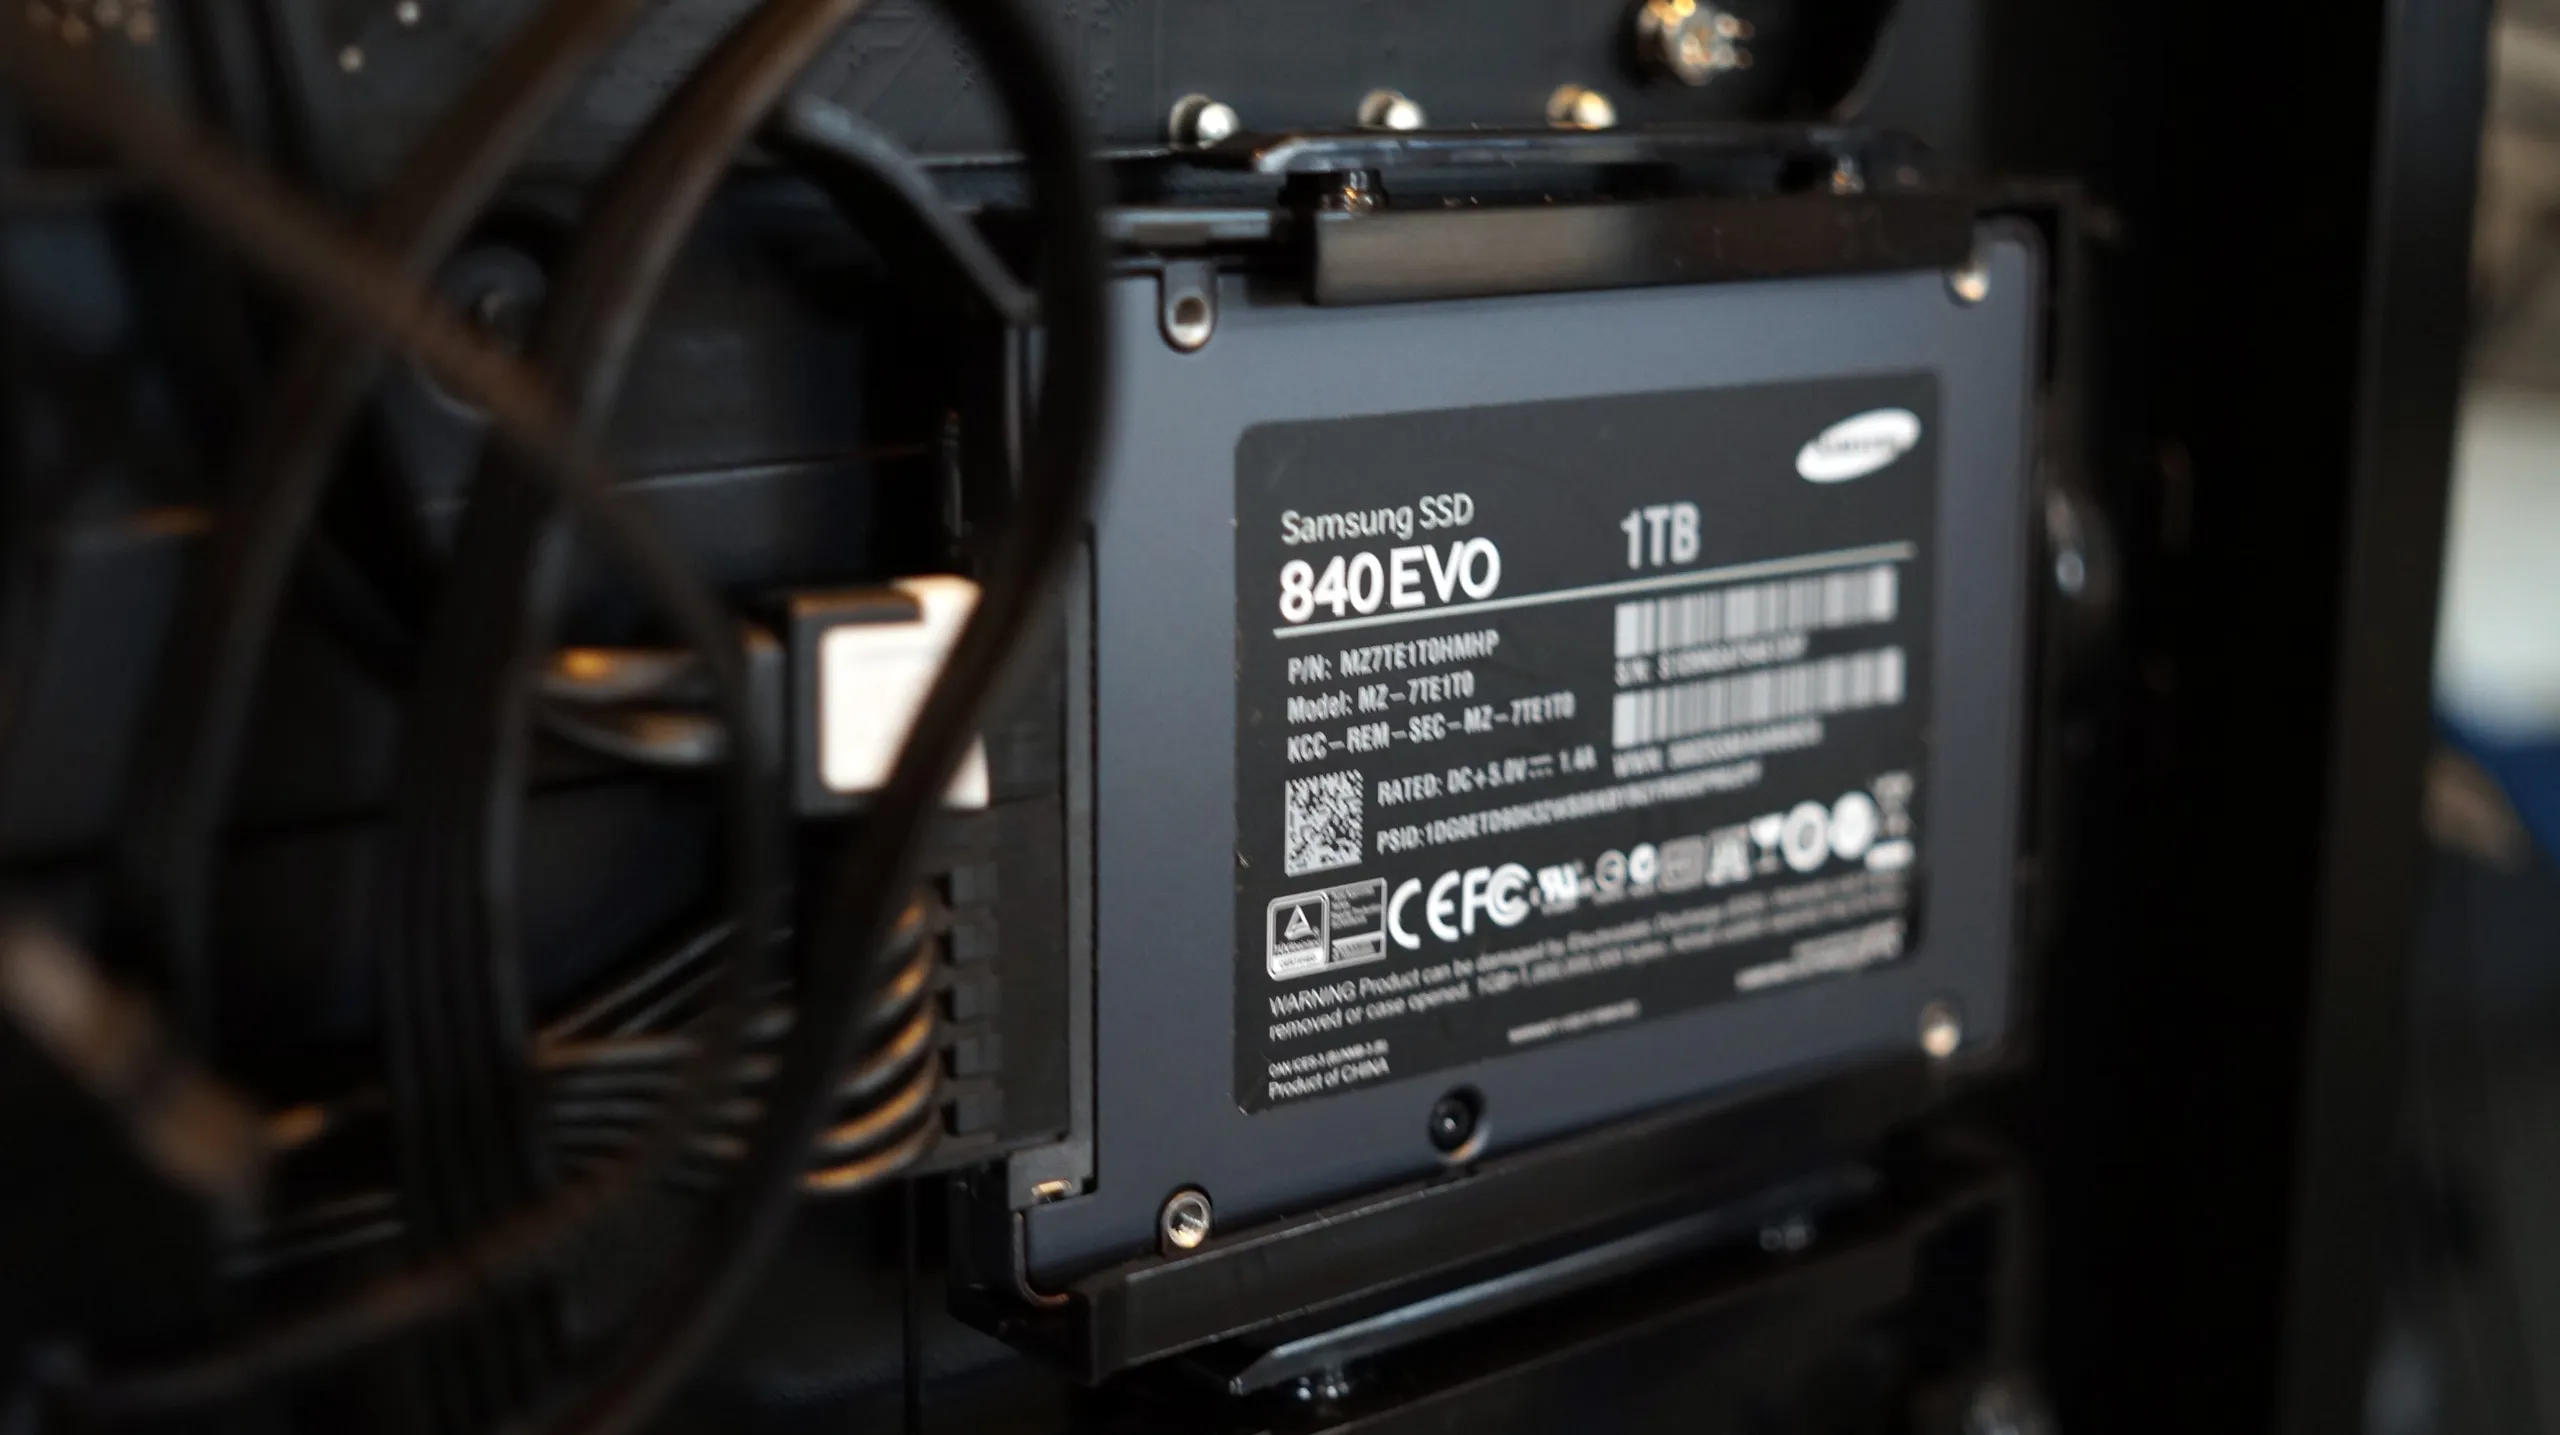
- SSD: Of course, you’ll need the solid-state drive itself. Make sure you purchase an SSD that is compatible with your Cyberpower PC model.
- SATA data cable: This cable is used to connect the SSD to the motherboard. Most SSDs come with a SATA data cable included, but it’s always good to have a spare one in case you need it.
- SATA power cable: This cable provides power to the SSD. It usually comes with the power supply unit (PSU) of your computer.
- Mounting bracket (if necessary): Some computers, especially older models, may require a mounting bracket to secure the SSD in place inside the hard drive bay. Check your Cyberpower PC’s specifications to determine if you need one.
Once you have all the necessary tools and materials ready, you can proceed to the next step, which involves preparing your computer for the installation process. It’s an exciting journey, so let’s get started!
Step 2: Prepare the computer for installation
Before you can install the solid state drive (SSD), it’s crucial to prepare your Cyberpower PC for the upgrade. This step involves a few important tasks to ensure a smooth installation process and prevent any potential issues.
Here’s what you need to do:
- Back up your data: As a precautionary measure, it’s recommended to back up all your important data from the existing hard drive. This will ensure that if anything goes wrong during the installation, you’ll still have a copy of your files.
- Create a recovery drive: It’s also a good idea to create a recovery drive or system image of your existing setup. This will allow you to restore your PC to its previous state if needed.
- Shut down your computer: Before working on any internal components, make sure to power off your Cyberpower PC and unplug it from the power source. This will prevent any accidental electric shocks or damage to the hardware.
- Ground yourself: To avoid static electricity damage, it’s essential to ground yourself before handling any computer components. You can do this by wearing an anti-static wrist strap or by touching a grounded object, such as a metal table or a doorknob.
By taking these preparatory steps, you’ll be ready to proceed with the installation of your new SSD with peace of mind. Now, let’s move on to the next step, which involves opening the computer case.
Step 3: Open the computer case
Now that you’ve prepared your Cyberpower PC for the installation, it’s time to open the computer case. Opening the case will give you access to the internal components, allowing you to install the solid state drive (SSD) effectively.
Follow these steps to open the computer case:
- Locate the screws: Look for the screws or fasteners on the backside of the computer case. These screws hold the side panel in place.
- Use a screwdriver: Once you identify the screws, use a screwdriver to remove them. Place the screws in a safe place to avoid losing them.
- Remove the side panel: Gently slide off or pull back the side panel of the computer case. Be careful not to force it, as different cases have different mechanisms for removing the panel.
After removing the side panel, you should now have a clear view of the internal components of your Cyberpower PC. It’s important to handle the case and its components with care to avoid any damage or static electricity issues.
Keep in mind that the specific process of opening the computer case might vary depending on the model and design of your Cyberpower PC. If you’re unsure or encounter any difficulties, refer to the manufacturer’s documentation or seek assistance from a professional technician.
With the computer case open, you’re ready to proceed to the next step: locating the hard drive bay. Let’s move on!
Step 4: Locate the hard drive bay
Now that the computer case is open, the next step is to locate the hard drive bay where the solid state drive (SSD) will be installed. The hard drive bay is the designated area inside the computer case where the storage drives are housed.
Here’s how you can locate the hard drive bay in your Cyberpower PC:
- Observe the internal layout: Take a moment to familiarize yourself with the internal components of your computer. Look for the existing hard drives or storage bays installed inside the case.
- Refer to the manual or documentation: If you’re unsure about the exact location of the hard drive bay, consult the manufacturer’s manual or documentation for your specific Cyberpower PC model. This information can often be found on the manufacturer’s website as well.
- Look for drive cages or brackets: In many cases, the hard drive bay will consist of drive cages or brackets. These are typically metal structures that hold the hard drives securely in place.
- Identify the vacant slots: Once you’ve located the drive cages or brackets, identify the vacant slots where you can install the SSD. These slots are usually empty or may have removable drive trays.
It’s worth noting that the location and configuration of the hard drive bay may vary depending on the specific model and design of your Cyberpower PC. Some models may have easy-access slots or tool-less installation mechanisms, while others may require more manual steps.
If you’re unable to locate the hard drive bay or are unsure about the correct slot, don’t hesitate to seek assistance from the manufacturer’s support team or a knowledgeable technician.
Now that you’ve located the hard drive bay, you’re one step closer to installing the SSD. In the next step, we’ll cover how to remove the existing hard drive if applicable. Let’s continue!
Step 5: Remove the existing hard drive (if applicable)
In this step, we will guide you through the process of removing the existing hard drive from your Cyberpower PC, if there is one installed. This step is necessary if you’re replacing the existing hard drive with a solid state drive (SSD).
Follow these steps to remove the existing hard drive:
- Disconnect the cables: Start by disconnecting the data and power cables from the existing hard drive. Gently pull the connectors away from the hard drive and set them aside.
- Remove any mounting screws: Depending on your specific Cyberpower PC model, the hard drive may be secured with screws. Use a screwdriver to carefully remove any screws that are holding the hard drive in place. Take note of the location and type of screws for easier reinstallation later.
- Slide or lift the hard drive out: Once the cables and screws have been removed, you can now slide or lift the existing hard drive out of the hard drive bay. Be cautious when handling the hard drive to avoid any damage.
If you’re planning to keep the existing hard drive as additional storage, make sure to store it in an anti-static bag or other protective packaging. This will help prevent any accidental damage or static electricity discharge.
It’s important to note that not all Cyberpower PCs may come with pre-installed hard drives. In such cases, this step may not be applicable, and you can skip to the next step. If you’re unsure, consult the manufacturer’s documentation or seek assistance.
Now that the existing hard drive has been removed (if applicable), you’re ready to move on to the next step: preparing the solid state drive for installation. Let’s proceed!
Step 6: Prepare the solid state drive for installation
In this step, we will guide you through the process of preparing the solid state drive (SSD) for installation in your Cyberpower PC. Preparing the SSD involves a few essential steps to ensure its compatibility and readiness for installation.
Follow these steps to prepare the SSD:
- Check compatibility: Verify that the SSD you have purchased is compatible with your Cyberpower PC model. Refer to the manufacturer’s documentation or website for compatibility information.
- Handle with care: SSDs are sensitive electronic devices. When handling the SSD, avoid touching the gold connectors or any exposed circuitry. Hold the SSD by its edges to prevent any potential damage from static electricity or fingerprints.
- Remove protective coverings: Many SSDs come with protective coverings on the connectors or the surface. Remove any protective coverings or stickers before installation.
- Inspect the connectors: Take a moment to inspect the connectors on the SSD. Ensure that they are clean and free from any debris or damage. If you notice any issues, contact the manufacturer for guidance.
- Optional: Update SSD firmware: Check the manufacturer’s website for any available firmware updates for your SSD model. If updates are available, follow the manufacturer’s instructions to update the firmware before installation.
By following these steps, you will ensure that your SSD is ready for installation, minimizing the risk of any compatibility or functionality issues.
Now that you’ve prepared the solid state drive, you’re ready to proceed to the next step: installing the SSD into the hard drive bay. Let’s move forward!
Step 7: Install the solid state drive into the hard drive bay
Now that you have prepared the solid state drive (SSD), it’s time to install it into the hard drive bay of your Cyberpower PC. This step will securely position the SSD in place, allowing for proper functioning and stability.
Follow these steps to install the SSD into the hard drive bay:
- Locate the mounting points: Look for the mounting points in the hard drive bay where you will attach the SSD. These are typically holes or slots that align with the screw holes on the SSD.
- Position the SSD: Carefully align the connectors on the SSD with the corresponding SATA connections in the hard drive bay. Gently slide the SSD into place, ensuring it is seated correctly.
- Secure the SSD: Once the SSD is in position, use the screws that were removed earlier or the ones provided with the SSD to secure it firmly to the mounting points in the hard drive bay. Be cautious not to overtighten the screws, as it may damage the SSD or the bay.
If your Cyberpower PC requires a mounting bracket to install the SSD properly, attach the SSD to the mounting bracket before securing it in the hard drive bay. Refer to the manufacturer’s documentation or online resources for specific instructions on using a mounting bracket.
It’s important to note that the installation process may vary slightly depending on your Cyberpower PC model. If you encounter any difficulties or are unsure about the correct procedure, consult the manufacturer’s documentation or seek assistance from a professional.
Now that the SSD is securely installed in the hard drive bay, you’re one step closer to upgrading your storage. In the next step, we will guide you through connecting the necessary cables. Let’s proceed!
Step 8: Connect the necessary cables
In this step, we will guide you through connecting the necessary cables to ensure that the solid state drive (SSD) is properly powered and can communicate with other components in your Cyberpower PC.
Follow these steps to connect the necessary cables:
- SATA data cable: Take the SATA data cable that came with your SSD or use a spare one if needed. Connect one end of the cable to the SATA data port on the SSD, and the other end to an available SATA port on the motherboard. Make sure the connections are secure but not overly tightened.
- SATA power cable: Locate the SATA power cable from the power supply unit (PSU) in your Cyberpower PC. Connect one end of the SATA power cable to the corresponding power port on the SSD and the other end to an available SATA power connector from the PSU.
It’s important to ensure that the cables are properly connected and securely seated in their respective ports. This will ensure a stable and reliable connection for the SSD during operation.
If you are not familiar with the different types of ports or cables in your Cyberpower PC, refer to the manufacturer’s documentation or online resources for guidance. Additionally, some Cyberpower PC models may have specific cable routing or management requirements, so it’s beneficial to follow any instructions provided by the manufacturer.
Once the necessary cables are connected, the SSD is ready to be secured in place in the hard drive bay. In the next step, we will cover the process of securing the solid state drive.
Step 9: Secure the solid state drive in place
Now that you have connected the necessary cables, it’s time to secure the solid state drive (SSD) in its designated position within the hard drive bay of your Cyberpower PC. Properly securing the SSD will ensure that it stays in place and avoids any potential movement or damage.
Follow these steps to secure the SSD in place:
- Align the screw holes: Verify that the screw holes on the SSD and the hard drive bay are properly aligned.
- Insert and tighten the screws: Using the screws that were removed earlier or the ones provided with the SSD, insert them into the aligned screw holes and gently tighten them. Be careful not to overtighten, as it may damage the SSD or the hard drive bay.
- Check for stability: Once the screws are securely tightened, gently shake the SSD and ensure that it does not shift or move within the hard drive bay. If it feels loose, double-check the screws and make any necessary adjustments.
Securing the SSD in place is crucial to prevent any accidental disconnections or damage during operation. It is important to use the appropriate screws and ensure a stable and firm attachment.
If your Cyberpower PC requires the use of a mounting bracket to secure the SSD, follow the manufacturer’s instructions for attaching and positioning the bracket correctly. Refer to the documentation or online resources for your specific Cyberpower PC model if you need further guidance.
With the SSD now securely installed and properly secured within the hard drive bay, you’re one step closer to completing the installation process. In the next step, we will guide you through closing the computer case.
Step 10: Close the computer case
After successfully installing and securing the solid state drive (SSD) in your Cyberpower PC, it’s time to close the computer case. Closing the case not only protects the internal components but also ensures proper airflow and ventilation for optimal performance and cooling.
Follow these steps to close the computer case:
- Align the side panel: Place the side panel back onto the computer case, ensuring that it aligns properly with the slots or hooks on the case.
- Slide or push the side panel: Gently slide or push the side panel into place until it sits flush with the rest of the case. Make sure it is securely attached and does not feel loose.
- Insert and tighten the screws: Locate the screws that were removed earlier and use a screwdriver to securely tighten them back into their original positions. Ensure that all screws are tightened evenly to maintain a balanced closure.
Be cautious not to overtighten the screws, as it could damage the case or strip the screw threads.
Once the side panel is securely attached and the screws are tightened, the computer case is effectively closed. Double-check that all cables inside the case are neatly routed and not obstructing any airflow paths.
Now that the computer case is closed, you can reconnect your Cyberpower PC to the power source and prepare to power it on. In the next step, we will guide you through the initial startup and configuration of the solid state drive.
Step 11: Power on the computer and configure the solid state drive
After closing the computer case, it’s time to power on your Cyberpower PC and configure the newly installed solid state drive (SSD). By following this step, you’ll be able to ensure that the SSD is recognized by the system and set up for optimal performance.
Follow these steps to power on the computer and configure the SSD:
- Reconnect the power cable: Plug the power cable back into the power source and ensure it is securely connected to your Cyberpower PC.
- Press the power button: Locate the power button on your Cyberpower PC and press it to turn the computer on. Wait for the system to boot up.
- Enter BIOS/UEFI settings: During the boot-up process, you may need to press a specific key (such as Delete, F2, or F10) to access the BIOS/UEFI settings. Consult your Cyberpower PC’s documentation or check for on-screen prompts to determine the correct key to press.
- Configure boot settings: Once in the BIOS/UEFI settings, navigate to the boot settings or boot priority section. Set the SSD as the primary boot device to ensure that the system boots from it instead of the old hard drive. Save any changes you make before exiting the BIOS/UEFI settings.
- Install the operating system (if necessary): If you have installed a new and empty SSD or if you want to reinstall the operating system, boot from the operating system installation media (such as a USB drive or DVD) and follow the on-screen instructions for installation.
- Format or transfer data (if necessary): If you are using the SSD as an additional storage drive and want to transfer data or format it, you can do so using the operating system’s disk management tools or third-party software.
By following these steps, you will successfully power on your Cyberpower PC and configure the solid state drive for optimal functioning. Remember to refer to the manufacturer’s documentation or online resources if you encounter any difficulties during the configuration process.
Congratulations! You have now completed the installation and configuration of the solid state drive in your Cyberpower PC. Enjoy the enhanced performance and improved efficiency that the SSD brings to your computing experience.
Conclusion
Congratulations on successfully installing a solid state drive (SSD) in your Cyberpower PC! By following the step-by-step guide outlined in this article, you have upgraded your computer’s storage, enhancing its performance, speed, and overall efficiency.
An SSD offers numerous benefits, including faster boot times, improved file transfer speeds, reduced lag, and increased productivity. It brings new life to your Cyberpower PC, whether you’re a gamer looking for reduced loading times or a professional seeking smoother multitasking and application performance.
Throughout the installation process, you learned how to gather the necessary tools and materials, prepare your computer, open and locate the hard drive bay, remove the existing hard drive (if applicable), and prepare and install the SSD. You also connected the necessary cables, secured the SSD in place, closed the computer case, powered on the computer, and configured the SSD to ensure optimal performance.
Remember, it’s essential to follow the manufacturer’s documentation or seek assistance if you encounter any difficulties during the installation process. Computer hardware can vary between models and manufacturers, so it’s always a good idea to refer to the appropriate resources for your specific Cyberpower PC model.
We hope that this guide has been informative and has provided you with the necessary knowledge and confidence to successfully install an SSD in your Cyberpower PC. Enjoy the improved speed and responsiveness that your new SSD brings, and make the most out of your computing experience.
Thank you for choosing to upgrade your Cyberpower PC with an SSD and for trusting in our installation guide. Happy computing!


