Introduction
Welcome to the world of smart TVs, where you can access a vast array of entertainment right from the comfort of your living room. One of the key features of a smart TV is its ability to connect to the internet, allowing you to stream your favorite shows, movies, and videos or browse the web directly on the big screen.
Connecting your smart TV to Wi-Fi is an essential step in unlocking its full potential. With a stable Wi-Fi connection, you can take advantage of a wide range of online streaming platforms, connect with social media, browse the internet, and even control your TV with voice commands. If you’re ready to dive into the world of online entertainment, we’ve got you covered with this step-by-step guide on how to hook up your smart TV to Wi-Fi.
Before we get started, it’s important to note that the exact steps may vary slightly depending on the make and model of your smart TV. However, the basic principles should remain the same across most devices. So, without further ado, let’s jump right into it.
Step 1: Gather the Essential Equipment
Before you begin the process of connecting your smart TV to Wi-Fi, it’s important to gather the essential equipment. Here’s what you’ll need:
- Smart TV: Ensure that your TV is a smart TV that is capable of connecting to the internet. Most modern TVs come with built-in Wi-Fi capabilities, but if your TV doesn’t have this feature, you may need to purchase an external Wi-Fi adapter.
- Wi-Fi Router: You’ll need a Wi-Fi router that is already connected to the internet. Ensure that the router is in proper working condition and within range of your TV.
- Internet Connection: Make sure you have an active internet connection with a working username and password provided by your internet service provider.
- Remote Control: Keep the remote control of your smart TV handy, as you’ll need it to navigate through the on-screen menus and settings.
Once you have all the necessary equipment, you’re ready to move on to the next step.
Step 2: Locate the Wi-Fi Network
Now that you have gathered all the essential equipment, it’s time to locate the Wi-Fi network on your smart TV. Follow these steps:
- Turn on your smart TV and grab the remote control.
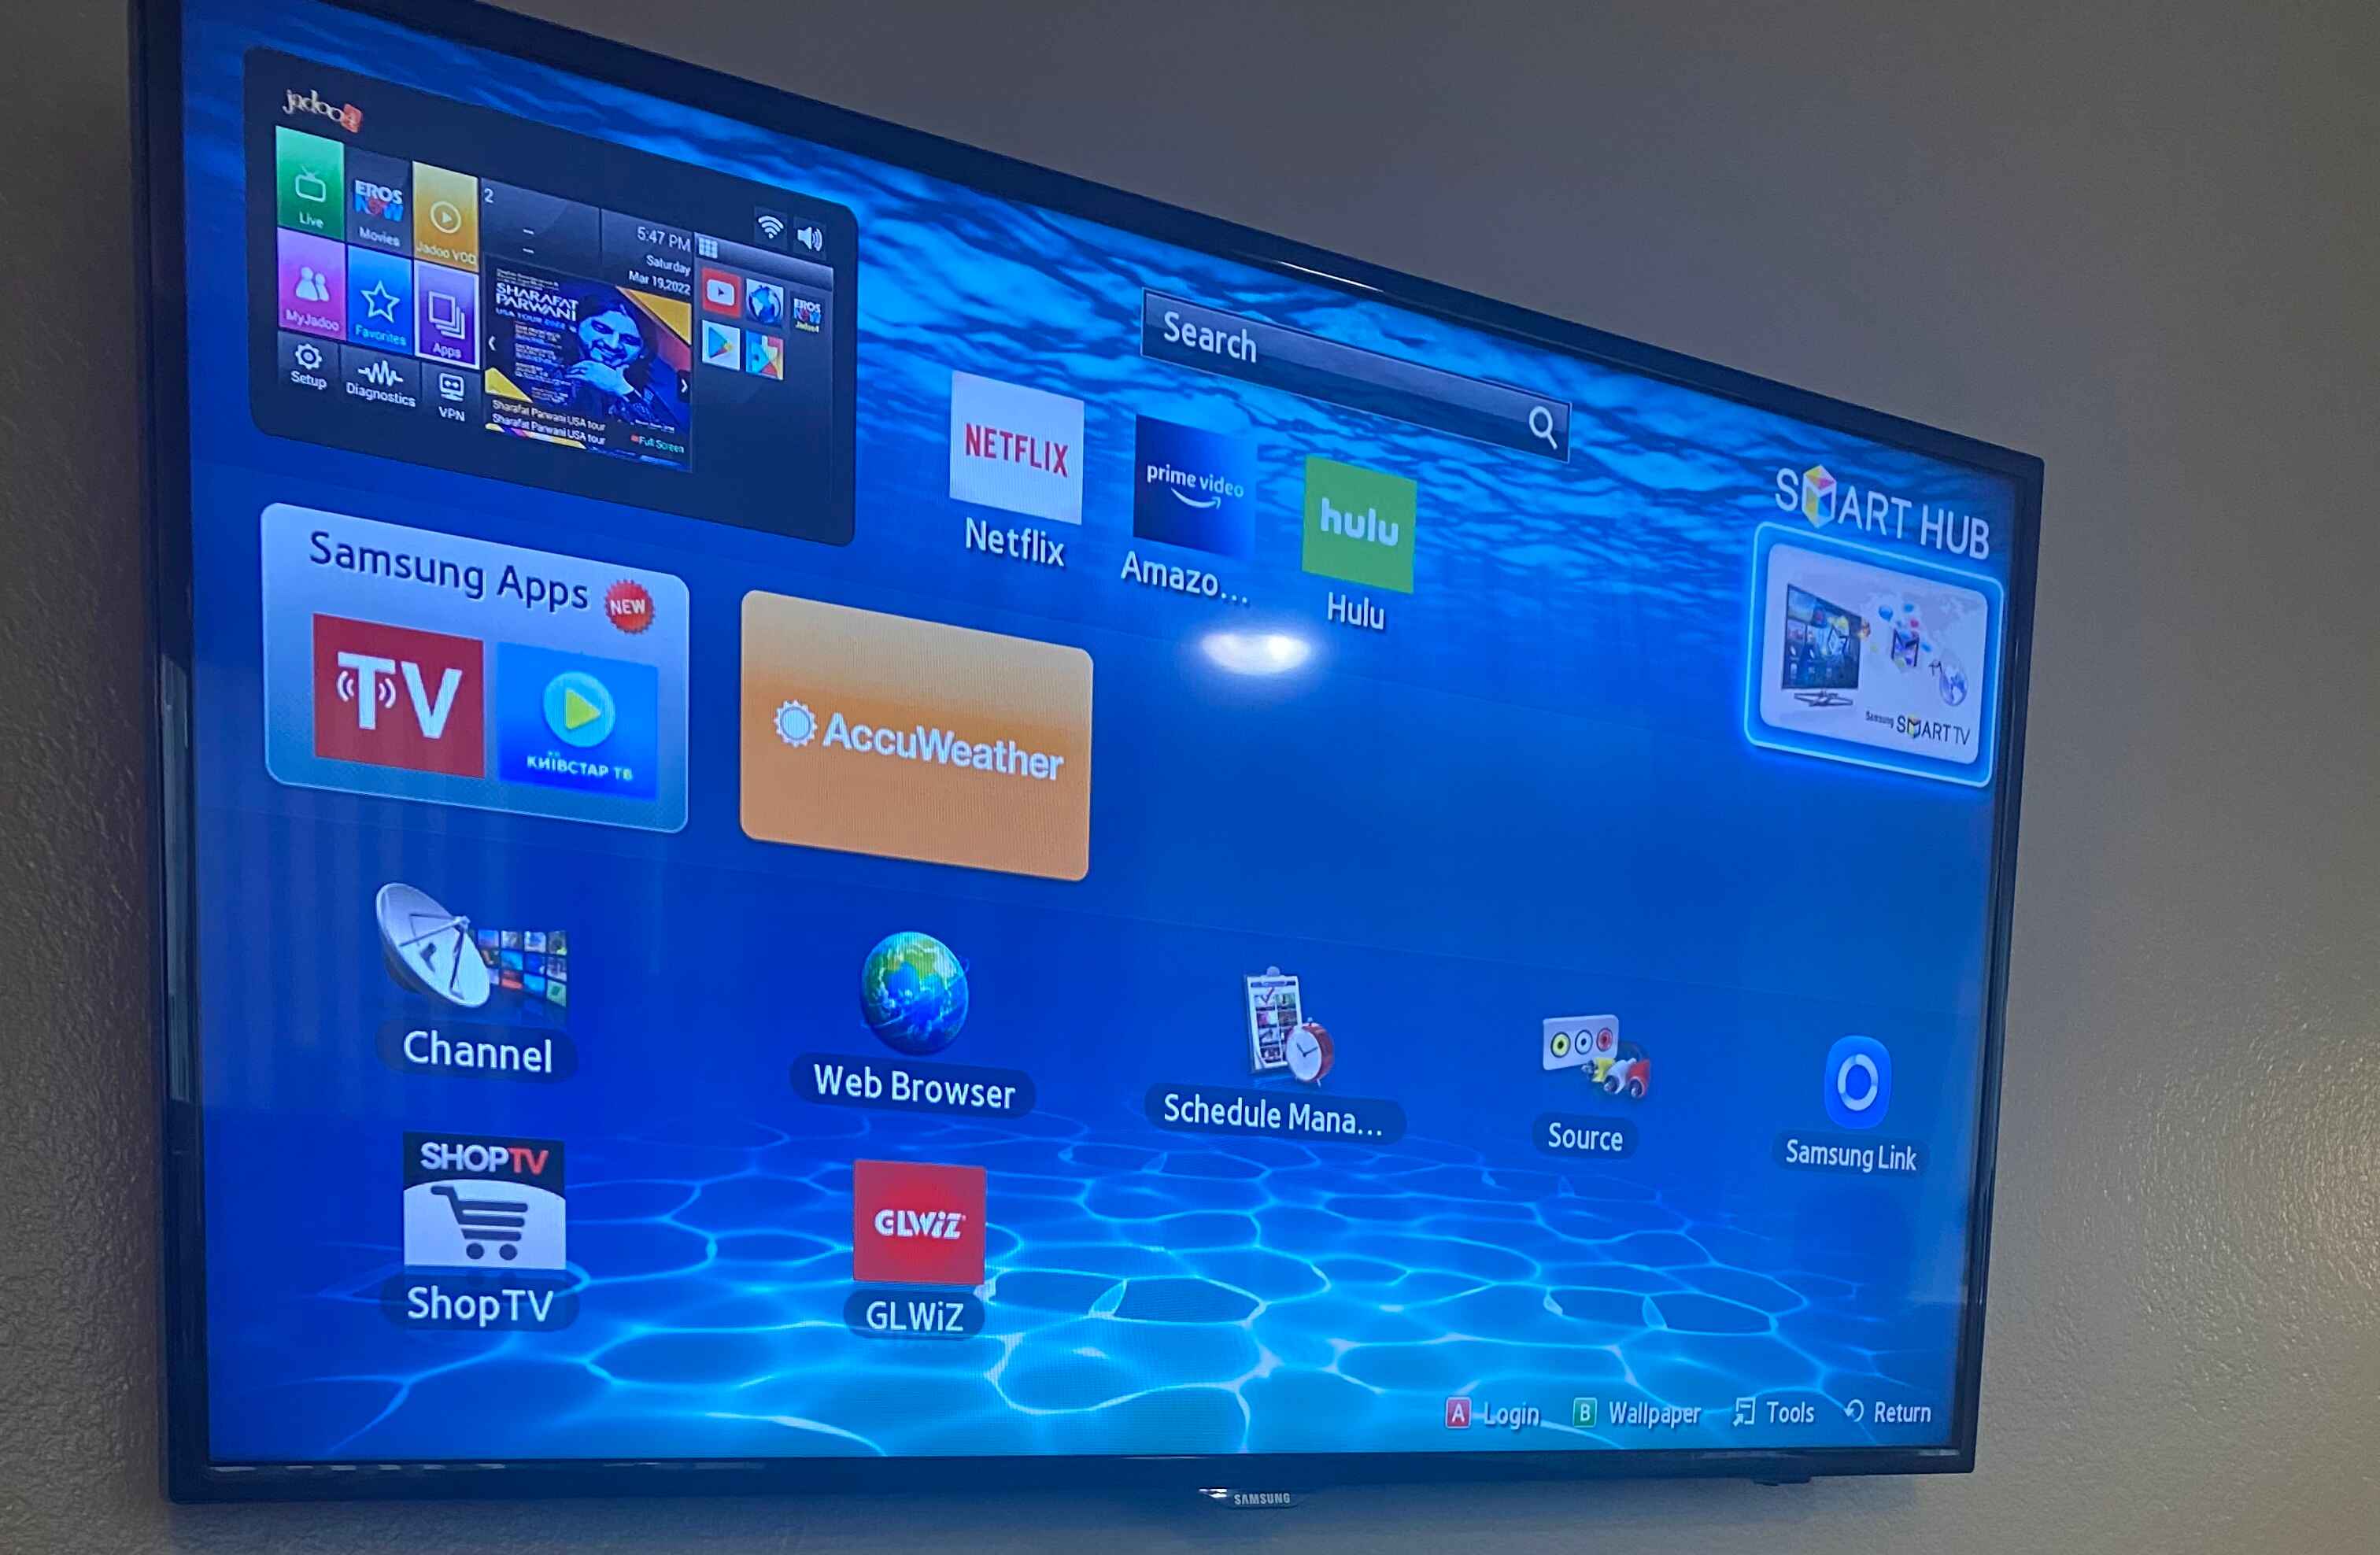
- Access the settings menu on your TV. The exact method may vary depending on the brand and model of your smart TV. Look for options such as “Settings,” “Menu,” or a gear icon.
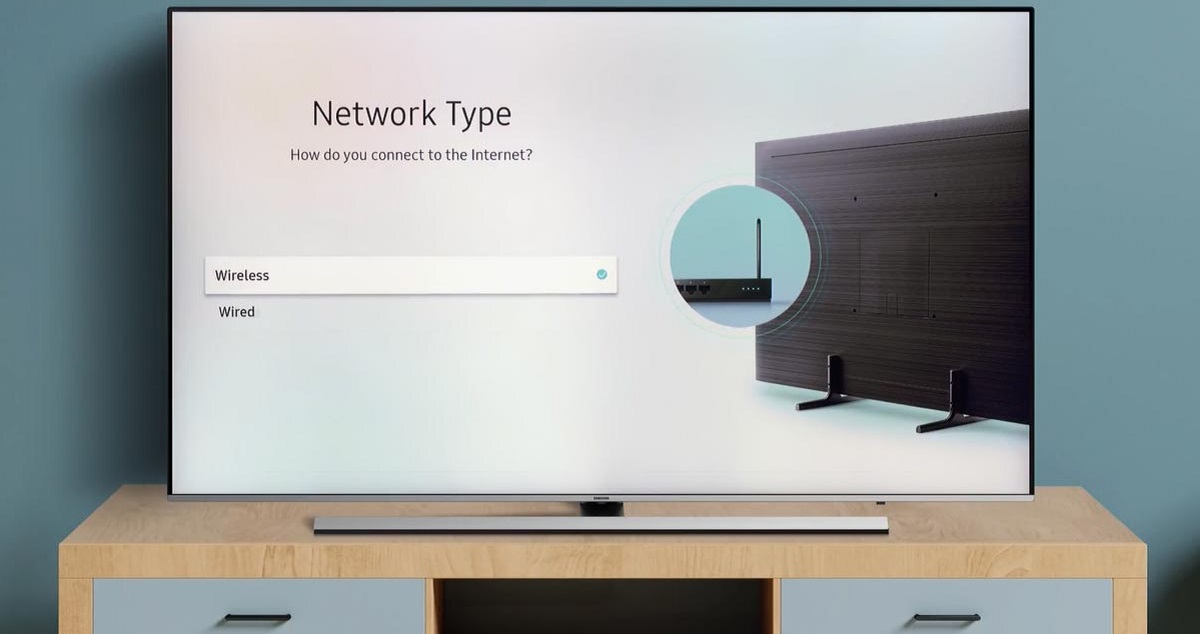
- Navigate to the network settings. This might be labeled as “Network,” “Wi-Fi,” or “Wireless.” Select the appropriate option to proceed.
- Your smart TV will scan for available Wi-Fi networks in the vicinity. Wait for a moment while it completes the scan.
- A list of detected Wi-Fi networks will appear on the screen. Look for your home Wi-Fi network name in the list.
- If your network name is not visible, make sure your Wi-Fi router is powered on and within range of the TV. You may need to move closer to the router or try restarting the router.
- Select your Wi-Fi network from the list by highlighting it and pressing the “Enter” or “OK” button on your remote control.
By following these steps, you should now be able to locate the Wi-Fi network on your smart TV. In the next step, we’ll guide you through the process of connecting your TV to the Wi-Fi network.
Step 3: Connect the Smart TV to Wi-Fi
With the Wi-Fi network located, it’s time to connect your smart TV to the network. Follow these steps:
- Once you have selected your Wi-Fi network from the list, you may be prompted to enter the Wi-Fi password. If so, move on to the next step. If not, skip to step 5.
- Using the remote control, navigate to the password field and select it. A virtual keyboard should appear on the screen.
- Use the arrow buttons on the remote control to navigate between letters, numbers, and symbols on the virtual keyboard. Enter your Wi-Fi password correctly, taking care to capitalize letters and enter special characters if required.
- Once you have entered the Wi-Fi password, double-check for any errors. Then, select the “Enter” or “OK” button to proceed.
- Your smart TV will now attempt to connect to the Wi-Fi network. This process may take a few seconds, and you may see a loading or connecting animation on the screen.
- If the password was entered correctly and the connection is successful, your smart TV should display a message indicating that it is now connected to the Wi-Fi network.
- Congratulations! Your smart TV is now connected to Wi-Fi, and you can start enjoying the benefits of internet connectivity on your big screen.
Note that some smart TVs may have additional steps or settings to configure, such as choosing the network type (Wi-Fi or wired) or setting up a static IP address. Refer to your TV’s user manual for more detailed instructions specific to your device.
Now that your smart TV is connected to Wi-Fi, you’re just a few steps away from accessing a world of online entertainment and information. In the next step, we’ll provide troubleshooting tips to help you overcome any potential connectivity issues.
Step 4: Enter Wi-Fi Password
If you are prompted to enter the Wi-Fi password during the setup process, follow these steps:
- Using your TV remote control, navigate to the password field on the screen.
- Select the password field to activate the virtual keyboard.
- Use the arrow buttons on the remote control to navigate between letters, numbers, and symbols on the virtual keyboard.
- Enter your Wi-Fi password carefully, making sure to capitalize letters and enter special characters, if required.
- Double-check the entered password for any mistakes, as the Wi-Fi connection will fail if the password is incorrect.
- Once you are confident that the password is correct, select the “Enter” or “OK” button to confirm.
Your smart TV will now attempt to connect to the Wi-Fi network using the entered password. It may take a few seconds for the connection to be established. During this time, you may see a loading or connecting animation on the TV screen. If the password was entered correctly and the connection is successful, your smart TV will display a message indicating that it is now connected to the Wi-Fi network.
If you encounter any issues during this step, ensure that you have entered the Wi-Fi password correctly and that you are within range of the Wi-Fi router. If the problem persists, consider restarting your smart TV and the Wi-Fi router before retrying.
Once your smart TV is connected to Wi-Fi, you can start enjoying a wide variety of online content and services. In the next step, we will provide some troubleshooting tips to help you overcome any potential connectivity problems that you may encounter.
Step 5: Troubleshooting Tips
If you encounter any issues while connecting your smart TV to Wi-Fi, here are some troubleshooting tips to help you resolve the problem:
- Check Wi-Fi Signal Strength: Ensure that your smart TV is within range of your Wi-Fi router. Walls, distance, and other objects can weaken the signal. If you have a weak signal, consider moving the router closer to the TV or using a Wi-Fi extender to improve the coverage.
- Restart Router and TV: Sometimes, a simple restart can resolve connectivity issues. Turn off both your smart TV and Wi-Fi router, wait for a few minutes, and then turn them back on. This helps refresh the connection and can resolve temporary glitches.
- Verify Wi-Fi Password: Double-check that you entered the correct Wi-Fi password during the setup process. Wi-Fi passwords are case-sensitive, so make sure to enter uppercase and lowercase letters correctly.
- Disable MAC Address Filtering: If you have enabled MAC address filtering on your router, make sure to add your smart TV’s MAC address to the allowed devices list. Alternatively, you can temporarily disable MAC address filtering to establish the connection and then re-enable it once the TV is connected.
- Reset Network Settings: If you are still unable to connect, try resetting the network settings on your smart TV. Look for the “Reset Network Settings” option in the settings menu of your TV. Note that resetting the network settings will remove any saved Wi-Fi network information, so be prepared to re-enter your Wi-Fi password.
- Contact Support: If none of the above steps work, consult the user manual for your smart TV or contact the manufacturer’s customer support for further assistance. They may be able to provide you with specific troubleshooting steps or guide you through the setup process.
By following these troubleshooting tips, you should be able to resolve most common connectivity issues and successfully connect your smart TV to Wi-Fi.
Now that you have successfully connected your smart TV to Wi-Fi, you can sit back, relax, and enjoy endless entertainment options right from your living room.
Conclusion
Congratulations! You have successfully learned how to connect your smart TV to Wi-Fi. By following the steps outlined in this guide, you can now enjoy the full range of features and benefits that come with having an internet-connected TV.
Remember, the process of connecting your smart TV to Wi-Fi may vary slightly depending on the make and model of your device. However, the general principles discussed in this guide should apply to most smart TVs.
From streaming your favorite shows and movies to browsing the web and accessing a wealth of online content, having your smart TV connected to Wi-Fi opens up a whole new world of entertainment possibilities. With a stable and reliable Wi-Fi connection, you can stay up to date with the latest news, connect with friends on social media, or even control your TV using voice commands.
If you encountered any issues along the way, remember to refer back to this guide for troubleshooting tips. In some cases, a simple reset or adjusting your Wi-Fi signal strength can resolve connectivity problems.
Now, grab some popcorn, settle into your favorite spot on the couch, and immerse yourself in the exciting world of smart TV entertainment. Enjoy your newfound connectivity and the endless possibilities it brings!