Introduction
Welcome to our guide on how to fix weak security on your Wi-Fi network. With the increasing dependence on the internet and the rise in cyber threats, it has become crucial to ensure the security of your wireless network. A weak Wi-Fi security can make your network vulnerable to hackers, unauthorized access, and data breaches.
In this article, we will outline several important steps that you can take to strengthen the security of your Wi-Fi network and protect your personal information. By implementing these measures, you can significantly reduce the risk of unauthorized access and safeguard your online activities.
It is important to note that the steps mentioned here are applicable to most routers and Wi-Fi networks. However, the exact steps and options may vary depending on your specific router model and firmware version. It is recommended to consult the user manual or visit the manufacturer’s website for specific instructions.
Now, let’s dive into the various ways you can improve the security of your Wi-Fi network.
Change Default Network Name (SSID)
One of the first steps you should take to enhance the security of your Wi-Fi network is to change the default network name or Service Set Identifier (SSID). Manufacturers often assign generic SSIDs to their routers, making it easier for hackers to identify the type of router you’re using and potentially exploit any known vulnerabilities.
By changing the default SSID, you make it more difficult for hackers to target your network. Choose a unique and creative name that doesn’t reveal any personal information or provide any hints about the router model you’re using. Avoid using common names like “Home” or “Default.” Instead, opt for something that only you and your family or team members would recognize.
Changing the SSID is usually a straightforward process. To do this, access your router’s administration panel by typing the router’s IP address into a web browser. Once logged in, navigate to the wireless settings section and look for an option to change the SSID. Enter your preferred name and save the settings.
Remember to write down the new SSID and password in a secure place, as you’ll need them to connect your devices to the Wi-Fi network.
Changing the default SSID is an essential first step in securing your Wi-Fi network, as it helps to prevent unauthorized users from easily identifying and targeting your network. However, it’s important to note that this step alone is not sufficient for complete Wi-Fi security. We’ll explore further measures in the following sections.
Create Strong, Unique Passwords
One of the most effective ways to strengthen the security of your Wi-Fi network is by creating strong and unique passwords for both your router’s administration panel and your Wi-Fi network. Weak or easily guessable passwords can make your network vulnerable to unauthorized access and potential security breaches.
When choosing a password, aim for a combination of uppercase and lowercase letters, numbers, and special characters. Avoid using common words, personal information, or sequential patterns that can be easily guessed. Instead, opt for a random combination of characters that would be difficult for anyone to guess.
Furthermore, it is crucial to use different passwords for your router’s administration panel and your Wi-Fi network. By doing so, even if someone manages to gain access to your router’s settings, they will still require a separate password to connect to your Wi-Fi network.
To change your router’s administration password, log in to the router’s administration panel using the default password or your current password. Navigate to the administrative settings section and look for an option to change the password. Enter your new strong and unique password and save the settings.
Next, update the Wi-Fi network password. Go to the wireless settings section of your router’s administration panel and find the option to change the Wi-Fi network password. Enter your new password and save the settings.
Remember to choose passwords that are not easily forgotten but are also secure. It is a good practice to update your passwords periodically to further enhance the security of your Wi-Fi network.
By creating strong and unique passwords, you add an additional layer of security to your Wi-Fi network, making it more difficult for unauthorized individuals to gain access and ensuring the privacy of your online activities.
Update Router Firmware Regularly
Regularly updating the firmware of your router is crucial for maintaining the security and functionality of your Wi-Fi network. Firmware updates often include security patches, bug fixes, and new features that can help protect your network from emerging threats and improve its overall performance.
Router manufacturers release firmware updates periodically to address known vulnerabilities and to ensure that your router’s software is up to date. These updates help to patch any security flaws that hackers can potentially exploit to gain unauthorized access to your network.
Most modern routers have a built-in feature that allows for automatic firmware updates. However, it is recommended to double-check this setting and ensure that it is turned on. If automatic updates are not available or enabled on your router, you can manually check for firmware updates on the manufacturer’s website or within the router’s administration panel.
To update the firmware manually, log in to your router’s administration panel and navigate to the firmware update section. Here, you can check the current firmware version and compare it with the latest version available from the manufacturer. If an update is available, follow the instructions provided by the manufacturer to download and install the new firmware.
During the firmware update process, it’s essential to avoid interrupting the power supply or disconnecting the router. Any interruption can cause the update to fail, potentially rendering your router inoperable.
By keeping your router’s firmware up to date, you ensure that the latest security measures are in place to protect your Wi-Fi network, minimizing the risk of security breaches and maximizing the performance of your router.
Enable WPA3 Encryption
Enabling WPA3 (Wi-Fi Protected Access 3) encryption on your router is an important step in enhancing the security of your Wi-Fi network. WPA3 is the latest and most secure encryption protocol available, providing stronger protection against unauthorized access and improving the privacy of your wireless communications.
Compared to its predecessor, WPA2, WPA3 offers several advanced security features. One notable feature is the use of individualized data encryption, which means that each device connected to the network has its own encryption key. This makes it extremely difficult for attackers to intercept and decipher the network traffic.
Additionally, WPA3 introduces improved protection against brute-force attacks. It includes a feature called Simultaneous Authentication of Equals (SAE), which makes it more challenging for hackers to guess or crack the Wi-Fi password by implementing stronger password-based authentication.
Not all routers and devices support WPA3 encryption, so it’s important to check whether your router is compatible. If your router supports WPA3, you can usually enable it by accessing the wireless settings section in your router’s administration panel. Look for the security options and select WPA3 as the preferred encryption method.
If your router does not support WPA3 encryption, it is still recommended to use WPA2 encryption, as it provides solid security for your Wi-Fi network. However, keep in mind that WPA2 has some known vulnerabilities, and it is best to upgrade to WPA3-compatible hardware when available.
Enabling WPA3 encryption on your router ensures that your Wi-Fi network benefits from the highest level of security currently available, protecting your data and preventing unauthorized access to your network.
Disable WPS
Wireless Protected Setup (WPS) is a feature that allows for easy and quick device pairing to your Wi-Fi network by pressing a button or entering a PIN code. While this convenience may seem appealing, it poses a significant security risk as it can be exploited by attackers to gain unauthorized access to your network.
Disabling WPS is essential for strengthening the security of your Wi-Fi network. Hackers can use brute force attacks to guess or crack the WPS PIN, especially if it is a simple or default PIN. Once the PIN is compromised, they can easily gain access to your network, bypassing any other security measures you have in place.
To disable WPS, log in to your router’s administration panel and navigate to the wireless settings section. Look for the option to disable WPS and save the changes. In some routers, you may find WPS settings under a separate WPS section.
It’s important to note that disabling WPS may vary depending on the router model and firmware version. If you are unsure about the exact steps, consult the user manual or visit the manufacturer’s support website for specific instructions.
Once WPS is disabled, you will need to connect your devices to the Wi-Fi network using the regular Wi-Fi settings and entering the Wi-Fi password manually. While this may require a little more effort, it significantly reduces the risk of unauthorized access to your network.
By disabling WPS, you eliminate a potential entryway for hackers, ensuring that only authorized devices can connect to your Wi-Fi network and enhancing the security of your wireless communications.
Enable Network Encryption (WPA2)
Enabling network encryption using WPA2 (Wi-Fi Protected Access 2) is a fundamental step in securing your Wi-Fi network. WPA2 provides robust encryption, making it difficult for unauthorized individuals to intercept and decipher your network traffic.
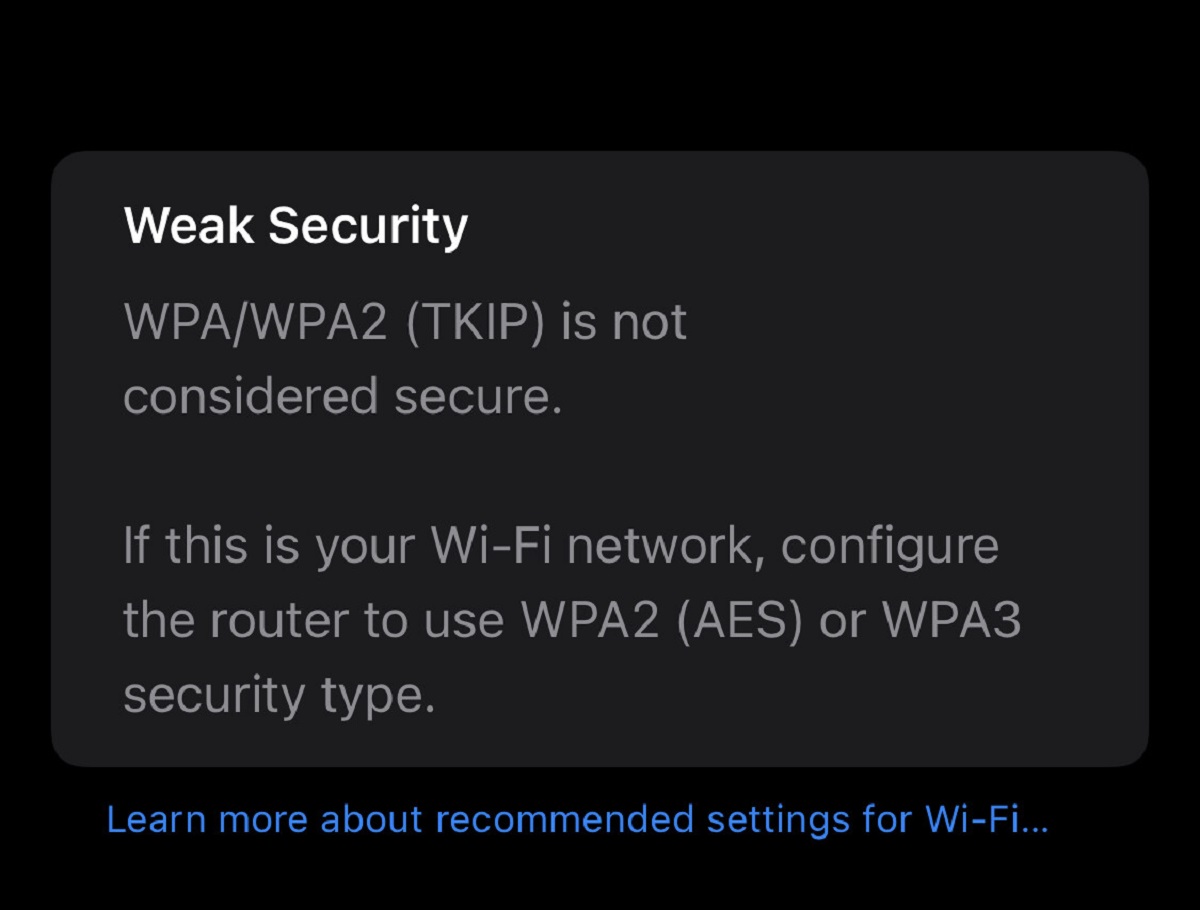
WPA2 offers two levels of encryption: TKIP (Temporal Key Integrity Protocol) and AES (Advanced Encryption Standard). AES is the stronger and recommended option, as it provides stronger encryption algorithms and better security.
To enable network encryption using WPA2, access your router’s administration panel and navigate to the wireless settings section. Look for the security options and select WPA2 as the encryption method. If available, also choose AES as the encryption algorithm.
It is important to note that older devices may not support WPA2 encryption, and may only be compatible with the older and less secure WEP (Wired Equivalent Privacy) or WPA (Wi-Fi Protected Access) encryption methods. In such cases, it is recommended to consider upgrading your devices to support WPA2 encryption for better security.
When setting up the network encryption, you will be prompted to enter a Wi-Fi password. Choose a strong and unique password following the guidelines mentioned earlier. This password will be required for any device trying to connect to your Wi-Fi network.
Keep in mind that once you enable network encryption with WPA2, any device attempting to connect to your Wi-Fi network will need to enter the correct Wi-Fi password. This ensures that only authorized devices can access your network and helps protect your sensitive data.
By enabling network encryption using WPA2, you add a significant layer of security to your Wi-Fi network and prevent unauthorized access to your network traffic.
Disable Remote Management
Remote management allows you to access and control your router’s settings from a remote location, such as through the internet. While this feature may seem convenient, it poses a significant security risk. Disabling remote management is an important step in protecting your Wi-Fi network from unauthorized access.
Leaving remote management enabled can potentially allow hackers to exploit any vulnerabilities in your router’s firmware, gain access to its settings, and take control of your network. By disabling remote management, you limit access to your router’s settings only to devices connected to your local network.
To disable remote management, log in to your router’s administration panel and look for the remote management settings. It is usually located in the administration or advanced settings sections. Disable the option to access the router’s settings remotely and save the changes.
Keep in mind that disabling remote management means that you will no longer be able to access your router’s settings from outside your local network. If you need to make any changes to your router’s settings, you will need to do so from a device connected to your Wi-Fi network.
Disabling remote management adds an extra layer of protection to your Wi-Fi network by closing off potential entry points for unauthorized individuals. It ensures that only devices within your local network have the ability to manage and control your router’s settings.
Remember to regularly check for firmware updates and security patches for your router to stay up to date with the latest security measures and protect against any new vulnerabilities.
Enable MAC Address Filtering
Enabling MAC Address Filtering is another effective way to enhance the security of your Wi-Fi network. MAC (Media Access Control) Address Filtering allows you to create a whitelist of specific devices that are allowed to connect to your network, while blocking all others.
Every device that connects to a Wi-Fi network has a unique MAC address associated with its network interface. By enabling MAC Address Filtering, you can specify which devices are permitted to connect to your network based on their MAC addresses.
To enable MAC Address Filtering, log in to your router’s administration panel and navigate to the wireless settings section. Look for the MAC Address Filtering or Access Control options. Here, you can usually find options to enable MAC Address Filtering and add devices to the allowed or blocked list.
To add a device to the allowed list, you will need to enter its MAC address. This can usually be found in the device’s settings or by connecting the device to your network and checking your router’s connected devices list.
Once MAC Address Filtering is enabled, only the devices with MAC addresses on your allowed list will be able to connect to your network. Any other device attempting to connect will be denied access, even if the correct Wi-Fi password is entered.
It’s important to note that MAC Address Filtering is not foolproof and can be bypassed by determined attackers who are able to spoof MAC addresses. However, it does provide an added layer of security and can help prevent casual unauthorized access to your Wi-Fi network.
Remember to periodically review and update the allowed list to include new devices and remove any that are no longer in use. This ensures that only the devices you trust have access to your network.
By enabling MAC Address Filtering, you have control over the devices that can connect to your Wi-Fi network, enhancing the security and reducing the risk of unauthorized access.
Enable Firewall
Enabling the firewall on your router adds an essential layer of protection to your Wi-Fi network by monitoring and controlling incoming and outgoing network traffic. The firewall acts as a barrier between your network and the internet, filtering out potentially harmful data and blocking unauthorized access attempts.
Most routers have built-in firewall functionality that can be easily enabled in the router’s administration panel. The firewall settings are usually found in the security or advanced settings section.
When enabling the firewall, there are typically different options you can choose from, such as basic or advanced firewall settings. It is advisable to select the most secure and robust firewall settings that provide the highest level of protection for your network.
The firewall works by inspecting data packets and determining whether they meet certain predefined rules. Suspicious or malicious packets are blocked, preventing them from reaching your network.
It’s important to note that while the router’s firewall provides a valuable level of protection, it is also recommended to have a software firewall installed on each device connected to your network for additional defense against threats.
Regularly updating the firmware of your router ensures that any security patches or updates for the firewall are installed, keeping your network protected against newly discovered vulnerabilities.
Enabling the firewall on your router serves as an effective deterrent against unauthorized access and helps to safeguard your Wi-Fi network from potential cyber threats.
Keep Devices and Software Updated
Maintaining the latest updates for your devices and software is crucial for the security of your Wi-Fi network. This includes keeping your router, computers, smartphones, and other connected devices up to date with the latest firmware and software patches.
Manufacturers regularly release updates to address known vulnerabilities and improve the performance and security of their devices. These updates often include fixes for security flaws that can be exploited by hackers to gain unauthorized access to your network.
To ensure that your devices stay updated, enable automatic updates whenever possible. This allows your devices to download and install updates as soon as they become available, without the need for manual intervention.
For your router, visit the manufacturer’s website regularly to check for firmware updates. Many routers have the option to automatically check for and install updates, so ensure that this feature is enabled. Alternatively, you can sign up for email notifications from the manufacturer to stay informed about any new firmware releases.
In addition to updating the firmware, it is equally important to keep the software on your devices up to date. This includes operating systems, web browsers, antivirus software, and any other applications you use to connect to the internet.
Software updates often include critical security patches that address vulnerabilities discovered by software developers or security researchers. Failure to update your software leaves your devices and network exposed to potential attacks.
Set up automatic updates for your operating system, web browser, and other software applications whenever possible. If automatic updates are not available, make it a habit to regularly check for and install updates manually.
By keeping your devices and software updated, you greatly reduce the risk of security breaches and ensure that your devices are equipped with the latest security measures to protect your Wi-Fi network.
Disable Guest Network Access
Disabling guest network access is an important step in securing your Wi-Fi network and protecting your personal information. Guest networks are separate networks that allow visitors or temporary users to connect to the internet without accessing your main network.
While guest networks can be convenient for sharing your Wi-Fi with guests, they can also pose security risks if not properly secured. By default, many routers come with a guest network feature enabled, allowing anyone within range to connect to the guest network with a password.
When guest network access is enabled, it creates a potential entry point for attackers to gain unauthorized access to your network or eavesdrop on the communication between devices. Disabling the guest network ensures that only trusted devices and users can connect to your network, reducing the risk of potential security breaches.
To disable guest network access, log in to your router’s administration panel and navigate to the wireless settings. Look for an option related to guest network or guest access and disable it. Save the settings to apply the changes.
If you occasionally require a guest network, make sure to set a strong and unique password for it, separate from your main network. Also, consider enabling additional security features such as client isolation, which restricts communication between devices connected to the guest network.
By disabling guest network access or properly securing it with a strong password and additional security measures, you ensure that only authorized devices can connect to your Wi-Fi network and reduce the risk of unauthorized access or compromised security.
Conclusion
Securing your Wi-Fi network is essential for protecting your personal information and reducing the risk of unauthorized access. By following the steps outlined in this guide, you can significantly enhance the security of your Wi-Fi network and enjoy a safer online experience.
Changing the default network name (SSID) and creating strong, unique passwords for your router’s administration panel and Wi-Fi network are crucial first steps in securing your network. Updating your router’s firmware regularly ensures you have the latest security patches and features.
Enabling WPA3 encryption and disabling WPS further strengthen the security of your network by implementing stronger encryption algorithms and removing potential vulnerabilities. Enable network encryption using WPA2, and consider enabling MAC Address Filtering for added protection.
Disabling remote management and enabling the firewall on your router provide additional barriers against unauthorized access and protect your network from potential threats. Keeping your devices and software updated with the latest firmware and security patches adds another layer of defense.
Finally, consider disabling guest network access or securing it with a strong password and additional security measures to prevent unauthorized access to your network.
By implementing these security measures, you can have peace of mind knowing that your Wi-Fi network is more secure and less susceptible to cyber threats. Remember to regularly review and update your security settings to stay ahead of potential risks and ensure the ongoing protection of your network.