Introduction
The HDMI port on the Xbox Series X is an essential component that allows you to connect your console to a TV or monitor and enjoy high-definition gaming and entertainment. However, like any other electronic device, the HDMI port can sometimes encounter issues that prevent it from functioning properly. Whether you’re experiencing no signal, flickering display, or audio problems, these issues can be frustrating and hinder your gaming experience.
In this article, we will guide you through the steps to fix the HDMI port on your Xbox Series X and get your console back up and running. We will cover common issues that may arise with the HDMI port and provide practical solutions to resolve them.
Before we start troubleshooting, it’s important to note that these steps are based on general guidelines and may vary depending on the specific problem you are facing. It’s always a good idea to refer to the official Xbox Series X support documentation or reach out to Xbox support for assistance if these methods do not solve your issue.
Now, let’s dive into the common issues that can occur with the HDMI port on the Xbox Series X and the steps you can take to fix them.
Common Issues with HDMI Ports on Xbox Series X
The HDMI port on the Xbox Series X can encounter various issues that may affect the display and sound output. Here are some common problems you may face:
1. No signal: One of the most frustrating issues is when your TV or monitor fails to receive a signal from the Xbox Series X. This can be due to a loose HDMI connection or a problem with the HDMI cable.
2. Flickering display: If you notice the screen flickering or experiencing intermittent blackouts while playing games or streaming content, it could indicate a fault in the HDMI port.
3. No audio: Another issue is when you have a video signal but no sound coming through the speakers. This can be caused by a loose HDMI connection, incorrect audio settings, or a faulty HDMI port.
4. Poor picture quality: Sometimes, you may encounter problems such as blurry or distorted visuals, color variations, or artifacts on the screen, affecting your overall gaming experience.
5. Unsupported resolution: In some cases, your TV or monitor may display an “unsupported resolution” message, indicating an incompatibility between the HDMI port of the Xbox Series X and the display device.
These issues can arise due to a variety of factors, including faulty hardware, outdated firmware, or improper settings. In the next sections, we will explore different troubleshooting steps to help you resolve these problems and get your Xbox Series X HDMI port back to working condition.
Tools and Materials Required
Before we begin troubleshooting the HDMI port on your Xbox Series X, there are a few tools and materials that you will need. Make sure you have the following items on hand:
1. Xbox Series X console: This is, of course, the main component that you will be working with.
2. HDMI Cable: A high-quality HDMI cable is essential for the proper transmission of audio and video signals between your Xbox Series X and the display device. If you suspect that your current cable is faulty, consider having an extra cable available for troubleshooting purposes.
3. Soft cloth or microfiber cloth: You’ll need a clean, soft cloth to wipe the HDMI port and remove any dust or debris that may be causing connectivity issues.
4. Alternative display device: It’s helpful to have access to an alternative display device such as a different TV or monitor. This can help identify whether the problem lies with the Xbox Series X or the original display device.
5. Internet connection: It is recommended to have an active internet connection to check for firmware updates during the troubleshooting process.
Having these tools and materials ready will ensure a smoother and more efficient troubleshooting experience. Now that you have everything you need, let’s move on to the steps to fix the HDMI port on your Xbox Series X and resolve any issues you may be facing.
Step 1: Check for Loose Connections
The first step in troubleshooting the HDMI port on your Xbox Series X is to check for any loose connections. Sometimes, a simple connection issue can result in no signal or poor audio/video quality. Follow these steps to make sure all connections are secure:
- Turn off your Xbox Series X and the display device (TV or monitor).
- Locate the HDMI cable that connects your Xbox Series X to the display device.
- Carefully remove the HDMI cable from both the Xbox Series X and the display device.
- Inspect the HDMI cable for any visible damage such as frayed ends or bent pins. If you notice any damage, replace the HDMI cable with a new one.
- Align the HDMI cable connector with the HDMI port on your Xbox Series X and insert it firmly until it clicks into place.
- Repeat the previous step for the HDMI port on the display device.
- Turn on your Xbox Series X and the display device.
- Select the correct HDMI input on the display device to ensure it is receiving the signal from the Xbox Series X.
- Check if the issue has been resolved and if the display and sound are functioning correctly.
If the issue persists after checking for loose connections, move on to the next troubleshooting step. This will help narrow down the potential causes and find a suitable solution for the HDMI port issue on your Xbox Series X.
Step 2: Inspect the HDMI Cable
In some cases, the issue with the HDMI port on your Xbox Series X may be due to a faulty HDMI cable. Inspecting the cable can help identify any visible damage or issues that may be causing the problem. Follow these steps to inspect the HDMI cable:
- Turn off your Xbox Series X and the display device.
- Disconnect the HDMI cable from both the Xbox Series X and the display device.
- Examine the length of the cable for any visible damage, such as cuts, kinks, or frayed ends. If you notice any damage, replace the HDMI cable with a new one.
- Check the HDMI connectors on both ends of the cable for any bent or damaged pins. If you see any, straighten them carefully using a small tool.
- Ensure that the HDMI connectors are clean and free from any dust or debris. Use a soft cloth or a microfiber cloth to wipe away any dirt.
- Reconnect the HDMI cable to both the Xbox Series X and the display device, making sure it is securely inserted until it clicks into place.
- Turn on your Xbox Series X and the display device.
- Select the correct HDMI input on the display device to receive the signal from the Xbox Series X.
- Test if the issue has been resolved and if the display and sound are functioning properly.
If inspecting the HDMI cable doesn’t resolve the issue, proceed to the next troubleshooting step to further diagnose and fix the HDMI port problem on your Xbox Series X.
Step 3: Try a Different HDMI Cable
If you have checked the connections and inspected the HDMI cable but are still experiencing issues with the HDMI port on your Xbox Series X, it’s time to try a different HDMI cable. Sometimes, the cable itself may be the culprit. Follow these steps to try a different HDMI cable:
- Turn off your Xbox Series X and the display device.
- Disconnect the current HDMI cable from both the Xbox Series X and the display device.
- Obtain a different HDMI cable that you know works or borrow one from a friend or family member.
- Connect the different HDMI cable to the HDMI port on your Xbox Series X.
- Connect the other end of the different HDMI cable to the HDMI port on the display device.
- Turn on your Xbox Series X and the display device.
- Select the correct HDMI input on the display device to receive the signal from the Xbox Series X.
- Check if the issue has been resolved and if the display and sound are functioning correctly with the different HDMI cable.
If the problem is resolved with the different HDMI cable, it indicates that the original HDMI cable was faulty. Consider replacing the original cable with a new one to avoid future issues. However, if the problem persists even with the different HDMI cable, move on to the next troubleshooting step to continue diagnosing the problem with your Xbox Series X HDMI port.
Step 4: Clean the HDMI Port
Sometimes, a dusty or dirty HDMI port can cause connectivity issues on your Xbox Series X. Cleaning the HDMI port can help ensure a better connection and potentially resolve the problems you are experiencing. Follow these steps to clean the HDMI port:
- Turn off your Xbox Series X and unplug it from the power source.
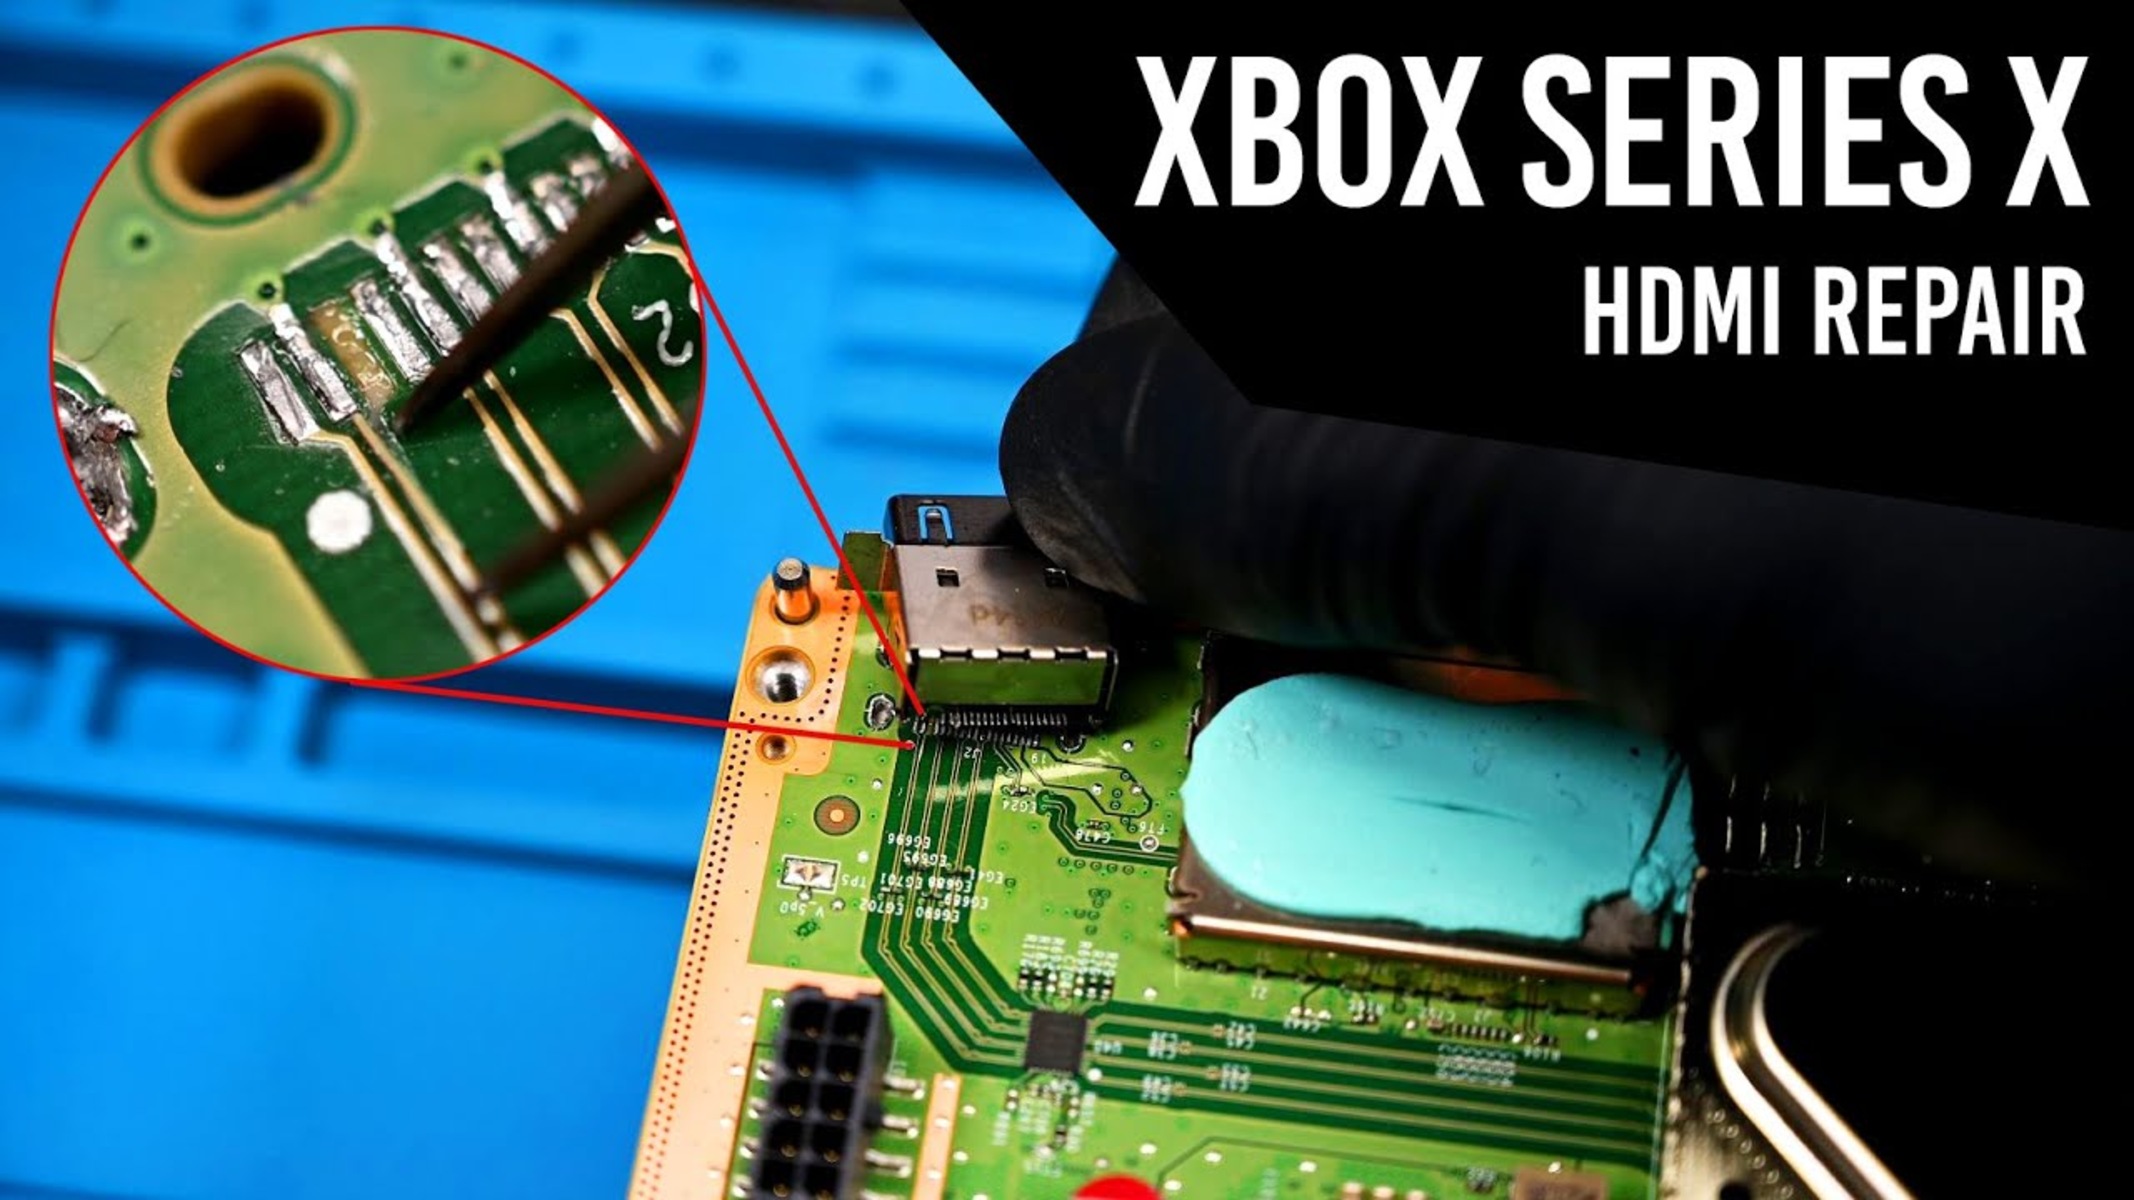
- Locate the HDMI port on the back of your Xbox Series X.
- Using a can of compressed air or a small brush, gently remove any loose dust or debris around the HDMI port.
- Take a lint-free cloth or a cotton swab and dampen it slightly with isopropyl alcohol.
- Gently wipe the inside of the HDMI port to remove any stubborn dirt or residue. Be careful not to apply too much pressure or let any liquid seep into the port.
- Allow the HDMI port to dry completely before proceeding.
- Reconnect the HDMI cable to the HDMI port on your Xbox Series X.
- Turn on your Xbox Series X and the display device.
- Select the correct HDMI input on the display device to receive the signal from the Xbox Series X.
- Check if the issue has been resolved and if the display and sound are functioning properly.
If cleaning the HDMI port doesn’t resolve the issue, proceed to the next troubleshooting step to further diagnose and fix the problem with the HDMI port on your Xbox Series X.
Step 5: Reset the Display Settings on Xbox Series X
If you’re still encountering issues with the HDMI port on your Xbox Series X, resetting the display settings may help. This step can resolve any incorrect settings or display configurations that might be causing the problem. Follow these steps to reset the display settings:
- Turn on your Xbox Series X and let it fully boot up.
- Press the Xbox button on your controller to open the guide.
- Go to the System tab and select Settings.
- In the Settings menu, select General.
- Scroll down and select TV & display options.
- Choose the resolution option and select the resolution that matches your display device’s native resolution.
- If you’re unsure of your display device’s native resolution, choose Auto-detect to let the Xbox Series X automatically detect and optimize the display output.
- Once you’ve selected the appropriate resolution, confirm the change.
- Restart your Xbox Series X.
- Check if the issue has been resolved and if the display and sound are functioning properly.
If resetting the display settings doesn’t fix the problem, proceed to the next troubleshooting step to further diagnose and resolve the issue with the HDMI port on your Xbox Series X.
Step 6: Test with an Alternative Display Device
If you’re still experiencing issues with the HDMI port on your Xbox Series X, it’s time to determine whether the problem lies with the console or the original display device. Testing with an alternative display device can help identify the source of the issue. Follow these steps to test with an alternative display device:
- Turn off your Xbox Series X and the original display device.
- Disconnect the HDMI cable from both the Xbox Series X and the original display device.
- Connect the HDMI cable to the alternative display device.
- Turn on the alternative display device.
- Turn on your Xbox Series X.
- Select the correct HDMI input on the alternative display device to receive the signal from the Xbox Series X.
- Check if the issue persists on the alternative display device.
- If the alternative display device works without any issues, it indicates that the problem may be with the original display device. There may be compatibility issues or a malfunction with the HDMI port on the original display device.
- If the issue persists on the alternative display device, it suggests that the problem may be with the HDMI port on your Xbox Series X.
By testing with an alternative display device, you can narrow down the cause of the HDMI port issue and determine the appropriate steps for resolution. If the issue lies with the Xbox Series X HDMI port, proceed to the next troubleshooting step to address the problem.
Step 7: Check for Firmware Updates
One possible reason for issues with the HDMI port on your Xbox Series X is outdated firmware. Microsoft often releases firmware updates to address bugs, improve performance, and enhance compatibility. Therefore, checking for and installing any available firmware updates may help resolve the problem. Follow these steps to check for firmware updates:
- Turn on your Xbox Series X and ensure it is connected to the internet.
- Press the Xbox button on your controller to open the guide.
- Go to the Profile & system tab and select Settings.
- In the Settings menu, select System.
- Scroll down and select Console info.
- Under Console info, select Update console.
- If an update is available, the system will prompt you to download and install it. Follow the on-screen instructions to complete the update.
- Once the update is installed, restart your Xbox Series X.
- Check if the issue with the HDMI port has been resolved.
If the problem persists even after installing any available firmware updates, proceed to the next troubleshooting step to continue resolving the issue with the HDMI port on your Xbox Series X.
Step 8: Contact Xbox Support for Assistance
If you have followed all the previous troubleshooting steps and are still experiencing issues with the HDMI port on your Xbox Series X, it may be time to seek assistance from Xbox Support. Microsoft’s support team is equipped to provide specialized guidance and help resolve complex technical problems. Here’s how you can get in touch with Xbox Support:
- Visit the official Xbox Support website at support.xbox.com.
- Navigate to the support page specifically for Xbox Series X.
- Explore the available support options, which may include helpful articles, troubleshooting guides, and community forums.
- If you are unable to find a solution to your problem, consider contacting Xbox Support directly through their customer support channels.
- There are several options for reaching Xbox Support, such as live chat, phone support, or submitting a support ticket.
- Provide a detailed description of the issue you are facing, including the troubleshooting steps you have already taken.
- The Xbox Support team will assist you further and provide personalized guidance based on your specific problem.
Remember to be patient and cooperative when interacting with Xbox Support. They are there to help you, and providing accurate information about your issue will contribute to a more effective resolution. Utilize their expertise and resources to address the problem with your Xbox Series X HDMI port.
If all other troubleshooting steps have been unsuccessful and Xbox Support is unable to resolve the issue remotely, they may recommend sending your console for repair or replacing it if it is still under warranty.
Before reaching out to Xbox Support, ensure you have the necessary information on hand, such as your Xbox Series X serial number, purchase details, and any documentation related to the issue. This will help expedite the support process.
By contacting Xbox Support, you will be able to access the expertise of dedicated technical professionals who can provide further assistance in resolving the HDMI port issue on your Xbox Series X.
Conclusion
Dealing with issues related to the HDMI port on your Xbox Series X can be frustrating, but with the right troubleshooting steps, you can often resolve these problems and get back to enjoying your gaming experience. In this article, we covered several steps to help you fix HDMI port issues on your Xbox Series X. We started by checking for loose connections and inspecting the HDMI cable for any visible damage. Then, we explored the option of trying a different HDMI cable to rule out any cable-related problems.
If the issue persists, we discussed the importance of cleaning the HDMI port and resetting the display settings on your Xbox Series X. Additionally, testing with an alternative display device can help determine whether the problem lies with the console or the original display device. We also highlighted the significance of checking for firmware updates, as outdated firmware can sometimes cause HDMI port issues.
Lastly, if all else fails, we recommended reaching out to Xbox Support for further assistance. Their knowledgeable support team can provide guidance and help you navigate through more complex issues with your Xbox Series X HDMI port.
Remember, it’s essential to follow each troubleshooting step carefully and have patience throughout the process. In some cases, the solution might be a simple fix, while in others, further investigation or professional support may be required.
We hope that this guide has been helpful in resolving any HDMI port issues you may have encountered with your Xbox Series X. By following these steps, you can troubleshoot and address problems with the HDMI port, ensuring that you can enjoy uninterrupted gaming and entertainment on your console.