Introduction
Chromebooks have become increasingly popular as lightweight and affordable alternatives to traditional laptops. These devices offer a streamlined experience, but like any other electronic device, they can encounter issues over time. One common problem that users may face is a malfunctioning keyboard.
A non-responsive or sticky keyboard, lag and delay in keystrokes, spilled liquid, and software glitches are some of the issues that can affect the functionality of a Chromebook keyboard. These problems can be frustrating and hinder productivity, but the good news is that they can often be resolved with a few troubleshooting steps.
In this article, we will explore some common keyboard issues that Chromebook users encounter and provide effective solutions to fix them. Whether you are experiencing unresponsive keys, keyboard lag, or other problems, this guide will help you navigate through them and get your Chromebook keyboard back in optimal working condition.
Common Chromebook Keyboard Issues
While Chromebooks are known for their reliability, there are certain keyboard issues that users may encounter from time to time. Here are some of the most common problems:
- Non-Responsive Keys: This is a frustrating issue where certain keys on the Chromebook keyboard do not respond when pressed. It can hinder your ability to type and perform various tasks effectively.
- Sticky Keys: Sticky keys can occur due to debris or liquid spills. When a key feels sticky or gets stuck when pressed, it can disrupt your typing experience and require additional effort.
- Keyboard Lag and Delay: Keyboard lag and delay can cause a noticeable delay between pressing a key and the corresponding character appearing on the screen. This can slow down your typing speed and affect productivity.
- Troubleshooting Backlit Keyboards: Some Chromebooks come with backlit keyboards, which can enhance visibility in low-light conditions. However, issues with the backlight not turning on or flickering can be a common concern.
- Spilled Liquid on the Keyboard: Accidental spills happen, and if liquid seeps into the keyboard, it can cause damage and affect the functionality of the keys.
- Keyboard Software Problems: In some cases, keyboard issues can be related to software glitches, such as outdated drivers or conflicting software, leading to malfunctioning keys.
- Replacing a Damaged Chromebook Keyboard: In rare cases, if the keyboard is physically damaged or cannot be fixed through troubleshooting, it may need to be replaced.
These issues can be frustrating, but rest assured that there are solutions available to tackle each problem. In the following sections, we will discuss effective methods to address these common Chromebook keyboard issues.
Solutions for Non-Responsive Keys
A non-responsive key on your Chromebook keyboard can greatly hinder your ability to type and use certain functions. Here are some solutions you can try:
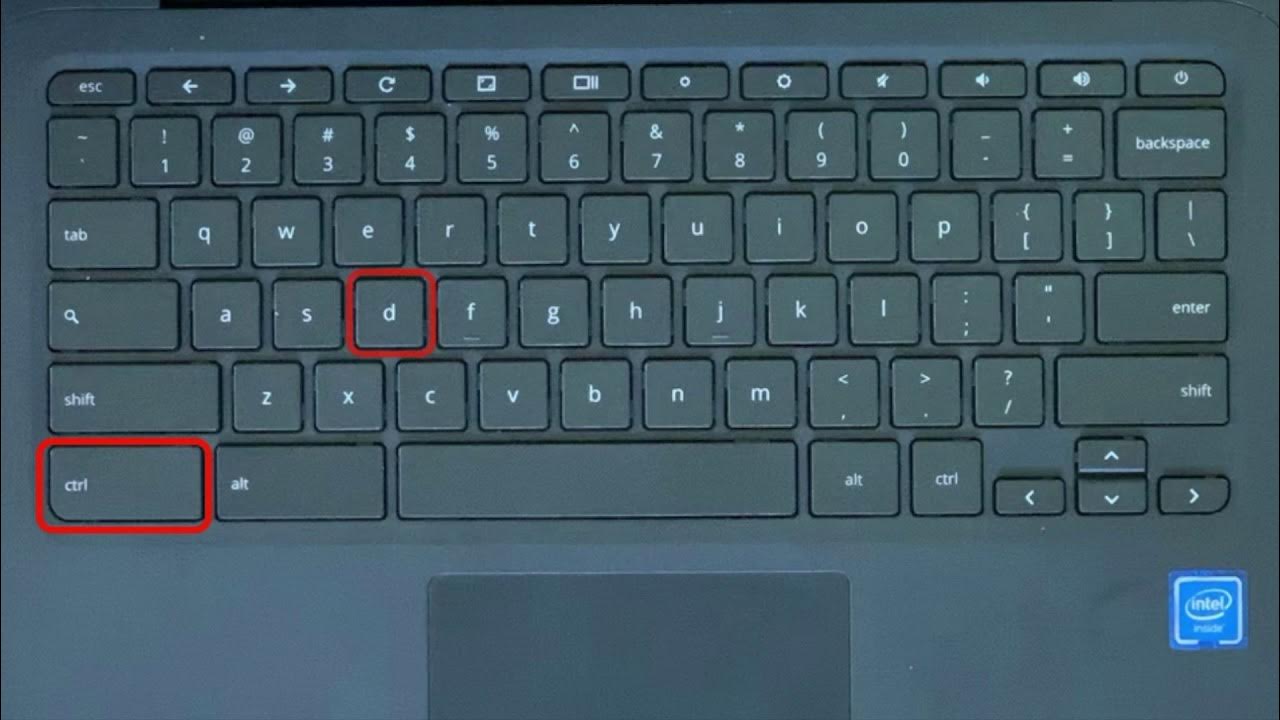
- Restart your Chromebook: Sometimes, a simple restart can resolve keyboard issues. Press the Power button and select Restart from the menu that appears. Check if the non-responsive key starts working after the restart.
- Check for debris: Dust, crumbs, or debris can interfere with the proper functioning of the keys. Gently turn your Chromebook upside down and tap the back to dislodge any loose particles. Use compressed air or a soft brush to clean around the keys.
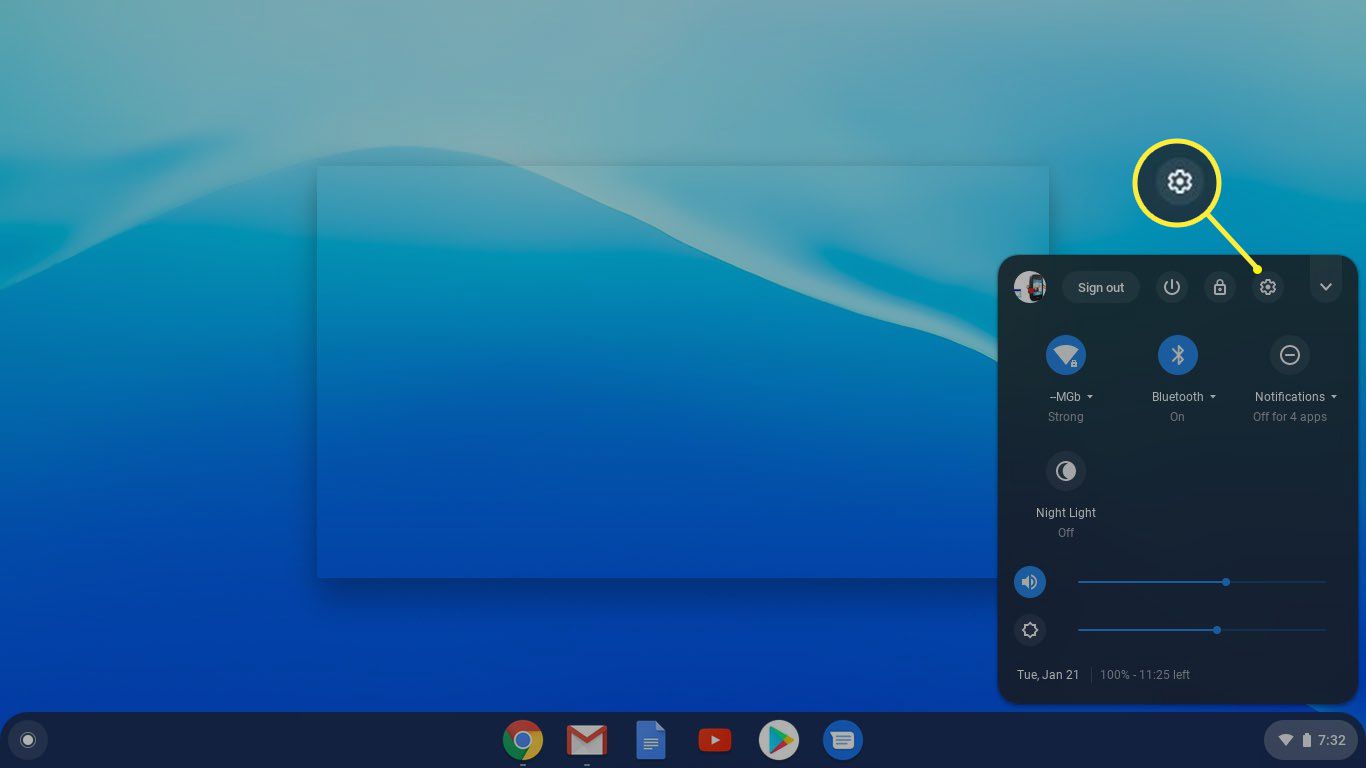
- Enable on-screen keyboard: If a specific key is not working, you can use the on-screen keyboard as a temporary solution. Go to the system tray in the bottom-right corner of the screen, click the clock, and select the Accessibility button to turn on the on-screen keyboard.
- Perform a powerwash: If the non-responsive key issue persists, you can try performing a powerwash. This will reset your Chromebook to its factory settings. To do this, go to Settings, click on Advanced, then click on Powerwash. Keep in mind that you will lose all your locally stored data, so make sure to back up important files before proceeding.
- Connect an external keyboard: If none of the above steps resolve the issue, you can connect an external USB keyboard to your Chromebook. This will allow you to continue using your device until you find a solution or get the built-in keyboard repaired.
Remember to test the non-responsive key after each step to check if the problem has been resolved. If the issue persists, you may need to reach out to a professional technician for further assistance or consider replacing the keyboard if it is no longer under warranty.
Fixing Sticky Keys
Sticky keys on a Chromebook keyboard can be frustrating to deal with, but there are a few steps you can take to address this issue:
- Power off your Chromebook: Before attempting to fix sticky keys, make sure to turn off your Chromebook and disconnect it from any power sources.
- Clean the affected keys: If you suspect debris or residue is causing the keys to stick, you can try cleaning them. Use a soft cloth dampened with a small amount of isopropyl alcohol or mild cleaning solution. Gently press down on the affected key and wipe around it to remove any dirt or sticky residue. Avoid using excessive liquid or harsh cleaners that may damage the keyboard.
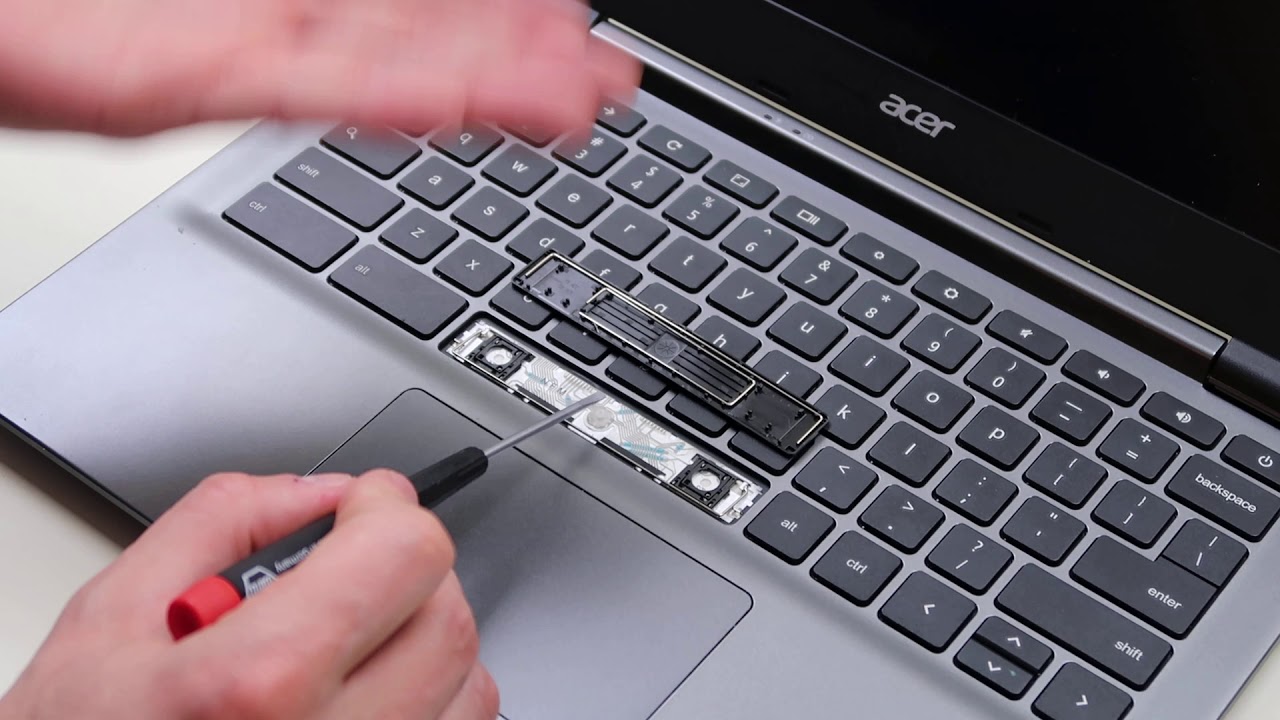
- Use a keycap remover: If the keys are still sticky after cleaning, you may need to remove them for a more thorough cleaning. Use a keycap remover tool or a small flat-head screwdriver to carefully pry off the sticky keycaps. Clean both the keycaps and the underlying switch mechanism with a cloth dampened with isopropyl alcohol. Allow them to dry completely before reattaching them.
- Replace the keycaps: If the keycaps are damaged or broken, you may need to replace them. Check with the manufacturer or an authorized service center for replacement options specific to your Chromebook model.
- Consult a professional: If the above steps do not resolve the issue or if you are uncomfortable performing the cleaning or replacing the keycaps yourself, it is advisable to seek assistance from a professional technician. They will have the necessary expertise and tools to address the sticky keyboard problem effectively.
Remember to exercise caution when handling the keyboard components and avoid using excessive force or sharp objects that may cause further damage. By following these steps, you can increase the chances of restoring your Chromebook keyboard to its normal, non-sticky state.
Resolving Keyboard Lag and Delay
Keyboard lag and delay can be frustrating, especially when it affects your typing speed and productivity. Here are some steps you can take to address this issue on your Chromebook:
- Check for system updates: Keeping your Chromebook up to date with the latest updates can help resolve software-related issues that may be causing keyboard lag. Go to Settings, click on About Chrome OS, and then select Check for Updates.
- Close unnecessary applications: Running multiple applications simultaneously can strain system resources and lead to keyboard lag. Close any unnecessary tabs or applications that may be running in the background to free up system resources.
- Clear browsing data: Clearing your browser’s cache, cookies, and history can improve performance and reduce keyboard lag. Open your Chrome browser, click on the three-dot menu, go to More Tools, and then select Clear Browsing Data.
- Disable unnecessary extensions: Browser extensions can sometimes conflict with keyboard functionality and cause lag. Disable any extensions that you do not actively use or suspect might be causing the issue.
- Reset Chrome settings: If the above steps do not resolve the keyboard lag, you can try resetting your Chrome settings. Go to Settings, click on Advanced, then click on Reset Settings and follow the prompts. Keep in mind that this will reset your browser settings to default, but it can help resolve any issues related to keyboard lag.
- Check for hardware issues: If the keyboard lag persists after trying the software-based solutions, it is possible that there could be a hardware issue. In such cases, it is advisable to seek assistance from a professional technician who can diagnose and fix any underlying hardware problems.
By following these steps, you can significantly improve keyboard responsiveness and eliminate lag and delay. However, if the issue persists, it may be necessary to seek further technical support or consider contacting the manufacturer for assistance.
Troubleshooting Backlit Keyboards
Backlit keyboards on Chromebooks can provide enhanced visibility, particularly in low-light conditions. If you’re experiencing issues with your backlit keyboard, the following troubleshooting steps may help:
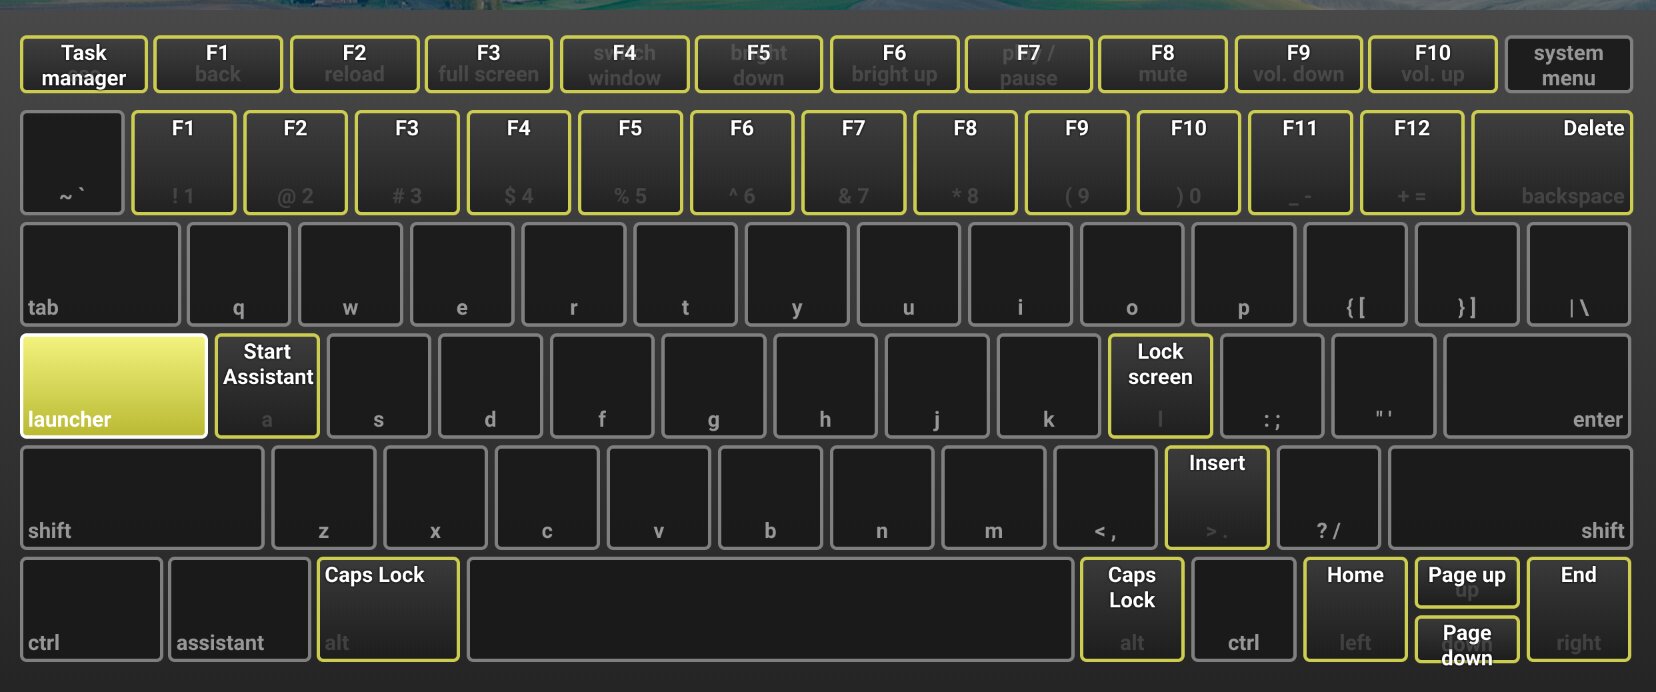
- Check the keyboard settings: Ensure that the backlight feature is enabled in your Chromebook settings. Go to Settings, click on Keyboard, and make sure that the “Keyboard backlight” option is turned on.
- Adjust the backlight brightness: If the backlight is turned on but appears dim, use the keyboard shortcut specific to your Chromebook model to adjust the brightness level. Typically, these shortcuts involve pressing the keyboard backlight key along with the brightness-up or brightness-down key.
- Restart your Chromebook: Sometimes, a simple restart can resolve backlit keyboard issues. Power off your Chromebook, wait for a few seconds, and then turn it back on.
- Update Chrome OS: Keeping your Chromebook’s operating system up to date is important for optimal performance. Go to Settings, click on About Chrome OS, and then select Check for Updates to ensure that you have the latest version installed.
- Perform a powerwash: If the above steps do not solve the problem, you can try performing a powerwash. This will reset your Chromebook to its factory settings. Go to Settings, click on Advanced, then click on Powerwash. Remember to back up your important files before proceeding, as a powerwash will erase all locally stored data.
- Contact manufacturer support: If the backlight issue persists after trying the troubleshooting steps, it may indicate a hardware problem. In such cases, it is recommended to contact the manufacturer’s support for further assistance or to inquire about possible repairs.
By following these steps, you can hopefully resolve any issues with your backlit keyboard and enjoy improved visibility while typing in various lighting conditions. If the problem persists, seeking professional help or contacting the manufacturer’s support should provide you with the necessary guidance to resolve the issue.
Fixing Spilled Liquid on the Keyboard
Accidental spills on your Chromebook keyboard can be a cause for concern, but quick action can help minimize the damage. Follow these steps to address liquid spills:
- Act fast: Immediately power off your Chromebook and unplug it from any power sources to prevent further damage.
- Turn the device upside down: Carefully flip your Chromebook upside down to allow any excess liquid to drain out. Gently tap the back of the device to encourage drainage.
- Remove the AC adapter and battery (if possible): If you’re comfortable doing so or if your Chromebook allows for it, remove the AC adapter and battery to further reduce the risk of damage.
- Wipe away excess liquid: Use a clean, lint-free cloth to gently wipe away any visible liquid from the keyboard and surrounding areas. Avoid applying pressure to prevent pushing the liquid further into the device.
- Leave it to dry: Allow your Chromebook to dry completely before attempting to power it on again. It is crucial to wait for at least 24 to 48 hours to ensure that all components are dry and ready for use.
- Use moisture-absorbing materials: To expedite the drying process, you can place your Chromebook in a bag or container filled with uncooked rice or silica gel packets. These materials can help absorb moisture from the device.
- Power it on: After ensuring that your Chromebook is thoroughly dry, reconnect the AC adapter and battery (if removed) and power it on. Test the keyboard to see if any keys are still unresponsive or exhibiting unusual behavior.
- Seek professional assistance: If the spillage was significant or if the keyboard continues to malfunction after the drying period, it is recommended to seek assistance from a professional technician or the manufacturer’s support for further assessment and repairs.
Remember, time is of the essence when dealing with liquid spills on electronics. Acting quickly and following these steps can increase the chances of a successful recovery and minimize potential damage caused by the spill.
Addressing Keyboard Software Problems
Software issues can sometimes be the cause of keyboard problems on your Chromebook. Here are some steps you can take to address keyboard software problems:
- Restart your Chromebook: A simple restart can often resolve software glitches affecting the keyboard. Power off your Chromebook, wait for a few seconds, and then turn it back on.
- Check for system updates: Keeping your Chromebook’s operating system up to date can prevent software-related problems. Go to Settings, click on About Chrome OS, and then select Check for Updates.
- Check keyboard settings: Sometimes, keyboard settings can be misconfigured or accidentally changed. Go to Settings, click on Keyboard, and review the settings to ensure they match your preferences.
- Remove conflicting applications or extensions: Conflicting software applications or extensions can interfere with keyboard functionality. Uninstall any recently installed apps or extensions, and check if the keyboard issue is resolved.
- Reset Chrome settings: If the keyboard problem persists, you can try resetting your Chrome settings. Go to Settings, click on Advanced, then click on Reset Settings. Keep in mind that this will restore your Chrome settings to default, so make sure to back up any important data before proceeding.
- Check keyboard drivers: Faulty or outdated keyboard drivers can cause software problems. Go to Device Manager on your Chromebook and check for any keyboard driver issues. Update the drivers if necessary or contact the manufacturer’s support for assistance.
- Perform a factory reset: If all else fails, you can try performing a factory reset. This will revert your Chromebook to its original settings and remove any software issues. Remember to back up your important files before proceeding, as a factory reset will erase all locally stored data.
- Seek professional help: If the keyboard software problems persist after trying the above steps, it is advisable to seek assistance from a professional technician or contact the manufacturer’s support for further guidance.
By following these steps, you can troubleshoot and address various keyboard software problems. However, if the issue persists, it may require more advanced troubleshooting or professional assistance to resolve.
Replacing a Damaged Chromebook Keyboard
In rare cases, if your Chromebook keyboard is physically damaged or cannot be fixed through troubleshooting, you may need to consider replacing it. Here are the steps involved in replacing a damaged keyboard:
- Check warranty and support: Determine if your Chromebook is still under warranty and if keyboard replacement is covered. Contact the manufacturer’s support or visit their website for information on warranty coverage and authorized service centers.
- Order a replacement keyboard: If your warranty has expired or does not cover keyboard replacement, you will need to purchase a replacement keyboard. Look for the specific keyboard model compatible with your Chromebook. Online marketplaces or computer repair stores may have the required keyboard.
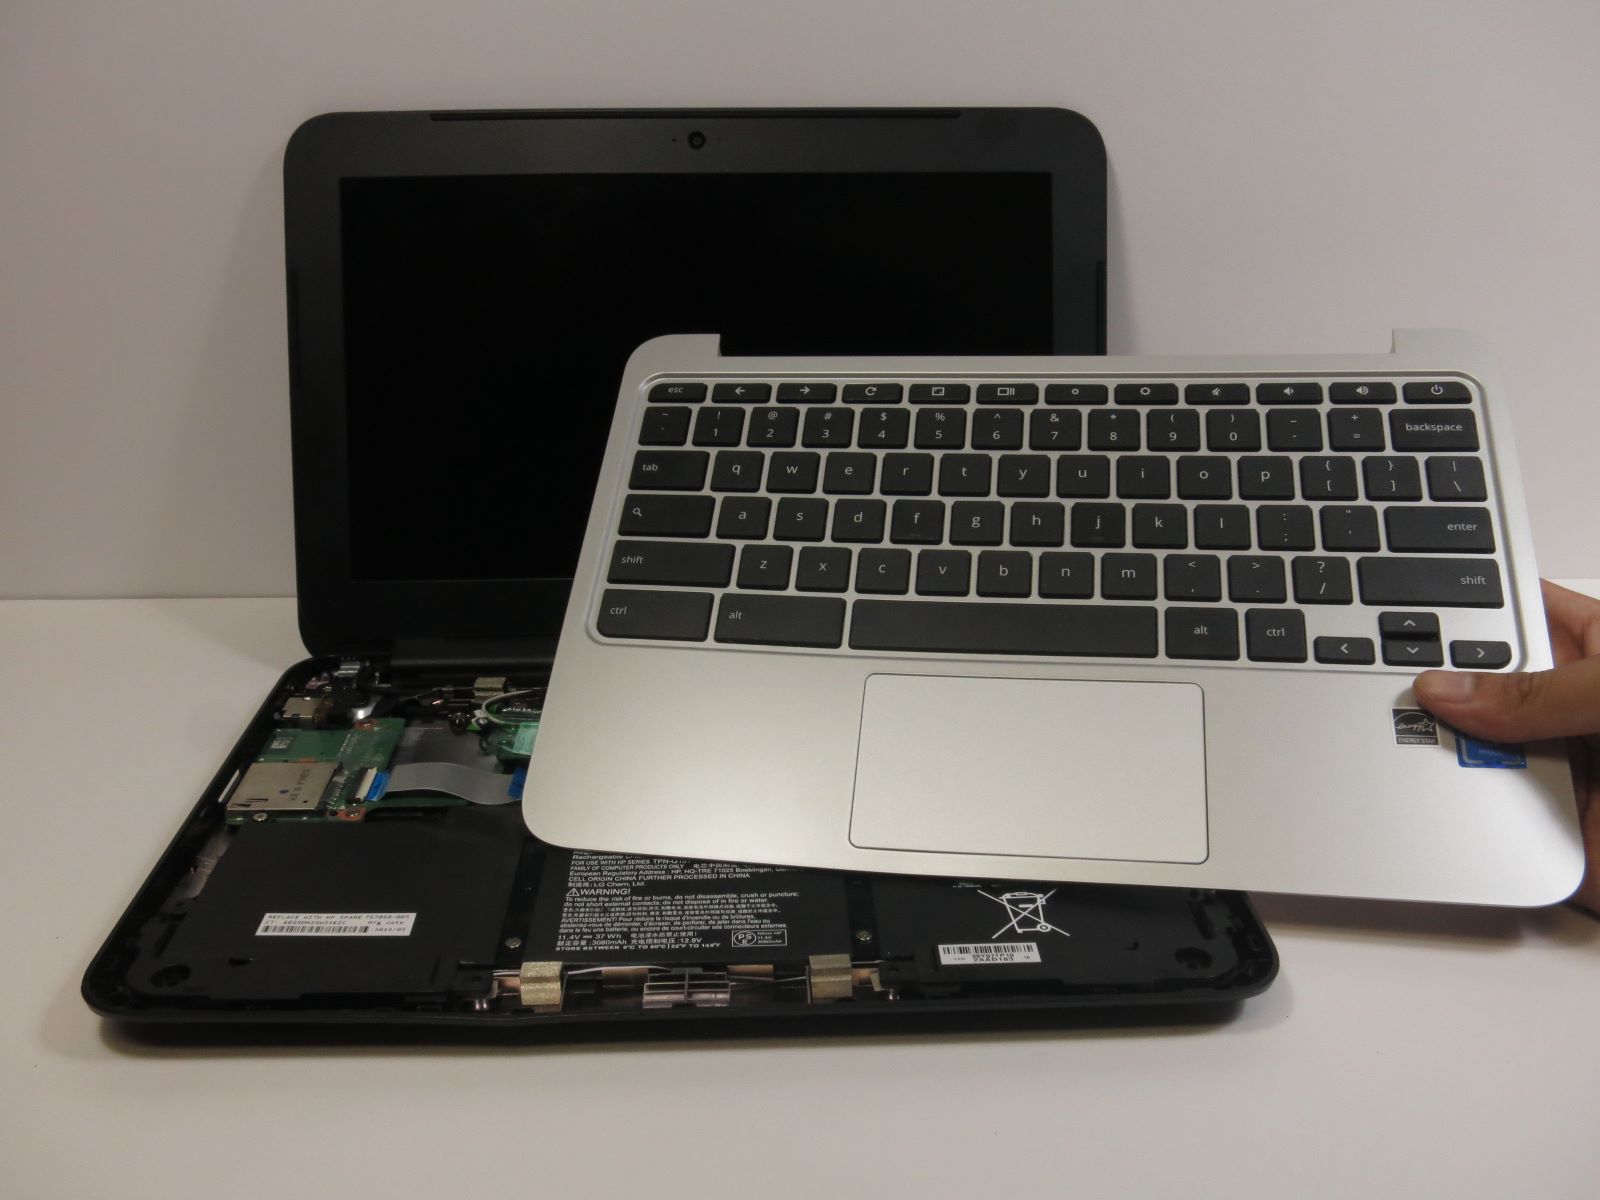
- Prepare for the replacement: Power off your Chromebook and remove any power sources, such as the AC adapter or battery (if removable). Use a small Philips-head screwdriver to remove the screws securing the keyboard to the device.
- Disconnect the old keyboard: Carefully detach the ribbon cable connecting the old keyboard to the motherboard. Pay attention to any locking mechanisms that hold the cable in place. Gently unlock and remove the cable from its connector.
- Install the new keyboard: Connect the ribbon cable of the new keyboard to the motherboard’s connector, making sure it is securely attached. Place the new keyboard in position and reinsert the screws to secure it to the Chromebook’s frame.
- Verify functionality: Reconnect the battery and other power sources, and turn on your Chromebook. Test the keys on the new keyboard to ensure all are functioning correctly. If any keys still exhibit issues, double-check the connection and consider seeking professional assistance.
- Dispose of the old keyboard responsibly: If the old keyboard cannot be repaired, dispose of it responsibly according to local electronic waste regulations. Many recycling centers accept electronic components for proper disposal.
- Consider professional help: If you are not comfortable replacing the keyboard yourself or if you encounter difficulties during the process, it is recommended to seek the assistance of a professional technician who specializes in Chromebook repairs.
Replacing a damaged keyboard can be a delicate task. If you are unsure about the process or encounter any complications, it is always better to seek professional help to ensure a successful replacement without causing further damage to your Chromebook.
Conclusion
Having a functional keyboard on your Chromebook is essential for a smooth and productive user experience. We’ve explored various common keyboard issues that users may encounter, such as non-responsive keys, sticky keys, keyboard lag, backlit keyboard problems, liquid spills, software glitches, and physical keyboard damage.
Throughout this guide, we have provided effective solutions and troubleshooting steps to help you address these issues. From simple fixes like restarting your Chromebook or cleaning sticky keys to more complex actions like powerwashing or replacing the keyboard, these solutions aim to restore your keyboard’s functionality.
It’s important to note that while these solutions can often resolve keyboard problems, there may be instances where professional assistance or contacting the manufacturer’s support becomes necessary, especially for hardware-related issues or for those who are uncomfortable performing the repairs themselves.
By following the steps outlined in each section, you can take proactive measures to troubleshoot and resolve the specific keyboard issue you are facing on your Chromebook. Whether it’s fixing non-responsive keys, eliminating sticky keys, addressing keyboard lag, troubleshooting backlit keyboards, dealing with liquid spills, resolving software problems, or replacing a damaged keyboard, you now have the knowledge and tools to tackle these issues head-on.
Remember to also check your warranty coverage for possible repairs or replacements, and always back up your important data before performing any actions that could result in data loss.
We hope this guide has been helpful in assisting you with fixing your Chromebook keyboard issues. With these solutions at your disposal, you can enjoy a fully functional and efficient keyboard experience on your Chromebook once again.