Introduction
Welcome to this helpful guide on how to reset your browser. If you’ve been experiencing browser issues, such as slow performance, frequent crashes, or strange behavior, resetting your browser can often resolve these problems. Whether you use Chrome, Firefox, Safari, or another browser, this guide will provide you with step-by-step instructions to reset your browser settings and help you get your browsing experience back on track.
Nowadays, our browsers have become essential tools for both work and leisure. We rely on them to access websites, check our emails, stream videos, and much more. As we browse the internet, our browsers accumulate temporary files, cookies, and other data that can sometimes cause issues.
Resetting your browser can help to solve issues caused by conflicting extensions, corrupted settings, or accumulated cache and cookies. It essentially restores your browser to its default settings, eliminating any modifications or customizations you may have made.
If you’re hesitant to reset your browser, don’t worry – this process won’t delete your bookmarks or history. By following the steps in this guide, you can retain your important data while getting rid of any problematic settings or extensions that may be causing issues.
In the next sections, we will walk you through each step of the browser reset process, ensuring that you can easily navigate your way back to a smoother browsing experience. So, let’s get started with backing up your bookmarks before proceeding with the reset.
Why Reset Your Browser?
It’s no secret that modern browsers offer a plethora of features and customization options. From extensions and add-ons to personalized settings, there are countless ways to tailor your browser experience to suit your needs. However, with this customization comes the risk of encountering conflicts, performance issues, and unexpected behavior. This is where resetting your browser can be a game-changer.
One of the main reasons to reset your browser is to resolve performance problems. Over time, browsers can become cluttered with temporary files, cookies, and cached data. This can lead to sluggishness, slow page loading times, and even crashes. Resetting your browser helps to clear out this accumulated data and can significantly improve its speed and responsiveness.
Additionally, resetting your browser can help to resolve compatibility issues. Sometimes, recently installed extensions or add-ons can conflict with other components of your browser, causing it to malfunction. By resetting your browser, you can disable these extensions and return to a default configuration, allowing you to identify and resolve any compatibility conflicts.
Another benefit of resetting your browser is restoring default settings. Perhaps you made some changes to your browser settings and now find yourself struggling to remember what adjustments you made. Resetting your browser will bring it back to its original state, providing a fresh start and often resolving any issues caused by misconfigured settings.
Security is also a concern that should motivate you to reset your browser. Malicious websites, phishing attempts, and malware can compromise your online security. By resetting your browser, you can remove any potentially unsafe extensions or settings that may have been added without your knowledge. This helps to ensure that your browsing experience is as secure as possible.
Lastly, resetting your browser can be seen as routine maintenance. Just like any other software or device, regularly resetting your browser can help prevent issues from arising in the first place. It’s an effective way to keep your browser running smoothly and to maintain a hassle-free browsing experience.
Now that you understand the reasons behind resetting your browser, let’s dive into the step-by-step process to help you get started on refreshing and optimizing your browser settings.
Step 1: Back Up Your Bookmarks
Before you proceed with resetting your browser, it’s essential to back up your bookmarks. Bookmarks are a convenient way to keep track of your favorite websites, and losing them can be frustrating. By following this step, you can ensure that your valuable bookmarks are safely preserved.
Different browsers have various methods for backing up bookmarks. Here are a few common ways to back up your bookmarks in popular browsers:
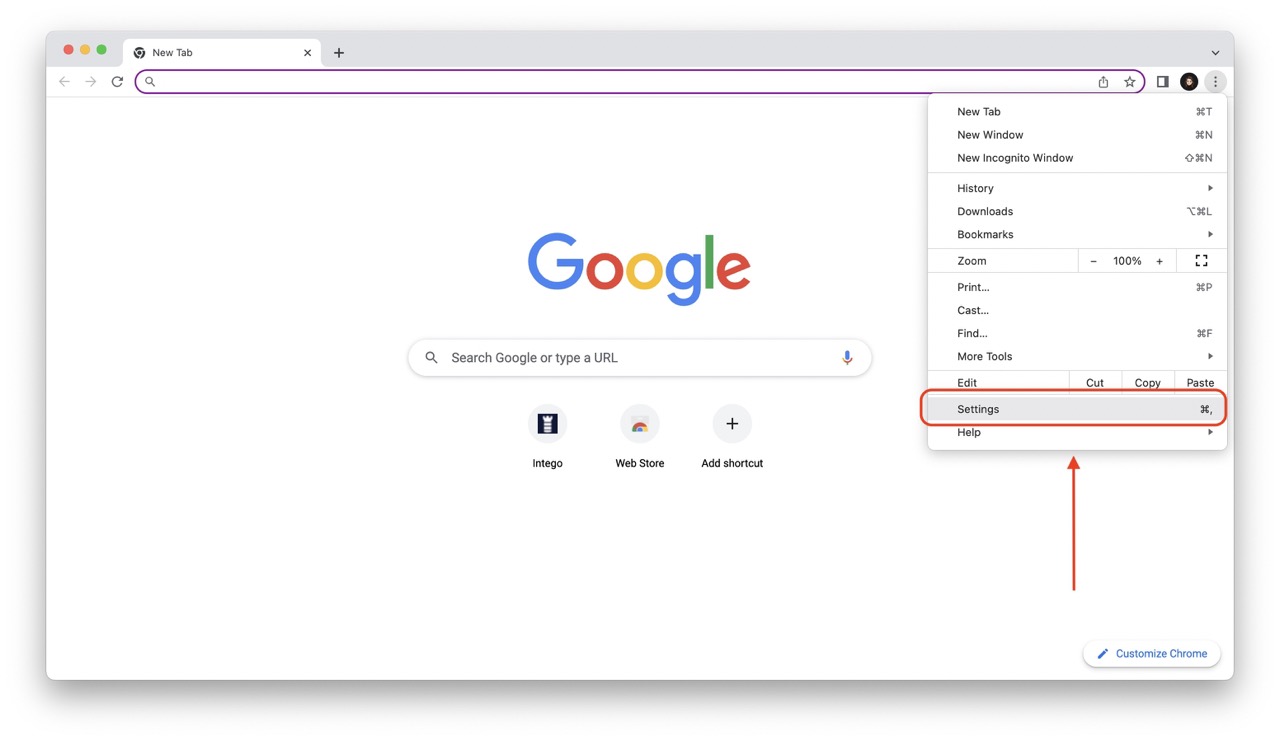
- Google Chrome: To back up bookmarks in Chrome, click on the three-dot menu icon in the top-right corner of the browser window. Go to “Bookmarks” and select “Bookmark Manager.” In the Bookmark Manager, click on the three-dot menu icon again and choose “Export Bookmarks.” Save the exported bookmarks file to a safe location on your computer.
- Mozilla Firefox: In Firefox, click on the three-bar menu icon in the top-right corner and select “Library.” Choose “Bookmarks” and then “Show All Bookmarks.” In the Library window, click on “Import and Backup” and select “Export Bookmarks to HTML.” Save the HTML file to a secure location.
- Microsoft Edge: To back up bookmarks in Edge, click on the three-dot menu icon in the top-right corner of the browser window. Go to “Favorites” and select “Manage Favorites.” In the Favorites window, click on “More Actions” (represented by three dots) and choose “Export to file.” Save the exported bookmarks file to a safe location.
It’s always a good idea to store the backup file on an external drive or cloud storage for added security. This way, even if something goes wrong during the reset process, you can easily import your bookmarks back into your browser.
Once you’ve successfully backed up your bookmarks, you can proceed with confidence to the next step, which involves clearing your cache and cookies. Remember, taking the time to back up your bookmarks is crucial to ensure that you don’t lose any valuable information during the browser reset process.
Step 2: Clear Your Cache and Cookies
After backing up your bookmarks, the next step in resetting your browser is to clear your cache and cookies. Cache and cookies are temporary files and data that browsers store on your computer to enhance your browsing experience. However, over time, these files can accumulate and cause issues such as slow performance or website loading problems. Clearing your cache and cookies can help resolve these issues and improve your browser’s speed and functionality.
To clear your cache and cookies, follow these general steps based on the most popular browsers:
- Google Chrome: Click on the three-dot menu icon in the top-right corner and select “More Tools” and then “Clear Browsing Data.” In the Clear Browsing Data window, choose the time range for which you want to clear the data (e.g., last hour, last 24 hours, last 7 days). Make sure “Cookies and other site data” and “Cached images and files” are selected, and then click on the “Clear Data” button.
- Mozilla Firefox: Click on the three-bar menu icon in the top-right corner, select “Options,” and go to the “Privacy & Security” tab. Under “Cookies and Site Data,” click on the “Clear Data” button. Make sure “Cookies and Site Data” and “Cached Web Content” are checked, and then click on “Clear.”
- Microsoft Edge: Click on the three-dot menu icon in the top-right corner and select “Settings.” In the Settings menu, go to the “Privacy, search, and services” section and click on “Choose what to clear.” Select “Cookies and other site data” and “Cached images and files,” and then click on the “Clear” button.
Each browser may have slightly different options or interface layout, but the general process remains the same—select the appropriate settings to clear cache and cookies. It’s worth noting that clearing your cache and cookies will sign you out of any websites you are currently logged into, so be prepared to re-enter login information afterward.
Once you’ve cleared your cache and cookies, you can continue to the next step, which involves disabling extensions and add-ons. By following each step of this guide, you’ll be well on your way to refreshing your browser and resolving any issues you’ve been encountering.
Step 3: Disable Extensions and Add-ons
Continuing with the browser reset process, the next step is to disable extensions and add-ons. These additional features and enhancements can sometimes conflict with the browser’s default settings or with each other, causing performance issues and unexpected behavior. By temporarily disabling extensions and add-ons, you can identify if any of them are causing the problems you’re experiencing and selectively enable them back later.
To disable extensions and add-ons, follow these general steps based on popular browsers:
- Google Chrome: Click on the three-dot menu icon and go to “More Tools” and then “Extensions.” Here, you’ll see a list of installed extensions. Toggle off the switch next to each extension you want to disable, or you can choose to remove them entirely by clicking on the trash bin icon.
- Mozilla Firefox: Click on the three-bar menu icon and select “Add-ons.” In the Add-ons Manager tab, click on the “Extensions” or “Appearance” category. Here, you can choose to disable or remove individual extensions by clicking on the respective options.
- Microsoft Edge: Click on the three-dot menu icon and go to “Extensions.” From the Extensions menu, toggle off the switch next to each extension you want to disable, or click on the “Remove” button to uninstall them completely.
Remember, disabling extensions and add-ons doesn’t permanently remove them; it simply turns them off temporarily. This allows you to identify if any specific extension was causing the issues you’ve been facing. If disabling a particular extension resolves the problem, you can choose to keep it disabled or remove it entirely.
By selectively enabling extensions one by one, you can test if any combination of extensions is causing conflicts. This way, you can pinpoint the problematic extension and either leave it disabled or seek alternatives if necessary.
Once you’ve disabled or removed any troublesome extensions or add-ons, you can move on to the next step: resetting your browser settings. This step will help restore your browser to its default configuration, eliminating any lingering issues or misconfigurations that may be causing problems.
Step 4: Reset Browser Settings
Taking the next step in resetting your browser, it’s time to reset your browser settings. Resetting your browser will undo any customizations you’ve made and restore it to its default configuration. This can be particularly helpful if you’ve made changes that are causing issues or if you simply want to start fresh with a clean slate.
To reset your browser settings, follow these general steps based on popular browsers:
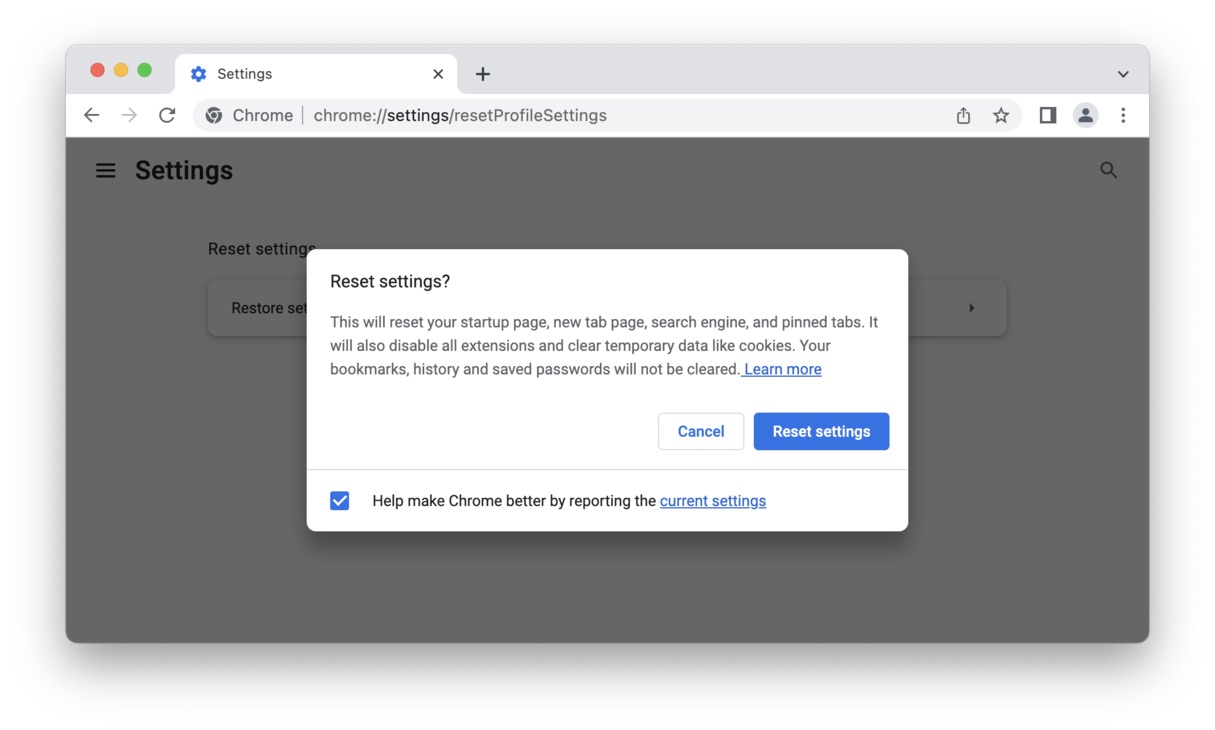
- Google Chrome: Click on the three-dot menu icon and go to “Settings.” Scroll to the bottom of the page and click on “Advanced.” Under the “Reset and clean up” section, select “Restore settings to their original defaults.” Confirm your selection and click on the “Reset settings” button.
- Mozilla Firefox: Click on the three-bar menu icon and select “Help.” From the Help menu, choose “Troubleshooting Information.” In the Troubleshooting Information tab, click on the “Refresh Firefox” button. Confirm your selection and allow Firefox to reset your browser settings.
- Microsoft Edge: Click on the three-dot menu icon and go to “Settings.” Scroll down and click on “Restore settings to their default values.” Confirm your selection and click on the “Reset” button.
During the reset process, your browser may restart, and you may lose some personalizations or preferences. However, this step is crucial for resolving persistent issues or reverting to a stable browser state.
After the settings reset is complete, you’ll have a clean, default configuration. Take this opportunity to reconfigure any necessary settings or preferences to personalize your browsing experience. Keep in mind that extensions and add-ons that were disabled or removed in previous steps will need to be reinstalled if desired.
With your browser settings reset, it’s time to move on to the final step: updating your browser. Updating ensures that you have the latest security patches, bug fixes, and performance improvements, providing a more stable and secure browsing experience.
Step 5: Update Your Browser
As the final step in the browser reset process, it’s important to update your browser to ensure you’re using the latest version available. Browser updates often include important security patches, bug fixes, and performance improvements that can enhance your browsing experience and protect you from vulnerabilities.
To update your browser, follow these general steps based on popular browsers:
- Google Chrome: Click on the three-dot menu icon and go to “Help” and then “About Google Chrome.” Chrome will automatically check for updates and install them if available. Once the update is complete, relaunch the browser to apply the changes.
- Mozilla Firefox: Click on the three-bar menu icon and select “Help.” From the Help menu, choose “About Firefox.” Firefox will check for updates and install them if necessary. Restart the browser to complete the update.
- Microsoft Edge: Edge updates automatically alongside Windows updates. If there are updates available, they will be installed automatically. To check for updates manually, click on the three-dot menu icon, go to “Settings,” and then select “About Microsoft Edge.”
Keeping your browser up to date is crucial for security, performance, and compatibility with the latest web standards. Regularly checking for and installing updates ensures that you have the best browsing experience possible.
By following each of the steps in this guide – backing up bookmarks, clearing cache and cookies, disabling extensions and add-ons, resetting browser settings, and updating your browser – you can effectively reset your browser and address any issues you’ve been encountering. Remember to reconfigure any necessary settings and reinstall desired extensions or add-ons after the reset process is complete.
Congratulations! You’ve successfully completed the browser reset process and are now ready to enjoy a refreshed and optimized browsing experience. If you encounter any further issues, don’t hesitate to consult the browser’s documentation or seek support from their official support channels.
Conclusion
In today’s digital age, our browsers play a vital role in our daily lives. They serve as gateways to information, communication, and entertainment. However, as we browse the web and customize our browsers, issues can arise, impacting performance and overall user experience.
This guide has provided you with a step-by-step process to reset your browser, helping you to resolve common problems and restore your browsing experience to its optimal state. From backing up your bookmarks to clearing cache and cookies, disabling extensions and add-ons, resetting browser settings, and updating your browser, each step has played a crucial role in refreshing and optimizing your browser.
Resetting your browser is a maintenance task you should consider periodically to prevent issues and maintain a hassle-free browsing experience. Remember that every browser may have a slightly different interface or terminology, so consult your browser’s documentation if needed.
By following these steps, you’ve not only resolved any persistent issues but also enhanced the security, speed, and stability of your browser. You now have a clean slate to personalize your settings and reinstall any necessary extensions or add-ons.
Should any further problems arise, don’t hesitate to reach out to the browser’s official support channels for assistance. They are there to help you navigate through any challenges you may encounter.
Thank you for using this guide to reset your browser. Enjoy your refreshed browsing experience!