Introduction
Welcome to this guide on how to find an SSD (Solid State Drive) on your PC. If you’re looking to upgrade your computer’s storage or simply want to know if you already have an SSD installed, this article will walk you through the process step by step.
An SSD is a type of storage device that uses flash memory to store data, making it faster and more reliable than traditional hard disk drives (HDDs). With their lightning-fast read and write speeds, SSDs have revolutionized the way we use and experience our computers.
But why should you use an SSD in the first place? Well, there are several advantages. SSDs are significantly faster than HDDs, which means faster boot times, quicker file transfers, and smoother overall performance. They also have no moving parts, making them more durable and less prone to mechanical failure. Additionally, SSDs are quieter and consume less power, resulting in a more energy-efficient system.
Now that you understand the benefits of using an SSD, let’s dive into the process of determining if your PC already has one. By following the steps outlined in this guide, you’ll be able to find the SSD and verify its presence on your computer system.
What is an SSD?
An SSD, or Solid State Drive, is a type of storage device that has become increasingly popular in recent years. Unlike traditional hard disk drives (HDDs) which use spinning disks and magnetic storage to read and write data, SSDs use flash memory to store data electronically.
The use of flash memory in SSDs offers several advantages over HDDs. First and foremost, SSDs are significantly faster in terms of read and write speeds. This means that tasks like booting up your computer, opening programs, and accessing files are much quicker with an SSD. These faster speeds can greatly improve the overall performance and responsiveness of your PC.
Another important benefit of SSDs is their reliability. Since SSDs have no moving parts like HDDs, there is less risk of mechanical failure. This makes SSDs more durable and less prone to crashes or data loss due to physical impact or movement. Additionally, SSDs are more resistant to heat and temperature changes, making them suitable for use in various environments.
SSDs also consume less power compared to HDDs. As a result, you can expect improved battery life on laptops and reduced energy consumption on desktop systems. Furthermore, SSDs operate silently as they lack spinning disks, which means no humming or clicking noises that can be associated with HDDs.
In terms of form factor, SSDs come in various sizes to accommodate different devices. The most common form factors are 2.5-inch, which is the standard size for laptops and desktops, and M.2, a smaller form factor commonly found in ultrabooks and compact PCs. Some SSDs are also available in PCIe (Peripheral Component Interconnect Express) format, offering even faster speeds through a direct connection to the motherboard.
Overall, SSDs offer a significant upgrade over traditional HDDs in terms of speed, reliability, durability, power efficiency, and noise reduction. With the declining prices of SSDs and their increasing availability, they have become the preferred storage option for many computer users today.
Why Should You Use an SSD?
If you’re considering upgrading your computer’s storage, or if you’re building a new system, you may be wondering why you should use an SSD (Solid State Drive) instead of a traditional hard disk drive (HDD). Here are several compelling reasons:
1. Speed: One of the primary advantages of using an SSD is its speed. SSDs are significantly faster than HDDs in terms of data transfer and access times. The absence of moving parts and the use of flash memory technology allows for lightning-fast read and write speeds. With an SSD, your operating system will boot up much faster, and applications and files will load almost instantly.
2. Performance: The increased speed of an SSD directly translates to better overall performance. Tasks such as launching programs, opening large files, and multitasking become smoother and more efficient. With an SSD, you’ll experience reduced lag, improved responsiveness, and seamless computing.
3. Reliability: SSDs are more reliable than HDDs due to their lack of moving parts. Without spinning disks, there is less risk of mechanical failure, making SSDs less prone to crashes or data loss. This is especially important for portable devices, such as laptops, as they are subject to movement and vibrations that could potentially damage a traditional HDD.
4. Durability: SSDs are more durable than HDDs. Traditional HDDs are sensitive to physical shock and movement, which makes them more susceptible to damage. SSDs, on the other hand, are built to withstand physical impact, making them more suitable for use in rugged environments or devices that are frequently on the move.
5. Energy Efficiency: SSDs consume less power than HDDs. In a world that emphasizes energy efficiency, using an SSD can not only reduce your computer’s energy consumption but also extend battery life in laptops and portable devices. This makes SSDs an environmentally friendly choice that can save you money on electricity bills.
6. Silent Operation: HDDs have spinning disks that generate noise when in use. SSDs, being devoid of moving parts, operate silently. This not only reduces noise pollution but also allows for a quieter and more peaceful computing environment.
7. Compact Size: SSDs come in various form factors, including the standard 2.5-inch size and the smaller M.2 form factor. This makes them suitable for a wide range of devices, from desktops to laptops and even compact ultrabooks. The compact size of SSDs allows for greater flexibility in system design and enables more efficient use of space within devices.
Overall, using an SSD offers a significant performance boost, enhanced reliability, durability, energy efficiency, and silent operation compared to traditional HDDs. With the prices of SSDs becoming more affordable, it’s a worthwhile investment that will greatly enhance your computing experience.
Checking if Your PC Already Has an SSD
If you’re unsure whether your PC already has an SSD (Solid State Drive) installed, there are several methods you can use to check. By following these steps, you’ll be able to determine if an SSD is present in your computer system:
1. Checking Your PC’s Specifications: The first step is to check your PC’s specifications. You can do this by opening the “System Information” or “System Properties” window on your computer. In Windows, you can access this information by right-clicking on “My Computer” or “This PC,” selecting “Properties,” and looking for the “Device specifications” section. Here, you should see details about your computer’s processor, RAM, and storage devices, including any SSDs listed.
2. Opening Your PC’s Case: If you want to physically verify the presence of an SSD, you’ll need to open your PC’s case. Ensure that your computer is powered off and disconnected from any power source before proceeding. Consult your computer’s manual or search for instructions specific to your model to safely open the case without causing any damage. Once the case is open, you’ll have a clear view of the internal components.
3. Locating the SSD: Once you have access to the internal components, you’ll need to locate the SSD if one is installed. In most desktop computers, the storage drives are typically mounted in drive bays or slots. Look for small rectangular-shaped drives connected to the motherboard with cables. SSDs are generally smaller and thinner than traditional hard drives, so they may stand out visually.
4. Identifying the SSD: To confirm if a drive is an SSD, look for markings or labels on the drive itself. SSDs often have the term “SSD” or “Solid State Drive” printed on them. They may also have branding or model information that can help you identify them as SSDs. Additionally, SSDs usually do not have any visible moving parts, such as spinning disks.
5. Verifying If the Drive is an SSD: If you’re still unsure whether you’re looking at an SSD, you can verify it by searching for the drive’s model number or specifications online. Manufacturers’ websites or online tech forums often provide detailed information about specific SSD models, including appearance and dimensions.
6. Checking the Storage Capacity: Finally, check the storage capacity of the drive. SSDs typically have smaller capacities compared to traditional HDDs, especially in older models. If the drive you’ve identified has a storage capacity of 240GB or below, it’s highly likely that you’re dealing with an SSD.
By following these steps, you can determine if your PC already has an SSD. Whether you’re planning to upgrade your storage or simply curious about your computer’s configuration, this process will help you gain clarity regarding the presence of an SSD in your system.
Checking Your PC’s Specifications
If you want to check the specifications of your PC, including the presence of an SSD (Solid State Drive), there are various methods available. By following these steps, you can easily identify the key components of your computer:
1. Windows System Information: The most straightforward method is to use the built-in Windows System Information tool. To access this tool, press the Windows key + R to open the Run dialog box, then type “msinfo32” and hit Enter. This will open the System Information window, where you can find detailed information about your PC’s specifications. Look for the “Storage” or “Drives” section, which should display any installed SSDs.
2. Device Manager: Another way to check your PC’s specifications is by using the Device Manager. To open it, right-click on the Start button and select “Device Manager” from the context menu. In the Device Manager window, expand the “Disk drives” category. Here, you should see a list of all the storage devices connected to your PC, including any SSDs.
3. BIOS/UEFI Settings: You can also check your PC’s specifications by accessing the BIOS/UEFI settings. Restart your computer and look for the key to enter the BIOS/UEFI settings during the startup process. This key is usually displayed on the screen briefly and varies depending on your computer’s manufacturer. Once you’re in the BIOS/UEFI settings, navigate to the “Storage” or “Drives” section to see the list of installed drives, including any SSDs.
4. Third-Party System Information Tools: If you prefer a more comprehensive overview of your PC’s specifications, there are third-party system information tools available. These tools provide detailed information about your computer’s hardware and software. Popular options include CPU-Z, Speccy, and HWiNFO. Download and install one of these tools, then launch it to view a detailed summary of your PC’s specifications, including any SSDs.
5. Manufacturer’s Website: If you know the specific model of your PC, you can visit the manufacturer’s website to check the specifications. Look for the support or product page for your model and search for the specifications or technical details. Most manufacturers provide detailed information about their products, including the storage devices installed.
By using these methods, you can easily check your PC’s specifications and determine if an SSD is present. Understanding your computer’s configuration is essential for troubleshooting, upgrading, or simply gaining a better understanding of its capabilities.
Opening Your PC’s Case
If you want to physically inspect the internal components of your PC and check for the presence of an SSD (Solid State Drive), you’ll need to open your computer’s case. Here’s a step-by-step guide to opening your PC’s case safely:
1. Power Off: Before opening your PC’s case, make sure it is completely powered off. Shut down your computer through the operating system and unplug it from the power source. This will ensure your safety and prevent any potential damage to the internal components.
2. Ground Yourself: To prevent any static discharge that could damage sensitive components, it’s important to ground yourself. Touch a metal object, such as a doorknob or the metal case of your PC, to discharge any static electricity before proceeding.
3. Locate Screws or Latches: Look for screws or latches that secure the side panel of your PC’s case. The location may vary depending on the case design, but most cases will have screws or latches on the back panel. Refer to your PC’s manual or the manufacturer’s website for specific instructions and diagrams related to your computer model.
4. Remove Screws or Release Latches: Use a screwdriver or your hands, depending on the case design, to remove the screws or release the latches that secure the side panel. Set the screws aside in a safe place. Be gentle when removing the panel to avoid any unnecessary strain on the case or components inside.
5. Slide or Swing Open the Panel: Slide or swing open the side panel of your PC’s case. Some cases have panels that slide backward, while others swing open like a door. Take care not to force the panel open if it doesn’t move easily. If you encounter resistance, double-check that you have removed all the necessary screws or latches.
6. Safely Stow the Panel: Once the side panel is open, find a safe place to stow it temporarily. Lay it flat on a clean surface or lean it against a wall where it won’t be accidentally tripped over. Avoid placing the panel on a conductive surface, such as carpet or metal, to prevent static electricity buildup.
With the case open, you now have a clear view of the internal components of your PC. Take a moment to familiarize yourself with the layout and identify the storage devices, including any SSDs. SSDs are typically smaller and slimmer than traditional hard drives, so they may be easily recognizable.
Remember to handle the internal components with care and avoid touching any exposed circuitry. If you’re unsure about any specific components, consult your PC’s manual or seek guidance from a professional technician.
By following these steps, you can safely open your PC’s case to access the internal components and check for the presence of an SSD. This hands-on approach allows you to visually verify the presence of the SSD and gain a better understanding of your computer’s storage configuration.
Locating the SSD
Once you have successfully opened your PC’s case, your next step is to locate the SSD (Solid State Drive) if one is installed. Here’s a guide to help you find the SSD within your computer:
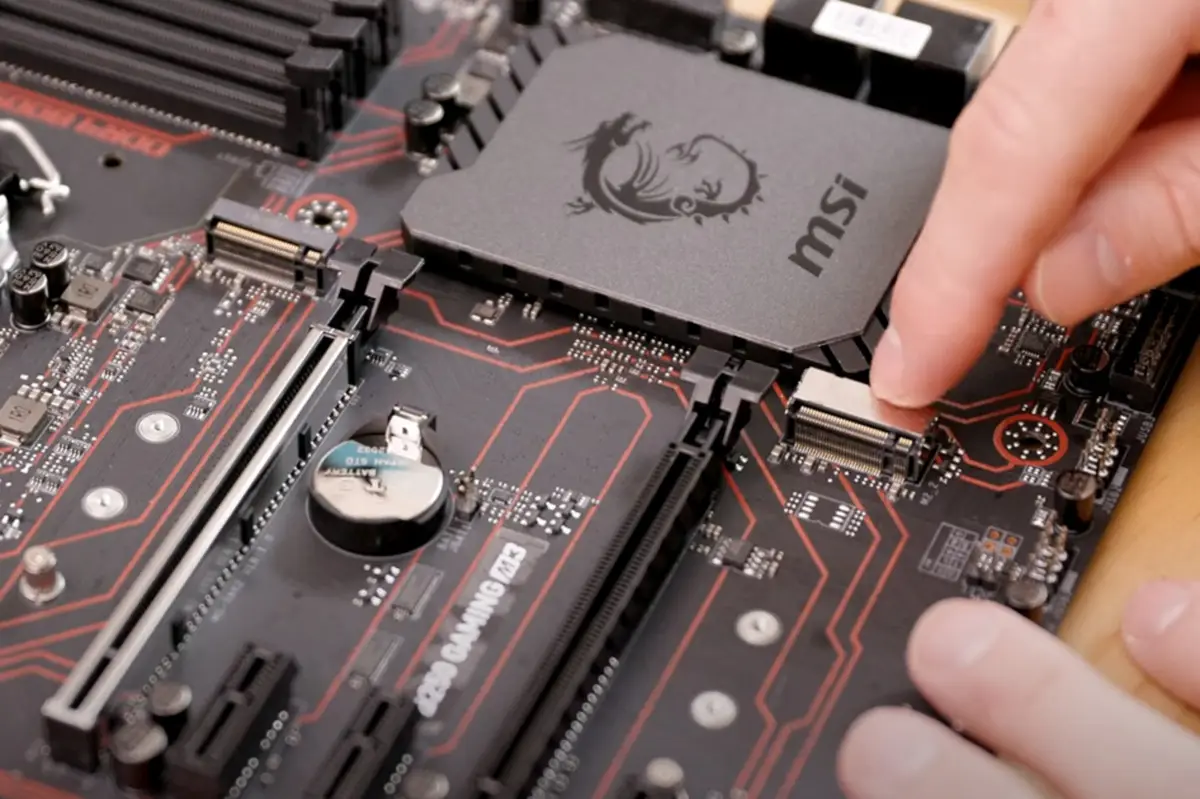
1. Visual Inspection: Take a careful look inside your PC’s case and observe the different components. SSDs are typically smaller and slimmer compared to traditional hard disk drives (HDDs). They are often rectangular in shape and don’t have any visible moving parts, such as rotating disks.
2. Drive Bays or Slots: Most desktop computers have drive bays or slots, where the storage drives are mounted. Check these areas for any SSDs. SSDs are usually connected to the motherboard and secured in place with screws or brackets.
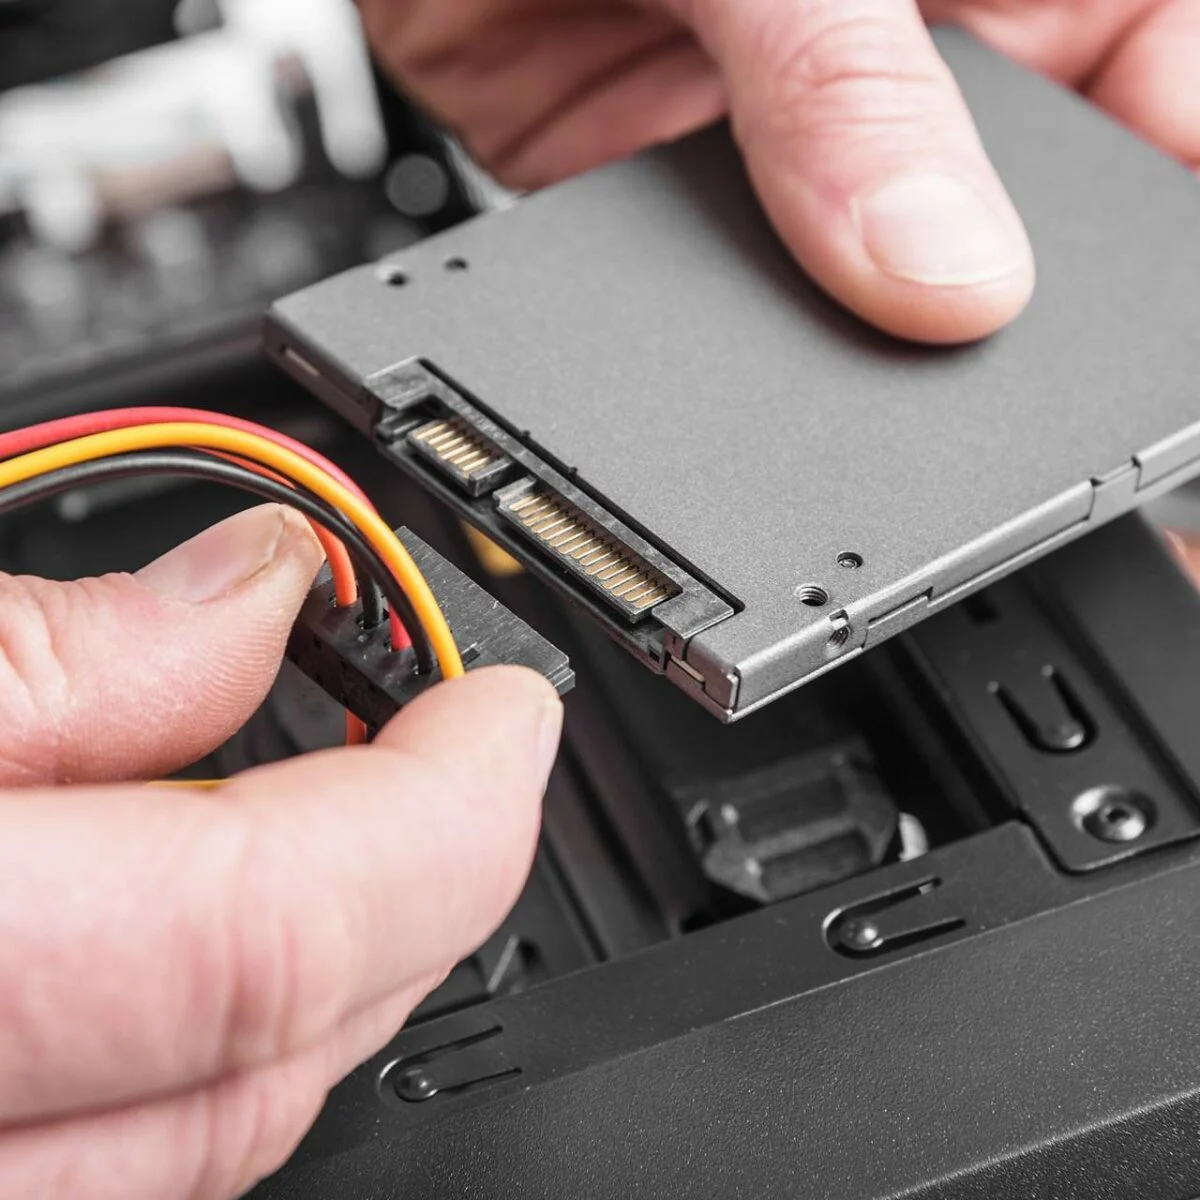
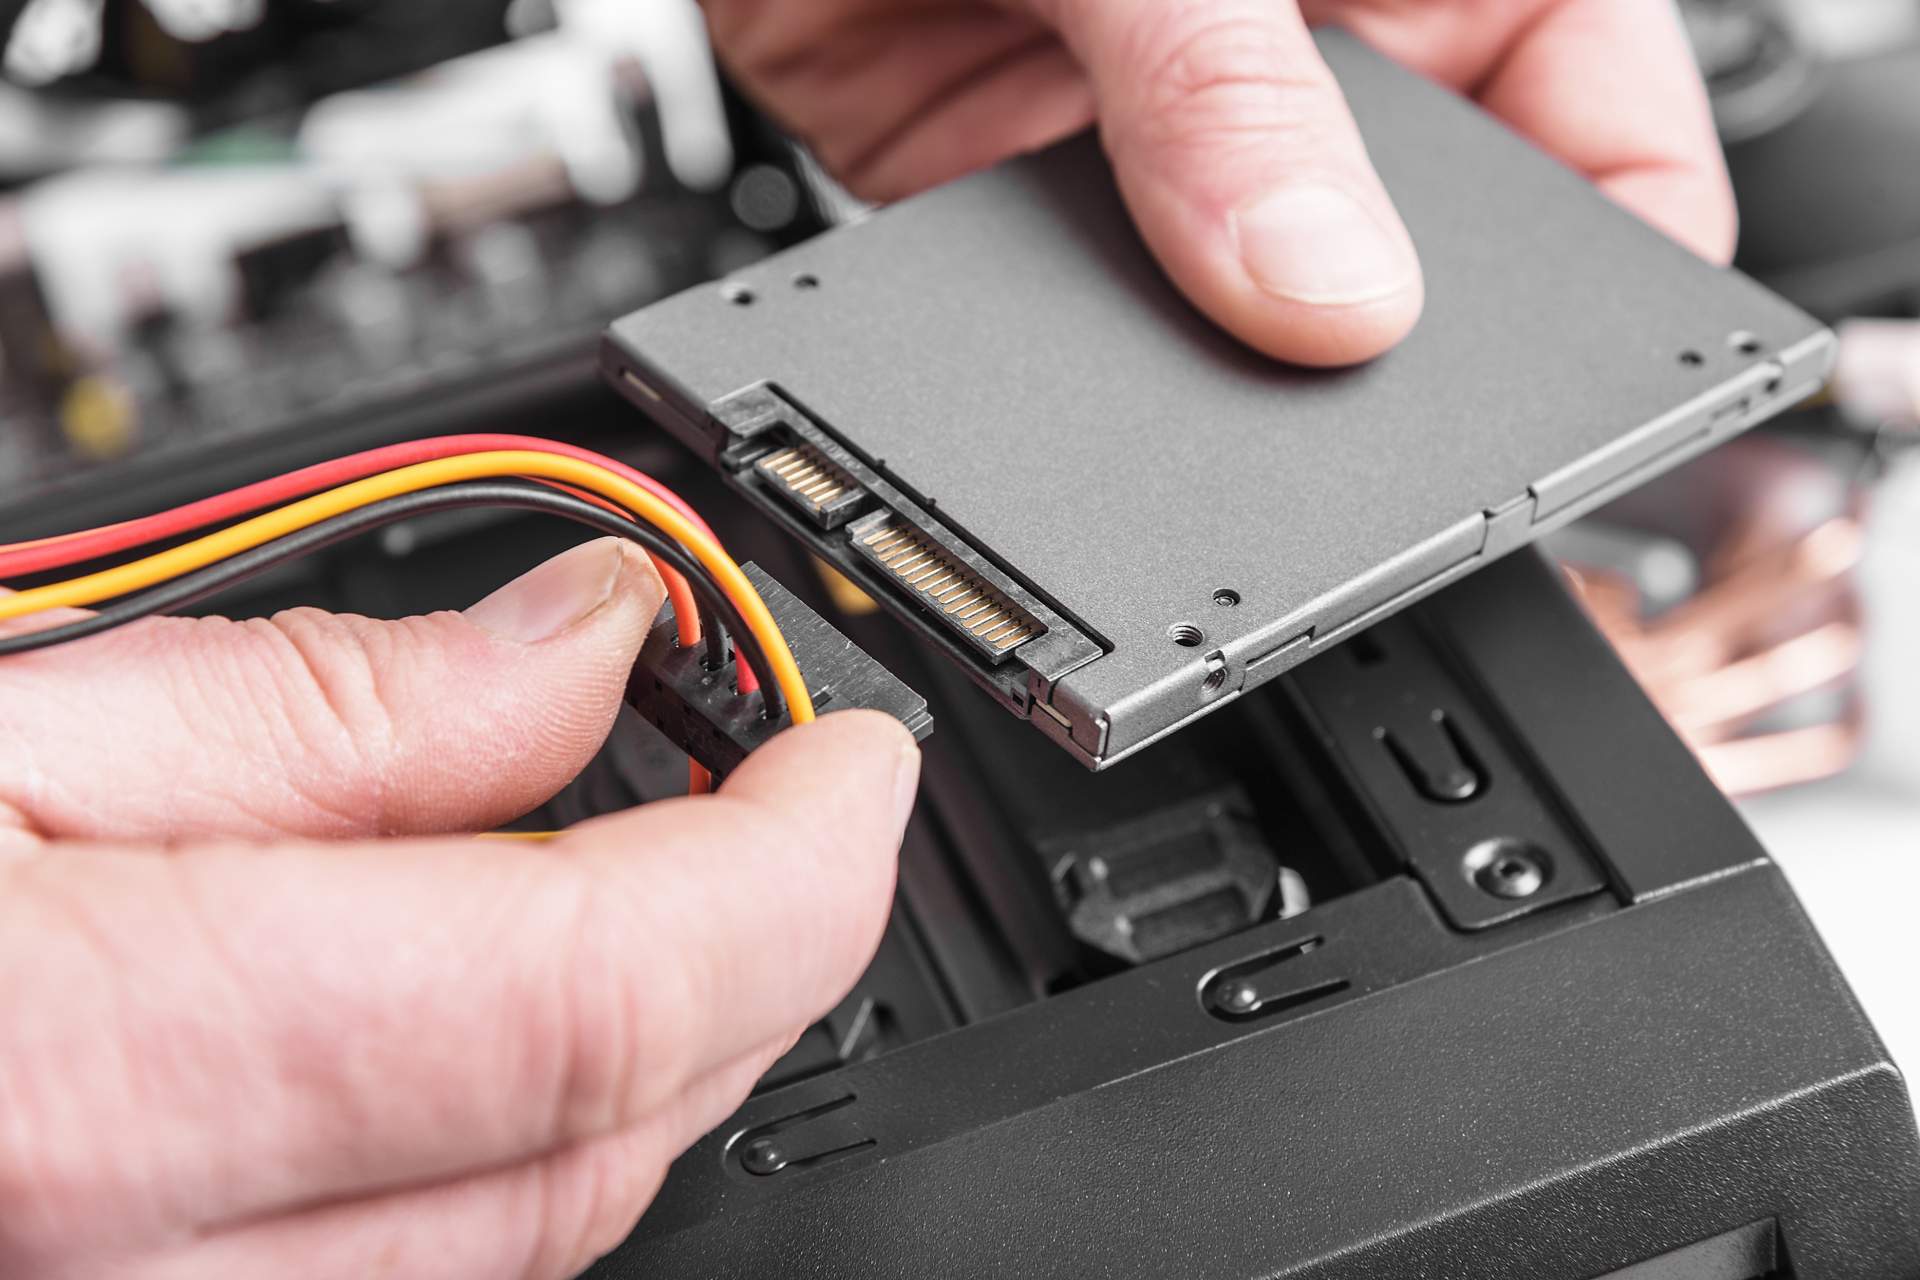
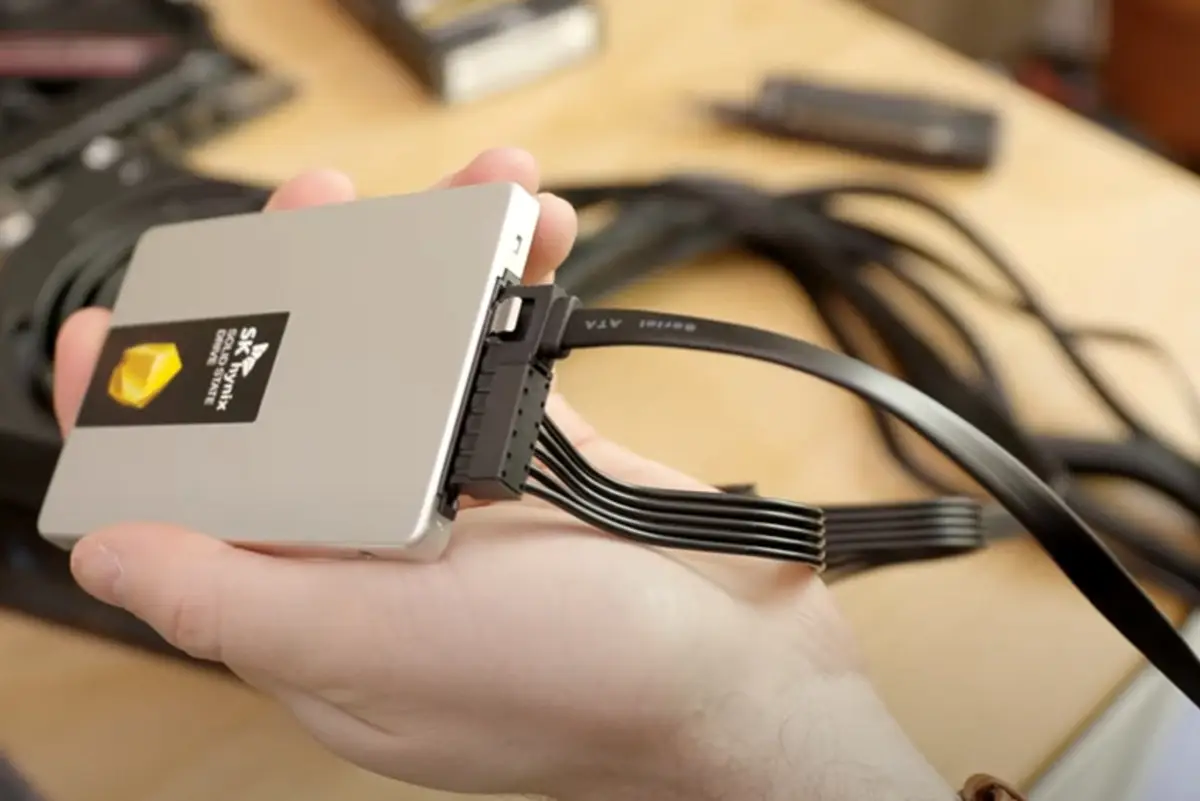
3. Cable Connections: Look for cables connected to the SSD. These cables provide the necessary power and data connections to the drive. SATA cables are commonly used to connect SSDs to the motherboard, while power cables ensure the drive receives the necessary power supply.
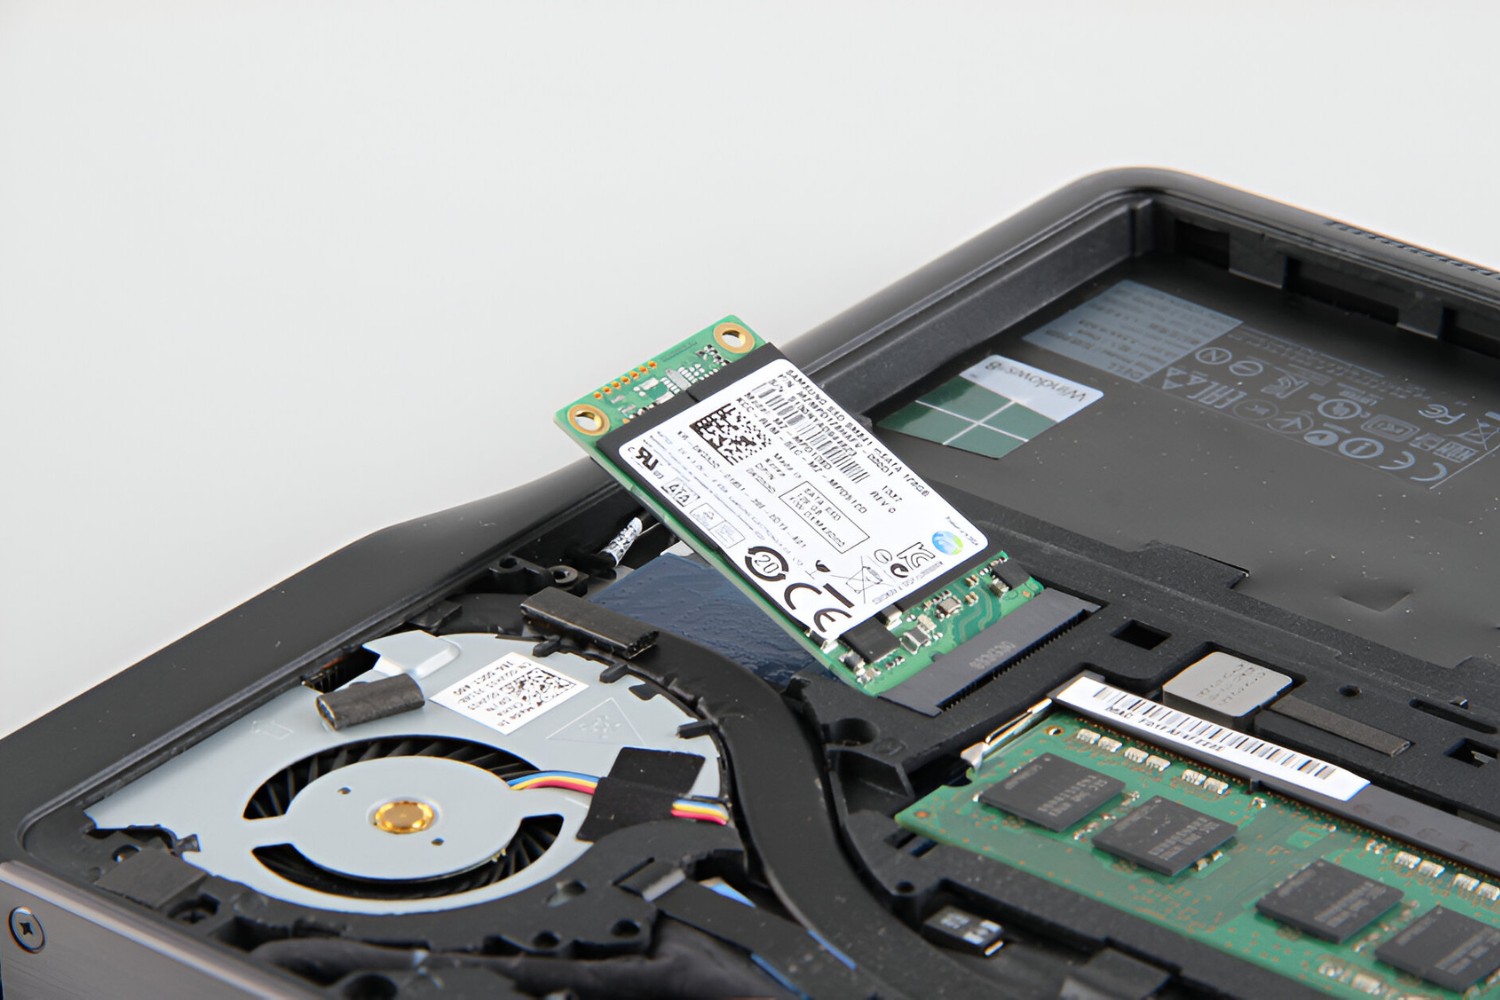
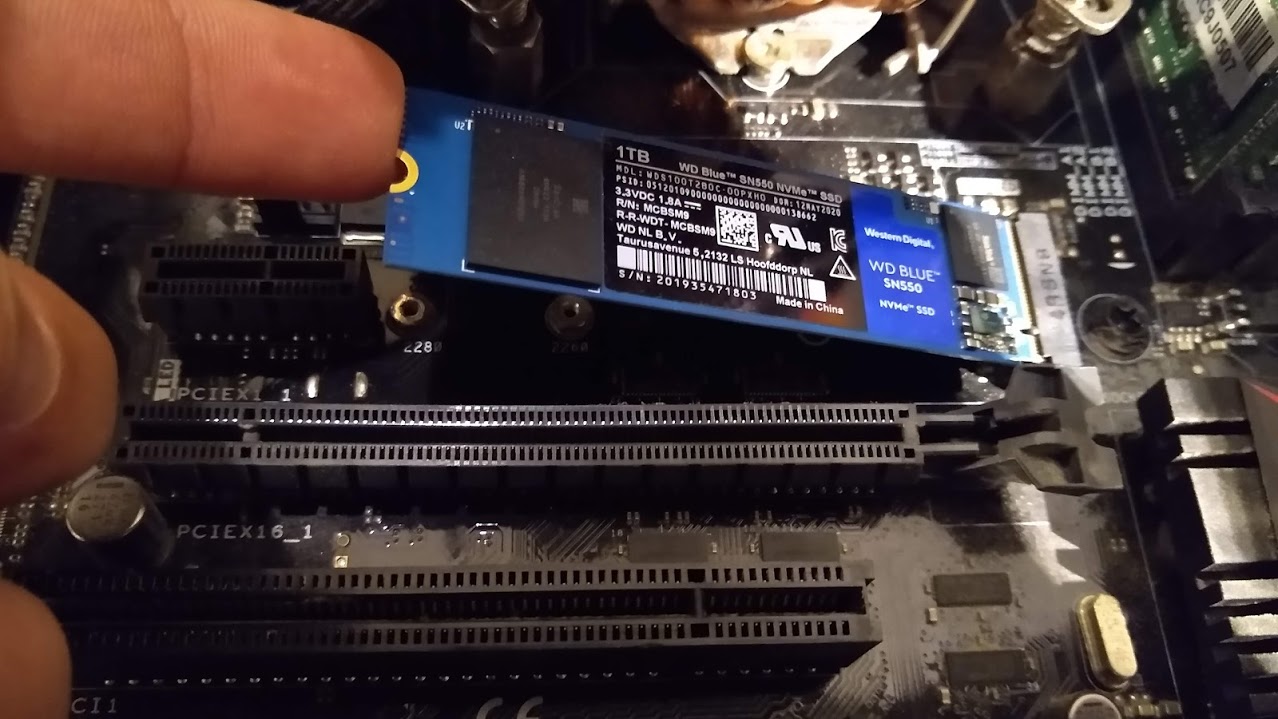
4. M.2 Slots: If your PC is relatively new or has a compact form factor, it may utilize M.2 slots for storage. M.2 slots are smaller and require no cables for connection. They are often located near the motherboard or positioned vertically on the motherboard itself.
5. Consult the Manual: If you’re unsure about the location of the SSD, refer to your PC’s manual or documentation. The manual should provide information on the internal components and their placement. If you don’t have the physical manual, most manufacturers offer digital versions on their websites.
6. Labels or Markings: SSDs often have labels or markings that can help you identify them. Look for SSD-specific brands, model numbers, or the term “SSD” printed on the drive itself. These labels can provide a clear indication that the drive you’re looking at is indeed an SSD.
7. Online Research: If you are still uncertain whether a drive is an SSD, you can search for the model number or specifications of the drive online. Manufacturer websites and tech forums often provide information about specific SSD models, including appearance and dimensions.
Remember to handle the components inside your PC with care and avoid touching any exposed circuitry. If you’re unsure about any specific components or concerned about damaging your PC, consider seeking assistance from a professional technician.
By following these steps and visually inspecting your PC’s internal components, you’ll be able to locate the SSD, if one is present. Identifying the SSD is an essential step in determining your computer’s storage configuration and allows you to proceed with further troubleshooting or upgrades if desired.
Identifying the SSD
Once you have located the SSD (Solid State Drive) within your PC, the next step is to ensure that you can positively identify it as an SSD. Here are some methods to help you accurately identify the SSD:
1. Markings or Labels: Check the surface of the SSD for any markings or labels. SSDs often have branding, model numbers, or specific terms like “SSD” or “Solid State Drive” printed on them. These markings can provide a clear indication that the drive is indeed an SSD.
2. Appearance and Form Factor: In terms of physical appearance, SSDs typically have a rectangular shape with rounded corners. They are often slimmer and sleeker compared to traditional hard disk drives (HDDs). Familiarize yourself with the appearance of different SSD models to easily identify them during inspection.
3. No Moving Parts: Unlike HDDs, SSDs have no moving parts such as spinning disks or actuator arms. When inspecting the drive, observe whether there are any visible mechanical components. Not seeing any moving parts can be a strong indicator that the drive is indeed an SSD.
4. Research the Model Number: If you have access to the model number of the SSD, you can conduct online research to verify its identity. The manufacturer’s website or official documentation often provides detailed specifications for each SSD model, including appearance and characteristics specific to that model.
5. Compare Specifications: Compare the specifications of the identified drive with the specifications of SSDs. SSDs have different characteristics compared to HDDs, such as faster read/write speeds, lower power consumption, and lack of mechanical components. If the drive aligns with these SSD specifications, it is likely an SSD.
6. Seek Professional Assistance: If you are still unsure about the identification of the drive, consider seeking professional assistance. A computer technician or someone with expertise in hardware can help you identify the drive accurately and provide further guidance.
Remember to handle the components inside your PC with care and avoid touching any exposed circuitry. If you’re uncertain about any specific components or concerned about damaging your PC, it’s best to consult a professional technician to ensure accurate identification.
By following these methods and closely inspecting the markings and appearance of the drive, you’ll be able to confidently identify the SSD within your PC. Accurate identification is crucial for troubleshooting, upgrading, and maintaining your computer’s storage configuration.
Verifying If the Drive is an SSD
After identifying a drive as a potential SSD (Solid State Drive), the next step is to verify its true identity. Here are several methods to help you confirm if the drive is indeed an SSD:
1. Manufacturer’s Documentation: Consult the manufacturer’s official documentation, such as user manuals or online product specifications, for the specific drive in question. These resources often provide detailed information about the drive’s characteristics, including whether it is an SSD or a different type of storage device.
2. Model Number Verification: Look up the model number of the drive online and cross-reference it with the manufacturer’s specifications or reputable technology websites. This way, you can confirm if the model is indeed an SSD.
3. Read/Write Speeds: SSDs are known for their superior read and write speeds compared to traditional hard disk drives (HDDs). You can use benchmarking tools such as CrystalDiskMark or AS SSD to test the read/write performance of the drive. If the results align with the typical speeds of SSDs, it is likely an SSD.
4. Boot Time and Performance: SSDs provide faster boot times and improved overall system performance compared to HDDs. Observe the time it takes for your computer to boot up and launch applications while using the identified drive. If you notice significantly faster performance, it is a good indicator that the drive is an SSD.
5. Noise and Vibration: SSDs do not have moving parts, while HDDs contain spinning disks that can generate noise and vibrations. Listen closely to determine if the drive emits any sound or vibrations during operation. If it remains completely silent, it is likely an SSD.
6. Seek Professional Opinion: If you are still uncertain about the drive’s identity, consider seeking the opinion of a knowledgeable professional. An experienced computer technician or an expert in hardware can provide a thorough assessment and confirm whether the drive is indeed an SSD.
Remember to exercise caution when handling internal components of your PC and to avoid touching any exposed circuitry. If you are unsure or uncomfortable performing the verification process yourself, it is best to seek assistance from a professional.
By using a combination of research, performance testing, and expert opinion, you can verify if the identified drive is truly an SSD. Accurate verification will ensure that you have a clear understanding of your PC’s storage configuration and help you proceed with any necessary upgrades or troubleshooting.
Checking the Storage Capacity
Once you have identified the drive as an SSD (Solid State Drive), it’s important to check the storage capacity of the drive. The storage capacity will give you an idea of how much data the SSD can hold. Here are some methods for checking the storage capacity of the SSD:
1. Operating System: One of the easiest ways to check the storage capacity is through your computer’s operating system. In Windows, you can open File Explorer and navigate to “This PC.” The SSD, along with its storage capacity, should be listed along with other storage drives. On macOS, go to the “About This Mac” menu and click on the “Storage” tab to view the storage capacity of the SSD.
2. System Information Tools: There are several system information tools available that provide detailed hardware information, including storage capacity. These tools, such as CPU-Z or Speccy, will display the storage capacity of all connected drives, including the SSD.
3. Manufacturer Documentation: Consult the manufacturer’s specifications or documentation for the SSD. The manufacturer’s website or official documentation will provide detailed information about the SSD, including the storage capacity.
4. Disk Management Utility: The Disk Management utility in Windows provides a detailed view of the storage drives connected to your PC. To access it, right-click on the Start button and select “Disk Management.” The SSD should be listed, along with its storage capacity. Be cautious when using the Disk Management utility, as it provides advanced options for managing disk partitions.
5. Physical Label on the SSD: There may be a physical label or sticker on the SSD that indicates its storage capacity. Look for any markings on the drive itself that provide this information, which can be helpful, especially if you are unable to access the computer’s operating system.
6. Online Research: If you have the model number of the SSD, you can conduct online research to find its specifications. Manufacturer websites, technology forums, and reputable technology websites often list the storage capacity of SSD models.
By utilizing these methods, you can easily check the storage capacity of the SSD. Knowing the storage capacity is crucial for managing your data, ensuring you have sufficient space for your files, programs, and applications.
Remember that the actual available storage capacity may be slightly lower than the advertised capacity due to formatting and system requirements. This is normal and applies to all storage devices.
With the storage capacity identified, you can make informed decisions about file organization, storage management, and potential upgrades to meet your storage needs.
Potential Locations for the SSD
When it comes to the placement of SSDs (Solid State Drives) within a computer, there are various potential locations depending on the design and form factor of your PC. Here are some common locations where you may find an SSD:
1. Drive Bays: SSDs are often installed in drive bays, which are dedicated areas within the computer case designed to hold storage drives. Drive bays can be found in both desktop and server cases, and they typically have slots or brackets to secure the SSD in place. In desktops, the drive bays are usually located at the front of the case, while in servers, they may be located internally or accessible from the front or rear.
2. M.2 Slots: Many modern motherboards and laptops feature M.2 slots, which are specific connectors designed for M.2 SSDs. M.2 SSDs are smaller and more compact compared to traditional drives, making them an ideal choice for slim laptops and compact form factor PCs. M.2 slots are typically located on the motherboard itself, and they allow the SSD to be directly mounted onto it without the need for cables or brackets.
3. Expansion Slots: Some desktop cases feature expansion slots that allow you to add SSDs using expansion cards. These expansion cards connect to the motherboard through a PCIe (Peripheral Component Interconnect Express) slot. This method is less common for consumer-grade PCs but may be relevant in specific workstation or server setups where higher-performance SSDs or specialized storage configurations are required.
4. Adapter Brackets: In situations where the SSD doesn’t fit directly into a standard drive bay or M.2 slot, you may need to use adapter brackets or trays. These brackets or trays provide a secure mount for the SSD and allow it to be installed in a different location within the case. For example, you can use a 2.5-inch to 3.5-inch adapter bracket to mount a smaller SSD in a larger drive bay meant for traditional HDDs.
5. External Enclosures: SSDs can also be housed in external enclosures that connect to your computer via USB, Thunderbolt, or other external interfaces. These enclosures are useful for portable storage, backup, or data transfer purposes. They allow you to utilize the SSD as an external drive that can be easily connected to different computers or devices.
Remember that the specific location of the SSD will depend on your computer’s design, motherboard layout, and the form factor of the SSD itself. It is always recommended to consult your PC’s manual, the motherboard manufacturer’s documentation, or seek professional assistance if you are unsure about the precise location or installation method for your SSD.
By understanding the potential locations for SSDs, you can effectively locate and install an SSD in your computer, whether it’s in a desktop, laptop, or external enclosure. The placement will ultimately depend on your specific hardware setup and storage requirements.
Conclusion
Throughout this guide, we have provided you with information and step-by-step instructions on how to find an SSD (Solid State Drive) on your PC. SSDs have become increasingly popular due to their speed, reliability, and overall performance benefits. By identifying whether your computer already has an SSD installed, you can make informed decisions about storage upgrades or troubleshooting.
We started by explaining what an SSD is and highlighted the advantages of using an SSD over traditional hard disk drives (HDDs). The speed, performance, reliability, durability, energy efficiency, and silent operation of SSDs make them a preferred choice for many computer users today.
We then covered the process of checking if your PC already has an SSD. By checking the specifications of your PC, physically examining the internal components, and identifying the SSD, you can confidently determine if an SSD is present in your system.
Furthermore, we provided guidance on verifying if the drive is indeed an SSD, checking the storage capacity of the SSD, and potential locations where the SSD may be installed within a computer.
Remember to exercise caution when handling internal components, avoid touching exposed circuitry, and refer to your PC’s manual or consult with a professional if you are uncertain or uncomfortable with any aspect of the process.
Identifying and utilizing an SSD can greatly enhance your computer’s performance, improve data access speeds, and provide a more reliable storage solution. SSDs offer a significant upgrade in terms of speed, durability, energy efficiency, and noise reduction. Whether you’re upgrading your current storage or confirming your PC’s configuration, understanding the presence and location of an SSD is crucial.
We hope this guide has equipped you with the knowledge and tools to successfully locate and identify an SSD on your PC. Harnessing the power of an SSD can significantly enhance your computing experience, and we encourage you to explore the possibilities offered by this advanced storage technology.