Introduction
Replacing the solid state drive (SSD) in a Dell XPS 27 All-In-One PC may seem like a daunting task, but with the right tools and equipment, it is definitely manageable. SSDs are a popular choice among computer users thanks to their faster data transfer speeds and improved overall performance. Whether you want to upgrade to a larger capacity SSD or simply replace a faulty drive, this guide will walk you through the steps to successfully replace the SSD in your Dell XPS 27 All-In-One PC.
Before we dive into the process, it’s important to note that opening up your computer and replacing components may void your warranty, so proceed with caution. If your Dell XPS 27 All-In-One PC is still under warranty, it’s best to consult with Dell or an authorized service center for SSD replacement options. However, if you’re comfortable with DIY projects and want to save some money, this guide is for you.
In this guide, we’ll discuss the tools and equipment you’ll need, as well as the step-by-step process of replacing the SSD. We’ll also provide tips for backing up your data and testing the new SSD to ensure it’s working properly. So, let’s get started and breathe new life into your Dell XPS 27 All-In-One PC!
Tools and Equipment Needed
Before you start replacing the solid state drive (SSD) in your Dell XPS 27 All-In-One PC, you’ll need to gather a few essential tools and equipment. Having the right tools at your disposal will make the process smoother and ensure that you can effectively complete the task. Here’s a list of what you’ll need:
- Phillips-head screwdriver: You’ll need a small Phillips-head screwdriver to remove the screws that secure the back cover of your Dell XPS 27 All-In-One PC.
- Anti-static wrist strap: To prevent any static electricity from damaging the sensitive components of your computer, it’s recommended to wear an anti-static wrist strap throughout the process.
- Plastic opening tool or spudger: This handy tool will help you pry open the casing and disconnect cables without damaging any of the internal components of your Dell XPS 27 All-In-One PC.
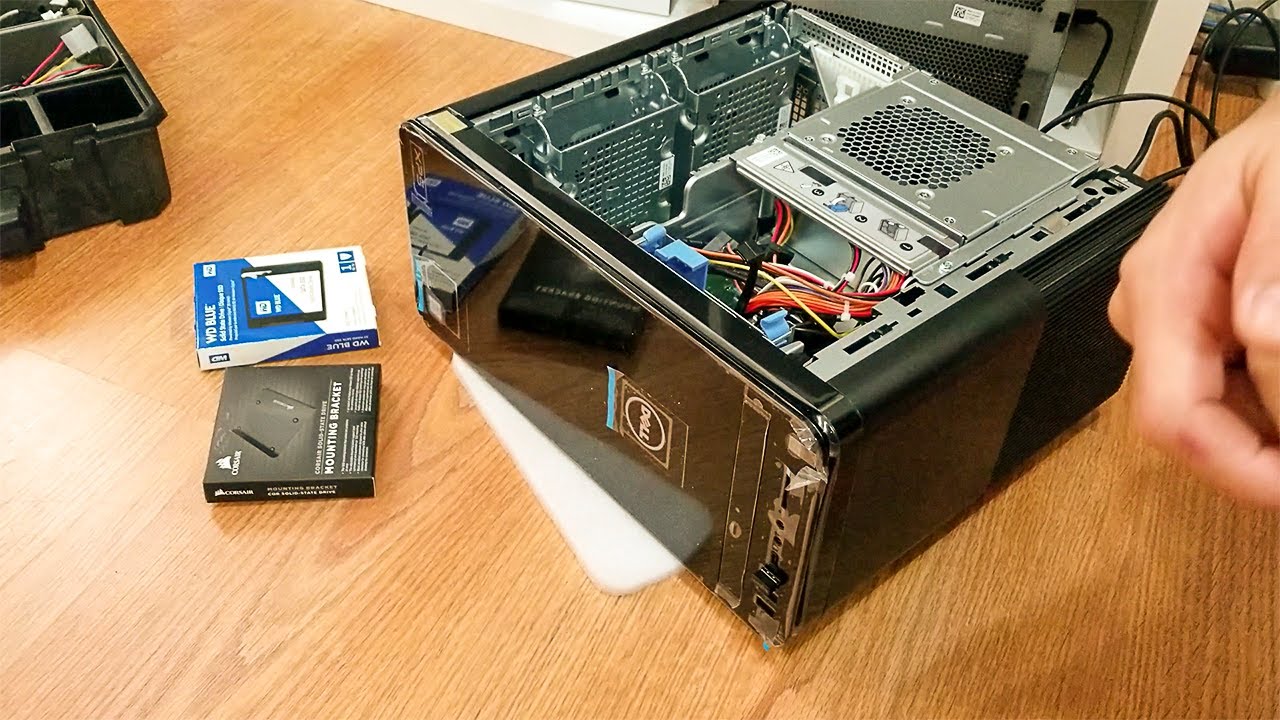
- SATA SSD: Of course, you’ll need a new solid state drive (SSD) to replace the old one. Make sure to purchase an SSD that is compatible with your Dell XPS 27 All-In-One PC and has the required capacity for your needs.
- SATA data cable: This cable will connect your new SSD to the motherboard of your Dell XPS 27 All-In-One PC. Ensure that you have a SATA data cable that is long enough to reach the motherboard connector.
- SATA power cable: Along with the data cable, you’ll also need a SATA power cable to provide power to your new SSD. Check that you have a spare SATA power cable available.
- External storage device: Before you begin the SSD replacement process, it’s crucial to back up your data. You’ll need an external storage device such as an external hard drive or a USB flash drive to transfer your important files and documents.
By gathering these tools and equipment in advance, you’ll be well-prepared for the task of replacing the solid state drive (SSD) in your Dell XPS 27 All-In-One PC. Remember to exercise caution and follow the steps carefully to ensure a successful SSD replacement and a smoothly functioning computer. Now that you have all the necessary tools, let’s move on to preparing the workspace.
Step 1: Preparing the Workspace
Before you begin replacing the solid state drive (SSD) in your Dell XPS 27 All-In-One PC, it’s important to set up a clean and organized workspace. By creating an optimal environment, you can ensure that the process goes smoothly and reduce the risk of damaging any components. Follow these steps to prepare your workspace:
- Choose a well-lit and spacious area: Find a location with ample lighting, as this will help you see the components clearly. Make sure the area is spacious enough to accommodate your Dell XPS 27 All-In-One PC and the tools you’ll be using.
- Gather a clean working surface: Place a soft, clean cloth or an anti-static mat on the surface where you’ll be working. This will provide a cushioned and static-free area for your Dell XPS 27 All-In-One PC.
- Remove any distractions or obstructions: Clear the workspace of any unnecessary objects that could get in your way or cause accidental damage during the SSD replacement process.
- Ensure proper ventilation: Your Dell XPS 27 All-In-One PC may generate heat during the process, so it’s important to have proper ventilation in the workspace. Avoid working in confined spaces or areas with poor airflow.
- Wear an anti-static wrist strap: To prevent any static discharge from damaging your computer’s internal components, it’s recommended to wear an anti-static wrist strap throughout the process. Attach the strap to a grounded metal object or use an anti-static mat.
- Organize your tools: Lay out all the necessary tools and equipment you gathered in the previous step. Having everything organized and within reach will save you time and effort as you progress through the SSD replacement process.
By following these steps and creating an optimal workspace, you’ll be ready to embark on the task of replacing the solid state drive (SSD) in your Dell XPS 27 All-In-One PC. With a clean and organized environment, you can proceed confidently and ensure a successful SSD replacement. Now that your workspace is prepared, let’s move on to the next step: backing up your data.
Step 2: Backing Up Your Data
Before you replace the solid state drive (SSD) in your Dell XPS 27 All-In-One PC, it’s crucial to back up your data to prevent any loss or corruption. By creating a backup, you can ensure that your important files and documents are safe and can be easily transferred to the new SSD. Follow these steps to back up your data:
- Create a backup plan: Determine which files and folders you want to back up. It’s a good idea to include important documents, photos, videos, and any other files that you want to preserve. Consider using an external storage device such as an external hard drive or a USB flash drive to store your backup.
- Choose a backup method: There are several ways to back up your data, including using built-in backup software, third-party backup software, or manually copying files. Choose a method that suits your preferences and ensure that it will securely store all your important data.
- Start the backup process: Depending on the chosen backup method, follow the necessary steps to initiate the backup. This may involve selecting the files and folders you want to back up, specifying the destination location, and initiating the backup process.
- Verify the backup: After completing the backup process, take the time to verify that all your important files have been successfully backed up. Double-check the backup location to ensure that it contains all the necessary data.
- Test the backup: It’s a good practice to test the integrity of your backup by restoring a few select files or folders to ensure they can be accessed and opened without any issues. This will provide peace of mind and confidence that your data is securely backed up.
By following these steps and backing up your data, you can minimize the risk of losing any important files during the solid state drive (SSD) replacement process. Remember, data backups are crucial to prevent any data loss or corruption, so don’t skip this step. Once you’ve successfully backed up your data, you’re ready to move on to the next step: shutting down and unplugging your Dell XPS 27 All-In-One PC.
Step 3: Shutting Down and Unplugging the Computer
Before you proceed with replacing the solid state drive (SSD) in your Dell XPS 27 All-In-One PC, you need to ensure that the computer is safely shut down and disconnected from any power sources. Follow these steps to properly shut down and unplug your computer:
- Save and close all programs: Make sure to save any open files and close all running programs on your Dell XPS 27 All-In-One PC. This will prevent any data loss or corruption during the shutdown process.
- Shut down the computer: Click on the “Start” menu and select “Shut Down” to initiate the shutdown process. Wait for the computer to completely turn off before proceeding to the next step.
- Unplug all cables and peripherals: Once the computer is shut down, unplug all cables and peripherals connected to your Dell XPS 27 All-In-One PC. This includes the power cable, external devices, such as printers or scanners, and any other cables attached to the computer.
- Press and hold the power button: To discharge any residual power, press and hold the power button on your Dell XPS 27 All-In-One PC for a few seconds. This helps to ensure that the computer is completely powered down and eliminates any potential electrical hazards.
- Allow the computer to cool down: It’s important to let your Dell XPS 27 All-In-One PC cool down for a few minutes before proceeding to the next step. This reduces the risk of accidental burns or damage caused by heat.
By following these steps to shut down and unplug your computer, you ensure that it is safely disconnected from all power sources and ready for the solid state drive (SSD) replacement. Properly shutting down and unplugging your Dell XPS 27 All-In-One PC is essential to avoid any electrical hazards and ensure your safety during the SSD replacement process. Now that your computer is safely powered down and disconnected, you can move on to the next step: opening the Dell XPS 27 All-In-One PC.
Step 4: Opening the Dell XPS 27 All-In-One PC
Now that you’ve safely shut down and disconnected your Dell XPS 27 All-In-One PC, it’s time to open it up and gain access to the internal components. Keep in mind that opening up your computer may void the warranty, so proceed with caution. Follow these steps to open your Dell XPS 27 All-In-One PC:
- Place the computer face-down: Carefully lay your Dell XPS 27 All-In-One PC face-down on a soft and clean surface.
- Locate and remove the back cover screws: Use a small Phillips-head screwdriver to remove the screws that secure the back cover of your Dell XPS 27 All-In-One PC. Keep the screws in a safe place for later use.
- Remove the back cover: Gently lift the back cover of your Dell XPS 27 All-In-One PC to expose the internal components. Be mindful of any attached cables and connectors.
- Set the back cover aside: Place the removed back cover away from your workspace to ensure it does not get damaged during the SSD replacement process.
- Take note of the internal components: Take a moment to familiarize yourself with the internal components of your Dell XPS 27 All-In-One PC. Locate the current solid state drive (SSD) and identify how it is connected.
By following these steps, you’ve successfully opened up your Dell XPS 27 All-In-One PC and gained access to the internal components. Take your time to observe the layout and components before proceeding to the next steps. As you navigate through the SSD replacement process, make sure to handle the computer and its components with care to avoid any accidental damage. Now that the Dell XPS 27 All-In-One PC is open, we can move on to the next step: locating the solid state drive (SSD).
Step 5: Locating the Solid State Drive
Now that you have opened up your Dell XPS 27 All-In-One PC, it’s time to locate the solid state drive (SSD) that you will be replacing. Finding the SSD is an important step in the process, as it will enable you to proceed with disconnecting and removing the old drive. Follow these steps to locate the SSD:
- Identify the internal layout: Take a moment to observe the internal components of your Dell XPS 27 All-In-One PC and familiarize yourself with the layout. Look for the area where the SSD is typically located.
- Refer to the user manual: If you’re unsure about the exact location of the solid state drive, consult the user manual that came with your Dell XPS 27 All-In-One PC. The manual should provide detailed information and illustrations to help you locate the SSD.
- Look for the storage bay: The SSD is typically housed in a storage bay within the computer. It is often a smaller rectangular device that may be secured with screws or other fasteners.
- Inspect the connectors: Take note of the connectors attached to the SSD. These connectors include the data cable and power cable, which link the SSD to the motherboard and provide it with power.
- Double-check with online resources: If you’re still having trouble locating the SSD, you can refer to online resources such as Dell’s support website or community forums, where other users may have shared their experiences and insights.
By following these steps, you should be able to successfully locate the solid state drive (SSD) in your Dell XPS 27 All-In-One PC. Take your time to carefully identify the SSD and familiarize yourself with its location and connectors. Once you have successfully located the SSD, you are ready to proceed with the next steps of disconnecting and removing the old drive. Now that you’ve found the SSD, let’s move on to the next step: disconnecting the cables and removing the SSD.
Step 6: Disconnecting the Cables and Removing the SSD
Now that you have located the solid state drive (SSD) in your Dell XPS 27 All-In-One PC, it’s time to disconnect the cables and remove the old SSD. Follow these steps to ensure a smooth disconnection and removal process:
- Identify the cables: Take note of the cables connected to the solid state drive (SSD). These include the data cable and power cable, which are responsible for transferring data and providing power to the SSD.
- Disconnect the data cable: Carefully unplug the data cable from the SSD by gently pulling it out. Be cautious and ensure you do not apply excessive force that could damage the connectors or the cable itself.
- Disconnect the power cable: If there is a separate power cable connected to the SSD, unplug it by gently pulling it out. Again, exercise caution to avoid any damage to the connectors or cables.
- Remove any securing screws: Some SSDs may be secured with screws or fasteners. If this is the case, use a small Phillips-head screwdriver to remove any screws that are holding the SSD in place. Keep track of the screws for later use.
- Slide out the SSD: Once the cables are disconnected and any securing screws are removed, carefully slide out the old SSD from its storage bay. Handle it with care to avoid any physical damage or electrostatic discharge.
- Set aside the old SSD: Place the removed SSD in a safe and secure location, taking care not to expose it to excessive heat, moisture, or static electricity.
By following these steps, you should be able to successfully disconnect the cables and remove the old solid state drive (SSD) from your Dell XPS 27 All-In-One PC. Take your time and be gentle in handling the connections and the SSD itself. Remember to keep track of any screws you remove, as you will likely need them when installing the new SSD. Now that the old drive is removed, it is time to move on to the next step: installing the new solid state drive.
Step 7: Installing the New Solid State Drive
Now that you’ve successfully removed the old solid state drive (SSD) from your Dell XPS 27 All-In-One PC, it’s time to install the new SSD. Follow these steps to ensure a proper installation of the new drive:
- Align the new SSD: Take the new SSD and align it with the storage bay in your Dell XPS 27 All-In-One PC. The connectors should be facing towards the appropriate ports.
- Slide in the new SSD: gently slide the new SSD into the storage bay, ensuring that it is properly seated and securely in place. Be careful not to force it in, as this could cause damage to the connectors or the drive itself.
- Secure the SSD: If there are any securing screws provided with the new SSD, use a small Phillips-head screwdriver to carefully secure it in place. Ensure that the screws are tightened enough to hold the SSD firmly, but avoid overtightening, as it can damage the connectors or the drive.
- Connect the data cable: Attach the data cable to the new SSD by gently pushing it into the appropriate connector. Ensure that it is firmly connected and properly aligned.
- Connect the power cable: If your new SSD requires a separate power cable, connect it to the drive by gently pushing it into the appropriate connector. Double-check that it is securely connected and properly aligned.
- Double-check the connections: Before proceeding, double-check that both the data cable and power cable are securely connected to the new SSD. This will ensure proper functioning without any loose connections.
By following these steps, you should be able to successfully install the new solid state drive (SSD) in your Dell XPS 27 All-In-One PC. Take your time to properly align the drive, securely fasten it, and ensure that the cable connections are tight. A properly installed SSD will allow for optimal performance and data transfer speeds. Now that the new SSD is in place, let’s move on to the next step: reconnecting the cables and closing the PC.
Step 8: Reconnecting the Cables and Closing the PC
Now that you have successfully installed the new solid state drive (SSD) in your Dell XPS 27 All-In-One PC, it’s time to reconnect the cables and close the PC. Follow these steps to ensure a proper reconnection and secure closure:
- Reconnect the data cable: Attach the data cable to the appropriate port on the motherboard of your Dell XPS 27 All-In-One PC. Ensure that it is securely plugged in and properly aligned.
- Reconnect the power cable: If you had disconnected any other power cables during the SSD replacement process, ensure that they are properly reconnected to their respective ports on the motherboard.
- Replace the back cover: Carefully align the back cover over the back of your Dell XPS 27 All-In-One PC. Gently press it down to secure it in place. Ensure that all edges are properly aligned and that there are no gaps.
- Secure the back cover screws: Using the small Phillips-head screwdriver, insert and tighten the screws that secure the back cover. Start with one corner and then move on to the remaining screws. Make sure not to overtighten them.
- Double-check the cable connections: Before moving on to the next step, double-check that all cables are securely connected and properly aligned. This includes the data cable, power cable, and any other cables that were disconnected during the process.
- Verify the closure: Inspect the back cover to ensure that it is securely closed without any gaps or misalignments. A properly closed PC will protect the internal components and ensure proper functioning.
By following these steps, you should be able to successfully reconnect the cables and close your Dell XPS 27 All-In-One PC. Take your time to ensure that all connections are properly aligned and that the back cover is securely in place. A properly closed PC helps maintain the integrity of the internal components and ensures optimal performance. Now that the PC is reconnected and closed, let’s move on to the next step: powering on and testing the new SSD.
Step 9: Powering On and Testing the New SSD
After successfully reconnecting the cables and closing your Dell XPS 27 All-In-One PC, it’s time to power it on and test the new solid state drive (SSD). Follow these steps to ensure that the SSD is functioning properly:
- Plug in the power cable: Connect the power cable of your Dell XPS 27 All-In-One PC to a power source and ensure it is securely plugged in.
- Power on the computer: Press the power button to start your PC. Watch the screen to ensure that it powers on and displays the Dell logo.
- Enter the BIOS/UEFI settings: During the boot process, you may need to enter the BIOS/UEFI settings of your Dell XPS 27 All-In-One PC. Follow the on-screen instructions or refer to the user manual to access the settings.
- Verify the new SSD: In the BIOS/UEFI settings, navigate to the section displaying storage devices. Verify that the new solid state drive (SSD) is detected and listed correctly.
- Exit the BIOS/UEFI settings: Once confirmed, exit the BIOS/UEFI settings, saving any changes if prompted.
- Boot into the operating system: Your Dell XPS 27 All-In-One PC should now boot into the operating system. Allow it to complete the boot process and check for any error messages or abnormalities.
- Test the new SSD: Open various applications and perform tasks to test the functionality of the new SSD. Check for improved performance and faster data transfer speeds compared to the previous drive.
- Verify data and file accessibility: Access your files and data to ensure that everything has been properly transferred and is easily accessible on the new SSD.
- Monitor for issues: Keep an eye on your Dell XPS 27 All-In-One PC over the next few days to ensure that the new SSD continues to function without any issues. Pay attention to any abnormal behavior, errors, or crashes.
By following these steps, you should be able to successfully power on and test the new solid state drive (SSD) in your Dell XPS 27 All-In-One PC. Take your time to verify that the SSD is detected in the BIOS/UEFI settings and that the system is functioning as expected. If you encounter any issues, refer to the user manual or seek assistance from Dell support or a professional technician. Congratulations on completing the SSD replacement process and enjoy the enhanced performance of your Dell XPS 27 All-In-One PC with the new SSD!
Conclusion
Replacing the solid state drive (SSD) in your Dell XPS 27 All-In-One PC may initially seem like a daunting task, but with the right tools, instructions, and careful execution, it is manageable even for those with limited technical expertise. Upgrading to a new SSD can significantly enhance the performance and speed of your computer, allowing for faster data transfer and improved overall functionality.
In this guide, we covered the step-by-step process of replacing the SSD in your Dell XPS 27 All-In-One PC, from preparing the workspace and backing up your data to opening the computer, locating the SSD, disconnecting the cables, and removing the old drive. We then discussed how to install the new SSD, reconnect the cables, and properly close the PC. Finally, we covered the crucial step of powering on and testing the new SSD to ensure it is functioning optimally.
Remember, before you embark on the SSD replacement process, it is essential to take precautions to avoid damaging any components or voiding the warranty. If you are uncertain or uncomfortable with performing the replacement yourself, it is always advisable to seek the assistance of a professional technician or consult Dell support.
By successfully replacing the SSD in your Dell XPS 27 All-In-One PC, you can enjoy the benefits of improved performance, faster boot times, and enhanced data storage capabilities. Make sure to keep regular backups of your data and monitor the functionality of the new SSD to ensure continued reliability and satisfaction with your upgraded computer.
We hope this guide has provided you with the necessary information and guidance to confidently replace the solid state drive in your Dell XPS 27 All-In-One PC. Good luck with your SSD replacement journey, and enjoy the improved performance and efficiency of your computer!