Introduction
Google Photos is a feature-rich platform that allows users to store and organize their photos and videos. With its seamless integration across devices, many users rely on Google Photos to keep their precious memories safe. However, there may be instances when you have hidden photos that you want to retrieve or access. These hidden photos might be images that you’ve mistakenly hidden, or ones that are stored in specific albums or folders.
In this article, we’ll explore various methods to help you find hidden Google Photos. Whether you’re using Google Drive, the Google Photos app on Android, the Google Photos website, or even third-party apps, there are ways to uncover those hidden gems. By following the steps outlined in this guide, you’ll be able to rediscover your hidden photos and make them visible once again.
Before we dive into the different methods, it’s important to note that Google Photos continuously evolves, and certain features may vary based on device, operating system, or updates. Therefore, the steps provided in this article are based on the latest available information but may be subject to change. It’s always recommended to ensure you have the latest version of the Google Photos app or software for the most accurate results.
Method 1: Using Google Drive
Google Drive is closely integrated with Google Photos, and using this method allows you to access and manage your hidden photos effectively. Here’s how:
- Open Google Drive on your computer or mobile device.
- Click on the menu icon (three horizontal lines) in the top-left corner to reveal the navigation panel.
- Scroll down and click on “Google Photos”. If you don’t see this option, click on “More” to expand the menu.
- You will now see a list of all your Google Photos albums and folders. Hidden photos are usually stored in specific albums or folders, so make sure to check each one.
- Click on the album or folder where you suspect the hidden photo might be located.
- Browse through the photos and look for the one you want to unhide.
- Once you’ve found the hidden photo, right-click on it and select the “Move to” option.
- Choose a destination album or folder where you want to move the photo to make it visible again.
- The photo is now unhidden and will appear in the chosen album or folder.
Using Google Drive is an efficient way to find and unhide hidden photos in Google Photos. It allows you to manage and organize your photos across devices seamlessly. Whether you’re using a computer or a mobile device, following these steps will enable you to locate and bring back those hidden memories.
Method 2: Using Google Photos App on Android
If you primarily use Google Photos on your Android device, there’s a simple method to find and unhide hidden photos directly within the app. Here’s how:
- Open the Google Photos app on your Android device.
- Tap on the menu icon (three horizontal lines) in the top-left corner to open the side navigation panel.
- Scroll down and tap on “Archive” from the options.
- You will now see a list of all the photos and videos you have archived.
- Browse through the archived items and look for the hidden photo you want to unhide.
- Once you’ve found the hidden photo, long-press on it to select it.
- Tap on the three-dot menu icon at the top right corner of the screen.
- In the options menu, select “Unarchive” to bring the photo back to the main view.
- The photo is now unhidden and will appear in the main Google Photos view, along with other non-hidden photos.
The Google Photos app on Android provides a straightforward way to access and unhide hidden photos. By using the Archive feature, you can find and retrieve any photos that you may have hidden along the way. Keep in mind that archived photos can also be accessed on other devices, including the Google Photos website or the iOS app, providing you with a seamless experience across platforms.
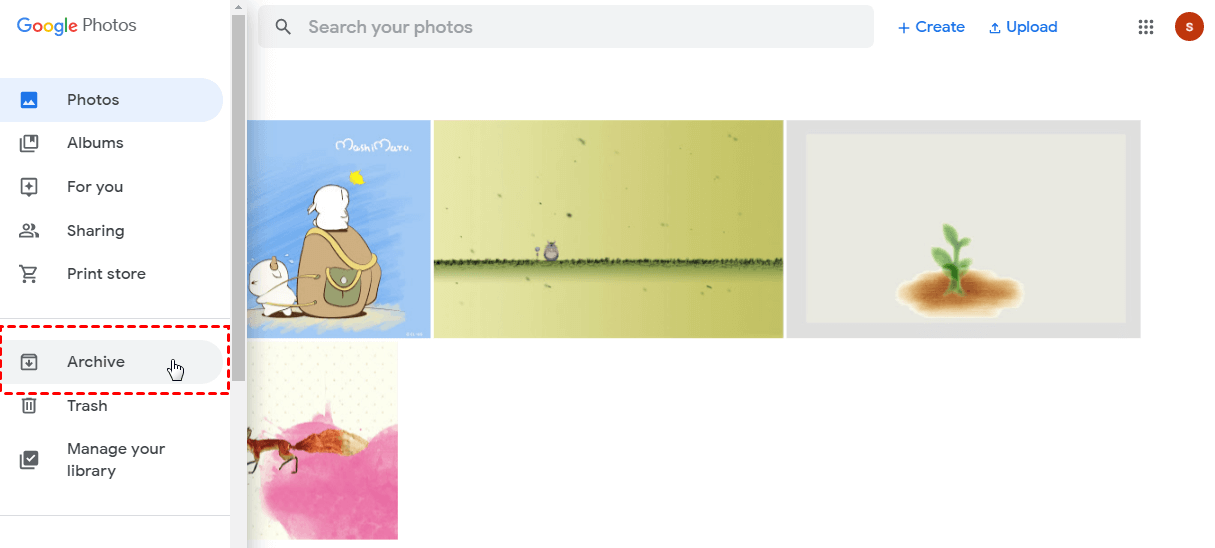
Method 3: Using Google Photos Website
If you prefer to access Google Photos on your computer or laptop, using the Google Photos website is a convenient way to find and unhide hidden photos. Here’s how:
- Open a web browser on your computer and go to the Google Photos website (photos.google.com).
- Sign in to your Google account if you haven’t already.
- In the left sidebar, click on “Albums” to view all your albums and folders.
- Scroll through the list and look for any specific album or folder where you suspect the hidden photo might be stored.
- Click on the album or folder to open it.
- Browse through the photos and locate the hidden photo you want to unhide.
- Click on the three-dot menu icon at the top right corner of the photo.
- In the options that appear, click on “Move to archive” to unhide the photo and make it visible.
- The photo will now be moved from the hidden state and will appear in the album or folder along with your other non-hidden photos.
By accessing Google Photos through the website, you have full control over your hidden photos. You can easily navigate through albums and folders to locate the specific photo you want to unhide. The Google Photos website offers a user-friendly interface that allows for efficient management and organization of your photos, ensuring you never miss out on those hidden memories.
Method 4: Using Google Photos Archive Feature
The Google Photos Archive feature provides a dedicated space to temporarily hide photos without completely removing them from your library. By using this feature, you can easily organize your photos and keep certain ones hidden from view. Here’s how to use the Archive feature to find and unhide hidden photos:
- Open the Google Photos app on your device.
- Browse through your photo library and find the photo you want to hide.
- Tap and hold on the photo to select it.
- In the menu that appears at the top of the screen, tap on the Archive icon (a box with an arrow pointing down into it).
- The photo will now be moved to the Archive section, where it will remain hidden from the main view.
- To unhide the photo, tap on the Library tab at the bottom of the screen.
- In the top-left corner of the screen, tap on the Archive icon (a box with an arrow pointing up from it).
- You will now see a list of all the photos and videos you have archived.
- Browse through the archived items and find the hidden photo you want to unhide.
- Tap and hold on the photo to select it.
- In the menu that appears at the top of the screen, tap on the Archive icon again to remove the photo from the Archive section.
- The photo is now unhidden and will reappear in your main photo library.
The Google Photos Archive feature provides a convenient way to temporarily hide photos without permanently deleting them. By using this method, you can easily find and unhide hidden photos whenever you wish. It’s a useful tool for organizing and managing your photo collection, ensuring that you have full control over which photos are visible and which ones are not.
Method 5: Using Third-Party Apps
In addition to the built-in features of Google Photos, there are also third-party apps available that can help you find and unhide hidden photos. These apps often provide additional functionalities and customization options for managing your photo library. Here’s how you can use third-party apps to uncover your hidden Google Photos:
- Search for and download a reputable third-party photo management app from your device’s app store.
- Install and open the app on your device.
- Follow the app’s instructions to grant it access to your Google Photos library.
- Once you have successfully connected your Google Photos account to the app, browse through the available options and menus.
- Look for a specific feature or setting that allows you to view hidden photos or albums.
- Once you have located the hidden photos, you may have the option to unhide them within the app or export them back to your Google Photos library.
- Explore the app’s additional features, such as advanced organization tools, editing capabilities, or additional cloud storage options.
Using third-party apps can provide an alternative and customizable solution for finding and managing hidden Google Photos. These apps often offer unique features and a different user interface, allowing you to tailor your photo management experience to your preferences. However, it’s important to choose apps from reputable sources and review their permissions and privacy policies before granting access to your photos and personal information.
Conclusion
Google Photos is a powerful platform for storing and organizing your photos, but sometimes you may have hidden photos that you want to find and unhide. Whether they were accidentally hidden, stored in specific albums or folders, or hidden using the Archive feature, there are several methods to locate and bring back these hidden gems.
In this article, we explored five different methods to help you uncover hidden Google Photos. From using Google Drive and the Google Photos app on Android to accessing the Google Photos website and utilizing the Archive feature, each method offers its own benefits and ease of use. Additionally, we discussed the option of using third-party apps, which provide additional functionalities for managing and organizing your photo library.
Remember, Google Photos is continuously evolving, and features may vary based on updates and device compatibility. It’s always a good idea to ensure you have the latest version of the app or software to access the most updated features and options.
By following the methods outlined in this article, you can regain access to your hidden Google Photos and bring them back to the forefront of your collection. Whether you’re using a computer, Android device, or third-party app, you have the power to manage and organize your photos to create a personalized and memorable experience.
So go ahead and start uncovering those hidden Google Photos and relive those special moments that deserve to be seen and enjoyed!