Introduction
With the advent of digital photography, we now have the luxury of capturing countless moments with just a tap of our smartphones. However, this convenience also comes with the challenge of managing and organizing our ever-growing photo collections. This is where Google Photos comes to the rescue, offering a robust platform for storing, sharing, and organizing our precious memories.
One of the handy features provided by Google Photos is the ability to archive photos. This feature allows users to declutter their main photo library by moving selected images to a separate, hidden folder. In this article, we will explore what archive is, how to use it effectively, and the benefits it brings.
Whether it’s old screenshots, duplicate images, or photos that you simply don’t want to see in your main gallery, archiving them in Google Photos can help keep your photo library clean and organized. By archiving, these photos are hidden from the main view, but still accessible whenever you need them.
So, let’s delve into the world of archiving in Google Photos and discover how it can simplify the way you manage your photos.
What is Archive Google Photos?
Google Photos is a versatile platform that offers a range of features to help you organize and manage your photo collection. Among these features is the ability to archive photos. But what exactly does archiving mean in Google Photos?
Archiving photos in Google Photos is like putting them in a hidden folder. When you archive a photo, it no longer appears in your main photo gallery, but it still remains on your account and can be accessed whenever you want. Essentially, it allows you to declutter your gallery without deleting any pictures permanently.
Archiving is particularly useful for photos that you don’t want to see in your main feed, such as screenshots, receipts, or duplicates. Instead of scrolling through numerous images to find the ones that matter to you, you can archive the less important ones and focus on the ones that hold sentimental value.
Archiving is also a great way to keep your photo library organized. You can think of it as a filing cabinet where you store photos that you want to keep but don’t necessarily want to showcase in your main gallery.
It’s important to note that archiving a photo doesn’t affect its quality or resolution. The archived photos retain their original properties, ensuring that you can access them in their full glory whenever needed.
Google Photos provides a seamless and intuitive way to archive photos, making it easy for users to keep their photo collections tidy and manageable. In the next section, we will explore how to effectively archive photos in Google Photos.
How to Archive Photos in Google Photos
Archiving photos in Google Photos is a simple and straightforward process. Here’s a step-by-step guide to help you get started:
- Open the Google Photos app on your smartphone or access it through the web browser on your computer.
- Select the photo(s) you want to archive. You can do this by long-pressing on a photo or selecting multiple photos by tapping on the thumbnail of each photo.
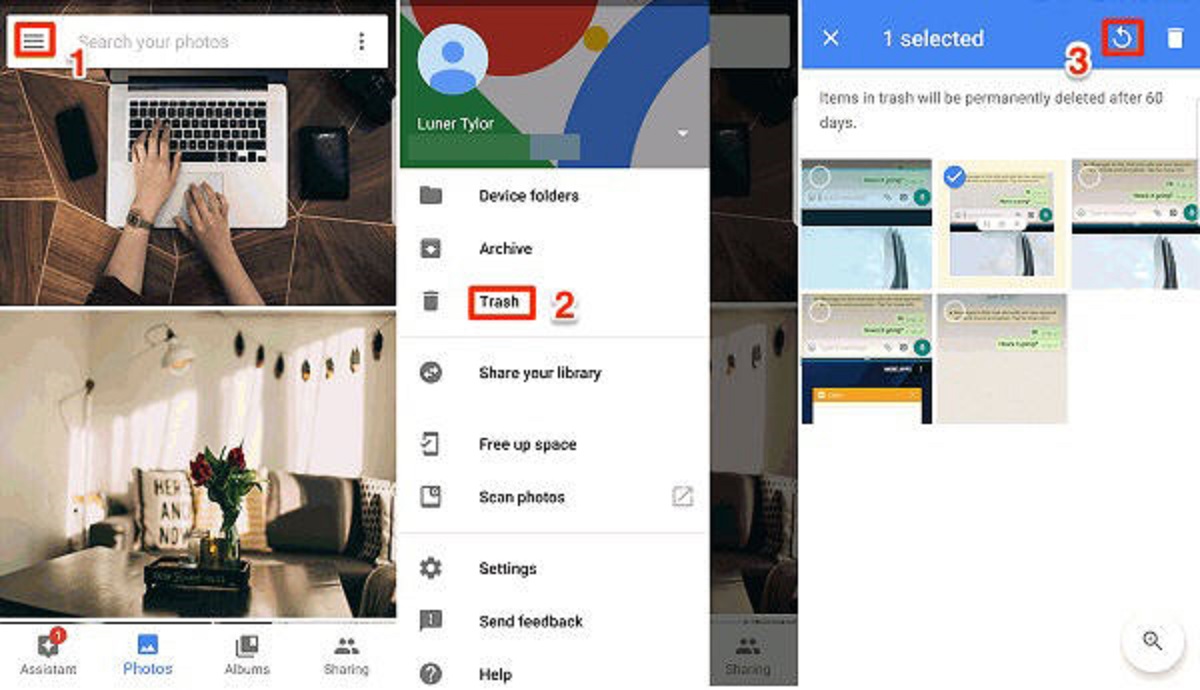
- Once you have selected the photo(s), tap on the three-dot menu icon located in the top-right corner of the screen.
- From the menu that appears, select the “Archive” option.
- The selected photo(s) will now be archived and will no longer appear in your main photo gallery.
That’s it! Your photos are now safely tucked away in the archive folder. You can access them whenever you want, but they won’t clutter your main photo feed.
If you want to view your archived photos, simply scroll down to the bottom of the main gallery screen and tap on the “Archive” option. This will take you to a separate folder where all your archived photos are stored.
It’s worth noting that archived photos can still be edited, shared, or deleted like any other photo in your Google Photos library. They are just hidden from the main view to provide a more streamlined experience.
By archiving photos, you can organize your Google Photos library and easily locate the photos that matter most to you. Now that you know how to archive photos, let’s explore the benefits of using this feature.
Benefits of Archiving Photos
Archiving photos in Google Photos offers several benefits that can greatly enhance your photo management experience. Let’s take a look at some of the key advantages:
- Organizational Efficiency: Archiving helps you declutter your main photo gallery by removing less important or temporary photos from the view. This allows you to focus on the photos that hold sentimental value or are most relevant to you.
- Streamlined Viewing Experience: With archived photos hidden from the main gallery, you can easily navigate through your collection and find the photos you want without distractions. This saves time and makes it easier to locate specific memories.
- Privacy and Presentation: Archiving photos provides a level of privacy. It allows you to keep certain photos hidden from others while still retaining access to them. Additionally, when showcasing your photo collection to others, you can present a curated selection of photos without unwanted clutter.
- Peace of Mind: Archiving photos ensures that important photos are securely stored while decluttering your main gallery. This reduces the risk of accidentally deleting or losing treasured memories.
- Flexible Editing and Sharing: Even when photos are archived, you can still edit them or share them with others. This allows you to make adjustments or enhancements to your archived photos while maintaining their accessibility.
Whether it’s for personal organization or a more streamlined viewing experience, archiving photos in Google Photos provides numerous benefits. It’s a handy feature that empowers users to have more control over their photo collection and effectively manage their memories.
Now that we’ve explored the benefits of archiving photos, let’s find out how to access and manage your archived photos in Google Photos.
How to Access Archived Photos in Google Photos
Accessing your archived photos in Google Photos is as easy as a few simple steps. Here’s how:
- Open the Google Photos app on your smartphone or access it through the web browser on your computer.
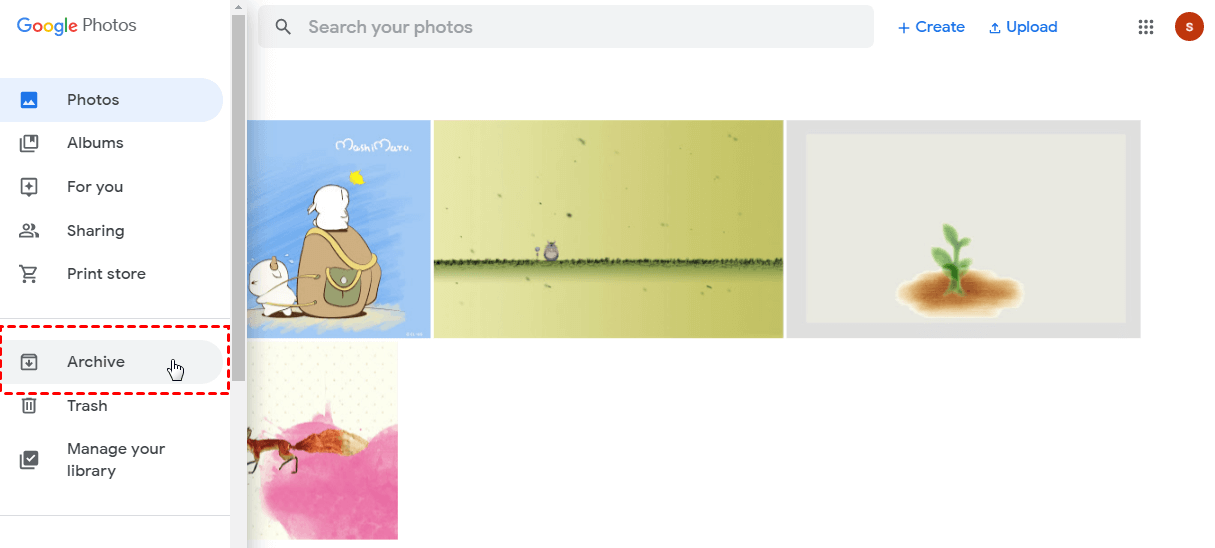
- Scroll down on the main gallery screen until you reach the bottom. You will see a section called “Archive.”
- Tap on the “Archive” section to enter the archive folder.
- Inside the archive folder, you will find all your archived photos neatly organized.
Once you’re in the archive folder, you can view, edit, share, or delete your archived photos just like any other photo in your Google Photos library. They are fully accessible, giving you the flexibility to manage them according to your preferences.
It’s important to note that accessing archived photos is just as intuitive on desktop as it is on mobile devices. Simply navigate to the “Archive” section on the left-hand side of the Google Photos interface to access your archived photos.
If you decide that you want to bring a photo back to your main gallery, simply select the photo from the archive folder, tap on the three-dot menu icon, and choose the “Unarchive” option. The photo will then be returned to your main photo feed.
By knowing how to access your archived photos, you have full control over your photo collection and can effortlessly manage and organize your memories with ease.
Now that we have covered how to access archived photos, let’s explore how you can effectively manage and organize your archived photos in Google Photos.
Managing and Organizing Archived Photos
While archiving photos in Google Photos helps keep your main gallery clutter-free, it’s essential to have a systematic approach to manage and organize your archived photos effectively. Here are some tips to help you in this process:
- Tagging and Labeling: To easily locate specific archived photos, consider using tags or labels. You can add relevant keywords or labels to each photo to categorize them based on events, locations, or people. This makes it simpler to search for specific photos within your archive.
- Create Albums: Another way to organize your archived photos is by creating albums. Group similar photos together based on themes, trips, or occasions. This allows for easy navigation and quick access to specific groups of photos.
- Sorting by Date: If you prefer to organize your archived photos chronologically, you can sort them based on the date they were taken. This helps maintain a sense of the timeline and makes it easier to locate photos from specific time periods.
- Regular Review: Set aside time to review and declutter your archive from time to time. As your photo collection grows, there may be photos that are no longer important or relevant to keep archived. Regularly reassessing your archived photos helps streamline your collection and frees up storage space.
- Backup and Sync: Ensure that your archived photos are securely backed up and synchronized across your devices. Google Photos offers automatic backup and sync options, allowing you to access your archived photos from any device with an internet connection.
- Utilize Search Functionality: Google Photos provides powerful search capabilities. Take advantage of the search bar to find specific photos within your archive based on people, objects, or locations. This saves time and makes it easier to locate specific memories.
By implementing these strategies, you can effectively manage and organize your archived photos in Google Photos. It ensures that your photo collection remains structured, easily navigable, and accessible whenever you need it.
Remember, your approach to managing and organizing archived photos may vary based on your personal preferences and needs. Find a system that works best for you and enjoy the benefits of a well-organized and easily accessible photo archive.
Conclusion
Google Photos’ archival feature offers a valuable solution for managing, organizing, and decluttering your photo collection. By archiving photos, you can keep your main gallery clean and focus on the photos that hold sentimental value or are most relevant to you. Additionally, archived photos remain easily accessible whenever you need them.
In this article, we explored the concept of archiving photos in Google Photos and learned how to effectively use this feature. We discussed the benefits of archiving, including organizational efficiency, streamlined viewing experience, privacy, peace of mind, and flexible editing and sharing options.
We also provided a step-by-step guide on how to archive photos, access archived photos, and manage them in an organized manner. By utilizing techniques such as tagging, creating albums, sorting by date, regular review, backup, sync, and utilizing the search functionality, you can optimize your archived photo collection.
Whether you’re looking to declutter your photo library, prioritize important photos, or simply keep your memories organized, archiving in Google Photos is a valuable tool. Take advantage of this feature, and enjoy a more streamlined and efficient photo management experience.
Start archiving your photos in Google Photos today and discover how this simple yet powerful feature can revolutionize the way you manage and cherish your precious memories.