Introduction
Factory resetting a gaming laptop can be a necessary step in troubleshooting various issues or restoring it to its original state. Whether you’re experiencing performance issues, system errors, or simply want to start fresh, a factory reset can help resolve these issues and optimize your gaming experience.
When you factory reset a gaming laptop, it erases all data and settings, returning it to its default configuration. However, it’s important to note that this process removes all installed programs, personal files, and data, so it’s crucial to back up any important data before proceeding.
In this article, we will guide you through the process of factory resetting a gaming laptop, ensuring that you have all the necessary information and steps to perform a successful reset. We will also provide some tips and precautions to help you avoid any complications during the process.
So, if you’re ready to give your gaming laptop a fresh start and resolve any persistent issues, let’s dive in and learn how to factory reset your gaming laptop!
Backup Your Data
Before proceeding with a factory reset, it’s crucial to back up your important data to ensure that you don’t lose any valuable files or information. This includes documents, photos, videos, game saves, and any other files that you want to keep.
There are several methods you can use to back up your data:
- External Hard Drive or SSD: Connect an external storage device to your gaming laptop and manually copy and paste your files onto it. This method allows for easy transfer of files and ensures that you have a physical backup.
- Cloud Storage Services: Utilize cloud storage services like Google Drive, Dropbox, or OneDrive to upload and store your files online. This option provides accessibility to your files from any device with an internet connection.
- Network Attached Storage (NAS): If you have a NAS device, you can back up your files onto it, providing centralized storage for all your devices connected to the same network.
Remember to double-check that you have copied all the necessary files and folders before proceeding with the factory reset. It’s better to be safe than sorry!
Once you have successfully backed up your data, you can proceed to the next step of factory resetting your gaming laptop.
Disconnect Any External Devices
Prior to initiating the factory reset process on your gaming laptop, it is important to disconnect any external devices that are connected to it. This step ensures a smooth and uninterrupted reset, avoiding any potential conflicts or issues that may arise from external devices.
Here are some external devices that you should disconnect before proceeding:
- USB Devices: Remove any USB drives, external hard drives, wireless dongles, or other USB devices connected to your gaming laptop.
- External Monitors: If you have an external monitor connected to your gaming laptop, unplug the cable or switch the display to the laptop’s built-in screen.
- Printers and Scanners: Disconnect any printers, scanners, or other peripherals that are connected to your gaming laptop.
- External Speakers or Headphones: Unplug any external speakers or headphones that are connected to your gaming laptop.
- Game Controllers: If you have any game controllers connected to your gaming laptop, disconnect them to avoid any interference during the reset process.
By disconnecting these external devices, you minimize the risk of encountering compatibility issues or potential data loss during the factory reset. It also ensures a smoother reset process without any interruptions or errors caused by these external devices.
Once you have disconnected all the external devices, you are ready to proceed to the next step of accessing the recovery menu on your gaming laptop.
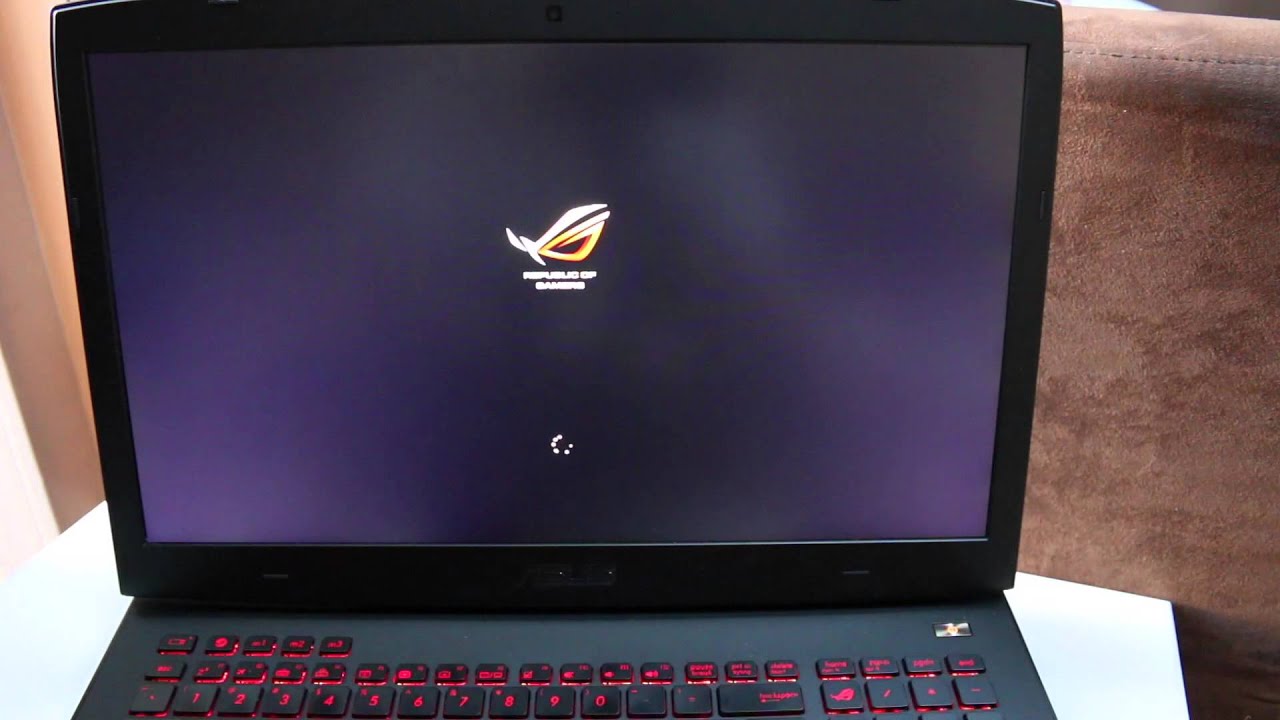
Access the Recovery Menu
In order to initiate the factory reset process on your gaming laptop, you need to access the recovery menu. The exact method of accessing this menu may vary depending on the make and model of your laptop, but here are some common ways to do it:
1. Using the Operating System: On Windows laptops, you can usually access the recovery menu by going to the “Settings” menu, selecting “Update & Security,” and then navigating to the “Recovery” tab. From there, you can choose the option to “Reset this PC” and follow the on-screen instructions.
2. Using Function Keys: Some laptops have a dedicated function key (e.g., F11, F12) that can be used to access the recovery menu. Restart your laptop and press the designated function key repeatedly until the recovery menu appears.
3. Using a Bootable USB Drive: If your gaming laptop did not come with a built-in recovery partition, you may need to create a bootable USB drive with the recovery files. Insert the USB drive, restart your laptop, and access the boot options by pressing the boot menu key (e.g., F2, F10, Esc) during startup. Choose the USB drive as the boot device and follow the prompts to access the recovery menu.
4. Refer to the User Manual: If you’re unsure about the specific method to access the recovery menu on your gaming laptop, consult the user manual or visit the manufacturer’s website for detailed instructions.
Once you have successfully accessed the recovery menu, you are ready to proceed with the factory reset process. The next section will guide you through choosing the reset option.
Choose the Reset Option
After accessing the recovery menu on your gaming laptop, it’s time to choose the reset option that will initiate the factory reset process. Depending on your laptop’s manufacturer and the options available in the recovery menu, you may have different choices to select from.
Here are some common reset options you may come across:
1. Reset to Factory Settings: This option will erase all data and settings on your gaming laptop, returning it to its original factory configuration. It will remove all installed programs, personal files, and data, so make sure you have backed up everything you need before proceeding.
2. Reset with Data Backup: Some laptops offer a reset option that allows you to keep your personal files while removing installed programs and settings. This option can be useful if you want to start fresh without losing your important documents, photos, or videos. However, it is still recommended to back up your data before choosing this option, as there is still a possibility of data loss during the reset process.
3. Advanced Reset Options: Depending on your laptop’s manufacturer, there may be additional advanced reset options available. These can include options for refreshing the operating system, reinstalling Windows, or troubleshooting specific issues. These advanced options may vary, so make sure to carefully read the descriptions and select the appropriate option for your needs.
Select the reset option that aligns with your requirements and follow the on-screen instructions to confirm your choice. It’s essential to understand that once the factory reset process begins, it cannot be undone, so ensure that you have selected the correct option before proceeding.
Once you have chosen the reset option, the next step will walk you through confirming the factory reset.
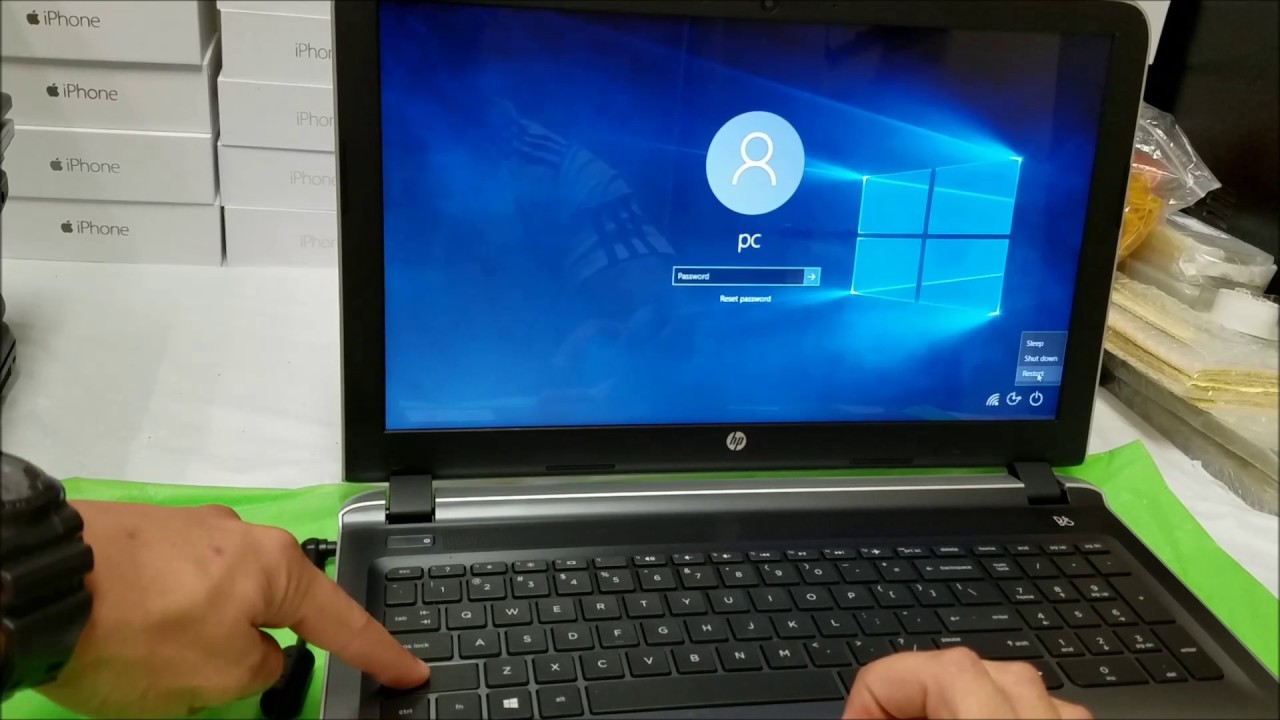
Confirm the Factory Reset
After selecting the reset option in the recovery menu, the next step is to confirm the factory reset. This confirmation step is crucial, as it ensures that you are intentionally initiating the process and are aware of the consequences.
Before proceeding with the confirmation, it’s important to note that the factory reset will erase all data and settings on your gaming laptop, returning it to its original factory state. This means that all installed programs, personal files, and data will be permanently deleted. Double-check that you have backed up any essential files and have copied any necessary information before confirming the factory reset.
Once you are ready to proceed, carefully read the confirmation message or prompt displayed on the screen. It will typically provide a summary of the actions that will be taken during the factory reset process. Some prompts may also include options to retain certain files or choose additional settings.
If you are certain that you want to proceed with the factory reset, confirm your choice by following the on-screen instructions. This may involve clicking a button, entering a password or PIN, or selecting “Yes” from a list of options. Keep in mind that the exact method of confirmation may vary depending on your laptop’s manufacturer and the specific recovery menu.
After confirming the factory reset, be patient as the process begins. Depending on the speed and configuration of your gaming laptop, the reset process can take some time to complete. Avoid interrupting the process or turning off your laptop during this time, as it may lead to data corruption or other issues.
Once the factory reset is confirmed, the next section will guide you on what to do while you wait for the reset process to complete.
Wait for the Process to Complete
After confirming the factory reset on your gaming laptop, it’s time to exercise patience and wait for the reset process to complete. The duration of the reset process can vary depending on the speed of your laptop and the amount of data being erased.
During this waiting period, it’s important to avoid interrupting the process or turning off your gaming laptop. Doing so can result in incomplete or corrupted data, leading to potential issues with the operating system and other components.
While you wait, here are a few things you can do:
- Find an alternate device: Since your gaming laptop will be temporarily inaccessible, use this time to work, play games, or browse the internet on another device.
- Catch up on other tasks: Take advantage of the reset process to attend to other pending tasks or activities that require your attention.
- Take a break: Use this opportunity to relax, take a walk, or engage in activities that help you unwind while patiently waiting for the reset process to complete.
Make sure to periodically check on the progress of the reset process by glancing at your gaming laptop’s screen. Some laptops may display a progress bar or provide status updates to give you an idea of how much time is remaining.
Once the reset process is complete, your gaming laptop will restart, and you will be greeted with a clean, freshly reset system. The next section will guide you on setting up your gaming laptop again.
Set Up Your Gaming Laptop Again
After the factory reset process is complete, it’s time to set up your gaming laptop again to personalize your settings and get it ready for use. Here are the essential steps to follow:
1. Language and Region: Choose your preferred language and region settings for your gaming laptop. This will determine the system language and date/time format.
2. Internet Connection: Connect your gaming laptop to a Wi-Fi network or use an Ethernet cable to establish an internet connection. This is crucial for downloading updates and installing necessary drivers.
3. Windows Updates: Check for and install any available Windows updates. This helps ensure that your operating system is up to date with the latest security patches and improvements.
4. Driver Updates: Visit the manufacturer’s website or use the device manager to update drivers for your gaming laptop’s components, such as the graphics card, sound card, and network adapter. Updated drivers optimize performance and compatibility.
5. Install Necessary Software: Install any essential software programs or applications that you regularly use for gaming, work, or entertainment. This includes web browsers, antivirus software, productivity tools, and any gaming platforms or clients.
6. Restore Backed-up Data: If you previously backed up your data, restore it back onto your gaming laptop. This includes documents, photos, videos, and game saves. Ensure that everything is in its proper place and accessible.
7. Reinstall Games and Programs: Reinstall any games or programs that you had installed before the factory reset. You may need to redownload them from their respective platforms or use installation files if you have them saved.
8. Personalize Settings: Customize your gaming laptop’s settings to your preferences. Adjust display options, power settings, sound settings, and any other settings that enhance your gaming experience.
Take your time to go through these steps, ensuring that everything is properly set up and configured. This will help you tailor your gaming laptop to your specific needs and preferences, creating an environment that is conducive to an enjoyable gaming experience.
Conclusion
Factory resetting a gaming laptop can be a useful solution when faced with performance issues, system errors, or the desire for a clean slate. By following the steps outlined in this guide, you can successfully perform a factory reset on your gaming laptop.
Remember to back up your data before proceeding with the reset process to prevent any potential loss. Disconnecting external devices and accessing the recovery menu are important initial steps to ensure a smooth reset. Choosing the appropriate reset option and confirming the factory reset are crucial stages that require careful consideration.
Waiting patiently for the reset process to complete allows for the effective restoration of your gaming laptop to its factory settings. After the process is finished, you can set up your gaming laptop again, personalizing it to meet your specific requirements.
By following these steps, you can resolve persistent issues, optimize performance, and get a fresh start with your gaming laptop. Remember to take your time during the setup process and customize the settings to enhance your gaming experience.
We hope that this guide has been helpful to you in understanding the process of factory resetting a gaming laptop. By resetting your gaming laptop, you can ensure that it runs smoothly, providing you with the best gaming experience possible.