Introduction
Welcome to this guide on how to erase an external hard drive on a Mac! Whether you’re looking to sell or donate your external hard drive, securely erasing it is an essential step to protect your sensitive data from falling into the wrong hands. Additionally, by erasing your external hard drive, you can free up storage space and ensure that all of your previous files are permanently removed.
Erasing an external hard drive may seem like a daunting task, but fear not! With the step-by-step instructions provided in this article, you’ll be able to navigate through the process with ease. Before we jump into the details, please note that erasing an external hard drive will permanently delete all the data stored on it. Therefore, it’s crucial to back up any important files or documents that you want to keep on a separate storage device before proceeding.
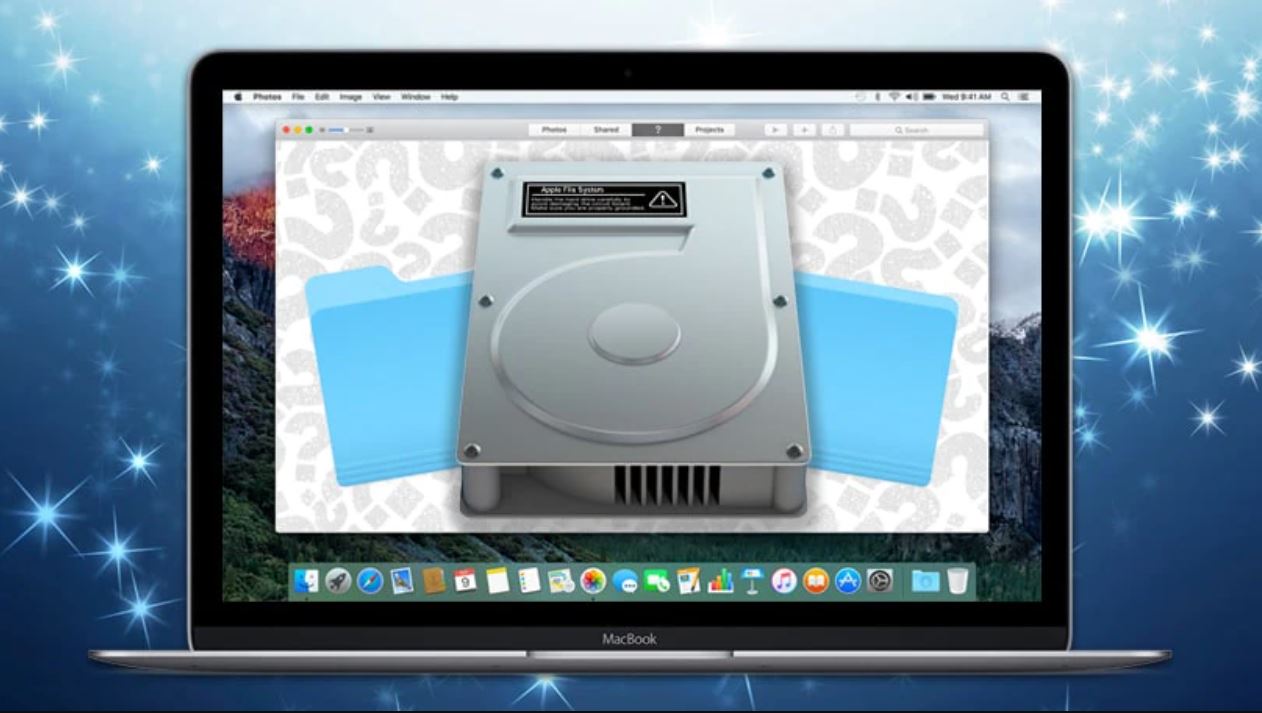
In this guide, you’ll learn how to erase an external hard drive using the built-in Disk Utility tool on your Mac. Disk Utility is a powerful utility that allows you to manage your storage devices, format drives, and perform various disk operations.
Let’s dive into the step-by-step process of safely erasing an external hard drive on your Mac. By following these instructions, you’ll be able to ensure the complete removal of your data while optimizing your external hard drive for future use.
Step 1: Back Up Your Data
The first and most crucial step before erasing your external hard drive is to back up all the data you want to keep. This ensures that you don’t lose any important files during the erasure process. Backing up your data can be done in a few different ways:
- Using Time Machine: If you have Time Machine set up on your Mac, you can easily create a backup of your external hard drive by connecting it to your Mac and letting Time Machine automatically perform a backup. This way, you’ll have a complete copy of your external hard drive’s contents.
- Manually copying files: If you prefer a more manual approach, you can simply copy the files from your external hard drive to another storage device, such as your Mac’s internal hard drive, another external hard drive, or even cloud storage services like iCloud or Dropbox.
- Using a specialized backup software: There are various third-party backup software options available that can help you streamline the process of backing up your data. These tools often provide additional features such as scheduling backups or creating bootable clones of your external hard drive.
Regardless of the method you choose, make sure to double-check that all your important files have been successfully backed up before proceeding to the next step. This step is crucial because once you erase your external hard drive, all the data on it will be permanently deleted.
By safely backing up your data, you give yourself peace of mind, knowing that even if something goes wrong during the erasure process, you won’t lose any important files. Now that you have your data safely backed up, you’re ready to move on to the next step of erasing your external hard drive.
Step 2: Disconnect the External Hard Drive
Before you can proceed with erasing your external hard drive, it’s essential to disconnect it properly from your Mac. This ensures that there are no active connections or processes running, which could interfere with the erasure process.
Here’s how you can disconnect your external hard drive:
- Save and close any open files: If you have any files or documents open that are stored on your external hard drive, make sure to save and close them before proceeding. This ensures that all changes are correctly saved and that you don’t risk losing any unsaved data.
- Eject the external hard drive: To safely disconnect your external hard drive, locate its icon on your desktop or in the Finder sidebar. Right-click on the icon and select “Eject” from the dropdown menu. Alternatively, you can also drag the icon to the Trash bin, and it will change to an eject symbol. Once the symbol appears, release the mouse button to eject the drive.
- Physically disconnect the external hard drive: Once you’ve successfully ejected the external hard drive, it’s time to physically disconnect it from your Mac. Depending on the type of connection your external hard drive uses (USB, Thunderbolt, etc.), gently unplug the cable from your Mac’s port or the external hard drive itself. Be careful not to pull the cable forcefully to avoid damaging the ports or the cable itself.
Ensure that the external hard drive is safely disconnected from your Mac before moving on to the next step. By following these steps, you prevent any potential data loss or damage to your external hard drive when erasing it in the next steps.
Step 3: Go to Disk Utility
Now that you have safely disconnected your external hard drive, it’s time to open Disk Utility, the built-in tool on your Mac that allows you to manage and format storage devices.
To access Disk Utility, follow these steps:
- Open Finder: Click on the Finder icon in your Mac’s Dock, which is typically located at the bottom of the screen. The Finder will open, displaying your files and folders.
- Go to Applications: In the left sidebar of the Finder window, click on “Applications” to access your applications folder.
- Open Utilities: In the Applications folder, locate and open the “Utilities” folder.
- Launch Disk Utility: Inside the Utilities folder, you’ll find Disk Utility. Double-click on its icon to launch the application.
Alternatively, you can also use the Spotlight search feature on your Mac to quickly search for and open Disk Utility. Simply press Command + Space to open Spotlight, type in “Disk Utility,” and press Enter to launch the application.
Once Disk Utility is open, you’ll see a list of all the storage devices connected to your Mac, including your external hard drive. Disk Utility allows you to perform various operations on your storage devices, such as erasing, formatting, and partitioning.
Now that you have accessed Disk Utility, you’re ready to proceed to the next step, where you’ll select your external hard drive and begin the erasure process.
Step 4: Select the External Hard Drive
With Disk Utility open, it’s time to select your external hard drive as the target device for erasure. By selecting the correct device, you ensure that the erasure process only affects your external hard drive and not any other storage devices connected to your Mac.
Follow these steps to select your external hard drive in Disk Utility:
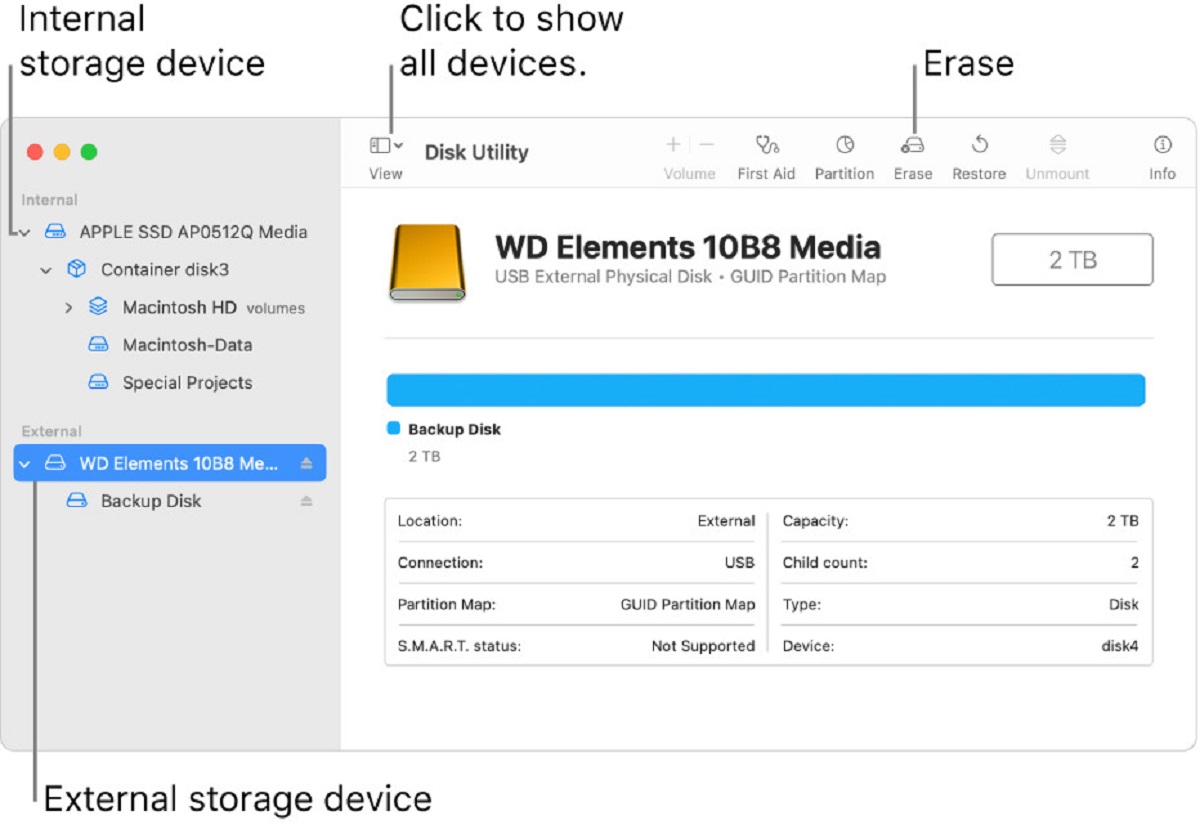
- Locate your external hard drive: In the Disk Utility window, you’ll see a sidebar on the left-hand side that displays a list of all the storage devices connected to your Mac. Look for the name or label that corresponds to your external hard drive, and click on it to select it.
- Verify the selected device: Double-check that you have indeed selected the correct external hard drive. It’s important to ensure that you don’t accidentally erase the wrong device, as this would result in permanent data loss.
Once you have selected the correct external hard drive in Disk Utility, you’re now ready to move on to the next step, where you’ll begin the erasure process. It’s crucial to double-check your selection to avoid any unwanted consequences.
Step 5: Erase the External Hard Drive
Now that you have selected your external hard drive in Disk Utility, it’s time to proceed with the erasure process. This step will ensure that all the data on your external hard drive is permanently deleted, making it ready for reuse or disposal.
Follow these steps to erase your external hard drive:
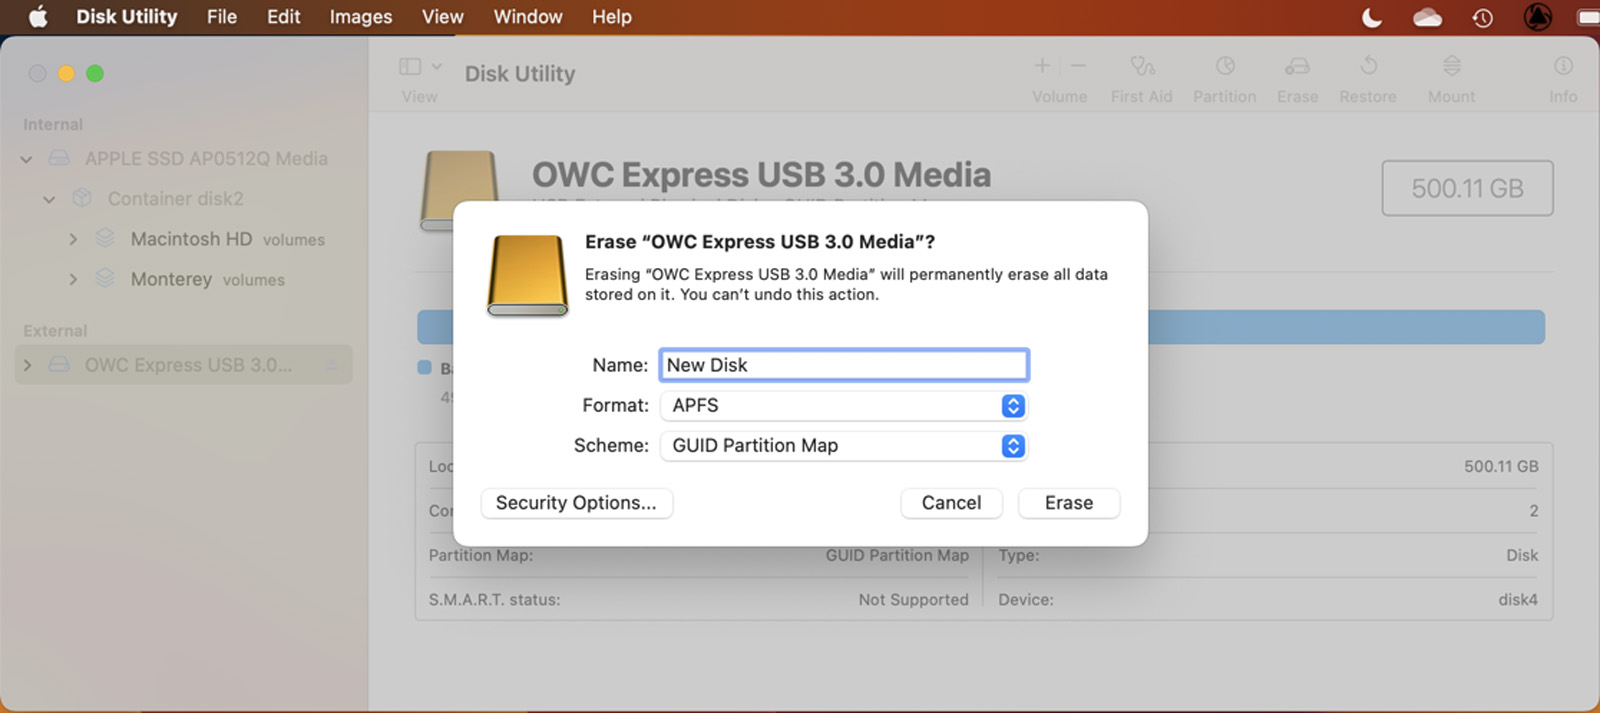
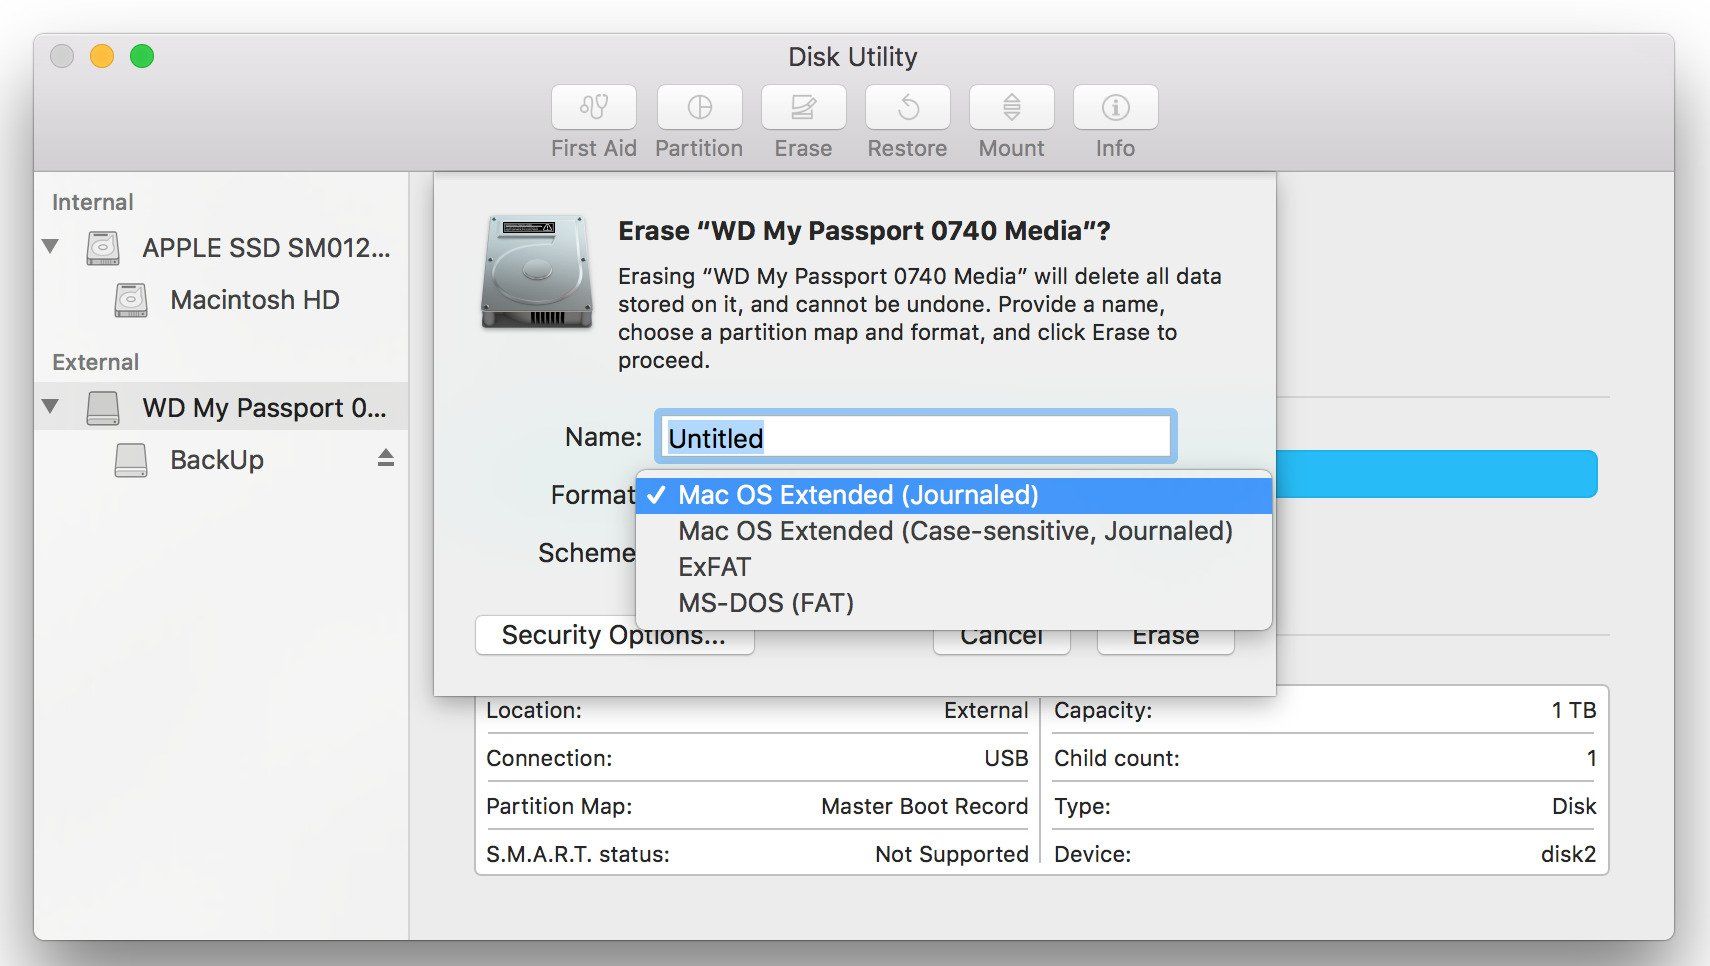
- Click on the “Erase” button: In the top toolbar of Disk Utility, you’ll find a button labeled “Erase.” Click on this button to open the erase options.
- Provide a name for your external hard drive: In the erase options dialog box, you’ll be prompted to enter a name for your external hard drive. Choose a descriptive and relevant name that will help you identify the drive in the future if needed.
- Select a format: You will also need to choose a format for your external hard drive. The most common format for Macs is “Mac OS Extended (Journaled).” This format is compatible with both macOS and older versions of macOS.
- Choose a scheme (if applicable): If your external hard drive is larger than 2TB, you may be prompted to select a partition scheme. The recommended scheme for Intel-based Macs is “GUID Partition Map.”
- Review the erase options: Double-check that all the erase options are set as desired. Make sure the correct external hard drive is selected, the name and format are correct, and the partition scheme is appropriate, if applicable.
- Click on the “Erase” button: Once you have reviewed the erase options and verified that everything is set up correctly, click on the “Erase” button to begin the erasure process.
Keep in mind that once you click the “Erase” button, all the data on your external hard drive will be permanently deleted. Therefore, it’s crucial to ensure that you have backed up any important files before proceeding.
Now that you’ve successfully initiated the erasure process, it’s time to move on to the next step, where you’ll configure the erase options to suit your preferences.
Step 6: Configure the Erase Options
After initiating the erasure process in Disk Utility, you’ll have the opportunity to configure the erase options to tailor them to your specific needs. These options allow you to customize the erasure process based on your preferences and requirements.
Follow these steps to configure the erase options for your external hard drive:
- Select the security level: Disk Utility offers different security levels for erasing your external hard drive. These levels determine how thoroughly the data is overwritten. If you’re concerned about sensitive data potentially being recovered, choose a higher security level. Keep in mind that higher security levels may take longer to complete.
- Choose the number of passes: Some security levels offer the option to specify the number of passes performed during the erasure process. Each pass involves writing random data over the existing data. The more passes performed, the more secure the erasure process becomes.
- Consider using “DoD 5220.22-M” (optional): Disk Utility includes the “DoD 5220.22-M” option, which follows the data sanitization standards of the U.S. Department of Defense. Choosing this option performs several passes of random data followed by a final pass of a specific data pattern.
- Review the erase options: Double-check that the erase options are configured according to your preferences. Ensure that the security level, number of passes, and any additional options are set correctly.
Configuring the erase options allows you to find the right balance between security and time efficiency. Depending on your specific needs and the sensitivity of the data on your external hard drive, you can choose the appropriate level of security for the erasure process.
Once you have configured the erase options to your satisfaction, you’re now ready to move on to the next step, where you’ll confirm and start the erasure process.
Step 7: Confirm and Start the Erase Process
After configuring the erase options for your external hard drive in Disk Utility, it’s time to review and confirm the settings before starting the erasure process. This step ensures that you have complete control over the process and can double-check that everything is set as desired.
Follow these steps to confirm and start the erasure process:
- Review the erase options: Carefully review the erase options one more time to ensure that they are configured correctly. Check the security level, number of passes, and any additional options you have selected.
- Verify the external hard drive: Double-check that you have selected the correct external hard drive for erasure. It’s crucial to confirm this step to avoid accidentally erasing the wrong device.
- Click on the “Erase” button: Once you are confident that all the settings are correct, click the “Erase” button to confirm and start the erasure process. Disk Utility will display a warning message reminding you that all data on the external hard drive will be permanently deleted.
- Enter your administrator password: To proceed with the erasure process, you may be prompted to enter your administrator password. This is a security measure to prevent unauthorized modifications to your storage devices.
- Wait for the erasure process to complete: Once the erasure process has begun, sit back and wait for Disk Utility to complete the task. The time it takes to erase the external hard drive will depend on the size of the drive and the chosen erase options.
During the erasure process, it’s important not to disconnect or interrupt the process as it may lead to data corruption or an incomplete erasure. Ensure that your Mac remains powered on and connected to a reliable power source for the duration of the process.
Now that you have confirmed and started the erasure process, you can proceed to the next step, where you’ll need to wait for the erasure to complete before moving forward.
Step 8: Wait for the Erase to Complete
After starting the erasure process in Disk Utility, it’s time to exercise patience and wait for the process to complete. The time it takes for the erasure to finish will depend on the size of your external hard drive and the erase options you have selected.
Here’s what you need to do while waiting for the erasure to complete:
- Monitor the progress: Disk Utility will display a progress bar or a status indicator that shows the progress of the erasure. Keep an eye on this to get an idea of how much time is remaining.
- Avoid interrupting the process: It’s important not to disconnect, eject, or interrupt the external hard drive or your Mac while the erasure is in progress. Doing so may result in data corruption or an incomplete erasure. Let the process continue until it reaches completion.
- Be patient: The erasure process can take some time, especially for larger external hard drives or when using more thorough erase options. Stay patient and avoid rushing the process. It’s better to let it complete successfully rather than risk incomplete erasure or data loss.
During this waiting period, you can utilize your time by organizing your workspace, catching up on other tasks, or taking a short break. Just ensure that your Mac remains powered on and connected to a reliable power source.
Once the erasure process has reached completion, you’ll be ready to move on to the next step of disconnecting and reconnecting the external hard drive.
Step 9: Disconnect and Reconnect the External Hard Drive
Now that the erasure process has successfully completed, it’s time to disconnect and reconnect your external hard drive. This step ensures that your Mac recognizes the newly erased drive and prepares it for further use or disposal.
Follow these steps to disconnect and reconnect your external hard drive:
- Eject the erased external hard drive: In Disk Utility, make sure that the erasure process has finished and the external hard drive is no longer in use. Then, right-click on the drive’s icon and select “Eject” from the dropdown menu. Alternatively, you can drag the drive’s icon to the Trash bin, and it will change to an eject symbol. Release the mouse button to complete the ejection process.
- Physically disconnect the external hard drive: Once the drive has been successfully ejected, safely disconnect it from your Mac by gently unplugging the cable from the port or the external hard drive itself. Take care not to pull the cable forcefully to avoid any damage to the ports or the cable.
- Reconnect the external hard drive: After a few moments, depending on the type of connection used, reconnect the external hard drive to your Mac by plugging in the cable to the appropriate port. Ensure that the connection is secure to establish a proper connection between the Mac and the external hard drive.
- Check the recognition: Once the external hard drive is reconnected, give your Mac a moment to recognize it. You should see the drive’s icon appear on your desktop or in the Finder sidebar, indicating that it has been successfully recognized and is ready for use.
With your external hard drive now safely disconnected and reconnected, you have completed the final step in the erasure process. At this point, you can use the drive for a fresh data backup, repurpose it for new files, or securely dispose of it according to your needs.
Always remember to handle your external hard drives with care and keep them in a safe place to prevent any physical damage or unauthorized access to your data.
Conclusion
Congratulations! You have successfully learned how to erase an external hard drive on your Mac. By following the step-by-step instructions in this guide, you have ensured the complete removal of your data and protected your sensitive information from falling into the wrong hands.
Remember, before proceeding with the erasure process, it’s crucial to back up any important files or documents that you want to keep. Once the erasure process is initiated, all data on the external hard drive will be permanently deleted.
By safely backing up your data, disconnecting the external hard drive, accessing Disk Utility, selecting the correct device, configuring the erase options, confirming, and starting the erasure process, and then patiently waiting for the erasure to complete, you have successfully erased your external hard drive.
After completing the erasure process, don’t forget to disconnect and reconnect your external hard drive to ensure that it is recognized by your Mac. This step prepares it for further use or disposal.
Now that you have a clean and empty external hard drive, you can use it for a fresh data backup, repurpose it to store new files, or securely dispose of it according to your needs.
Thank you for following along with this guide. We hope it has been helpful in assisting you with erasing your external hard drive on a Mac.