Introduction
When watching videos, having subtitles can greatly improve the viewing experience, especially when the audio is unclear or in a different language. While many media players allow you to load external subtitle files, VLC media player offers a convenient option to embed subtitles permanently into the video. This means that you can play the video on any device or media player without the need to separately load the subtitle file.
VLC media player is a popular open-source multimedia player that supports a wide range of video formats and offers a multitude of advanced features. One such feature is the ability to embed subtitles directly into the video file, allowing you to enjoy subtitled videos hassle-free.
In this article, we will guide you through the process of embedding subtitles permanently into a video using VLC media player. Whether you want to add subtitles to a video for personal viewing or to share it with others, this step-by-step guide will help you achieve it.
Please note that in order to embed subtitles into a video permanently, you will need to have the subtitle file in a compatible format and the VLC media player installed on your computer.
So, let’s dive in and learn how to embed subtitles into a video permanently using VLC media player.
Step 1: Download and install VLC media player
The first step in embedding subtitles into a video permanently is to download and install VLC media player on your computer. VLC is a free and open-source media player that works on Windows, Mac, and Linux operating systems.
To download VLC media player, you can visit the official website at https://www.videolan.org/vlc/. On the website, you will find the download button, which will automatically detect your operating system and provide you with the appropriate installer.
Once the installer is downloaded, double-click on it to start the installation process. Follow the on-screen instructions to install VLC media player on your computer. The installation process is straightforward and should only take a few minutes to complete.
After the installation is complete, launch VLC media player to verify that it has been installed successfully. You should see the VLC media player interface, which is simple and easy to navigate.
With VLC media player installed on your computer, you are now ready to proceed to the next step and download the subtitle file.
Step 2: Download the subtitle file
Now that you have VLC media player installed, the next step is to download the subtitle file that you want to embed into the video. Subtitle files are typically available in various formats such as .srt, .sub, or .ass.
There are several websites where you can find subtitle files for movies and TV shows. Popular subtitle websites include OpenSubtitles.org, Subscene.com, and Addic7ed.com. These websites offer a vast collection of subtitles in different languages.
To download the subtitle file, visit one of these websites and search for the specific movie or TV show you want subtitles for. Once you find the appropriate subtitle file, download it to your computer.
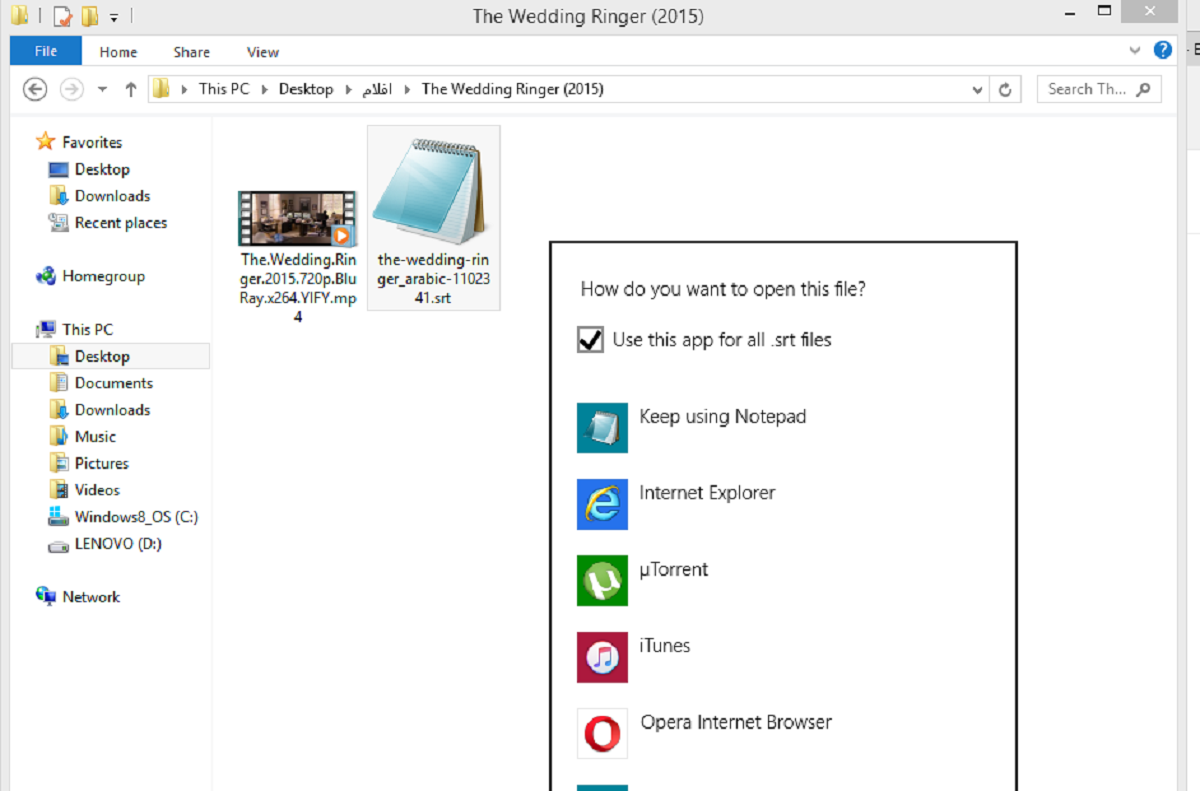
It’s important to make sure that the subtitle file has the same name as the video file. For example, if your video file is named “movie.mp4”, the subtitle file should be named “movie.srt”. This ensures that VLC media player can automatically recognize and load the subtitle file when playing the video.
After downloading the subtitle file, ensure that it is saved in the same location as the video file. This will make it easier to load the subtitle file in the next step.
Now that you have downloaded the subtitle file, you are ready to proceed to the next step and open VLC media player to load the video.
Step 3: Open VLC media player and load the video
With the subtitle file downloaded and saved in the same location as the video file, it’s time to open VLC media player and load the video.
First, locate the VLC media player icon on your desktop or in your Start menu and double-click on it to launch the application. Alternatively, you can search for “VLC media player” in the Start menu or use the search function in your operating system to find and open the program.
Once VLC media player is open, you will see the main interface with various options and controls. To load the video file, click on the “Media” tab in the menu bar at the top of the window and select “Open File” from the drop-down menu.
A file explorer window will open, allowing you to navigate to the location where your video file is saved. Find and select the video file you want to embed subtitles into, and then click on the “Open” button.
VLC media player will now load the video and start playing it. You should be able to see the video playing in the main window, along with the playback controls at the bottom.
It’s important to note that VLC media player supports a wide range of video formats, so you can load videos in formats such as MP4, AVI, MKV, and more.
Now that you have successfully loaded the video file into VLC media player, you can proceed to the next step and load the subtitle file to synchronize it with the video.
Step 4: Load the subtitle file
Now that you have the video loaded in VLC media player, it’s time to load the subtitle file and synchronize it with the video.
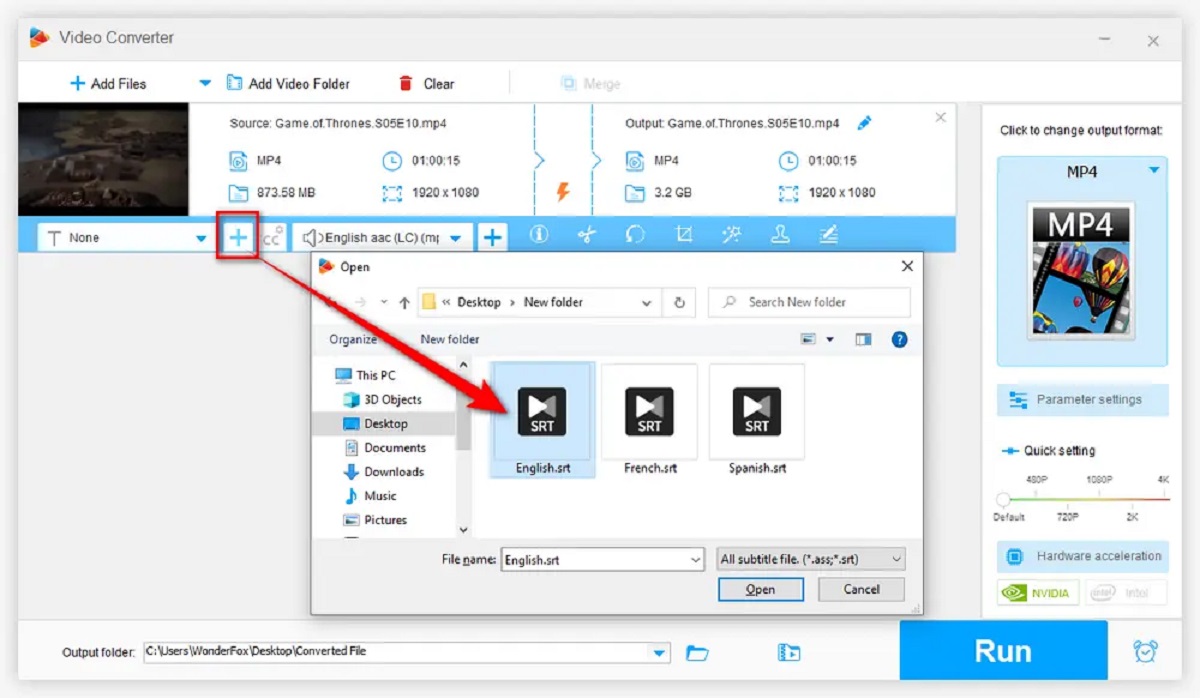
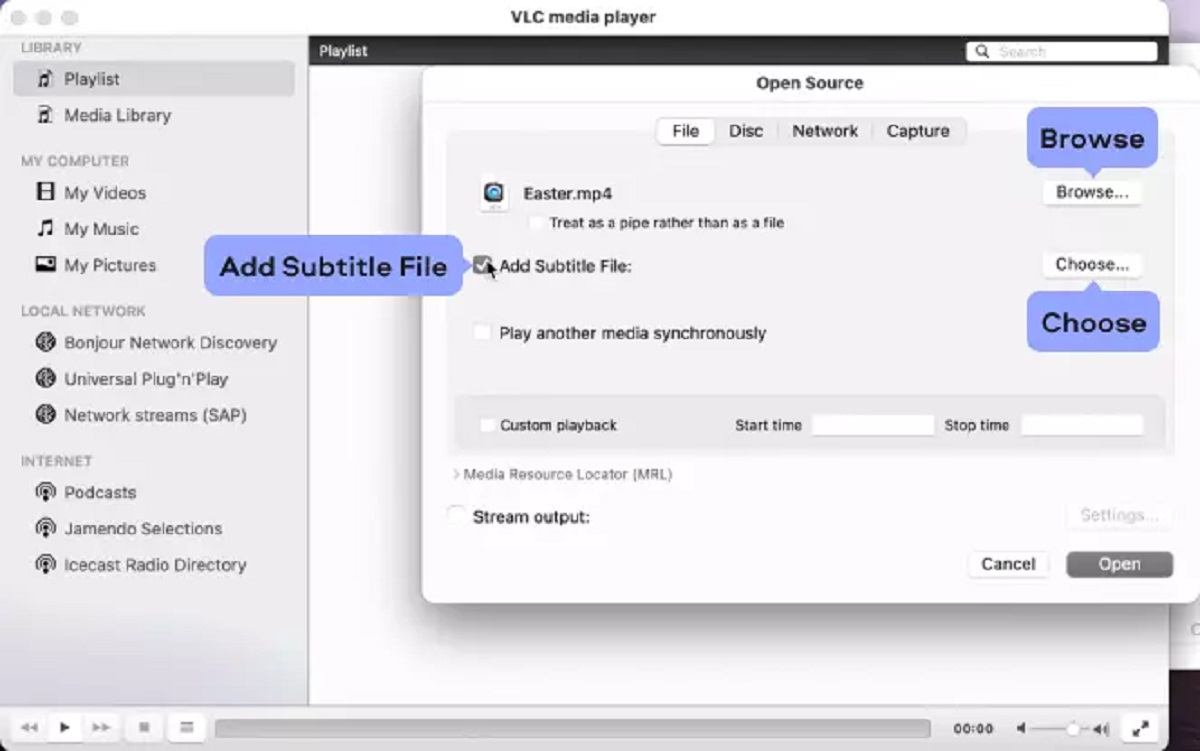
To load the subtitle file, click on the “Subtitle” tab in the menu bar at the top of the VLC media player window. From the drop-down menu, select “Add Subtitle File”.
A file explorer window will appear, allowing you to navigate to the location where your subtitle file is saved. Locate and select the subtitle file that you downloaded earlier, and then click on the “Open” button.
VLC media player will now load the subtitle file and display it on the video. You should see the subtitles appearing at the bottom of the video, synchronized with the audio.
If the subtitles do not appear or are not synchronized correctly, you can adjust the subtitle delay by going to the “Subtitle” tab and selecting “Sub Track” from the drop-down menu. From there, you can modify the subtitle delay in milliseconds to match the audio and video.
It’s worth noting that VLC media player also offers options to customize the appearance of subtitles. You can change the font, size, color, and positioning of the subtitles by going to the “Subtitle” tab and selecting “Subtitle Track” -> “Subtitle Track Options”.
Now that you have successfully loaded the subtitle file and synchronized it with the video, you are ready to proceed to the next step and embed the subtitles permanently into the video.
Step 5: Verify the subtitle file is synced with the video
After loading the subtitle file and displaying the subtitles on the video in VLC media player, it’s important to verify that the subtitles are properly synced with the video.
To ensure that the subtitles are synchronized correctly, play the video and pay close attention to the dialogue or any other audio elements. Check if the subtitles appear at the right time and accurately correspond to the spoken words or sounds in the video.
If you notice any synchronization issues, such as subtitles appearing too early or too late, you can make adjustments within VLC media player. Pause the video at a specific point where the synchronization seems to be off, and then use the “Subtitle Delay” option in the “Subtitle” tab to adjust the timing by small increments. Continue playing the video to see if the subtitles now align properly with the dialogue.
It is important to have the subtitles perfectly synced with the audio to ensure a smooth viewing experience. Take your time to make the necessary adjustments until the subtitles match the audio accurately throughout the entire video.
Additionally, you can also check for any spelling or grammatical errors in the subtitles. If you notice any mistakes, you can edit the subtitle file using a text editor and save the changes before continuing to embed the subtitles permanently into the video.
Once you have confirmed that the subtitle file is synced correctly and free of errors, you can proceed to the next step and embed the subtitles permanently into the video.
Step 6: Embed the subtitles permanently into the video
Now that you have verified that the subtitles are properly synced with the video in VLC media player, you can proceed to embed the subtitles permanently into the video.
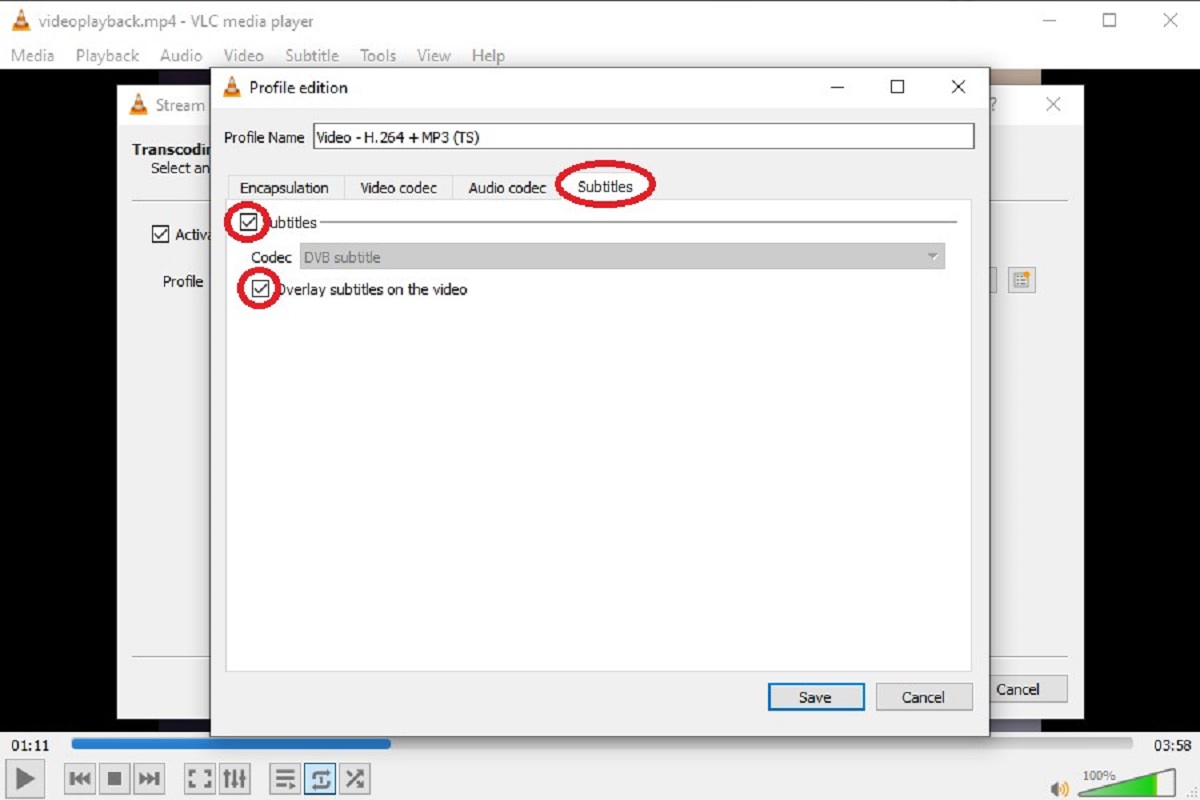
To embed the subtitles, go to the “Subtitle” tab in the menu bar and select “Subtitle Track”. From the drop-down menu, choose “Open” to open the “Subtitle Track” options.
In the “Subtitle Track” options window, you will see a checkbox labeled “Keep text track visible when switching to another video”. Make sure this checkbox is checked.
Next, select the “Convert” button in the “Subtitle Track” options window. You will be prompted to save the video file with the embedded subtitles. Choose a location to save the file and give it a new name.
VLC media player will then begin the process of embedding the subtitles permanently into the video. This may take a few moments, depending on the length and complexity of the video.
Once the process is complete, you will have a new video file with the subtitles permanently embedded. This means that you can now play the video on any device or media player without the need to separately load the subtitle file.
It’s important to note that the original video file remains unchanged, and the newly embedded subtitles are saved in a separate file. This ensures that you have a copy of the video with embedded subtitles, while still preserving the original video file.
Now that you have successfully embedded the subtitles permanently into the video, you can proceed to the final step and save the video with the embedded subtitles.
Step 7: Save the video with embedded subtitles
After embedding the subtitles permanently into the video using VLC media player, the final step is to save the video with the newly embedded subtitles.
To save the video, go to the “Media” tab in the menu bar and select “Convert/Save” from the drop-down menu.
A “Open Media” window will appear. Click on the “Add” button to select the video file with the embedded subtitles. Once you have added the file, click on the “Convert/Save” button at the bottom of the window.
In the “Convert” window, you can choose the destination folder where you want to save the video file. Click on the “Browse” button and navigate to the desired location on your computer. Enter a name for the video file in the “File name” field.
Under the “Settings” section, make sure to select a video format that is compatible with your needs. You can choose popular formats such as MP4, AVI, or MKV, depending on your preferences and the compatibility of the media player or device you intend to use.
Once you have selected the destination folder and specified the video format, click on the “Start” button to initiate the process of saving the video with the embedded subtitles.
Depending on the length and complexity of the video, this process may take some time. The progress of the conversion will be displayed in the VLC media player interface.
Once the saving process is complete, you will have a new video file with the subtitles permanently embedded. You can locate this file in the destination folder you specified earlier.
Now you have successfully saved the video with the embedded subtitles. You can now enjoy watching the video with the subtitles on any device or media player, without the need to separately load the subtitle file.
Congratulations! You have completed all the steps to embed subtitles permanently into a video using VLC media player.
Conclusion
Embedding subtitles permanently into a video using VLC media player can greatly enhance your viewing experience and allow you to enjoy subtitled videos without the need to separately load the subtitle file.
In this article, we have walked through the step-by-step process of embedding subtitles into a video using VLC media player. We started by downloading and installing VLC on our computer, then proceeded to download the subtitle file and load both the video and the subtitle file in VLC media player. We verified that the subtitles were properly synced with the video and made any necessary adjustments. Finally, we embedded the subtitles permanently into the video and saved the new file.
VLC media player, with its wide format support and user-friendly interface, is an excellent choice for embedding subtitles. Whether you want to add subtitles to a personal video or share a subtitled video with others, VLC provides an efficient and hassle-free solution.
Remember, when embedding subtitles permanently into a video, it’s crucial to ensure that the subtitles are accurately synced with the video and free of errors. Take your time to make any necessary adjustments for the best viewing experience.
Now that you have acquired the knowledge and understanding of how to embed subtitles permanently into a video using VLC media player, you can enjoy watching videos with embedded subtitles on any device and share them with others easily.
So, why wait? Start embedding subtitles into your videos today and elevate your viewing experience to a whole new level!