Introduction
Adding subtitles to videos can dramatically improve the accessibility and user experience of watching multimedia content. Whether you’re watching a movie, TV show, or video clip, having subtitles can help those with hearing impairments, individuals who are learning a new language, or simply those who prefer to watch videos with captions.
Fortunately, VLC Media Player, a popular and versatile multimedia player, provides a simple and intuitive way to add subtitles to your videos. With VLC’s powerful features and wide compatibility with various formats, you can easily enhance your viewing experience by following a few straightforward steps.
Whether you’re a beginner or a seasoned VLC user, this guide will walk you through the process of adding subtitles to VLC so that you can enjoy your favorite videos with ease. By the end of this tutorial, you’ll be equipped with the knowledge to enhance your videos with subtitles and customize VLC’s subtitle settings according to your preferences.
In the following sections, we will explore each step in detail, from downloading and installing VLC to adjusting subtitle preferences. By the time you finish reading this guide, you will be able to effortlessly add subtitles to VLC and begin enjoying your videos with captions.
So, let’s dive in and discover how to add subtitles to VLC Media Player!
Step 1: Downloading and Installing VLC
The first step to adding subtitles to VLC is to download and install VLC Media Player. VLC is a free and open-source multimedia player that supports a wide range of audio and video formats, making it a popular choice among users worldwide.
To download VLC, follow these steps:
- Open your preferred web browser and go to VLC’s official website. You can find it by searching for “VLC Media Player” in a search engine.
- Navigate to the download page and select the appropriate version for your operating system. VLC is available for Windows, Mac, and Linux.
- Click on the download link to start the download process. The file size may vary depending on the version and your internet connection speed.
- Once the download is complete, locate the installer file and double-click on it to begin the installation process.
- Follow the on-screen prompts to complete the installation. You may be asked to agree to the terms and conditions, choose installation options, and select the destination folder.
- After the installation is finished, you can launch VLC by locating it in your installed programs or clicking on the desktop shortcut if you chose to create one during the installation process.
That’s it! You now have VLC Media Player installed on your computer and are ready to proceed to the next step of adding subtitles to VLC.
Please note that VLC is regularly updated with bug fixes and new features, so it’s a good idea to check for updates periodically to ensure you have the latest version of the software.
Step 2: Launching VLC
Now that you have VLC Media Player installed on your computer, it’s time to launch the program. Follow these simple steps to open VLC:
- Locate the VLC Media Player icon on your desktop or in the Programs menu.
- Click on the icon to launch VLC. The program will start up and display the VLC Media Player interface.
Alternatively, you can also launch VLC by following these steps:
- Click on the Start menu (Windows) or the Applications menu (Mac).
- Navigate to the VLC Media Player folder.
- Click on the VLC Media Player icon to open the program.
Once VLC is launched, you will see the main interface, which displays the media player window. VLC’s interface is user-friendly and intuitive, making it easy for beginners to navigate and use.
With VLC open and ready to go, you’re now prepared to add subtitles to your videos. In the next few steps, we will guide you through the process of opening a video file in VLC and adding subtitles to it.
Keep in mind that VLC supports a wide variety of video and audio formats, so you can use it to play almost any multimedia file you have on your computer.
Step 3: Opening the Video File
Now that VLC is launched and ready to use, the next step is to open the video file to which you want to add subtitles. Follow these steps to open a video file in VLC:
- Click on the “Media” tab in the top menu bar of VLC Media Player.
- In the dropdown menu, click on “Open File” or press the keyboard shortcut “Ctrl + O”.
- A new window will appear, allowing you to browse your computer’s files and folders. Use this window to navigate to the location where your video file is stored.
- Select the video file you want to open and click on the “Open” button.
Upon selecting the video file, VLC will begin playing it automatically. The video will be displayed in the VLC Media Player window, and you can use the various playback controls to pause, play, rewind, or fast forward the video as needed.
In case you have multiple video files you want to add subtitles to, you can follow the same steps to open additional files in separate VLC instances or use the playlist feature in VLC to create a playlist of multiple videos.
Now that you have successfully opened your video file in VLC, it’s time to move on to the next step and download the subtitles you want to add to the video.
Note that VLC also allows you to open video streams from URLs or network sources, giving you the flexibility to play online videos or stream content directly within the VLC Media Player.
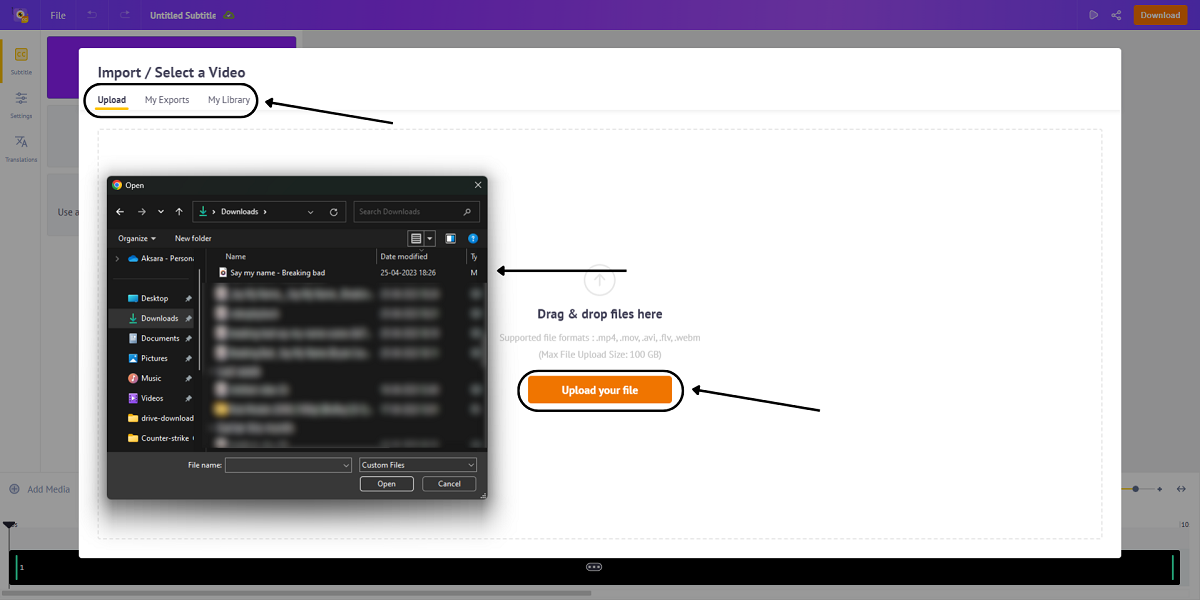
Step 4: Downloading Subtitles
In order to add subtitles to your video in VLC, you will first need to download the subtitles file for the specific video you are working with. There are various websites and resources available where you can find and download subtitles in different languages. Here’s how you can download subtitles for your video:
- Identify the website or resource where you can find the subtitles for your video. One popular website is OpenSubtitles.org which offers a vast collection of subtitles for movies and TV shows.
- Visit the website and search for the specific video using its title or the IMDB ID. This will help you find the most accurate and compatible subtitles for your video.
- Once you find the desired subtitles, click on the download button or link associated with the subtitle file format you prefer. Subtitles are typically available in formats like .srt, .sub, or .ass.
- A pop-up window may appear prompting you to save the subtitle file. Choose a location on your computer where you want to save the file and click “Save.”
- The subtitle file will be downloaded to your computer.
Repeat these steps for each video file you want to add subtitles to, ensuring that you download the corresponding subtitle file for each video.
Now that you have the subtitle file(s) downloaded, you’re ready to proceed to the next step and add the subtitles to VLC Media Player.
Remember to choose subtitles in the appropriate language for your video to ensure a seamless viewing experience.
Step 5: Adding Subtitles to VLC
With the subtitle file downloaded to your computer, you are now ready to add the subtitles to VLC. Follow the steps below to add subtitles to your video:
- Ensure that the video you want to add subtitles to is currently playing in VLC.
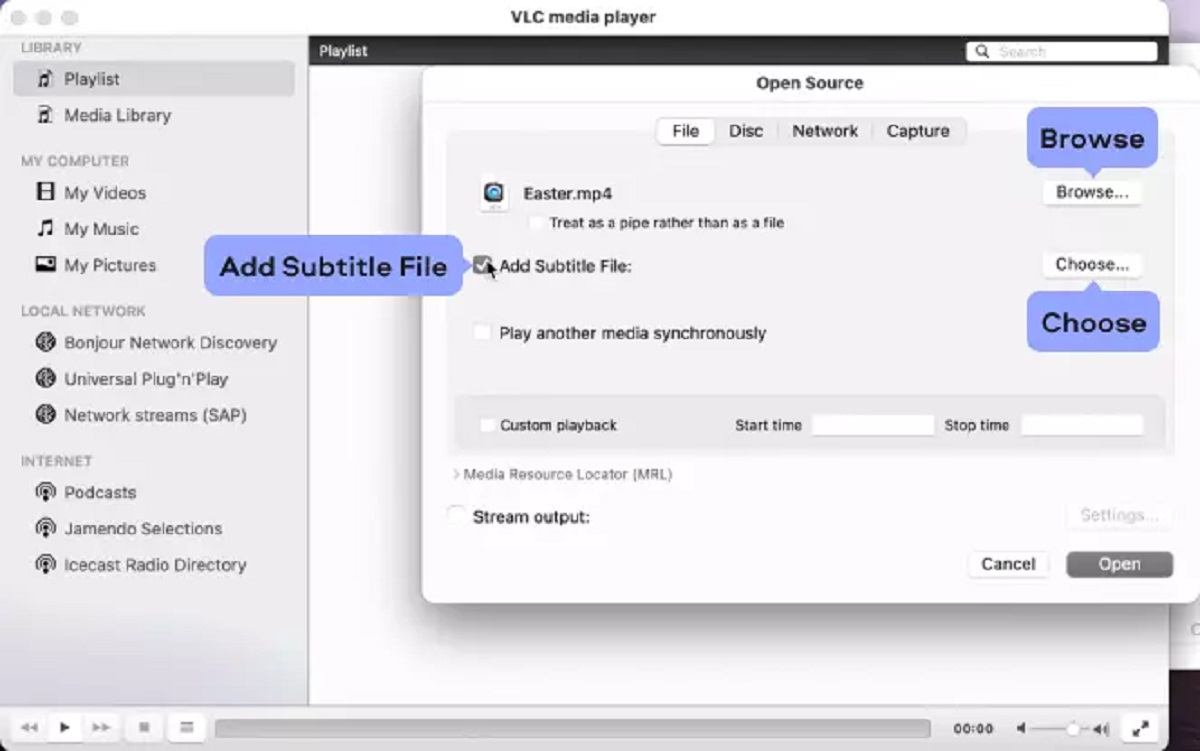
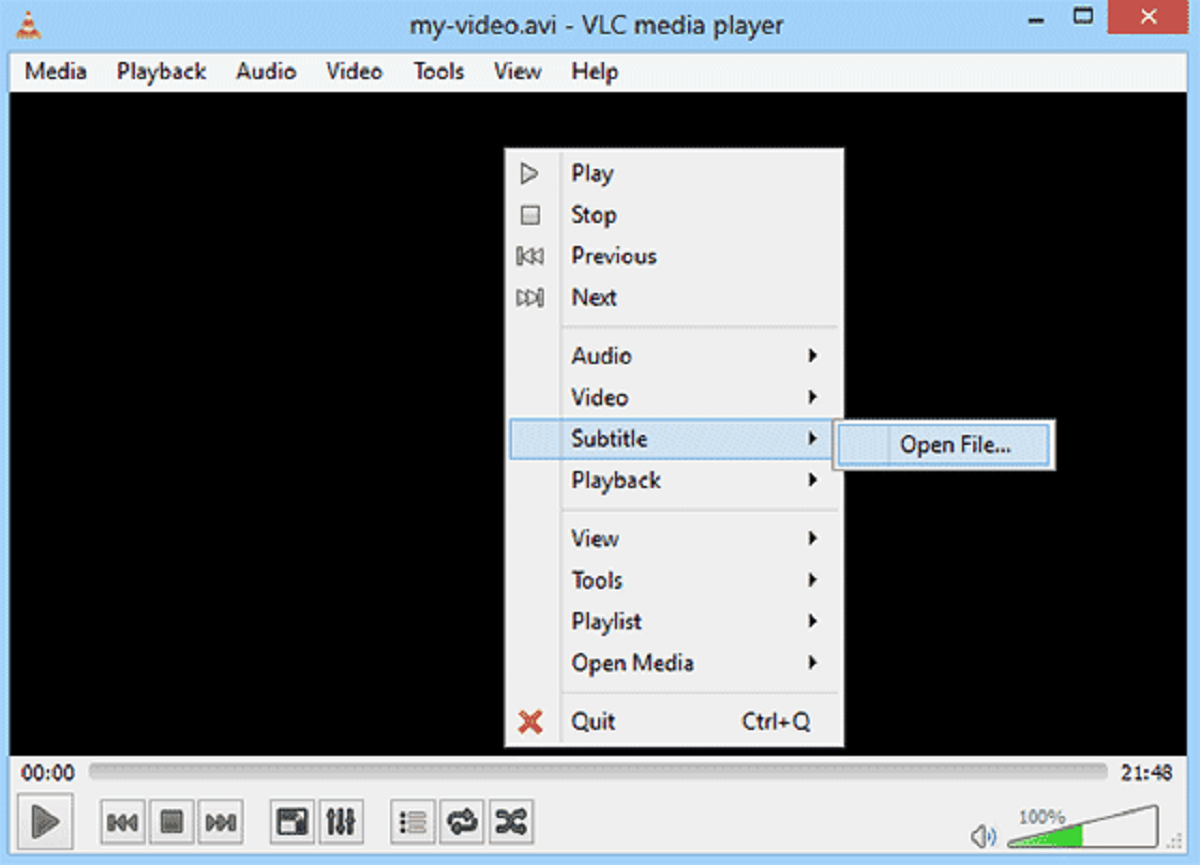
- Click on the “Subtitle” tab in the top menu bar of VLC Media Player.
- In the dropdown menu, click on “Add Subtitle File” or use the keyboard shortcut “V” to open the subtitle file browser.
- Navigate to the location where you saved the downloaded subtitle file, select the file, and click on the “Open” button.
Once you have added the subtitle file, VLC will automatically synchronize and display the subtitles on the video. You can adjust the appearance and timing of the subtitles through the VLC subtitle options, which we will cover in the next step.
If you have multiple videos playing, repeat these steps for each video to add the respective subtitle files.
It’s important to note that VLC also allows you to directly drag and drop subtitle files onto the video window to add them, providing an alternative method for adding subtitles quickly and easily.
Congratulations! You have successfully added subtitles to your video in VLC Media Player. Now, let’s move on to the next step and explore how you can adjust the subtitle preferences in VLC for a personalized viewing experience.
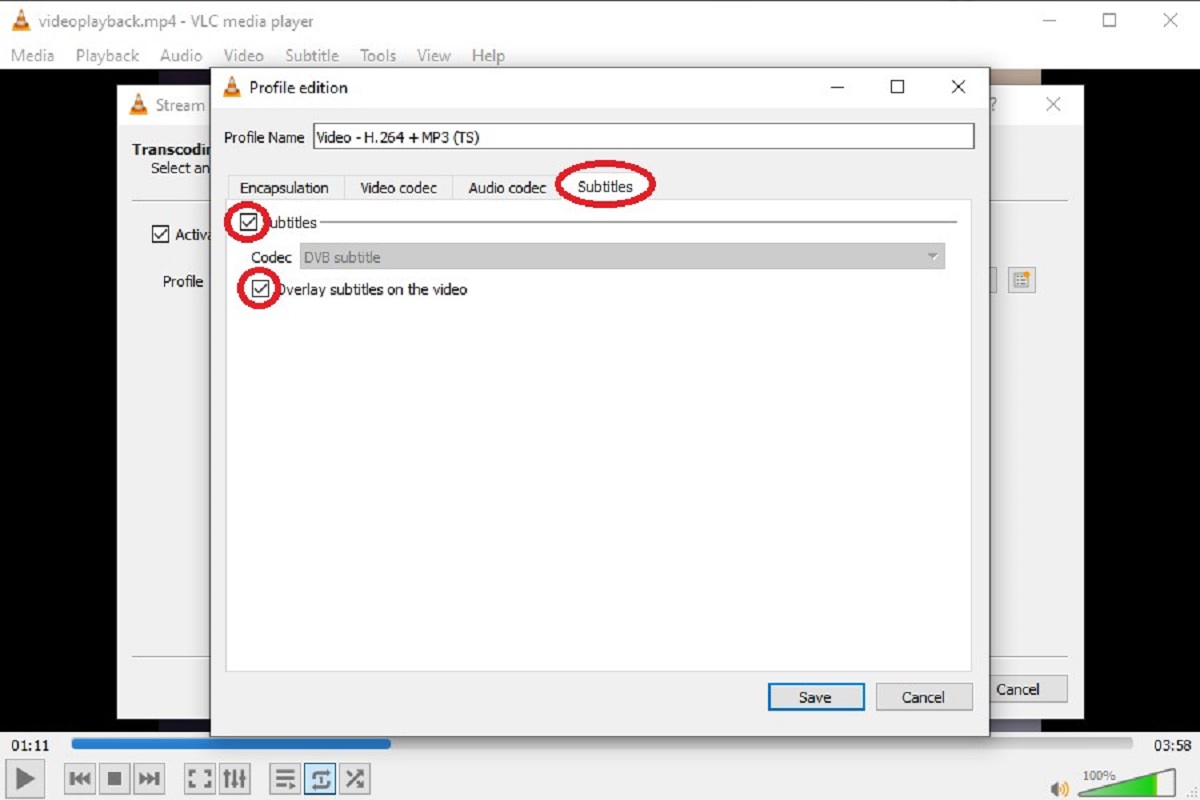
Step 6: Adjusting Subtitle Preferences in VLC
In VLC Media Player, you have the ability to customize various subtitle preferences to suit your personal preferences. These options allow you to control the appearance, timing, and behavior of subtitles while watching videos. Follow the steps below to adjust subtitle preferences in VLC:
- Click on the “Tools” tab in the top menu bar of VLC Media Player.
- In the dropdown menu, click on “Preferences” or use the keyboard shortcut “Ctrl + P” to open the Preferences window.
- In the Preferences window, navigate to the “Subtitles / OSD” section. This section contains various settings related to subtitle display.
- Explore the different options available to adjust the appearance of subtitles. Here are some commonly modified settings:
- Subtitle Track Synchronization: Use this option to manually adjust the timing of subtitles if they are out of sync with the video.
- Subtitle Text Size, Font, and Color: Modify these settings to change the size, font, and color of the subtitles according to your preference.
- Subtitles Position: Adjust the position of the subtitles on the video screen, choosing from various options such as top, bottom, or centered.
- Make the desired changes to the subtitle preferences based on your preferences.
- Click on the “Save” button to apply the changes.
By adjusting these subtitle preferences in VLC, you can create a tailored viewing experience that enhances your enjoyment of videos with subtitles.
It’s important to note that VLC provides an extensive range of customization options, allowing you to further personalize your multimedia experience. Feel free to explore other sections of the Preferences window to discover additional settings and features that may enhance your VLC usage.
With the subtitle preferences adjusted to your liking, you’re now ready to enjoy your videos with customized subtitles in VLC Media Player!
Conclusion
Adding subtitles to videos in VLC Media Player is a simple process that can greatly enhance your multimedia viewing experience. By following the steps outlined in this guide, you can easily download and add subtitles to your videos, making them accessible to individuals with hearing impairments, language learners, and those who prefer to watch videos with captions.
In this tutorial, we covered the six key steps to adding subtitles in VLC:
- Downloading and installing VLC Media Player
- Launching VLC Media Player
- Opening the video file
- Downloading the subtitle file
- Adding subtitles to VLC
- Adjusting subtitle preferences in VLC
By following these steps, you can easily add subtitles to your videos and customize the appearance and timing of the captions according to your preferences.
VLC Media Player offers a wide range of features and compatibility with various audio and video formats, making it a versatile and popular choice among users worldwide. Its user-friendly interface and intuitive controls make it accessible for both beginners and advanced users.
With subtitles added to your videos in VLC, you can enjoy a more inclusive and enjoyable multimedia experience. Whether you’re watching movies, TV shows, or video clips, the addition of subtitles enhances accessibility and engagement for all viewers.
So, go ahead and add subtitles to your videos in VLC Media Player and elevate your viewing experience!